Thursday, January 6, 2022

Freezable Personal Pizzas


Make ahead meals are great, right? You do all the work, pop it in the freezer, and then when you need it, it only takes a few non-messy moments! 
This recipe is basically for the dough with steps on how to make ahead and freeze. The actual toppings and shape of the pizza are totally customizable. I made snowmen because... obviously, they are adorable, d'uh!
This recipe will make between 6 - 8 personal size pizzas or 2 regular sized. 


Make Ahead (Freezable) Personal Pizzas

Dough Ingredients
2 Tbsp instant yeast
2 cups hot water
2 Tbsp oil
1 tsp sugar
4 - 6 cups flour
2 tsp salt

Directions
In a bowl, whisk together the yeast, hot water, oil, and sugar. Set aside to activate yeast for about 5 - 8 minutes, until bubbly. 
Stir in about 4 cups of flour and the salt. Add more flour as needed to form a soft but not sticky dough. Knead on a floured surface for 2 minutes. Place in an oiled bowl, cover with a tea towel, set somewhere warm to rise for about an hour. 
After dough has risen, preheat oven to 425.
Separate dough into 6 equal pieces. 


Shape dough into desired shape. Place onto parchment paper lined cookie sheets. 


Par-bake the dough for 5 - 8 minutes, until puffy but not cooked through. It should still be pale. 


Top pizzas as desired. 


For snowmen I used: pizza sauce, onions, pepperoni, then mozzarella, olives, more pepperoni, and yellow pepper.


Sooooooo cute. Once you have topped the pizzas simple double wrap them in plastic wrap and freeze.
When ready to cook: preheat oven to 425, unwrap pizzas and place on parchment paper lined tray, cook for about 15 minutes. Just until heated through and cheese is bubbly. 


I also made jack-o-lanterns for Halloween....


After par-baking, these are topped with: pizza sauce, onions, cheddar cheese, deli ham, and green pepper.


Then simply double wrap with plastic wrap and freeze!


And, just thought I would share this too....
I made 2 regular pizzas to freeze and cook later for a friend who broke their leg. They were made exactly the same way except for bigger. Cooking time was a little bit longer, maybe about 5 minutes, but otherwise everything was the same!


I will update with photos if I make more for for other holidays! I feel some heart shaped pizzas may be happening for Valentine's Day or shamrocks for St. Patrick's Day! 


Tuesday, January 4, 2022

Keto Thai Peanut Chicken Curry on Zoodles


This is one of my absolute favorite keto dishes.  It's a little messy to make but still easy peasy and a whole bowl of this ridiculously delicious comfort food is only 10 net carbs. 
According to MyFitnessPal, one servings (recipe makes 4) is: 420 calories, 22 fat, 14.5 carbs, 4.5 fiber, 42 protein. (So 10 net carbs). Of course, as always, macros can vary depending on brands, cut of meat, and sizes so if you are tracking be sure to enter your own into a nutritional calculator! 
The flavor and texture of this dish are what make it so addicting. The fact that it is healthy is a bonus!


Keto Thai Peanut Chicken Curry on Zoodles

Ingredients
1 Tbsp coconut oil
1 clove garlic
1 lb chicken (breasts, thighs, or drumsticks will work)
1 1/2 cups of unsweetened coconut milk
2 Tbsp red curry paste
3 tsp fish sauce
6 Tbsp crunchy peanut butter
salt and pepper 
pinch of Swerve (or other sweetener)

4 medium zucchini, spiralized

Directions
Heat oil in a large skillet. Add in garlic and chicken. (If you are using drumsticks, leave them whole, if you are using breasts/thighs, dice them up). Cook until chicken is almost done, turning over as necessary. While chicken is cooking, whisk together coconut milk, red curry paste, fish sauce, peanut butter, swerve, and salt & pepper. 
Pour sauce over the chicken in the pan. Turn heat to low and continue simmer for about 10 - 15 minutes, stirring as needed to prevent sticking. 


While chicken is cooking: prepare your zoodles. If you don't have a spiralizer to make your zoodles you can simple slice the zucchini into very thin strips. This is more time consuming but will work. 


Cook zoodles in a pan just until heated through; about 5 - 8 minutes, stirring frequently. Do not overcook the zoodles or they will be mushy. You just need to heat them through!
When ready to eat: place zoodles in a bowl (one serving of a medium zucchini is about 2 cups of zoodles)


Spoon chicken and sauce over the zoodles and serve hot.


This also reheats very well the next day or so but, FYI, zoodles do not freeze well. 


Whether you make it with pieces of chicken or cut up meat, it's equally as delicious. Use your favorite!


Whether or not you are following low carb eating, this dish is a fabulous one to try. Healthy, filling, affordable, and delicious. What's not to love?


Saturday, December 11, 2021

Nutella Biscotti


If you know Sue and I, then you know we are not normally fans of crunchy cookies. Soft and chewy is the way to go! Unless, of course, we are talking about biscotti. Dipping crunchy cookies into hot chocolate or coffee or tea makes them a million times more delicious!
I had a jar of Nutella to use up and decided that Nutella biscotti would be a good idea. Turns out I was right. I usually find Nutella too sweet (hard to believe, I know) but there is just the right amount in these cookies so the sweet is balanced out. Dip them in your favorite hot beverage for a lovely afternoon treat!.


Nutella Biscotti

Ingredients
2 1/2 cups flour
2 Tbsp baking cocoa powder
1 Tbsp baking powder
pinch salt
3 eggs
1 cup sugar
1/3 cup melted butter
1 tsp vanilla
1/3 cup Nutella

Drizzle
1/4 cup Nutella

Directions
Preheat oven to 325. Line a large cookie sheet (or 2 regular sized) with parchment paper, set aside.
Whisk together flour, cocoa powder, baking powder, and salt.
In a separate bowl, beat together eggs until frothy, about 2 minutes. Beat in sugar for another 2 minutes. Beat in butter and vanilla. Lastly, beat in the Nutella, scraping the sides of the bowl as needed, until just combined. 
Divide dough into 2 equal pieces. Flatten into logs approximately 2 1/2 by 13 inches long. They should be about 3/4 inch thick. Place on prepared cookie sheet.


Bake at 325 for 30 minutes, rotating cookie sheet at the 15 minute mark. 


Remove from oven and let cool 5 minutes.
Reduce oven to 300. Carefully transfer one of the logs to a cutting board. Using a serrated knife, cut the log into 1/2 inch slices. Repeat with the other log. You should get 48 slices.
Place them back on the cookie sheet, cut side up. Place back in oven and bake for 15 minutes. Remove tray from oven and carefully flip all the cookies so the the side that was touching the cookie sheet is now facing up. return to oven for 15 more minutes.


Remove from oven and let cool completely. 
Place the Nutella for drizzling in a plastic bag and microwave for about 10 - 20 seconds, just until warm. Snip the corner of the bag and drizzle the Nutella over the cooled biscotti. 


Store at room temp for a day or two, in the fridge for a week, or freeze them. 


Biscotti, on their own, seem to be a little dry to me..... BUT dip them in hot chocolate and *wow*.... jazz hands for sure happening over here. 


Biscotti take a little longer to make because of the double baking but for the little extra effort you get 4 dozen delicious, crunchy cookies to share with friends and family (or keep for yourself). FYI - These are great at Christmas time for a cookie exchange too. 

Thursday, December 9, 2021

Giant Butter Tart Cinnamon Buns


Sue and I love to make hybrids of things. We take 2 different dishes and smush them together and come up with a third, also delicious thing. 
These treats, for example, are a combination of cinnamon buns and butter tarts. Are they the best thing on the planet? Well..... we don't like to make assumptions but..... maaaaaybe. 
What hybrid should we attempt next? Let us know in the comments if you have any suggestions for us!
In the meantime, whip up a batch of these ridiculously tasty buns which, by the way, do have a crazy butter tart taste when you eat the topping! 
Please don't tell us they are sweet. We are aware. If you can survive the sweetness of a sticky bun then you can survive these! :) 
Oh yeah, we also made them giant soooooo if you make "regular" sized buns you will get 2 dozen from this recipe. 


Giant Butter Tart Cinnamon Buns 

Ingredients
Dough
1 1/2 cups buttermilk
1/2 cup sugar
4 1/2 tsp yeast
1/2 cup butter, melted
1/2 tsp salt
6 eggs
7 - 8 cups flour

Topping
1 cup brown sugar
1 cup corn syrup
1 Tbsp vanilla
2 eggs
1/3 cup butter, melted
pinch salt
1 1/2 cup currants

Filling
1 cup butter, softened
2 cups brown sugar
1 Tbsp cinnamon

Directions
Prepare dough - Heat buttermilk in the microwave until warm, about 2 minutes. (You don't want it too hot, about 105 - 110 degrees. You should be able to stick your finger into it without it being too uncomfortable). Whisk in sugar. Whisk in yeast and let sit for about 5 - 8 minutes to activate. 
Whisk together melted butter, salt, eggs and then whisk in the bubbly yeast mixture.
Stir in flour until a soft but not sticky dough forms. Knead dough on floured work surface for 2 minutes. Place into an oiled bowl, cover with a tea towel, and place somewhere warm to rise for an hour. 


After an hour your dough should be double in size. 


While the dough is rising, prepare the topping:
Whisk together the brown sugar, corn syrup, vanilla, eggs, butter, and salt. Pour evenly into a 13 X 19 pan OR 2 - 9 X 13 pans. Sprinkle the currants evenly on top. Set aside. 


Prepare the filling by stirring together the softened butter, brown sugar, and cinnamon.
Roll the dough into a 24 X 17 rectangle and spread the filling over the dough.


Roll up, jelly roll style, and slice into 12 equal rolls about 2 inches wide. Place into the pan on top of the currants. Cover with a tea towel and place somewhere warm to rise for an hour.


When rolls have doubled in size, preheat oven to 350. 


Bake at 350 until tops of rolls are golden brown, about 30 minutes or so. Time will differ if you make the rolls smaller or if you use 2 pans instead of 1. Keep an eye on them,. 


Let cool for only about 5 minutes, any longer and they will stick in the pan.
Place a cookie sheet on top of the buns and very carefully invert the buns onto the cookie sheet. Tap the bottom of the pan to help release the buns. 


Let cool.


These are the next level up from sticky buns. 


The butter tart topping is thicker and stickier than regular sticky buns. Way more butter tart-y.


You can always half the recipe if you want to make 6 giant buns or 12 regular buns but WHY?! Gift them to people you love and they will love you even more OR freeze them for yourself to enjoy later!


It even kind of looks like a butter tart when you get down to the delicious middle of the bun. The middle is the best part, by the way, don't even argue. I actually had someone tell me they never ate the middle of the cinnamon bun. EXCUSE ME?!?! Who does that? 
Crazy people.... that's who.
Anyway, these are ridiculous and giant cinnamon bun butter tart hybrids are a fabulous idea. Let us know what you think if you try them and don't forget to tell us what hybrid needs to happen next!

Friday, November 26, 2021

Sugar Cookie Hot Chocolate Cups


The cuteness factor of these cookies is off the charts, am I right? 
And, believe it or not, they aren't that complicated to make. The kids will have a blast helping you out with these ones! You can use your favorite sugar cookie recipe for this or even store bought sugar cookie dough. We used Sue's Sugar Cookie recipe AKA Dinosaur Footprint Cookies (HERE). 
I think I got 18 cookies from the recipe, but I'm not 100% on that. I had helpers in the kitchen that may have sampled as we went along....


Sugar Cookie Hot Chocolate Cups

Ingredients
1/4 cup white chocolate chips, melted
small, hard pretzels
1/2 cup chocolate chips, melted
1/2 cup super mini marshmallows


Directions
Preheat oven to 350. Lightly spray a mini muffin tin with cooking spray, set aside. 
Prepare sugar cookie dough as per instructions. Pinch off golf ball sized amounts of dough and roll into a ball. Place into prepared muffin tin. Use your thumb to gently press in the center of each ball. 
Bake at 350 until edges are light, golden brown, about 8 - 10 minutes. 


Remove from heat and gently press down center of cookie with the bottom of a shot glass or something similar. This indent will hold the chocolate. 
Remove cookies from tray to a wire rack and let cool completely. 


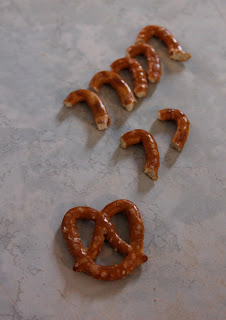
Prepare the handles of the cups by carefully cutting the round bits from the pretzels. Be sure to have extra pretzels as you will lose some to cracking!


Dip the ends of the round piece of the pretzel into the melted white chocolate and press to the side of the cookie cup. Hold it for a few seconds to make sure it adheres. Continue with the rest of the cups and pretzels bits. 


Take a small spoon and carefully fill each indent on the top of the cookies with about a tsp or so of melted chocolate. Don't fill the indent all the way to the top! Just enough to cover the bottom of the indent. 


Now all you have to do is sprinkle in a few of the super teeny marshmallows!


How cute are they?


Yes, they are a bit fussy to make but so worth it when you see them on display. Make a dozen and throw them in with your Christmas cookie tray. I bet they will be the most commented on by your guests. 
FYI - if you have trouble with the handles sticking; try propping the cookies on their side and then the pretzel can stand on top until it is dry. That way you don't have to hold it until it dries!

Monday, November 15, 2021

Keto Tomato Soup


We are well into comfort food weather here in BC. 
And what better comfort food is there than soup? We have an amazing Tomato Soup recipe (HERE), but it is a bit time consuming and it's not keto friendly. It really is THE BEST though so if you want a delicious, from scratch, tomato soup you can can for the winter.... make that one!
This keto friendly tomato soup recipe only takes about 10 - 15 minutes from start to finish. Not even lying. Plus it's delicious. Try both, see which one you like better!


Keto Tomato Soup

Ingredients
24 oz jar of Rao's marinara sauce
1 cup chicken broth
1/2 cup whipping cream
2 Tbsp tomato paste
2 Tbsp Swerve granulated 
salt & pepper

Directions
Stir ingredients together in a pot over medium hot. Bring to a boil, reduce heat, simmer 5 minutes. 
Boom. 
Done. 


The nutritional counts for one serving (recipe makes 4) are: 220 calories, 19 fat, 8 carbs, 2 fiber, and 3 protein. So 6 net carbs! 
FYI - you can thin it a bit with more chicken broth if you feel you need to. It's very thick and luxurious (which is a weird word to use to describe soup but I can't think of another one right now). 


I like to serve them with a big scoop of Twin Peaks Nacho Cheese Protein Puffs. 
But I also love it with a delicious grilled cheese on Carbonaut bread to keep things keto friendly!


Either way, it's low carb, keto friendly, delicious, comfort food. 
You will never be able to convince me that tomato soup and grilled cheese isn't the greatest food pairing in the history of comfort food. 
Yes, I will fight you over this.