Monday, July 29, 2019

Easy Garlic Rosemary Lamb Chops


I started out looking for a marinade for the lamb chops I got from the grocery store, planning on making them up in advance and doing something fancy. As we all know... plans often change! I ended up getting sidetracked with something else and by the time I got back to the lamb chops it was already dinner time. I decided to just do a sort-of rub with a few ingredients and pan fry them. Best decision ever! From start to finish in about 20 minutes and the flavor was amazing! 
The next time you are cooking lamb chops and want to go the quick-and-easy-but-still-amazing route.... give these a try! 


Easy Garlic Rosemary Lamb Chops

Ingredients
salt & pepper
4 lamb chops
1 Tbsp minced garlic
2 tsp dried rosemary
1/4 tsp + 3 Tbsp oil
juice from one large lemon
2 Tbsp water
1 tsp dried parsley

Directions
Salt and pepper your lamb chops on both sides. Place on a plate and set aside.
In a small bowl combine minced garlic and dried rosemary and the 1/4 tsp of oil. Mix well. 


Divide mixture in half. Spread half of the mixture evenly on the tops of the lamb chops. Reserve the second half of the mixture. 


Heat the remaining 3 Tbsp of oil in a large skillet over medium high heat. Add pork chops, garlic side up, to the pan. Cook for 3 - 4 minutes and then flip over.
Spread the remaining garlic mixture onto the cooked side of the lamb chops.


Cook an additional 3 - 4 minutes, until desired level of doneness is reached. (Use a meat thermometer for best results) When they are done, remove from the pan and place on plates. 
Remove the pan from the heat and add the lemon juice, water, and parsley to the pan to deglaze it. Make sure to stir up all the brown bits! 


Divide this in 4 and spoon on top of each of the lamb chops. 


Serve immediately. 
Using the lemon juice to deglaze the pan adds a fabulous hint of lemon to the garlic and rosemary flavors that I am now convinced is what heaven tastes like. 
How easy was that, right? No marinating, no muss, no fuss and you end up with delicious lamb chops that are guaranteed to impress your guests!
This is a pretty forgiving recipe, FYI, you can also easily double the recipe for more chops or half it for less.

Friday, July 26, 2019

Canada Day Donuts (Maple and Canadian Beer Donuts)


I've recently gone back to work after a long break. I made these donuts for Canada Day but because I am back to being crazy busy I have not got around to posting them until now! 
It's okay though, these are the perfect donut to make to celebrate any Holiday - Canadian or not. I used Whistler Brewing Company Pale Ale to make these but you can use any brand of Canadian beer you like. I wouldn't sub anything else for the beer - it helps the donuts texture as well as the flavor and without it they just won't be the same. 
You can click here to see our Kilkenny Glazed Donuts we made for St. Patrick's Day! We used that recipe and switched up some ingredients to create a Canadian version!


Canada Day Donuts (Maple and Canadian Beer Doughnuts)


Ingredients
Ingredients for our Kilkenny Glazed Donuts
Additional to above:
Maple syrup
maple extract
1 1/2 cups Canadian Beer 
1 bag Christie Maple Leaf Cookies 

Directions
Once again, I'm going to send you over to our post about Kilkenny Glazed Donuts (HERE). You make them the exact same way EXCEPT you are going to use 1/4 cup sugar and 1/4 cup maple syrup instead of the 1/2 cup sugar. ALSO use 1 tsp maple extract instead of vanilla and Canadian beer instead of the Irish beer. 


Follow the instructions in the link provided above and you will get beautiful puffy donuts!


Frying is the scary part so be very careful around the hot oil!
When they are all made and you are ready to glaze then prep your Maple Leaf Cookies. Remove as many cookies halves as you have donuts - these are going to sit on the donut.
Scrape the filling from the cookies into the bowl with the glaze.
Crush up the remaining cookies fairly small.


 Whisk the glaze until smooth. Dip a donut top into the glaze, lightly shake off any excess, and then set the glaze side down into the crushed cookies. Press gently and then flip over. Press a Maple Leaf cookie half on top. (If it doesn't stick then use a little glaze as "glue".)


Let sit to set a bit.
Maple Leaf Cookies are so good - it's like you're getting 2 treats in one with this!


I got about 32 palm-of-your-hand sized donuts using this recipe so it makes a fair amount. I always figure if you're going to go through all the trouble of making donuts you might as well get a few! You can freeze these bad boys if they don't all disappear right away. 


Hints of maple and Canadian beer make this a true Canadian treat perfect for Canada Day or celebrating all summer long! 

Thursday, July 11, 2019

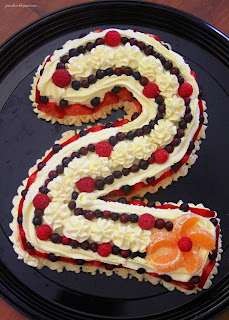
2nd Birthday Cake (Number Two Cake)


Our little great-niece turned two last month so we wanted to make her a special cake. We had to be able to travel with it so we couldn't really do a layered cake for fear it would fall over on the trip. 
This number two cake is fairly simple to shape and travels very well. You can easily decorate with your favorite fruits... we used saskatoons, raspberries, a mandarin orange, and strawberries. Make sure to pat your fruit dry before putting it on the cake so it doesn't bleed into the frosting.


2nd Birthday Cake (Number Two Cake)

Ingredients
recipe for chocolate cake (can use a mix if desired)

Frosting
4 cups whipping cream
2 pkg vanilla instant pudding

Fruit for decorating

Directions
Prepare cake as per recipe instructions. Bake the cake in one 9 inch round pan and one 9 inch square pan. Let cool. 
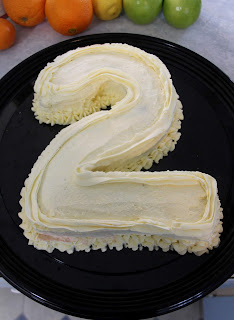
Using an approximately 2 1/2 inch round cutter, cut out the center of the round cake. Cut 1/4 of the round cake and turn the piece to the right. Cut a piece of the square cake to fit along the bottom of the circle pieces. (See photo for clarification!) I cut an extra little piece just to make the base of the two a little longer. This is not always necessary - use your best judgment. 
You will have a little more than 1/2 of the square cake leftover for another use. 


Prepare frosting - place 2 cups of the whipped cream and 1 pkg of the vanilla pudding in a large bowl. Whip with beaters until stiff enough to spread. Spread over the cake to cover. 
When you run out - simply whip the remaining 2 cups of whipping cream and box of vanilla pudding. Continue to spread or pipe on the frosting however you like. 


Let chill for about an hour or two before adding fruit.


I sliced the strawberries fairly thin so I could add them to the sides. If you cut them thicker they may fall off because they are too heavy. 


Chocolate, whipped cream frosting, and fruit make for a perfectly presentable birthday cake for all ages. Our little munchkin loved picking off the fruit to eat almost as much as eating the cake itself. 


I know... I know... the photo is sideways. For the life of me I cannot figure out how to rotate it. I've tried, trust me. 
Anyways.... a number cake is a fabulous way to celebrate a birthday or anniversary! And you can never go wrong with fruit! 

Saskatoon Scones


Saskatoon season around Lillooet is always highly anticipated. Saskatoons grow wild around the area and are always a welcome addition to baking. The berries are similar to blueberries but are smaller, have more teeny seeds, and have a different flavor (maybe sweeter? It's hard to describe!).
If you don't have access to saskatoons you could sub in blueberries, no problem. 
This is our basic, go-to scone recipe and can easily be used for tons of different flavor combos. I get 12 fairly good sized scones out of it but it can be halved to just get 6, if you prefer. Scones freeze well though so I say make the full batch!


Saskatoon Scones

Ingredients
4 cups flour
2/3 cup brown sugar
3 Tbsp baking powder
2 tsp baking soda
1 cup butter, cold
1 1/2 cups saskatoons
1 cup sour cream
1 cup buttermilk

Directions
Whisk together the flour, sugar, baking powder, and baking soda. Cut in the butter using 2 knives (or a pastry blender or pulse in a food processor) until mixture resembles coarse crumbs.  Stir in the saskatoons. 


Mix together the sour cream and buttermilk. Stir into the dry ingredients until dough comes together.
Place on lightly floured work surface and knead once or twice. You don't want to over work the dough, just have it come together. 
Roll into a rectangle about 1 inch thick. Cut into 12 triangles. You can also use a biscuit cutter if you want them a different shape. Just make sure they are about 1 inch thick. 


At this point you can cover them and place in fridge overnight, to be baked in the morning OR you can continue on to baking them. 
Preheat oven to 400. Line a cookie sheet with parchment paper and place scone wedges on the sheet about 2 inches apart. 


Bake at 400 for approx 20 minutes - tops will be lightly golden and appear dry. 


Remove from heat and serve warm or let cool to room temp.


Scones freeze very well. Just pop in the microwave for a few seconds to thaw and reheat. They are best eaten the day they are made but for a day or two they will still be good. I recommend reheating in the microwave for a few seconds to freshen. 
Our saskatoon scones make a great on-the-go breakfast. They are sweet but not too sweet and travel well in a lunch bag. 

Wednesday, July 3, 2019

Rhubarb Cheesecake Squares


When rhubarb season arrives everyone knows it. Rhubarb shows up everywhere because it just keeps growing and growing and growing! Not that we're complaining. Rhubarb is an amazing ingredients in soooo many things. Throw it in with some strawberries or blueberries and the flavor of whatever you are making just gets better. 
These cheesecake squares can be whipped up in about an hour from start to finish and will make you all sorts of new friends. People cannot get enough of them! And by "people" I mean me. I may have eaten more than one..... quality control, you understand. 
But seriously, be prepared to make more than one pan of these!


Rhubarb Cheesecake Squares

Ingredients
Rhubarb Layer
5 cups chopped rhubarb
3/4 cup sugar
1 Tbsp water
3 tsp cornstarch

Cheesecake Layer
2 - 8 oz bricks of cream cheese (16 oz total), room temp
1/2 cup icing sugar
1 egg

Crust/Crumb Layers
1 cup butter
1 3/4 cup flour
1 cup oats
3/4 cup brown sugar
pinch salt
1/2 cup chopped walnuts

Directions
Preheat oven to 350. Line a 9 X 13 pan with parchment paper, set aside. 
Prepare rhubarb layer - cook rhubarb, sugar, and water. Simmer for 8 minutes over medium heat. Add in the cornstarch and cook 2 more minutes. Set aside to cool.
Prepare cheesecake layer - Beat together the cream cheese, icing sugar, and egg until smooth. Set aside. 
Prepare crust/crumb layer - Crumble together butter, flour, oats, brown sugar, and salt. Add half of this mixture to the prepared pan and press firmly. 
Add the walnuts to the remaining half and set aside. 
Assemble square: Scoop cheesecake mixture by the spoonful on top of the crust and spread with a spoon, being careful not to disturb the crust layer too much. 


Spread the rhubarb mixture on top of the cheesecake.


Lastly, crumble on the remaining crust/crumb mixture evenly over the top.


Lightly press down. 
Bake in 350 oven until topping is golden brown and cheesecake is set - about 30 minutes. 
Cool completely before slicing. Store in fridge. 


Love cheesecake but not the time involved to make it? Give this a try. All the tastiness of cheesecake but in a fraction of the time. Plus... rhubarb and crumbly bits.... you've got nothing to lose here. 
FYI - If you are a little shy of 5 cups of rhubarb you can make up the difference with strawberries!