Thursday, February 28, 2019

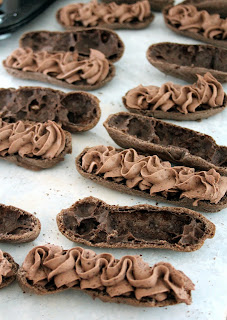
Triple Chocolate Eclairs


I've never made eclairs before. 
Never.
I'm a little embarrassed about that because the only reason I never tried to is I thought they were really complicated to make. I don't usually attempt anything if I don't immediately believe I will be good at it. I know... I know.... That's not how one grows as a person. 
I'm terrible. I get it.
Anyway, I was feeling like I needed a bit of a challenge and Sue assured me that I would be fine making eclairs as she had made them and didn't die. She's very supportive... oh wait... I mean sarcastic... 
After researching a few recipes I decided on this one - I figured if it ended up in the garbage then I wouldn't be out too much moolah. They are actually really inexpensive to make - again, surprising to me, I thought they were super costly. Nope. Not so much.


Triple Chocolate Eclairs

Ingredients
Dough
3/4 cup water, boiling
6 Tbsp butter, cut up
1 Tbsp sugar
1/4 tsp salt
3/4 cup flour
1 Tbsp baking cocoa
3 eggs

Filling
2 cups whipping cream
1 box instant chocolate pudding
1 Tbsp cocoa powder

Glaze
1 cup chocolate chips
1 tsp coconut oil

Directions
Preheat oven to 425. Line a cookie sheet with parchment paper, set aside. 
Prepare dough - In a medium saucepan over medium heat, stir together water, butter, sugar, and salt. Bring to a boil, stirring constantly. Remove from the heat and stir in the flour and cocoa powder. 
Return to heat for 1 - 2 minutes - until smooth and forms a ball. Remove from heat again and let rest 5 minutes. 
Beat in eggs, one at a time, making sure it is smooth and glossy between each addition. 
Scoop dough into a piping bag and pipe into 1 X 4 inch strips. (You should get approx 12.) 
Bake at 425 for 5 minutes. Then, reduce heat to 350 and bake for 30 minutes. Shut off the heat and let rest in oven for another 10 minutes. 
Remove from oven, poke each with a toothpick (to release any remaining steam) and let cool completely. 


When cool, carefully cut in half diagonally and set aside.
Prepare cream filling - Pour whipping cream into a bowl and add the pudding mix and cocoa powder. Beat until stiff enough to pipe. 
Pipe onto the bottom half off each eclair.


Prepare glaze - in a flat bowl, or plate with sides, melt the chocolate chips and coconut oil and stir until smooth. Gently dip the top half of each eclair into the glaze and shake off any extra. Place back on top of the cream.


Chill until ready to serve.


The chocolate glaze on top will solidify so it won't get all over your fingers!


I had so much fun making these. Granted, my piping skills need a little work. My eclairs were NOT equal at all. That's okay - I plan on practicing more with regular eclairs and playing with all the possible fillings. 


I could just eat a million of these. So light and airy and creamy and delicious. 
Also.... I love cream puffs, which are basically just teeny eclairs, so that is going to be happening as well. 
Should I try going out of my comfort zone more often? Absolutely. Will I? Well, that remains to be seen. Hey, a girl's not going to change overnight BUT I did try making eclairs so I can cross that off my bucket list now. 

Thursday, February 21, 2019

Keto BBQ Ribs


I've been following a keto eating plan since December and, I have to say, I have been having great success. I'm finding I'm not as tempted to snack between meals as I used to be. Keto isn't for everyone but these ribs definitely are. 
I love the fact that there is limited prep involved and the flavor is amazing! It's a little more work than just brushing on store bought BBQ sauce BUT it's totally worth the minimal effort involved! 
I finished these off under the broiler but you could finish them on the grill for even more flavor (plus those pretty grill marks). 


Keto BBQ Ribs

Ingredients
Ribs
2 lbs pork ribs, membrane removed
2/3 tsp salt

BBQ Sauce
2 Tbsp olive oil
1 Tbsp tomato paste
1/3 onion, finely diced
3 Tbsp water
1 tsp chili powder
1 tsp garlic powder
1 tsp cumin
dash of cayenne pepper
1 tsp salt
1 can (10 oz) whole tomatoes
1 1/3 Tbsp cider vinegar

Directions
Place ribs in a large pot and cover with water. Add in the salt. Bring to a boil, reduce to a simmer, and let ribs simmer for 2 - 3 hours. 


Prepare sauce - In a large pan over medium heat, stir together oil and tomato paste. Add in the onion and stir until onion starts to soften. 
Add in the water and spices and stir to combine. Add in the canned tomatoes and vinegar. Simmer for 15 - 20 minutes, stirring every so often, until sauce is thickened. 


Use an immersion blender to process until smooth. (You can also place in a blender and process). Set aside until ribs are done. 


When ribs have finished boiling, brush with about half of the sauce (on both sides of the ribs) and place in fridge, covered, until ready to cook. (They should marinate for at least 4 hours, up to overnight.) 
After marinating, preheat the broiler. Line a cookie sheet with parchment paper and place ribs on it.
Brush the bottom of the ribs with a little more sauce and broil for about 5 minutes.
Remove from oven, flip over, and spread the remaining sauce on top of the ribs. 


Broil an additional 5 - 10 minutes, until sauce is heated through and you start to get blackened spots. Watch it carefully so it doesn't burn! 


Serve immediately!


I have made these several times now and the whole family (even those not doing keto) love them. 
I only managed to snap one photo of the ribs after separating them...
Sorry for the quality, it was with my phone!


So tender! They just fall right off the bone. 
I entered the recipe into MyFitnessPal and the nutritional counts per serving are as such: 291 calories, 4 carbs, 21 fat, 49 protein, 1 fiber, 3 sugar. (Recipe as written makes 4 servings)  So that's 3 grams of net carbs. If you are doing keto then these make a great addition to your food plan. If you are not doing keto, they still make a great addition to your meal plan. :) 

Saturday, February 16, 2019

Cinnamon Bun Stuffed Donuts


I know what you are thinking..... why on earth would someone put a cinnamon bun inside a donut?
Well, why not? I mean... cinnamon buns = heaven on earth, and donuts = best things ever, so together = *fireworks* *unicorns* *rainbows*
Want to make new friends? Give people one of these and they'll be lining up. For real though. 
The great thing about this recipe is it is one dough that you can make both components of the treat with. I made the recipe large enough to get 24 but you can half it if you only want 12. Reeeeeeally though, who only wants 12? Come ooooon.... 


Cinnamon Bun Stuffed Donuts

Ingredients
Dough
9 tsp yeast
1 cup hot water
2 tsp sugar
1/2 cup sugar
2 tsp salt
2/3 cup butter
1 1/2 cup buttermilk
8 cups flour
4 eggs

Cinnamon Roll Filling
1/2 cup melted butter
1 cup brown sugar
1 Tbsp cinnamon

Cream Cheese Drizzle
1 pkg cream cheese, room temp
1/3 cup icing sugar
1 tsp vanilla

Oil for frying (about 1 liter) 

Directions
In a medium bowl, stir together the yeast, hot water, and 2 tsp sugar. Let sit for 10 minutes for yeast to proof. 
In a stand mixer with the dough hook place the 1/2 cup sugar and 2 tsp salt. 
In the microwave heat the 2/3 cup butter and 1 1/2 cup buttermilk for about 1 1/2 to 2 minutes - should be hot but still able to place your finger in comfortably. 
Pour the buttermilk mixture over the sugar mixture in the stand mixer, stir,  and let cool to lukewarm. 
Add in the flour and eggs to the mixing bowl. Add in the proofed yeast mixture. Using the dough hook, mix on low until dough pulls away from the sides. Then medium for 5 minutes. (You can also take out of bowl and knead for 5 minutes if your bowl is too full!). 
Place in an oiled bowl, cover, and set somewhere warm to rise for an hour. 


After an hour it should be doubled in size.


Cut off 1/3 of the dough. Cover and place the remaining dough in the fridge. 
Take the 1/3 you have cut off an place in a lightly floured work surface.


Preheat oven to 350. Spray 24 muffin tins with cooking spray, set aside.
Roll the dough to 24 X 6 rectangle. Brush with the 1/2 cup melted butter and then sprinkle with the brown sugar and cinnamon. 


Roll up jelly roll style and then slice into 24, 1 inch pieces. I find a serrated knife works best. 


Place into the prepared muffin tins, cut side down.


Bake at 350 for 10 - 15 minutes - they should puff up and fill the tins and be lightly browned on top. 


Remove from tins and let cool on wire racks. I flip them upside down so any gooeyness from the bottom runs back on to them instead of dripping off.


When the cinnamon buns are cool - take the dough from the fridge and divide it into 24 equal portions. 


Take one piece and flatten it in the palm of your hand. Place a cinnamon roll, top side down, on top of the dough.


Pinch the dough closed around the cinnamon bun and place, seam side down, on a cookie sheet lined with parchment paper. Place them about an inch or 2 apart so they have room to rise. You DO NOT want them touching! Repeat with remaining 23 pieces of dough and cinnamon buns. 


Cover with a clean tea towel and let rise somewhere warm for 30 minutes. About 15 minutes into the rise time, start heating your oil on the stove top in a large pot. Your oil needs to reach 350 degrees. (This usually takes 10 - 15 minutes over medium heat) Your donuts should be risen after 30 minutes as per photo below. 


Place 3 or 4 donuts at a time into the hot oil. Fry for 1 minute on each side - until deep golden brown. Make sure to use a thermometer to monitor your oil temperature. If it drops too low your donuts will soak up too much oil, if it goes too high, your donuts will cook on the outside but be raw in the middle. 


Carefully removed the cooked donuts from the oil using a slotted spoon. Place on paper towel or a wire rack over paper towel to absorb some of the oil. 


Let cool completely before frosting.
Prepare frosting - beat cream cheese until smooth. Beat in the icing sugar and vanilla until creamy, scraping sides of bowl as needed. Place in a piping bag or a large Ziplock bag with the corner snipped off. Drizzle over the donuts in a zig zag or swirl pattern. 


You can also just spread a little on with a knife... but drizzling is so much more fun.


Want to peek inside one? 


Or, if you cut it the other way....


What a lovely surprise inside, am I right? 


Can't decide between a cinnamon bun or a donut? Now you don't have to. 
You're welcome. 

Monday, February 11, 2019

Mac and Cheese Hot Dog with Bacon


Sue and I just got back from a trip to Vegas where we basically ate our way down the strip. We are the kind of people that totally plan any vacation around where we will be eating. And, we are also the kind of people that are really obnoxious about sharing ALL of our food photos on social media. Sorry, not sorry. We can't help it. We love food. 
Anyway, one of the stops we made this time was at the Haute Doggery in the promenade by The Linq hotel. Soooo many hot dogs to choose from. I went with the mac and cheese dog and it was delicious. What's not to love about hot dogs AND macaroni and cheese AND bacon? Seriously, don't answer. It's rhetorical. 
I had to recreate it when I got home because our mom and dad saw the photos and wanted to try it. 
Best decision ever. I think I may have liked our home cooked version even better than in Vegas. Maybe because I added more bacon? 
Probably...


Mac and Cheese Hot Dog with Bacon

Ingredients
1 box Kraft dinner mac & cheese (or similar) - with ingredients from the box to prepare
6 all beef wieners
1 large onion, sliced
6 hot dog buns
mustard
3 cups shredded cheese
12 slices of bacon, cooked and crumbled

Directions
Prepare mac and cheese on stove top, cover and keep warm. 
In a frying pan, cook the wieners and onion about 5 - 8 minutes - until wieners are heated through and onions are browned. Cover and keep warm.
Spread a little mustard on each bun and top each bun with about 1/2 cup of shredded cheese. Pop under the broiler for a few minutes to melt the cheese and slightly toast the bun. 


Top with 1/6th of the onions and a wiener.


Top with 1/6th of the macaroni and cheese then sprinkle with some of the crumbled bacon. 


Prepare to get a little messy. 


I didn't have any problem eating this. Only a few pieces of macaroni fell out. But then I'm pretty sure I could unhinge my jaw and eat it in one bite. For those of you who are a little more...um.... civilized... you may need to break down and get a fork and knife. Our mom had to eat hers that way but she still loved it!
My measurements are more of a guide... feel free to use more bacon or onion or extra cheese. As written it makes 6 hot dogs but can easily be sized up or down. Only want to make one or two? Use the single serving cups of mac and cheese instead of making a whole box. 


Be sure to visit Carole's Chatter for some fun foodie links!