Showing posts with label salsa. Show all posts

Monday, April 13, 2026

Dill Pickle Salsa


Sue is way more of a pickle person than I am. I don't hate pickles but they definitely are not my favorite. I will make an exception for this salsa though. #NewFavorite
We were sent a few samples of product from The Spice Age company (Canadian, yay!) and we decided to make something with their Dill Pickle Party Popcorn Seasoning. 
Dill pickle salsa might seem a little strange at first but pairs well with different meats. We enjoyed eating it straight from the bowl with tortilla chips! 


Dill Pickle Salsa

Ingredients
1 small tomato, seeded, finely diced
1 cup cucumber, seeded, finely diced
1/2 cup red onion, finely diced
1 jalapeno, seeded, finely diced
2 cloves garlic, minced
1/4 cup pickle brine (from the pickle jar)
1 Tbsp fresh dill (1 tsp dry)
1 Tbsp The Spice Age Dill Pickle Party Popcorn Seasoning

Directions
Stir together pickles, tomato, cucumber, red onion, jalapeno, garlic. Add in pickle brine, dill, and popcorn seasoning. (*Note, if you don't have the popcorn seasoning you can just leave it out)
Chill in fridge until ready to use. 


Serve with nacho chips or as a condiment with hot dogs and burgers. 


This salsa only takes a little bit of prep but adds a whole lot of flavor to your meal. Save this recipe for all those family get togethers and BBQs in the summer! 
You won't regret it!

We are members of the Amazon Affiliate Program and, as such, receive compensation for any purchases made through links on our blog. We were not compensated for this post by The Spice Age company but did receive free samples. Thank you for your support!

Sunday, June 1, 2014

Quinoa Taco Salad


Hearty, filling, comforting.
Not usually words I associate with a salad.
This salad is different though. It's those 3 things and more. 
It's like eating a warm and tasty taco minus the shell.
The servings are a very good size (this makes 7 servings) too, which doesn't hurt either. 
According to Myfitness pal per serving is:
400 calories, 50 carbs, 13 fat, and 21 protein. 
So tasty. I originally had this as a 4 or 5 serving recipe but the portions were HUMONGOUS and I decided 7 servings was more realistic. The portions are still very generous at 7 servings. 
Plus, this only takes 20 minutes from start to finish. 
*Win*


Quinoa Taco Salad

Ingredients
1 cup quinoa (uncooked)
2/3 cup water

1 lb extra lean ground beef
1/4 cup onion, diced
2 cloves garlic, minced
2 Tbsp Taco Seasoning
2 large tomatoes, diced
1 can (15oz) black beans, rinsed & drained

8 Romaine lettuce hearts, chopped
1 cup corn
1 avocado, diced
2/3 cup aged cheddar, shredded

Directions
Cook the quinoa according to package directions; using the amount of water listed in my recipe (2/3 cup) instead of the full amount.
While the quinoa is cooking, in a large frying pan, cook the beef, onions, and garlic until beef is no longer pink. Sprinkle with the Taco Seasoning. Stir in the tomatoes and black beans. Turn heat down to medium high and let simmer until quinoa is done.
Add the quinoa into the pan with the beef. Turn off heat and let the mixture sit for a few minutes to absorb the remaining liquid in the pan.


Divide the chopped lettuce evenly among 7 plates.
Top each plate of lettuce with the quinoa/beef mixture.


Now sprinkle each with plate with the corn, avocado, and cheese. 


Serve immediately. 


This is great to bring to work the following day too. Just keep the beef/quinoa mixture separate from the rest of the ingredients until ready to eat and then reheat the quinoa/beef for a minute in the microwave, add to the salad, and serve. 
You can, of course, add more of the toppings as you like but it will change the nutritional count - I threw a few more raw chopped tomatoes on top of mine. You could also add a little salsa if you like. Make it even more taco-y. 


Be sure to visit Carole's Chatter for tons of great links!

Monday, April 21, 2014

Baked Mexican Layered Dip


Sometimes the most delicious foods are just not terribly pretty.
Take this dip, for example. 
Not pretty at all...but so so so good. 
I brought it to our Easter dinner as an appetizer and it disappeared in about 10 minutes. The kids absolutely loved it. Sue and I have made the "regular" Mexican layered dip in the past and we both agreed this version is way better. Baking it in the oven just puts it over the top. 
Just be careful when you go to serve it. It is crazy hot when you take it out of the oven and will burn the heck out of your tongue if you dive into it. 
Not that it happened to me. 
Okay. It happened to me. 
I may have been a little too eager to try it. Lesson learned. Let it sit for a bit to save yourself some grief. 


Baked Mexican Layered Dip

Ingredients
Bottom Layer
1 can (14 oz) refried black beans
1/2 cup salsa

2nd Layer
1 cup prepared guacamole

3rd Layer
1 (8oz) brick cream cheese, softened
1/2 cup sour cream
3 tsp taco seasoning

4th Layer
3/4 cup salsa

5th Layer

Directions
Preheat oven to 350. Lightly spray a 9 inch, deep dish pie plate with cooking spray, set aside.
In a small bowl, stir together the black beans and salsa.


Spread evenly in prepared pie pan.
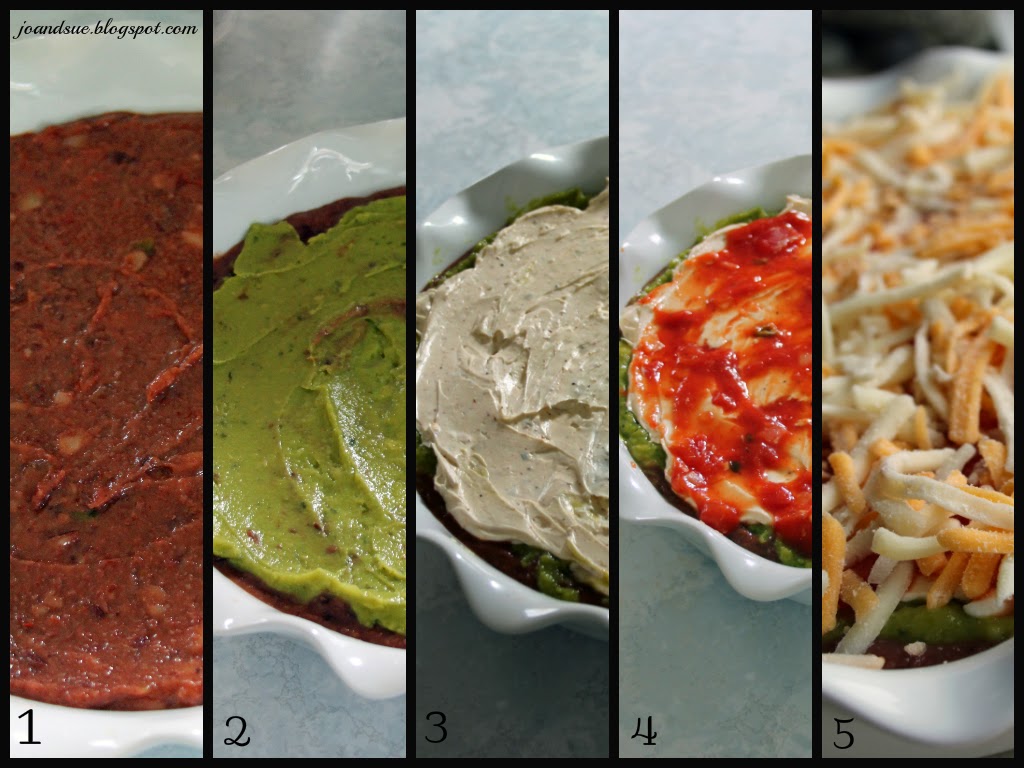
Next - spread the guacamole over the beans in the pie plate.
In another bowl, beat the cream cheese until smooth, scraping down sides as needed. Add in the sour cream and taco seasoning and beat until smooth.
Spread over the guacamole. **HINT - it helps to drop the mixture by spoonfuls over the dish and then gently spread them together. (see photo below)


Top the cream cheese mixture with the salsa. Spread evenly.
Finally - top with the shredded Tex-mex cheese. 
Here is the layers in one photos -- 


Bake in 350 oven for approx 30 minutes - until cheese is melty and dip is bubbling. 
Remove from oven and serve hot with Tostitos "Scoops" tortilla chips or regular tortilla chips. *Note - it is extremely hot when it comes out of the oven - be careful*


You can make this as spicy as you like. I used mild salsa but you could easily use medium or hot, you could add some cayenne pepper to the taco seasoning or a dash of hot sauce, you could use a different blend of cheese - ie: Kraft Habanero shredded cheese
Also, the amounts are forgiving too: For the salsa layer I just used up what I had left (3/4 cup) but you could use 1/2 cup or a full cup if you wanted to.  And for the amount of cheese, we like things cheesy so we used a good 2 handfuls of the Tex-Mex but you could cut back if you wanted to. 
Another note - I cooked this for 20 minutes, to where the cheese was just melting, took it out of the oven, wrapped it in a towel to keep it warm, then drove to my sisters house (15 minutes) and popped it in her oven for another 10 minutes or so to finish cooking it. 
You could just as easily prepare this ahead of time and keep it refrigerated until ready to cook it. Just remember to bring it out of the fridge while your oven is preheating to warm it up a bit. 

Be sure to stop by these blogs and check out all the great links! - The Chicken Chick, Ms. enPlace, Hungry Happenings, Hun...What's For Dinner?Carole's Chatter

Tuesday, February 4, 2014

Southwest Spaghetti Squash Casserole


Yet another recipe born out of hunger and what was available in the kitchen at the time. 
This one is definitely a keeper. 
Sooooo tasty!
I had pretty low expectations so was delightfully surprised by how much I loved this combination.
Hamburger + black beans + salsa + spaghetti squash = Yes. Just.....yes.
Give it a try and see what I am talking about. 
Plus, the nutritional count is pretty sweet too. According to Myfitnesspal 1 serving (1/4 of the recipe) is:
357 calories, 28 carbs, 11 fat, and 37 protein.
See that pic at the top? That's one serving! 


Southwest Spaghetti Squash Casserole

Ingredients
4 cups spaghetti squash, cooked & shredded
1 lb extra lean ground beef
1/4 cup onions, diced
3 cloves garlic, minced
1/2 Tbsp Taco Seasoning (store bought OR use our recipe HERE)
1/2 cup refried beans
1 cup black beans, rinsed and drained
1/2 cup salsa
1/2 cup light mozzarella/cheddar cheese mix

Directions
Preheat oven to 350. Lightly spray a 9 X 7 oven safe dish with cooking spray. 
Take cooked spaghetti squash (*Make sure you drain the squash well if you are worried about excess liquid*) and layer it in the bottom of prepared dish. Set aside.


In a medium skillet over medium heat, cook and stir the beef, onions, garlic, and Taco seasoning until beef is no longer pink. Stir in the refried beans until well mixed in. Stir in the black beans. Cook and stir another minute and then remove from heat.
Layer the beef mixture over the squash.


Spoon the salsa over the top of the beef and use a spoon to spread it evenly over the casserole.


Bake at 350 for approximately 30 - 40 minutes; until bubbling around the edges. Remove from oven and sprinkle evenly with the shredded cheese.


Bake another 10 or so minutes - until cheese is melty and casserole is very bubbly. 


Remove from heat and let sit for 5 minutes before serving.


*Note* I did not drain my spaghetti squash after I cooked in the microwave. I simply shredded it and then put it in the dish. As you can see in the photo above there is a little bit of liquid on my plate from the squash. 
This is something I don't mind so I don't really worry about draining my squash. 
If this is something that you are concerned with then make sure you press the liquid out of your squash before putting it in the casserole dish. 
When I reheated my leftovers the next day there wasn't any issue with excess liquid. 
You can make this as spicy as you like by using hot, medium, or mild salsa. 
You can definitely add more cheese too if you like. I only used half a cup because I am trying to keep my calorie count down. :)

Adorned From Above and Dizzy Busy & Hungry have some great links to more fun and tasty sites. Be sure to hop over and say hi!

Friday, September 21, 2012

Chili Nacho Waffle Fries

 
Who wants some chili nacho waffle fries?
If you didn't just raise your hand then you probably should just skip this post and go on to the next one. You won't want to see the layers of fries and chili and cheese and toppings that I am about to reveal.
Only keep reading if you are sure you want to be tempted by a plate of some unhealthy deliciousness.
Still there?
Okay.
First off, good for you. You made the right choice.
Second, you should probably get a napkin because you don't want to get drool on your keyboard once you start scrolling through these pictures. Just sayin'
 
 
Chili Nacho Waffle Fries
 
Ingredients
1 1/4 cup waffle fries
1/2 cup chili
1/2 cup cheese, shredded (divided)
3 cherry tomatoes, seeded and diced
2 Tbsp onion, diced
2 Tbsp sour cream
 
Directions
Preheat oven to 400. Line a small cooking tray with parchment paper. Place waffle fries, in a single layer, on top of parchment paper. (As you can see from the following photo, I was able to make this recipe in a toaster oven. Just remember to preheat the oven before putting in your fries.)
 
 
Bake fries at 400 for 15 minutes. Remove from oven, flip fries over, and cover with the chili and 1/4 of the shredded cheese.
 
 
Put back in oven for another 5 minutes, until cheese is all melty.
Top with diced tomatoes and onion and remaining cheese.
Place back in oven for another 5 minutes, until cheese is once again all melty.
Remove from oven, transfer fries to a plate using a spatula, and top with sour cream.
 
 
I'm of the belief that all diets can stand a little treat every once in a while.
This is one of those treats that is SOOOOO worth the indulgence. Plus, if you eat lots of fruit and veggies the rest of the day you won't go over your daily limits.
Calories for the entire recipe - 560, fat - 28, carbs - 60, and protein - 30.6.
I ate this for my dinner yesterday and it was really filling. Calorie wise 560 isn't that bad for dinner. Well, for me anyway.
I used the "low fat" chili, skim mozza cheese, and light sour cream. It didn't taste the least bit "low fat". Trust me.
Not that I have to work that hard to "sell" this recipe but... you can add whatever toppings you like. Chopped jalapenos, salsa, green onions, etc, etc...
You can have this made, from start to finish, in 25 minutes. You put your fries in to cook, cut up your tomato and onion while it cooks, put the cheese on, wash your few dishes while the cheese melts, and *ta-daaaaaah*...done.

Monday, April 2, 2012

Southwest Shredded Chicken and Quinoa


Dinner is always one of those meals that I struggle with. I am full of energy all day until about 3:00 or 4:00 pm and then I run out of steam. I don't feel like doing anything, let alone making dinner.
I truly appreciate those meals I can throw together in 5 minutes or the ones I can throw in the crockpot in the late morning (when I can still function like a human being) and let sit all day.
This is one of those meals.
I had originally planned to put it in the crockpot while I did other things but, of course, I got sidetracked and completely forgot about that. So, instead, I threw it all together in a casserole dish and baked it in the oven. It worked just as well and was still easy, peasy.


Southwest Shredded Chicken and Quinoa

Ingredients
3 - 4 boneless, skinless chicken breasts
1 jar salsa (about 2 cups)
1 15 oz can black beans, rinsed and drained
1 can corn (about 1 to 1 1/2 cups)
1 Tbsp chili powder
1/2 Tbsp cumin
4 cloves garlic, minced
sprinkle of cayenne pepper
salt and pepper
1/4 cup water
1 cup quinoa, uncooked
1 - 2 cups Tex-Mex cheese, shredded (You can use aged cheddar)

Directions
Preheat oven to 350. Spray a large casserole with cooking spray.  (OR - you can spray a large crockpot insert with cooking spray and not worry about preheating the oven)
Add everything except the quinoa and cheese to your casserole dish (or crockpot) and give it a good stir. Make sure the chicken breasts are covered with the salsa mixture.


Cook in preheated 350 oven for about one hour, until chicken is done. (Conversely, cook in crockpot on low for about 8 hours. Until chicken is cooked)
Remove chicken breasts from the mix and shred with 2 forks until completely shredded. Place shredded chicken back into mix and stir. Place back into oven while you prepare the quinoa. (Or, turn crockpot to warm and let sit while you prepare quinoa.
Prepare quinoa. (Place the 1 cup of quinoa into a pot with 1 3/4 to 2 cups of water. Bring to a boil. Cover, reduce heat, and simmer for about 15 minutes, until all the liquid is absorbed.)
Serve quinoa with a scoop of the shredded chicken mixture on top, sprinkle generously with shredded cheese.

There is a couple of things that are great about this recipe (if I do say so myself ):
1. There is hardly any prep work - does opening cans even count as prep work?
2. It is fast - just over an hour from start to finish (if you use the oven.)
3. There is only one dish to wash.
4. It is delicious.
5. You can fine tune it to your personal preferences - mild or spicy salsa, more or less cayenne, other veggies, etc...
6. You can use the leftover shredded chicken in tortilla wraps the next day for lunch, or sandwiched between two tortillas with some shredded cheese and grilled for a tasty quesadilla.
7. Did I mention it was delicious?

The one issue I have with this dish is the amount of effort it requires to shred the chicken. It only takes 5 minutes to do but, if you are having a "too lazy to cook dinner" day, then it seems like there is an unecessary call for a heavy duty arm workout.
It's a small issue though.
I get over it by pretending that I'm in a chicken shredding competition in the Olympics and that I'm going for the gold.
 What?
  I think it would be a pretty legit Olympic sport.

Friday, July 29, 2011

Fresh Apricot Salsa


I normally am not a chips and salsa kind of girl. Chocolate and caramel and such are more my thing. That being said, I came up with this recipe last year to enter into our local Apricot Festival and, now that the apricots are ready this year, have rediscovered it.
It is quick, easy, inexpensive, and - most importantly - full of flavour. Depending on your personal preference you can make it as spicy as you like. As written it provides enough of a kick to wake you up but not so much to scare you away after 2 bites. I am a bit of a wimp when it comes to heat so you decide what is right for you!


Fresh Apricot Salsa
Ingredients
3- 4 cloves garlic
1 jalapeno pepper
pinch salt
8 large (16 small) fresh apricots, pits removed
juice and grated rind from 1 lime
1 tsp brown sugar
Directions
In a food processor, pulse garlic and jalapeno pepper until coarsely chopped. Add the rest of the ingredients and pulse on and off until coarsely chopped.
(Of course, if you have a Magic Bullet feel free to use it! I did - surprise, surprise! I found it was chopping it too fine though so before serving I mixed in a few more apricots that I chopped by hand to give it a coarser texture.)
Spoon into serving dish, cover, and chill for at least an hour or two before serving.
This is one of those recipes that improves greatly if you let sit in the fridge overnight. The flavours have time to blend together. If you don’t have time to make it a day ahead it’s okay - same day is delicious too just not as intense.


For those of you who, like me, prefer sweet to salty; I encourage you to give this a try. The apricots provide an interesting sweetness amongst the garlic and jalapeno.
For those of you who, like Sue, prefer salty to sweet; I encourage you to try this recipe because it is in an amazing, interesting salsa to enjoy with tortilla chips.
.
I just wanted to add - you can also spoon some of this over your chicken or pork before you bake it. It goes really nicely with either.