Showing posts with label cheese. Show all posts

Thursday, September 10, 2026

Elote Corn Ribs


My love and I went out to dinner in Fort St John with his mom. She took us to this lovely Mexican restaurant called Broken Spanish. One of the things on the menu was elote - something I have been dying to try FOREVER. 


The above photo is from the restaurant. Sooooooo good!

 I knew I had to try and recreate it when I got home. 
My version isn't nearly as good as the one from the restaurant BUT I'm still happy with it. I was expecting it to be harder to make. It's pretty easy AND can be prepped ahead of time, which is perfect for dinner parties or family gatherings. 
I'm also going to try it as a corn salad next. :) 


Elote Corn Ribs

Ingredients
3 ears of corn
2 Tbsp mayo
2 Tbsp sour cream
1 Tbsp jalapeño, diced fine
1/2 tsp cumin
1/2 tsp paprika (or smoked paprika)
1/4 tsp chili powder
salt & pepper
2 - 3 Tbsp oil
1/2 cup cotija cheese, crumbled (or feta)
1/3 cup fresh cilantro, chopped

Directions
Preheat oven to 400. Line a cookie sheet with parchment paper. 
Mix together mayo, sour cream, and jalapeño. Set aside. 
Mix spices together in a small bowl. 
Cut corn in half diagonally. Then cut each half in half again, vertically. Place the flat sides down and cut in half again. If your corn is large, cut into thirds instead of halves. (You can do a quick Google search for videos on how to do this safely. It can be a bit tricky if your corn cobs are large!) Each cob should yield 4 - 6 ribs. 
Place each "rib" onto the prepared cookie sheet. Drizzle with a little oil. Sprinkle with about half of the seasonings. 
Bake at 400 for about 20 - 30 minutes, flipping the ribs halfway. 


When they have reached your desired level of doneness, remove from heat and slather the sauce on them. 


Sprinkle the remaining spices on top, then sprinkle generously with the crumbled cheese and cilantro. 


Serve immediately. 


Cotija cheese is the cheese traditionally used for elote. I was unable to find any near me, so I used plain feta. It is a good substitute in a pinch. 
If you don't like cilantro, then you can skip it, but it will change the flavour of the corn. 
Next time I make this, I will definitely add more spices. That was the biggest difference between my version and the restaurant version. Of course, you can adjust the spices to how you like them! Use my recipe as a jumping-off point. 
I am going to try this on a full cob of corn AND as a salad. I love the flavours so I am pretty sure I will like any combo of them. 
Also - you can, of course, cook this on a grill/BBQ. I don't have one otherwise I would have tried it. :)

Thursday, September 3, 2026

Jalapeno Popper Soft Pretzels


I have to give credit where it's due - Sue was the one who had the genius idea for these. 
We have several jalapeno popper-related posts already on the blog - check out our Jalapeno Popper Garlic Pickle Rolls (HERE), or our Pineapple Jalapeno Poppers (HERE), or even our Jalapeno Popper Mummies for Halloween (HERE). 
Needless to say... we enjoy jalapeno poppers. 
We were making up some of our delicious soft pretzels and were discussing how to top them. The original version can be found HERE - Cheesy Soft Pretzels. 
Originally, we just topped them the "normal" pretzel way - with coarse salt. We have also done them with cinnamon sugar, with pizza toppings, and with extra cheese. Sue suggested trying a jalapeño popper filling with a little extra cheese, and it turned out SO GOOD. 
Any other ideas for how to top a pretzel? We'd love to hear your ideas in the comments below.


Jalapeño Popper Soft Pretzels 

Ingredients
Topping
8 oz cream cheese, softened
1 jalapeño, finely diced
2 clove garlic, minced
1/2 cup aged cheddar, shredded
4 slices bacon, cooked and crumbled

Pretzels
1 recipe Cheesy Soft Pretzels found HERE  (makes 8 large)

Extra shredded cheese for sprinkling on top
Extra diced jalapeno, if desired

Directions
Preheat oven to 350. 
Mix together the softened cream cheese, finely diced jalapeño, garlic, cheddar, and bacon until combined. Spread the mixture evenly on 6 to 8 cooked pretzels (depending on how thick you want it).
Place pretzels on a parchment-lined cookie sheet. 


Sprinkle with extra jalapeño and cheese, if desired. 


Place into 350 oven and cook about 5 - 8 minutes. Just long enough to heat through and melt the cheese on top. 


Serve warm.


If you have extra bacon bits, you can sprinkle those on top too. You can never have too much bacon!


The filling should be enough for 6 - 8 pretzels that our recipe makes. 
I can't remember exactly but I am pretty sure we did 6 pretzels so it would be a little thicker on top. You don't want to skimp on the topping. 
You could use store-bought pretzels for this recipe. Any cooked, soft pretzel will work!


Sunday, May 10, 2026

Giant Pizza Rolls


I just realized I've never shared our pizza roll recipe. We've shared our Samosa Roll Ups (Recipe HERE), which are delicious BUT these pizza rolls might be even more tasty. 
You could fill the dough with pretty much anything you like AND make them any size you like. 
We recommend your favorite pizza toppings and making them giant. 
Because, what's better than pizza rolls? 
GIANT pizza rolls. 
Perfect for after school snacks, lazy dinners, and everything in between.


Giant Pizza Rolls

Ingredients
Dough
Dough Recipe - HERE - leave out vanilla

Toppings
1 - 2 cups Pizza Sauce (link HERE)
1/2 cup parmesan cheese, shredded
1 - 2 cups mozza cheese, shredded (or pizza blend)
pepperoni slices
salami slices
1/2 cup (or more) diced onion
1/2 cup (or more) diced peppers

Optional Garnish
pizza sauce
parmesan
parsley

Directions
Prepare dough as per original link above. Remember to LEAVE OUT THE VANILLA.
Follow instructions up to the point where you roll out the dough to a 12 X17 rectangle.
Instead of topping with a sweet filling you will now top with pizza toppings. 
Spread the pizza sauce on first. Thick enough to cover the dough but not so thick that it will all leak out when you roll it up. Then layer on toppings, then cheese. Leave about 1/2 an inch border clear so it is easier to roll up and seal.
NOTE - You can use the ingredients in our list or use your own favorites. 


Roll up, jelly roll style, and pinch edges firmly to seal. Cut into 6 rolls, 2 inches wide. 
Place on cookie sheet lined with parchment paper, cover with a tea towel, and let rise somewhere warm for an hour. 


When they have completed their second rise, preheat oven to 350. Remove tea towel and bake for 15 minutes, rotate pan, and bake for 15 minutes more. 
Buns are done with tops are golden brown and internal temperature is 190F.


I then top with a little more pizza sauce and a sprinkle of cheese and parsley to serve. 
Don't worry if your buns get a little gooey because sauce leaked out. They will still taste amazing. TIP - Don't over fill the dough before rolling it as it will be difficult to work with and your buns may not roll properly. 
These freeze very well and can just be popped in the microwave to warm up. If you are not freezing them they are best eaten the day they are made (maybe the next day for breakfast but do keep them in the fridge!). 


We belong to the Amazon Affiliate Program and, as such, will receive small compensation for any sales through links on our blog. Thank you for your support. 

Monday, November 3, 2025

Keto Garlic Gnocchi


I have been following keto off and on for over 5 years now. I find one of the things I end up missing the most is pasta and pasta adjacent foods. Gnocchi is one of those foods. 
Original gnocchi is pretty distinctive in texture and taste and is hard to replicate while keeping keto friendly. I would say this version is very tasty and very similar looking but still isn't as "chewy" as the original. That being said - I really enjoyed it. 
You get to have a fairly large serving and the macros are reasonable. As per Myfitnesspal - one serving (recipe, as written makes 4) is: 217 calories, 10.5 carbs, 4 fiber, 17.4 protein, for a total of 6.5 net carbs. 
It is far more fragile than original gnocchi so takes a bit of time to make BUT, in my opinion, it is worth the effort to get to eat something that fills a craving I am having. 


Keto Gnocchi

Ingredients
2 eggs
1 cup ricotta
2/3 cup grated parmesan
1 tsp minced, fresh garlic

Directions
Whisk eggs for about 1 minute. Whisk in ricotta, parmesan, and garlic until well combined. Whisk in coconut flour. 
Sprinkle xanthan gum over surface and let sit for a few seconds. Whisk in well. 
Cover and place in freezer for 15 minutes OR in fridge for an hour OR in fridge overnight. 
Pat into ball and divide into 8 pieces. 


Working with one piece at a time - oil hands and roll or press into a log about 1/2 inch thick. Cut into 1 inch pieces. 


Press each piece firmly between your fingers so it is not crumbly. Then press lightly with a fork.


Repeat with all 8 pieces of the dough. You should have approx 60 - 65 pieces. 


Freeze dough for approx 20 minutes. You want the pieces to be firm but not completely frozen. 

Heat butter (or oil) in a pan and fry gnocchi until golden brown. I did about 1 - 2 minutes on 2 sides. (So about 4 minutes total). Watch closely as it will burn quickly. Do NOT crowd the pan. 


Serve hot with a sprinkle of shredded parmesan and dried parsley. 
You can also serve in a keto friendly sauce (such as Raos). 


A serving is approx 15 - 16 gnocchi. 


Of course, you can use your favorite sauce with this recipe. You can also fry up onion and garlic and add the gnocchi to it. (Just watch how much as onion will up the carbs quite a bit)


In the photos, after I fried the gnocchi in butter, I added 1/4 cup of Raos, 1 Tbsp parmesan, and 1 serving of the gnocchi and it was 316 calories, 14 carbs, 21 fat, 20 protein, and 5 fiber. 
Net carbs: 9. 
Once you make the gnocchi it can be frozen up to 3 months. When you go to cook it thaw it but make sure it is still very cold and firm. Recipe, as written, makes 4 servings. 
I ate one serving as a complete meal. If I were going to use it as a side with a steak or chicken breast and greens, I would probably only need half a serving. It is filling. I'm thinking I'd like to try it with gravy instead of pasta sauce - I think it would be like a hashbrown/roasted potato. 
Also - you can leave out the minced garlic. I add it because I find the coconut flour is a strong flavor and the garlic helps to drown it out a bit. 
#keto #glutenfree #lowcarb #vegetarian

Saturday, June 15, 2024

Keto Fathead Lasagna


We have a few recipes for healthier lasagna recipes on the blog. You can find them by searching "lasagna" in the little search box at the top left of the screen. This particular recipe is keto friendly, gluten free, and very VERY filling. Fathead dough mimics regular lasagna noodles so you get the taste AND texture of lasagna. Fathead dough is a popular keto friendly substitute for quite a few other doughs. Again, search "fathead" in the search box at the top of the page for more ideas on how to use it.
According to MyFitnessPal, this lasagna is: 518 calories, 40 fat, 8 carbs, 0.5 fiber, 35 protein, so 7.5 net carbs per serving. Recipe, as written, makes 8 servings. 
NOTE - you can make this in a 9 X 13 pan or in 8 individual 4 x 5 containers. 


Keto Fathead Lasagna
Ingredients
"Noodles"
 8 oz cream cheese, room temp
2 cups mozzarella, shredded
1/2 cup parmesan, shredded
salt & pepper
3 eggs, beaten

Meat Layer
1 Tbsp oil
1/2 medium onion, diced
3 cloves garlic, minced
1 Tbsp tomato paste
1 lb ground beef
salt & pepper
3/4 cup low/no sugar tomato sauce (I use Raos)

Cheese Layer
2 cups ricotta cheese
1 cup mozzarella, shredded

Topping
1/2 cup mozzarella, shredded
1/2 cup parmesan, shredded
parsley

Directions
Preheat oven to 350. Line a cookie sheet with parchment paper, set aside. 
Prepare noodles - Place cream cheese, mozza and parmesan, salt & pepper in a microwave safe bowl. Microwave in 30 second intervals, stirring well in between, until melted and mixed well. Add in beaten eggs and beat until well incorporated. Batter will be lumpy. 
Pour onto prepared cookie sheet and spread evenly. 


Bake at 350 until firm and lightly browned on top, about 15 - 20 minutes. 


Let cool before cutting into pieces. 
If using a 9 X 13 - cut into 3 equal pieces. If using the 8 individual containers, cut into 24 pieces. 


While "noodles" are cooking, prepare the meat sauce.
Heat oil in a pan, add in onion and garlic until softened. Add in tomato paste, beef, and salt & pepper. Cook until beef is browned. *If there is a lot of grease, drain it off.
Add in the tomato sauce and stir well. Remove from heat.
Assemble lasagna:
Layer 1: 1/3 of the noodles, 1/3 of ricotta, 1/3 of meat sauce, 1/2 of mozza
Layer 2: 1/3 of the noodles, 1/3 of the ricotta, 1/3 of the meat sauce, 1/2 of the mozza
Layer 3: last of the noodles, last of the ricotta, last of the meat sauce, and then the toppings of mozza, parmesan, and parsley. 


Cook at 250 until bubbly and cheese on top is melted, about 30 or so minutes. Time differs depending on if you use one pan or individual pans. You just want it to be bubbly and melty. 


Serve hot.
I make this in individual pans because it makes it easier to share with family and easier to freeze. If you make it in a 9 x 13, cut into 8 pieces. Of course, you can cut it into however many pieces you want, but the nutritional info is for 8 servings. I usually serve it with cucumbers or salad or tomato slices for a delicious keto friendly/low carb dinner. The serving sizes may seem smallish but with how rich it is... they are just the right size, IMO. 

Saturday, April 1, 2023

Keto Chicken Fajita Casserole


This is one of those meals that you can enjoy even if you aren’t following a low carb or keto eating plan. 
It’s very rich and hearty, super tasty, and goes perfectly with a (keto or not) cheese quesadilla on the side. 
MyFitnessPal puts one serving (recipe as written makes 8) at: 
300 calories, 19 fat, 5 carbs, 1 fiber, 25 protein. That’s 4 net carbs. 
I make the full 8 servings because this meal is great for meal prepping. You can cut the recipe in half if you need to though. 


Keto Chicken Fajita Casserole

Ingredients
4 boneless, skinless chicken breasts cut into bite sized pieces
1 pkg taco seasoning
2 large bell peppers, cut into strips
1/2 large onion, sliced
1/4 cup diced tomato
1/4 cup green chilies, finely diced (or use canned)
8 oz cream cheese, cubed
1/4 cup heavy cream
1 cup shredded cheddar (or mozza) 

Directions
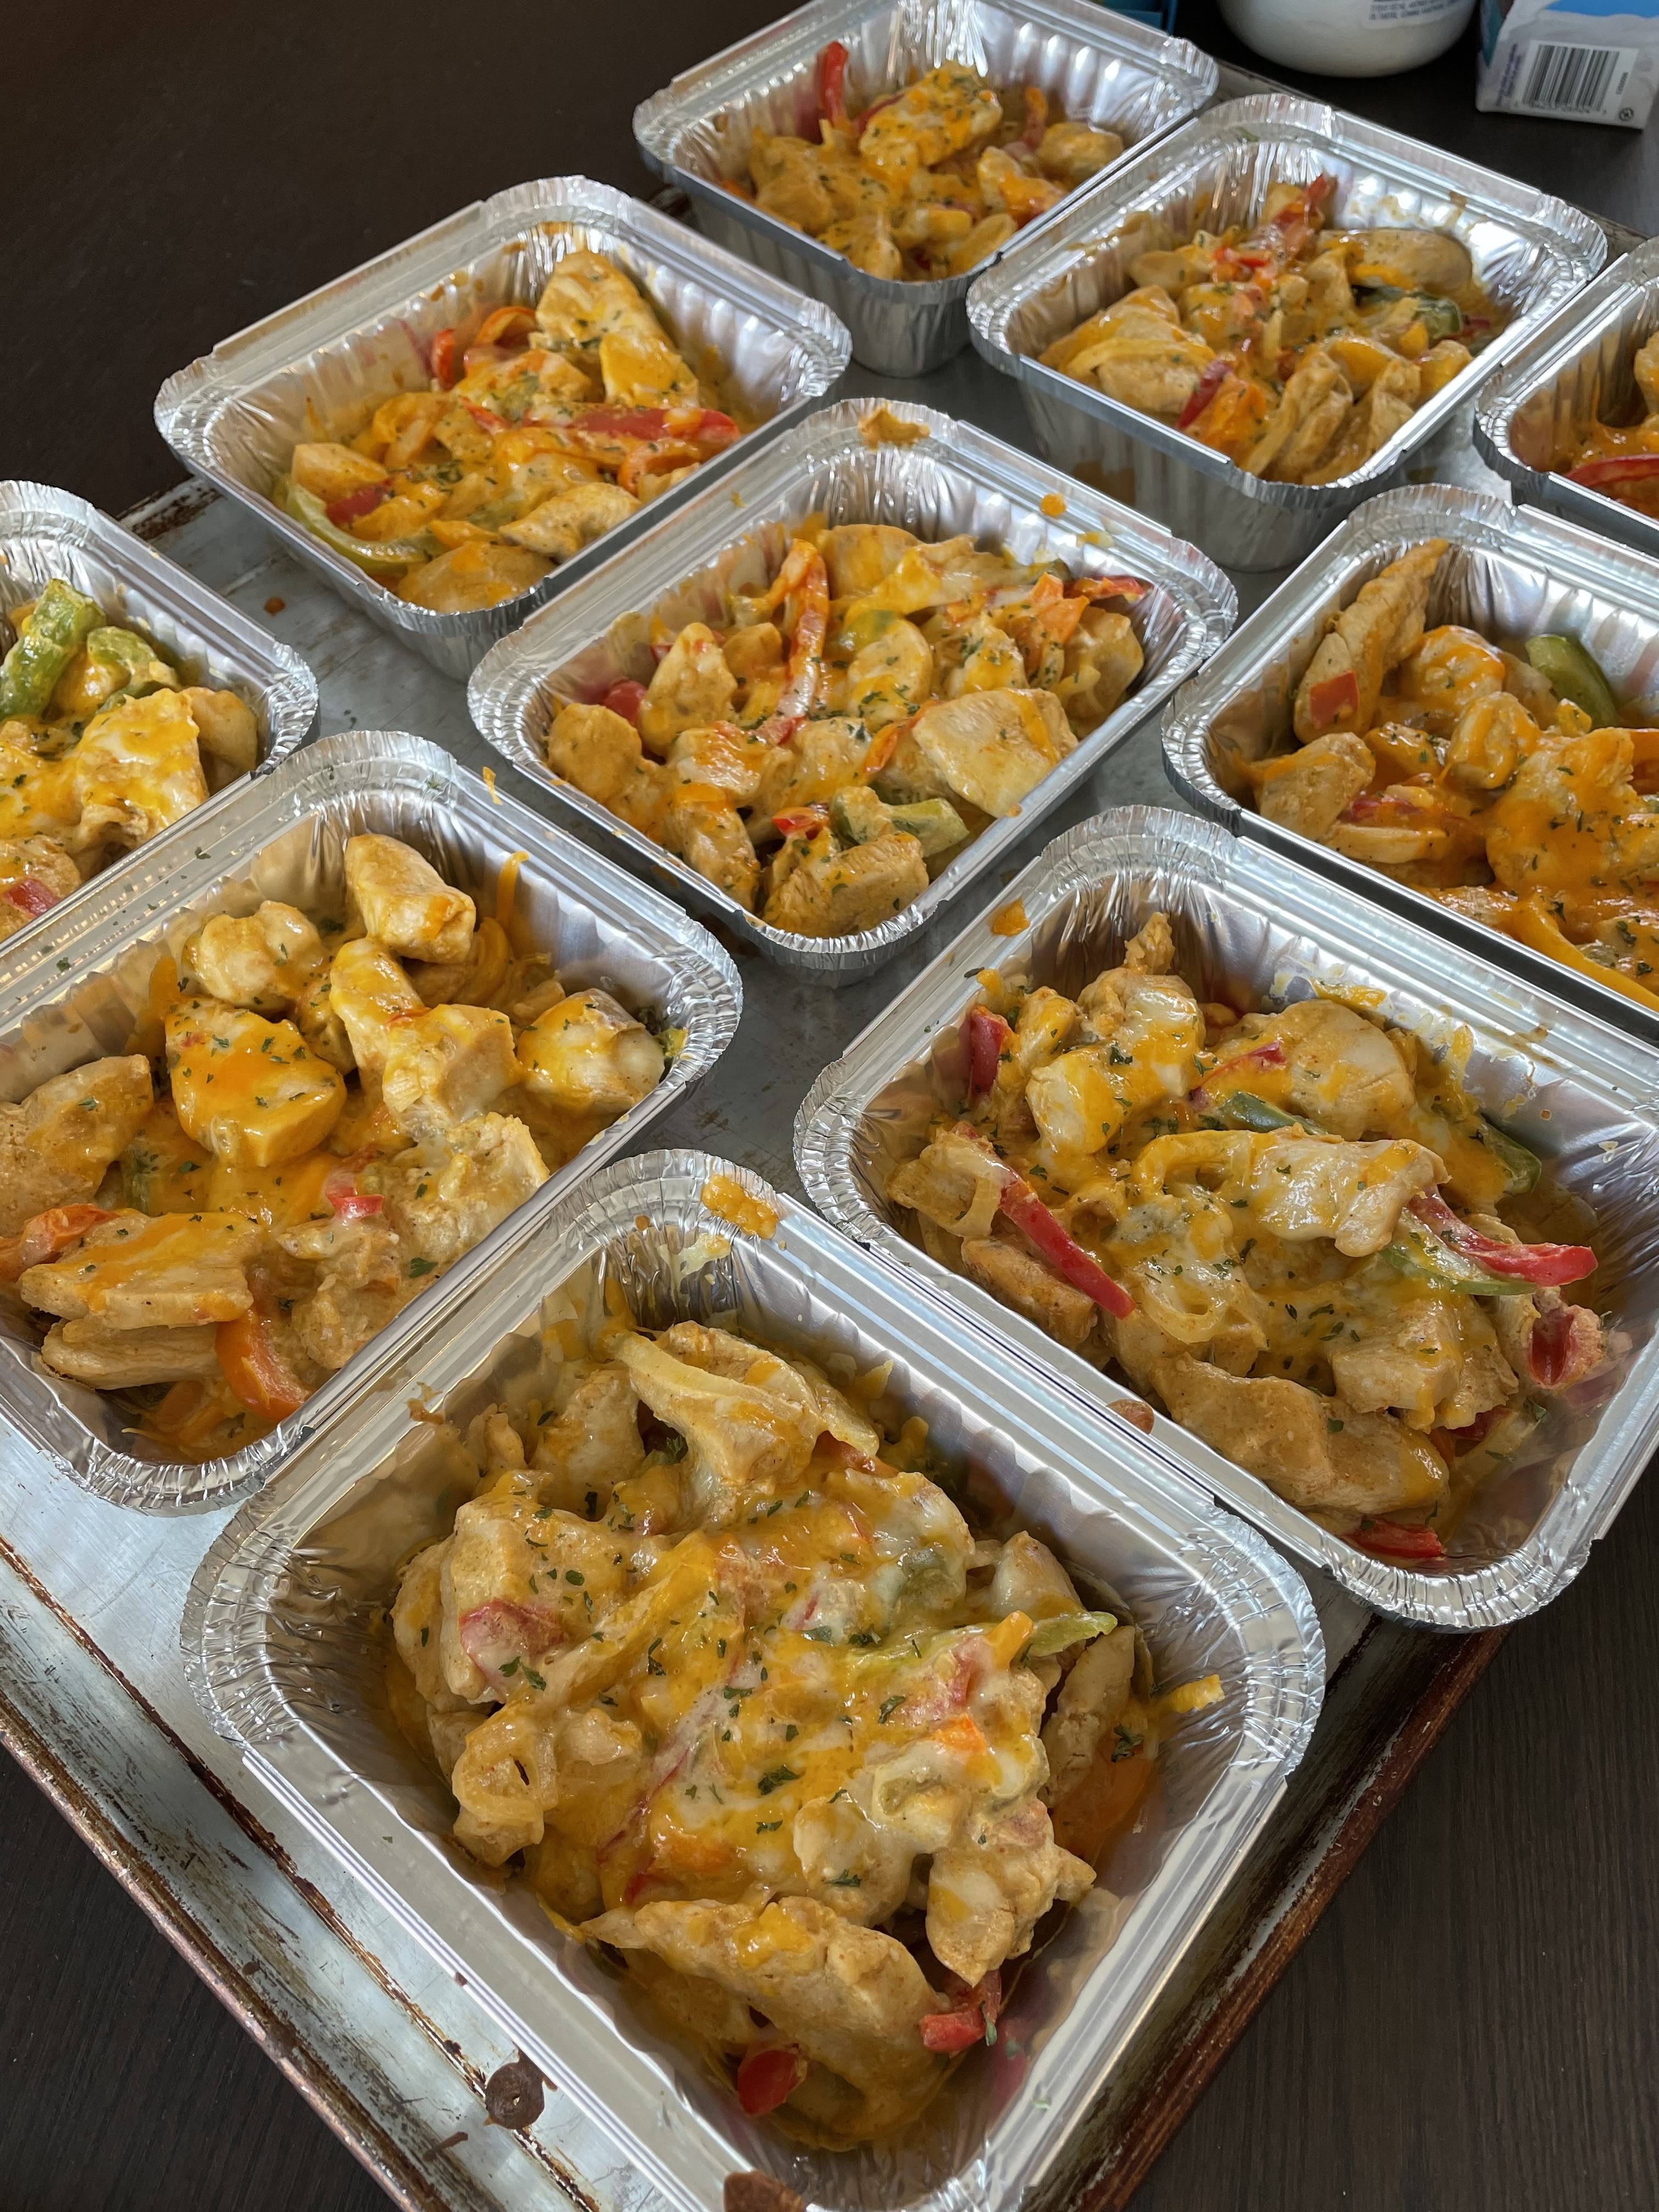
Preheat oven to 350. Spray 9x13 with cooking spray and set aside. (If I am meal prepping I will use individual dishes to make things easier, but this is totally optional) 
In a large pan, cook chicken until no longer pink. Sprinkle with the taco seasoning and stir to evenly coat. Drain any excess liquid from the pan. Place chicken on plate. 


Add peppers, onions, chilies, and tomato to the pan. Cook over medium heat until vegetables soften, about 5-8 minutes.


Add in cream cheese and heavy cream and stir until smooth and evenly mixed in. Stir the chicken back in.


Scrape into 9x13 pan (or individual pans - see photo below). Top with the shredded cheese. 
Bake at 350 for about 30 minutes - until cheese is melted and casserole is bubbly. 


Serve hot. 
This casserole will last for several days, covered, in the fridge. It can be frozen as well but will release a little water when reheated in the microwave. I just drain it off and it’s good to go. 


From start to finish in about an hour, if you include all the prep. A healthy and filling meal that is gluten free, keto friendly, and easy peasy to whip up. 
I turn a keto friendly tortilla into a cheese quesadilla and *voila* full keto friendly meal that doesn’t leave me feeling hungry. 


Thursday, January 6, 2022

Freezable Personal Pizzas


Make ahead meals are great, right? You do all the work, pop it in the freezer, and then when you need it, it only takes a few non-messy moments! 
This recipe is basically for the dough with steps on how to make ahead and freeze. The actual toppings and shape of the pizza are totally customizable. I made snowmen because... obviously, they are adorable, d'uh!
This recipe will make between 6 - 8 personal size pizzas or 2 regular sized. 


Make Ahead (Freezable) Personal Pizzas

Dough Ingredients
2 Tbsp instant yeast
2 cups hot water
2 Tbsp oil
1 tsp sugar
4 - 6 cups flour
2 tsp salt

Directions
In a bowl, whisk together the yeast, hot water, oil, and sugar. Set aside to activate yeast for about 5 - 8 minutes, until bubbly. 
Stir in about 4 cups of flour and the salt. Add more flour as needed to form a soft but not sticky dough. Knead on a floured surface for 2 minutes. Place in an oiled bowl, cover with a tea towel, set somewhere warm to rise for about an hour. 
After dough has risen, preheat oven to 425.
Separate dough into 6 equal pieces. 


Shape dough into desired shape. Place onto parchment paper lined cookie sheets. 


Par-bake the dough for 5 - 8 minutes, until puffy but not cooked through. It should still be pale. 


Top pizzas as desired. 


For snowmen I used: pizza sauce, onions, pepperoni, then mozzarella, olives, more pepperoni, and yellow pepper.


Sooooooo cute. Once you have topped the pizzas simple double wrap them in plastic wrap and freeze.
When ready to cook: preheat oven to 425, unwrap pizzas and place on parchment paper lined tray, cook for about 15 minutes. Just until heated through and cheese is bubbly. 


I also made jack-o-lanterns for Halloween....


After par-baking, these are topped with: pizza sauce, onions, cheddar cheese, deli ham, and green pepper.


Then simply double wrap with plastic wrap and freeze!


And, just thought I would share this too....
I made 2 regular pizzas to freeze and cook later for a friend who broke their leg. They were made exactly the same way except for bigger. Cooking time was a little bit longer, maybe about 5 minutes, but otherwise everything was the same!


I will update with photos if I make more for for other holidays! I feel some heart shaped pizzas may be happening for Valentine's Day or shamrocks for St. Patrick's Day!