Sunday, July 31, 2011

Pecan Toffee Meringues


One thing I have never been able to make is meringues. Well, okay....I can MAKE them but they just never turn out nice and fluffy and chewy and puffy. This time was no different. I used my wonderful new Kitchenaid to whip the heck out of the egg whites thinking maybe that has been my problem in the past. You know, maybe a hand mixer just wasn't doing the job properly. Nope. Apparently that was not the problem.
They were looking good, I had my hopes up, even folding the chopped pecans and toffee into the meringue didn't deflate it. BUT...as you can see from the photos....they went flat in the oven. Don't get me wrong, they are still quite tasty and even have the outer crispy / inner chewy that meringues are supposed to have but, dag nab it, they just don't look all poofy like they do in the many photos on line that I have seen. What am I doing wrong? Any ideas?


Pecan Toffee Meringues

Ingredients
4 egg whites
1/4 tsp cream of tartar
1 cup sugar
1 cup toffee bits
1 cup finely chopped pecans

Directions
Preheat oven to 250 degrees.
Whip egg whites and cream of tartar until soft peaks form. Gradually beat in sugar, 1 Tbsp at a time, until stiff peaks form. Around 6 or so minutes.
Gently fold in toffee bits and pecans.
Drop by spoonful onto parchment paper lined cookie sheet. Bake at 250 for 30 minutes then shut off oven. Leave cookies in oven for an hour to dry. Do not open oven.
Remove from oven and transfer to wire cookie racks to cool.


I am not sure if I am destined to not be able to make poofy meringues. Maybe it is one of those recipes where practice makes perfect. I would love to hear from those of you who make those wonderfully high meringues. Any tips you'd like to share would be appreciated.
I love making meringues as they are simple and inexpensive and a great way to use up egg whites left over from other recipes but they are slowly moving to bottom of my list of things to make as it is getting increasingly frustrating to not have them turn out how I want them to. Grrrrr!


Friday, July 29, 2011

Fresh Apricot Salsa


I normally am not a chips and salsa kind of girl. Chocolate and caramel and such are more my thing. That being said, I came up with this recipe last year to enter into our local Apricot Festival and, now that the apricots are ready this year, have rediscovered it.
It is quick, easy, inexpensive, and - most importantly - full of flavour. Depending on your personal preference you can make it as spicy as you like. As written it provides enough of a kick to wake you up but not so much to scare you away after 2 bites. I am a bit of a wimp when it comes to heat so you decide what is right for you!


Fresh Apricot Salsa
Ingredients
3- 4 cloves garlic
1 jalapeno pepper
pinch salt
8 large (16 small) fresh apricots, pits removed
juice and grated rind from 1 lime
1 tsp brown sugar
Directions
In a food processor, pulse garlic and jalapeno pepper until coarsely chopped. Add the rest of the ingredients and pulse on and off until coarsely chopped.
(Of course, if you have a Magic Bullet feel free to use it! I did - surprise, surprise! I found it was chopping it too fine though so before serving I mixed in a few more apricots that I chopped by hand to give it a coarser texture.)
Spoon into serving dish, cover, and chill for at least an hour or two before serving.
This is one of those recipes that improves greatly if you let sit in the fridge overnight. The flavours have time to blend together. If you don’t have time to make it a day ahead it’s okay - same day is delicious too just not as intense.


For those of you who, like me, prefer sweet to salty; I encourage you to give this a try. The apricots provide an interesting sweetness amongst the garlic and jalapeno.
For those of you who, like Sue, prefer salty to sweet; I encourage you to try this recipe because it is in an amazing, interesting salsa to enjoy with tortilla chips.
.
I just wanted to add - you can also spoon some of this over your chicken or pork before you bake it. It goes really nicely with either.


Thursday, July 28, 2011

Creme Brulee Cheesecake Bars


My friend’s husband has gotten me hooked on crème brulee. First let me just say “Thanks a lot Drew!” I mean that in a sarcastic and non-sarcastic way. Non-sarcastic: he made the best crème brulee ever and shared with me! Sarcastic: I am now addicted to crème brulee and NEED to have his recipe and will be gaining a million pounds because of this.
I am surprised that I love it so much. I can remember trying it many, many years ago and not even being able to eat more than a bite or two because the texture put me off and it was too “eggy”. Drew’s amazing crème brulee recipe has lead me to believe that way back when, when I tried it the first time, something had to have been horribly wrong with the recipe. Although I am not above believing my friend has kept her husband’s baking expertise hidden to keep us from stealing him away.
So, before you get too excited. This is NOT Drew’s crème brulee recipe. (I know…I know….sorry for getting you excited!) This is a crème brulee cheesecake bar. I saw this recipe on the Betty Crocker website today and had to try it. I mean, crème brulee CHEESECAKE…. How could I NOT make it? Besides, I have to harass Drew some more before he will (hopefully) share the recipe with me.
 
Creme Brulee Cheesecake Bar

Ingredients
1 pouch of Betty Crocker Sugar Cookie Mix
1 box (4 serving size) French vanilla instant pudding mix
2 Tbsp brown sugar, packed
½ cup butter, melted
3 tsp vanilla
2 eggs plus 3 egg yolks
2 x 8 oz pkgs of cream cheese
½ cup sour cream
½ cup granulated sugar
2/3 cup toffee bits, finely ground
Directions
Heat oven to 350°F. Line 13x9-inch pan with parchment paper. Spray with cooking spray.
In large bowl, stir cookie mix, pudding mix, brown sugar, melted butter, 1 tsp of the vanilla and 1 whole egg until soft dough forms. Press dough in bottom of pan.
(**NOTE ** I scooped out about 1/2 cup of dough because I felt the crust was too thick. It turned out just right, in my opinion, having done this.)
In small bowl, beat cream cheese, sour cream and sugar with electric mixer on medium speed until smooth. Add remaining whole egg, 3 egg yolks and remaining 2 tsp vanilla; beat until smooth. Spread over crust in pan.
Bake 30 to 35 minutes or until set in center. Immediately sprinkle top with crushed toffee bits. Cool 30 minutes. Refrigerate about 3 hours or until chilled. Cut into bars. Store covered in refrigerator.
.
It’s really, really tasty!. It didn’t really remind me a lot of crème brulee but there was a hint of it in there. The ground up toffee bits on top really were a nice touch. I was very excited to use them as this meant I got to fire up my Magic Bullet!

.
See, look how finely ground the toffee bits are. I love my Magic Bullet. (If you don't have a Magic Bullet then you can put the toffee into a pastic bag and roll it with a rolling pin to crush it.)
.
Plus, I was very, very, very excited because I got a new kitchen appliance to use. I have being dying to try it out. A new Kitchenaid mixer. I don’t know how I managed this long without one. (Technically I did have one given to me but then our mother gave it to Sue. It's okay though, I'm over it now, I have a shiny new one) 

Ooooooh…so pretty! I am going to need a bigger kitchen……


Monday, July 25, 2011

Hamburger Cupcakes and Sugar Cookie Fries


If you need a cute idea for a dessert to bring to your next BBQ or if you want to do something a little fancier for someone’s birthday – keep these adorable (and tasty) cupcakes in mind. They are fairly simple to assemble; they just require a little patience.
You can use a cake mix, brownie mix, sugar cookie mix, and canned icing to speed up the process or you can go all out and make everything from scratch. We went the “from scratch” route so spread the baking over 2 days. We made up the cookie dough and put it in the fridge and then baked the brownie on the first day so the next day all we had to do was bake the cookies and the cupcakes and then assemble them.

Sugar Cookie Dough
Ingredients
1 cup sugar
1/2 cup brown sugar
1/3 shortening
1/3 butter, softened
2 eggs
2 Tbsp + 1 tsp cream
3 1/4 cups flour
2 1/2 tsp baking powder
pinch salt
Directions
Prepare dough early in the day or the day before as it does need to chill for at least 3 hours before baking. In a large bowl, cream the sugars and shortening and butter. Add the eggs and cream.
In a medium bowl, mix the dry ingredients with a wire whisk. Add the dry ingredients to the wet ingredients. Mix with mixer until well combined. With hands, shape dough into a ball. Wrap with plastic wrap and refrigerator at least 3 hours, or overnight.
To bake: Preheat oven to 375. Line cookie sheet with parchment paper.
Roll 1/2 of dough at a time, keep the rest refrigerated. Roll 1/8 to 1/4 inch thick. Using a knife (or a pizza cutter works great too), cut dough into thin strips. Carefully place about ½ inch apart on cookie sheet. Bake 8 - 10 mins or until very lightly browned (watch them carefully – depending on how thin you roll them and how hot your oven cooks this time canvary greatly!). Let cool on cookie sheets for 2-3 mins then remove to wire racks to finish cooling. While still on cookie sheet – sprinkle generously with granulated sugar. (This makes the fries look salted.)
*Note – if you feel your fries look to fat/long then you can cut them skinnier/shorter when you first take them out of the oven. Just use a sharp knife and press firmly so the cookies don’t crack. You will lose a few cookies doing this but that’s okay! You can use these broken cookies as the fries that are loose in your burger trays.
 

Ultimate Fudgy Brownies
Ingredients
8, 1 oz squares of unsweetened chocolate
1 cup butter
5 eggs
3 cups white sugar
1 Tbsp vanilla
1 1/2 cups flour
1/4 tsp salt
2 1/2 cups chopped nuts, toasted
Directions
Preheat oven to 375. Line a 9 X 13 pan with parchment paper, allowing paper to hang over sides a little bit.
Melt chocolate and butter in a saucepan over low heat, set aside. With a mixer, beat eggs, sugar and vanilla at high speed for 10 minutes. Blend in chocolate, flour and salt until just mixed. Stir in the nuts. Pour into prepared pan.
Bake 35 - 40 minutes. (Don't over bake) Cool. Lift out the brownies by holding on to the parchment paper. Using a cookie cutter (or cutting around a cup) cut out your brownie circles.


Vanilla Cupcakes
Ingredients
2 Tbsp butter
1/2 cup milk
2 eggs
1 cup sugar
1 tsp vanilla
1 cup flour
1 tsp baking powder
pinch salt
 
Directions
Preheat oven to 350. Line 12 muffin tins with paper liners.
Heat the butter and milk. Beat eggs, sugar, and vanilla. Add flour, baking powder, and salt to eggs and sugar. Mix until blended. Add hot milk and butter, mix well.
Bake at 350 until toothpick inserted near centre comes out clean and tops are lightly browned, about 15 minutes.
Let cool in pan for 5 minutes before removing to wire rack to cool completely. Peel off paper liners.

Buttercream Icing
Ingredients
1/2 cup solid vegetable shortening
1/2 cup butter, softened
1 tsp vanilla
4 cups sifted icing sugar (approximately 1 lb.)
2 Tbsp milk
DIRECTIONS
In large bowl, cream shortening and butter with electric mixer. Add vanilla. Gradually add sugar, one cup at a time, beating well on medium speed. Scrape sides and bottom of bowl often. When all sugar has been mixed in, icing will appear dry. Add milk and beat at medium speed until light and fluffy. (You may have to add a bit more milk or icing sugar to get to desired consistency)
In 2 separate bowls, tint 1 scoop of icing red and 1 scoop of icing yellow.
 
 
YOU WILL ALSO NEED – about 1 cup of coconut tinted green with food dye. About 2 tablespoons of sesame seeds.
 Okay, now that you have the recipes all prepared – here are the instructions for how to assemble your burgers.


Cut a cupcake in half. On the cut side of the bottom half spread red icing (ketchup). Place a brownie “patty” onto the bottom half of the cupcake. Ice around outside edge of "patty" with yellow icing (mustard). Sprinkle generously with green coconut. Place top half of cupcake on top of the coconut. Using your finger, dab a little bit of water on top of cupcake and sprinkle with a few sesame seeds.


 Your hamburger cupcake is now complete! You can go HERE and print out totally awesome templates for the hamburger and fry holders or you can arrange them on a serving platter. Arrange your sugar cookie fries around the burgers. If desired, you can pipe some red icing onto the fries as a blob of ketchup.
 See...it is a little fiddly...but TOTALLY worth the effort. They look so cute. You can visit Bakerella's Blog HERE to get more detailed instructions and wonderful photos.
 
Be sure to visit Easy Life for some great links!!

Friday, July 22, 2011

Neapolitan Cupcakes


I wanted to make something a little out of the ordinary for a friend’s bake sale. Google surfing lead me to the Busty Baker's blog. Her photos of this appealing cupcake combination completely convinced me I had to try it. I tried to duplicate the fancy little icing swirls but, alas, I cannot pipe icing. I promise I will not stop trying though.... and that’s a big promise coming from me. I am the type of person who, if I am not immediately good at something, will give up.

Yes, she is a big baby that way...

 Thank you ,Sue, for your valuable input.
 
You are most welcome.

 At any rate, these are a really cool combination of flavours. Chocolate, vanilla, and strawberry! Remember Neapolitan ice cream? Of course you do. Remember how delicious it was? Of course you do. Remember how you used to try and beat your sister to serving it so you could steal all of the strawberry ice cream so she couldn’t get any? Of course....wait....maybe that was just me....
 
You were a big jerk sometimes.

 He he he.... Savour the small victories I always say.
Anyway, you probably want to try these pretty little things yourself. I definitely recommend trying it. Check out the Busty Baker’s blog for some incredible photos and to see how much cuter they look with the fancy frosting swirls. (*Sigh* )
 

NEAPOLITAN CUPCAKES

Vanilla Cupcakes
Ingredients
1 3/4 cups all-purpose flour
2 tsp baking powder
pinch salt
1/2 cup butter, softened
3/4 cup sugar
2 large eggs, room temperature
1 tsp vanilla
1/2 cup buttermilk
 Chocolate Cupcakes
Follow instructions for Vanilla Cupcakes above, but reduce flour to 1 1/4 cups, and add 1/2 cup unsweetened cocoa powder. Whisk into dry ingredients. I also used regular milk instead of buttermilk just to give a bit more of a variation.
*You will want to prepare both mixes at once so that one batter doesn’t have to sit too long while you prepare the other. *
 Directions
Preheat oven to 350. Prepare 2 standard 12-cup muffin pans with paper liners.
In a medium bowl, whisk together flour, baking powder, and salt; set aside. With an electric mixer, beat butter and sugar until light and fluffy. Add eggs one at a time, beating well after each addition; add vanilla, and mix until combined. On low speed, beat in half the flour mixture, followed by milk; end with remaining flour mixture. Mix just until incorporated (do not over mix).


Fill muffin cups with a large spoonful of each batter, side by side. Bake until a toothpick inserted in center of a cupcake comes out clean, 15 - 20 mins. Cool cupcakes in pan, 5 mins; transfer to a wire rack to cool completely.

Strawberry Buttercream
 
Ingredients
2 cups icing sugar
3/4 cup butter, softened
1/4 cup strawberry puree
1/2 tsp strawberry extract
8-12 fresh strawberries, hulled and sliced, for decoration
 Directions
In a bowl, using an electric mixer, beat butter until it is light and fluffy. Add strawberry puree, strawberry extract until well combined. Add sugar, a half cup at a time, and beat until frosting comes together and is light and fluffy, 5 to 7 miutes. Spread or pipe frosting over cooled cupcakes. Top each with a sliced strawberry. I didn’t have the strawberry extract and it still tastes deliciously strawberry-y


If you are going to be all fancy and pipe lovely swirls then this will only make enough to frost about 2/3 of the 2 dozen cupcakes. You will probably have to make a batch and a half to frost them all. I simply spread it on top and this was more than enough to do all 24.

Once I have learned how to pipe frosting into all those cute little swirls and shapes then I will be making these again! (Okay, I will be making them again before that) They taste soooo good!


Thursday, July 21, 2011

Baked Egg Rolls


Who doesn't love egg rolls?
They are usually deep fried, which only adds to the deliciousness. These are baked so it cuts the fat but still keeps the crispiness. Sue (who I think has chinese food flowing in her veins) is the genius behind this particular recipe. I did help with the wrapping and taste testing though.

Baked Egg Rolls

Ingredients
4 cups shredded, cooked pork
2 cups shredded cabbage
1 large carrot, shredded
1/2 medium onion, finely chopped
3 cloves garlic, minced
6 water chestnuts, finely chopped
3 Tbsp Hoisin Sauce
salt and pepper to taste
8 X 8 inch Egg Roll Wrappers

Directions
In a large fry pan, stir fry all ingredients (except wrappers) together. Scrape into bowl and let cool.


When filling is cool (or at least room temp), preheat oven to 400. Take a single egg roll wrapper and place it on the diagonal in front of you. Using water or egg, brush around outside of wrapper - this helps it to stick together better. Place 2 - 3 heaping tablespoons of filling on wrapper as per photo below.


Roll up from bottom corner, tucking in sides as you go. Place on parchment paper lined cookie tray. Spray tops with cooking spray. This is important - if you don't spray them they don't get that lovely golden brown color.


Bake at 400 for 15 minutes then gently flip over and bake another 5 minutes. Egg roll should be golden brown and feel crispy if you touch it.


I was surprised at how easy these were to do. It took us about 2 egg rolls each to get the rolling technique down. You have to be careful you don't put too much filling or the egg roll will split.
Don't get me wrong - they are still totally edible, they just won't look as pretty if they split.
If in doubt, use less. (Wow, it's not very often I say that!)
Egg rolls are another one of those foods that can be totally customized to your preferences. I definitely recommend using the water chestnuts though - they add a really nice crunch.

Be sure to stop by Carole's Chatter for tons of great links!

Wednesday, July 20, 2011

Strawberry Rhubarb and Strawberry Blueberry Jam

Strawberry Rhubarb on top, Strawberry Blueberry on the bottom

I like making jam (I also enjoying eating it – surprised?). The process isn’t that hard but it does take planning and preparedness. Making jam makes me feel like some king of evil super genius scientist working in a laboratory. You know, all that stirring and staring at bubbling pots of things with little glass jars lined up on the counter.
Sue and I are a great canning team! Working together the process goes very smoothly and quickly. She stirs, I pour, she fills, I grab lids. If you are working solo it is not too bad either, it’s just that it is a lot more fun when there is someone helping.
We decided to do strawberry jam this week because I am on a bit of a strawberry kick of late. They were also on sale at the grocery store so it worked out well! By changing the recipe a smidge we got two completely different jams that both have really nice color and flavour.
.
Strawberry Rhubarb Jam
Ingredients
2 cups crushed strawberries
2 cups chopped rhubarb
1 box Certo pectin crystals
5 1/2 cups granulated sugar
Directions
Measure all ingredients out ahead of time as you won't have time once you get started.
In a large saucepan, stir together strawberries and rhubarb, and Certo pectin crystals. Bring to a boil over high heat, stirring constantly. Add all the sugar. Return to a hard boil for 1 minute.
(While you wait you can tent your fingers together and raise one eyebrow while – with your best maniacal laugh – say, “Bwah ha ha! Yes, yes, everything is coming together nicely. My plan will soon be complete.”)
Remove from heat. Stir and skim for 5 minutes. Pour into hot, sterilized jars to 1/4 inch from rim. Cover with warm lids and screw rings on tightly.


Strawberry Blueberry Jam

Ingredients
4 cups crushed strawberries
1 cup lightly crushed blueberries
1 box Certo pectin crystals
6 cups granulated sugar

Directions
Exactly as listed above for the Strawberry Rhubarb Jam.

I am a beginner when it comes to canning but I am learning. There is a fancy schmancy fruit cocktail recipe I am dying to try (just need to convince Sue to help me). I hope to work my way up to pressure canning and do meats of some kind (Sue has already told me she won't be helping me with the pressure canning - she has issues with canned meat). There are so many really cool recipes out there. Feel free to share your favourites !!

Tuesday, July 19, 2011

Chocolate Chip Cookie Dough Truffles


If you are one of those people that don’t like to sample the cookie dough whilst making cookies then you probably will not enjoy this recipe as much as you should. Sue is one of those people. She’s all about the savory!
*Sigh*
I really don’t understand how we can be twins with sooooo little in common.
In any case, these are a little fussy to make but look so pretty and taste so yummy that they are worth the effort.
Two more plusses to this recipe – (1) it is no bake so a good choice when you don’t want to turn your oven on and (2) it does not contain eggs so you don’t have to worry about the whole “raw egg” thing like you do when eating actual cookie dough.
F.Y.I. – they ship very well. My boyfriend lives across the country and these are his favourites. I have shipped them several times and they always arrive in good shape.


Chocolate Chip Cookie Dough Truffles

Ingredients
1/2 cup butter, softened
3/4 cup brown sugar
2 cups flour
1 can (14oz) Sweetened Condensed Milk
1 tsp vanilla
1/2 cup mini choc chips OR mini M&M baking pieces
1/2 cup chopped nuts (Walnuts or Pecans)
8 oz chocolate

Directions
In bowl, cream the butter and brown sugar until light and fluffy. Add flour, condensed milk and vanilla. Mix well. Stir in the chocolate chips and nuts.
Shape into 1-in balls, place loosely on waxed paper or plastic wrap lined baking sheets. Loosely cover and refrigerate until firm. (about 1 - 2 hrs)
Melt chocolate over low heat (or place in microwave safe cup and microwave in 20 second intervals, stirring between each interval, until smooth). Dip balls in chocolate or drizzle balls with chocolate. Place in refrigerator again until chocolate is firm.
.
One of the cool things about this recipe is that you can shape the dough into different forms before dipping. I made them at Easter and shaped them into eggs and decorated them with different sprinkles, on Valentine’s Day I shaped them into hearts and used red melting wafers, and for St. Patrick’s Day I used a shamrock cookie cutter as a form and dipped them into green melting wafers. I’m thinking about stars or ornament shapes for Christmas.....

Update: Just wanted to add another photo - truffles with milk chocolate and white chocolate. Just another way to decorate them :)

Monday, July 18, 2011

S'more Pops


Sue and I found these monster sized marshmallows a little while ago and have been wondering what to make with them. They were too cool to just melt down for Rice Krispie Squares or some other such treat. We wanted to show how huge they were!!
S'more recipes are big right now. If you look on the internet for S'more recipes there is a bazillion. S'more cookies, S'more bars, S'more cake, S'more pie, S'more cupcakes.....I think you see where I am going with this.
We came up with this S'more “recipe”. (I put "recipe" in quotations because I don't know if this actually qualifies as a recipe or just assembling 3 ingredients.... you decide!) This is a nice treat for the kids (or for you) that you can make in 2 seconds. Okay, maybe not actually 2 seconds but you see the point I’m trying to make. It’s fast. You can let the kids help out too!
 
.
S’more Pops
Ingredients
Marshmallows
Melting wafers or chocolate chips
Graham cracker crumbs
.
Directions
Place marshmallow onto craft stick (Lollipop stick), pushing stick halfway into marshmallow to ensure it won’t fall off.
Place chocolate in a microwave safe coffee cup, melt at 20 second intervals – stirring after each 20 seconds, until smooth. Be careful not to overheat.
Pour graham cracker crumbs into a shallow dish or onto a plate with sloping sides.
Holding the skewered marshmallow by the stick, dip halfway into melted chocolate. Carefully shake off excess chocolate back into cup. Roll dipped marshmallow in the graham crumbs.
Let sit for a few minutes to firm up (or pop into fridge for a minute). Enjoy!
.
.
You can make this much more decadent by using homemade marshmallows and dark chocolate but, it is still a delicious treat this way!
Quick and easy and tasty....3 things we love in a treat, especially for the kids.

Sunday, July 17, 2011

Our Trip To Disneyland

 This is me (Sue) and my gang heading out on our big adventure. My husband, Rob, and I decided to surprise our daughter, Kenzie, and 2/3 of our nephews, Nick and Jord, with a trip to Disneyland. Not surprisingly we ate our way throughout Disneyland and Knott's Berry Farm. Here is some of the photos we took along the way.

.
 $3.25 for this rice krispie square with candy. So not worth it. One of the very few disappointments.

.
 Clam chowder bread bowl from New Orleans Square. Everyone (except me - I don't like clams) loved it.
.
 Chocolate cake with mousse filling. It was okay but not our favorite by any means. Also from New Orleans Square. 
.
 Another New Orleans Square dish. Mickey Mouse Beignets. Sooooo worth it! These were worth every penny of the million dollars we spent on them. 
.
 I cannot say enough about the Smoked Turkey leg from the carts found throughout Disneyland Park. I am not one to buy meat from a cart vendor (Jo says I have issues), but this was my favorite thing to eat in Disneyland. 
.
 See...we ate it all......I'm thinking of going back just for another turkey leg!
.
 From T.G.I.F.'s across from Knott's Berry Farm. Jord's meal of mashed potatos, steak & shrimp. Another hit!
.
 Nick's T.G.I.F meal. Beef wrap with french fries. Delicious!! (With all the choices in all the restaurants, Nick always seemed to choose wraps!)
.
 
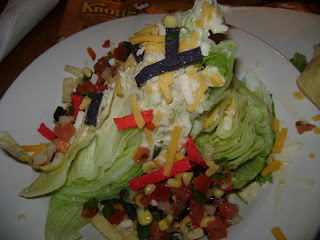
 My T.G.I.F. Southwest Wedge Salad. For how simple it was, it was amazingly good. The zippy dressing was just spicy enough for me!
.
 The OC Dog from Pink's in Knott's Berry Farm. A stretch hot dog, guacamole, American and Swiss cheese, fajita mix, jalepeno slices, topped with tortilla chips. Whew! Quite a mouthful. Jord's pick - a huge success.
.
 Kenzie with her dad's bucket of Mrs. Knott's Famous Fried Chicken. Good stuff!!
.
 Another Pink's hot dog. The Scottie Dog - stretch dog, yummy BBQ sauce, topped with onion rings. I don't normally like hot dogs but would seriously consider murder to get another one of these.
.
 Rob's pick from Pink's. Polish Pastrami - Polish sausage, pastrami, and Swiss cheese. Rob gave it 2 thumbs up.
.
 
 The giant pickle! The kids, Jordan especially, couldn't get enough of these bad boys. I found, oddly enough, that these helped to quench your thirst in the hot California sun. Funny story - you may notice the toothbrushes in the photo. Yes, they are children's toothbrushes and, even though the kids are teenagers, they fought over who was going to use the Wolverine toothbrush vs. the Hulk toothbrush.
.
 BBQ wings from Molly's, down the street from our hotel. This was the first meal we ate in California and it certainly set the bar pretty high for future meals. 
.
 Loaded Nachos. Excellent guacamole. Also from Molly's.
.

 Best banana split EVER. A perfect way to end our first meal. 
.
 Kenzie's spicy jambalaya pasta from The Rainforest Cafe in Downtown Disney. The Rainforest Cafe has a fantastic ambience and so many wonderful food choices. One of our favorite restaurants there. 
.
 My lettuce wraps. I loved the pickled salad that came with it. Really two people could have shared this. (I didn't share though..it was mine...all mine...)
.
 Kenzie's burger - loaded with bacon, onion rings, cheese, and pickles. We do love our pickles!!
.
Nick and Jord sharing the 1,000th giant pickle of the trip.

I have been to Disneyland several times and this was one of the best trips. We had so much fun bringing the boys with us. I definitely will remember this trip for the rest of my life - and not just for the incredible food. Although....I am not about to forget the food either. (Smoked Turkey Leg - Siiiiiiiigh)