Showing posts with label blackberry. Show all posts

Saturday, May 23, 2020

Sunshine Cake (12 Egg Yolk Cake)


I decided to give this cake a try because I had 12 egg yolks left over after making an angel food cake for our nephew's birthday. (Our Angel Food Cake recipe can be found HERE). 
From now on, whenever I make an angel food cake I will be making this cake as well. 


Never again will I have trouble using up 12 egg yolks!
You can use a 10 inch (12 cup) bundt pan or an angel food cake pan, either will work. This cake is kind of like a chiffon cake but not exactly. You have to make it to see what I mean. The texture is different as there is no fat in the cake other than the egg yolks. I'm calling it a sunshine cake because of the color it gets from the yolks! Very bright and cheery (more so if you use farm fresh eggs!) 


Sunshine Cake

Ingredients
3 cups flour
2 1/2 tsp baking powder
1/2 tsp salt
12 egg yolks
2 cups sugar
1 tsp vanilla
1 tsp lemon extract (or coconut)
1 cup cold water

Glaze
1 1/2 cup icing sugar
3 Tbsp milk
1 tsp lemon extract (or coconut)

Decoration (if desired)
black berries
lemon slices

Directions
Preheat oven to 350. Spray a 12 cup bundt pan (or angel food pan) with cooking spray and line the bottom with parchment paper, set aside.


 Sift together flour, baking powder, and salt. 
In a separate bowl, beat egg yolks until thick and fluffy, about 5 minutes. Gradually beat in sugar. beat for 2 minutes on high, stopping to scrape the bowl. Reduce to low speed and add in extracts and cold water. 
Gradually, but quickly, add sifted flour mixture. Beat only long enough to blend, about 1 - 2 minutes. Pour into prepared pan. 


Bake 50 - 60 minutes at 350, until golden brown or when a pick inserted near the center comes out clean. Remove from oven and cool at least 15 minutes on wire rack.


Run a knife around the edge of the pan (and the center) to loosen the cake. Invert onto wire rack and then invert again to another wire rack. Let cool completely. 


Whisk together the icing sugar, milk, and extract to make the glaze. It should be the consistency of glue (pour-able but not thin), add more milk if necessary. 
Pour the glaze evenly over the cake and let it drip down the sides. 


If you are using fruit to decorate the cake then do it before the glaze dries. They will stick when the glaze is wet. 


Of course, you can always go with coconut extracts and sprinkle it with toasted coconut too. 
Your options are pretty varied. 
I love the look of the berries and lemons. 


If you have 12 egg yolks to use up then I recommend you give this cake a try. It's pretty impressive looking. And very springy/summery. 
Decorate it with your favorite berries. 


You can definitely change up the flavors a bit with what extracts you use. Coconut, lemon, lime, strawberry.... you see where I am going here. The base flavor is very vanilla so a little extra flavor is a good idea. This is also a fairly large cake so perfect to bring to a gathering (or freeze the extras for later!) 

Thursday, August 1, 2019

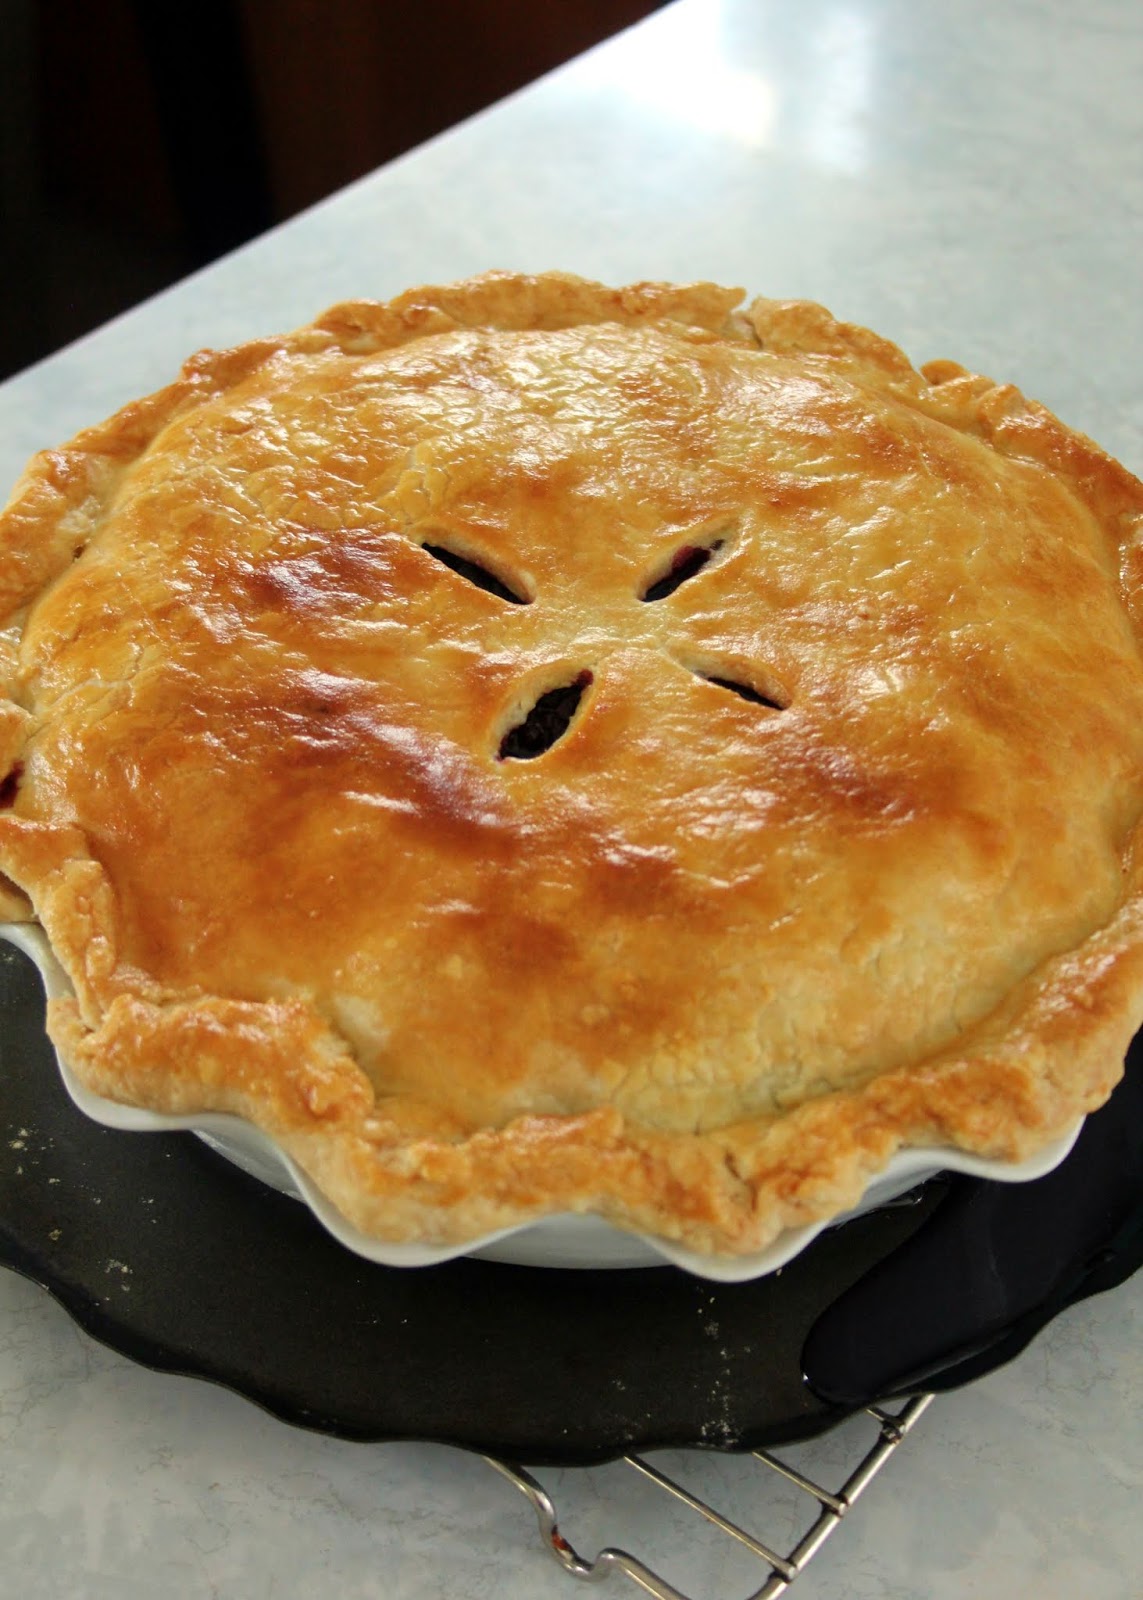
Blackberry Pie


I've never made a blackberry pie. I've made a Blackberry Meringue Pie (Link HERE) which was amazingly different and delicious, but not a good, old fashioned, blackberry pie. 
My niece, Sue's daughter, Kenzie brought up a whooooole bunch of blackberries so I knew this was my opportunity to make one. Also... I have a lot of blackberries.... anyone have any fabulous blackberry recipes they'd be willing to share? :)
This pie, like most pies, is a bit time consuming because you have to make a crust and a filling and then bake it. You can use a store bought crust if you want to cheat a little. I use our Never Fail Pie Crust (link HERE) because it's super-de-duper flaky and *jazz hands*. In the end, this pie is totally worth any time it's going to take you. Seriously. So good. 


Old Fashioned Blackberry Pie

Ingredients
Crust for double pie crust (Our Recipe HERE) 

Filling
6 cups blackberries
1/2 cup sugar
1/4 cup cornstarch
zest of one lemon
1 tsp vanilla

For Brushing on Crust
1 egg
1 Tbsp milk (or cream)

Directions
Preheat oven to 400.
Prepare crust as per instructions. You need enough crust for a double 9 inch pie. Roll out the bottom crust and place in pie pan. Set aside.
In a large mixing bowl, gently stir together the blackberries, sugar, cornstarch, lemon zest, and vanilla until well combined. Spoon into bottom crust. 


Roll out the other crust and place on top. Pinch around the edges to seal, cutting off any extra dough.
In a small bowl, whisk together the egg and milk. Using a pastry or basting brush, brush the egg mixture over the top crust. Cut a few slits in the top to allow steam to escape. 
NOTE - place on a cookie sheet or pizza pan as pie will boil over a little and you don't want that in your oven! 


Place in preheated 400 degree oven. Bake at 400 for 10 minutes. Turn heat down to 350 and continue to bake until pie is golden and filling is bubbly - about 40 - 50 minutes. 


Let cool on a wire rack to room temperature. 


If you try and slice it while warm it will ooze out. It will still taste fabulous but will not stay together very well. Let it cool and then chill it for a few hours for best results. In the photos here I cut it at room temp, without chilling it. It stayed together but still was a bit oozy. 


Of course, vanilla ice cream is a must...


Close up? Let's do it.


*cue angels singing*
Berry-licious. 


I think pies always look so pretty. Something about that flaky, golden crust just seems so artsy. 
Art you can eat.... I'm on board that train. 

Tuesday, January 2, 2018

Angel Food Dream Cups


For Christmas dinner I was trying to make a fruit pavlova and it just did not turn out. My pavlova cracked and fell apart and left me in a bit of a panic. I went through my cupboards to see what ingredients I had to save dessert. 
And that is the story of how this dessert came about. 
Turns out failing doesn't always mean failing. 
This is a light and fluffy dessert that is perfect for after a heavy meal. 


Angel Food Dream Cups

Ingredients
1 angel food cake
1 pkg strawberry Jello powder
1 cup boiling water
1 pkg (8 oz) cream cheese, room temp
2 cups whipping cream

Topping
fruit

Directions
Cut angel food cake into pieces and evenly distribute among 12 glasses (I used regular size disposable plastic cups). Press down firmly and set aside.
In a mixing bowl, beat the Jello powder and boiling water until Jello dissolves. Beat in the cream cheese. 
In a separate bowl, whip the cream until stiff peaks form. Fold the whipped cream into the Jello mixture. Spoon the mixture evenly into the 12 cups, on top of the angel food cake pieces. 
Top with a few pieces of fruit. Cover and chill until ready to serve, at least 2 hours up to overnight. (They will keep in the fridge for a couple of days)


I used strawberry Jello but you could easily switch it for your favorite flavor! Don't have fruit to top it with? Add a squish of whipped topping to fancy it up. 
My almost dessert disaster turned out pretty darned good. I'm going to be making this again with different flavors of Jello to see which is my favorite!

Sunday, September 17, 2017

Cantaloupe Fruit Salad


Our local U-pick farm had the most amazing melons this year. (Thank you Old Airport Gardens) We must have gone a hundred times to pick up more. Cantaloupe, honeydew, and watermelon (yellow, orange, and red). 
The cantaloupe though. 
Oh my. So juicy and sweet. I totally became a cantaloupe addict this summer. 
I decided to make the cantaloupe the centerpiece of this lovely fruit salad to celebrate its deliciousness. This is still a super easy fruit salad recipe to whip up, it just looks a little fancier served on a serving plate. Don't want to get all fancy? It's okay... you can just put all the ingredients in a bowl instead. 


Cantaloupe Fruit Salad
(Slightly adapted from Alive Magazine, Issue 418, Aug 2017)

Ingredients
Orange syrup
1 Tbsp honey
juice of 1/2 an orange (about 1/4 cup)

Salad
1 cantaloupe
1/4 cup pineapple chunks
1 cup blackberries
1 banana, sliced
2 strawberries, sliced
pinch salt

Topping
1/4 cup vanilla flavored, 0 fat Greek yogurt 
2 Tbsp pumpkin seeds

Directions
In a small saucepan over medium heat, bring honey and orange juice to a boil for 2 minutes. Remove from heat and let cool to room temp (can be placed in freezer to speed process while you continue making salad). 


Slice cantaloupe in half and scoop out the seeds. 


Cut into thin slices and remove the rind from each slice. Place equally on 2 serving serving plates.
Spoon the orange syrup equally over the melon on both plates. 


Top each of the plates with 1/2 of the pineapple chunks, blackberries, and banana. Place the sliced strawberry at the front of the salad for decoration (or you can also place the slices over the melon). 
Drizzle each salad with yogurt and then sprinkle with pumpkin seeds.


Serve immediately. 


So pretty. And tasty. And a fruit salad that is a little different than the usual. The orange and honey syrup adds a lot of flavor to the dish so don't leave it out. If you don't have vanilla yogurt you can use plain yogurt - simply add a 1/4 tsp of vanilla to the yogurt before drizzling. 


Be sure to visit Carole's Chatter for more fun foody links!

Sunday, April 9, 2017

Peanut Butter Smoothie Bowl


Hard to believe but this is Jo and Sue's 1,000th post.
That's pretty impressive, right?
I can tell you, it's blown our minds. When we started our blog in June of 2011 Sue and I wanted to share our love of cooking and baking with family and friends and (we hoped) some of the world. 
Our blog has grown beyond our dreams and we couldn't be happier (20 million views, WHAT!?!). We have improved our photography skills and learned some computer tricks along the way but still have so much more to learn and so many more recipes to try and share. 
We want to thank all of you who continue to support us along the way! You can follow us on Pinterest (HERE), or on Twitter (HERE), or on Facebook (HERE), or Instagram (HERE). Or, you can follow the blog itself by clicking the "follow" button on the side of the blog! 
If there is anything you would like to see on our blog PLEASE comment and let us know. I just want to say - we are working on a "PRINT" button - alas, it's not available on the format we are currently using. BUT we are still trying to work it out!. 
For our 1,000th post I decided to take one of my favorite all time breakfasts and sophisticate it up a bit. 


Some Greek yogurt, banana, peanut butter, chia seeds and *voila* a breakfast or snack that is easy enough for every day yet fancy enough for company. 
According to MyFitnessPal this recipe (recipe is one serving) - 400 calories, 53 carbs, 14 fat, 23 protein, 13 fiber. And, trust me, it's a very, very filling serving. 


Peanut Butter Smoothie Bowl

Ingredients
Smoothie
1/2 cup 0 fat Greek yogurt, plain (or vanilla)
1 banana
1 tsp chia seeds
1 Tbsp light, smooth peanut butter
1/2 cup no sugar almond milk, plain

Toppings
1 tsp chia seeds
6 - 8 blackberries
2 Tbsp prepared granola (I used Roger's Cranberry Almond Granola)
1/2 Tbsp peanut butter, melted

Directions
In a Ziplock bag, place Greek yogurt, banana, and chia seeds. Freeze until sold - you can make up and keep in freezer for several weeks.
When ready to make smoothie bowl - place frozen Greek yogurt, banana, peanut butter, and chia seeds into a blender. 


Add in the almond milk. Blend until smooth. You want the mixture to be quite thick and not very runny. Do not add too much liquid - simply keep stopping the blender and scraping the sides. 
When smooth, pour into a bowl with a 1 1/2 to 2 cup capacity. 
Top with the chia seeds, blackberries, granola, and drizzle with melted peanut butter. (I simply place peanut butter in a small bowl and microwave for about 15 - 20 seconds.)


Serve immediately.
Note - you can, of course, add more peanut butter (or the other ingredients) to this smoothie bowl it will just change the nutritional counts! 


Once the yogurt/banana/chia seeds are frozen, this recipe only takes 5 minutes to whip up. Gotta love quick and easy.... and delicious..... and pretty..... did we mention sophisticated? 'Cuz it's that too. 
Anyway, here's to the first 1,000 posts and on to the next 1,000. We hope you will join us.

Monday, August 1, 2016

Charcuterie Boards


Normally every year for my daughter's birthday, Jo and I decorate a really fun cake for her. This year was super crazy because our nephew got married the same weekend of Kenzie's birthday. So instead of a cake Kenzie okay'ed our idea of waiting a few weeks after the wedding and doing a charcuterie board type party. 
We went a little nuts.
It's really, really fun to create charcuterie boards. They're just sooooo pretty.
In case you are unfamiliar - charcuterie boards are made of different meats, cheeses, nuts, and fruit. 
Along with the meat and cheese we also put out some pickles, etc...


Spicy pickled beans....


Olives...


And... of course... a couple of pitchers of sangria. Red and white... just to cover all the bases.


We also went with a spinach dip. Because... well... it's spinach dip. It's delicious. Why wouldn't you have spinach dip? Get our recipe HERE !


We served it with pretzel chips, whole grain baguette slices, and cranberry baguette slices. 


We added a bowl of fruit for some color. Also... cheese and meat pair wonderfully with fruit. 


When serving meat and cheese you want to make sure you have plenty of crackers and crusty type artisan breads on hand. Our locally bakery in Lillooet (Abundance Bakery) had some lovely rye, whole wheat, and whole grain choices. 


One of the fun things about creating charcuterie boards is getting to use all of the wooden platters/cutting boards you have. Something about that wood grain makes the meat and cheese look fancier.
I had this cool shot glass board in my cupboard that was just begging to be filled with treats.


We used dried strawberries, salted peanuts, fresh strawberries, granola chocolate clusters, spicy cashews, and fresh blueberries. 


The brie got its own platter because we had to heat it first and it got all melty. 
We topped it with a cranberry and balsamic reduction. Jo was skeptical but ended up loving the flavor and texture combo.
Now.. on to the charcuterie boards...


This was our tiniest board. It would have been perfect for an intimate snack for two. 


All those textures and colors are a feast for the eyes, am I right?


Sue did a BBQ sausage board with a little extra BBQ sauce for dipping. 


Grapes, figs, pickles, cheese, and crackers round out the collection.


You can use any number of meats and cheeses to make up a board. We left some of the cheese wedges whole to change the look of some of the boards. The Beemster Dutch cheese was very pungent and breaking off a little sample was the best way to try it. 


I added some of my homemade Rhubarb Relish (Recipe HERE)  as an accouterment to this board.  


Don't be afraid to mix colors, flavors, textures to create your pallet.


Our biggest board was quite large so we left some of our meat un-sliced to take up a bit of space. Plus... it also looks cool. Just sayin'


Even the close ups are purdy.

Here is a list of some of the things we used on the above boards:
Meats:
salami
keilbasa
prosciutto
turkey sausage

Cheese:
Swiss
Dutch (Beemster)
Jarlsberg
cheddar - smoked, aged, and garlic & herb
bocconcini
Boursin garlic and fine herb
Laughing Cow

Nuts:
cashews - salted, plain, and spicy
peanuts
Brazil nuts
almonds
honeyed walnuts

Fruit:
figs
grapes - green, purple
blueberries
blackberries
apricots
apples
strawberries

Misc:
Granola dark chocolate clusters
Rhubarb relish
BBQ sauce
pickles
olives
pickled green beans


Have fun using your favorite meats and cheeses to create your charcuterie board. You can make it as expensive or as cheap as you like. 
We went all out for Kenzie and she loved it. 
Jo and I had a lot of fun coming up with different boards. Once you get started it's hard to stop. It feels like you are creating these edible works of art. Definitely an impressive way to serve meats and cheeses for your next get together.