Friday, May 29, 2020

Hawaiian Pizza


Where do you stand on the whole pineapple-on-pizza thing? 
If you're a "no pineapple" person.... you should probably just carry on.... things are about to get pineappley. 
I'm guessing by this point in your life you have had a Hawaiian pizza. I hope. It's amazing. Sue disagrees... but I still love her. 
Anyway, we wanted to share a super easy recipe for our version of Hawaiian pizza so you can make it at home. You'll never order take out again! (okay, who are we kidding, take out is amazing too, but maybe you'll also make it at home because it's delicious and fun.)


Hawaiian Pizza (A la Jo and Sue)

Ingredients
Crust
3/4 cup hot tap water
1 1/2 tsp active dry yeast
2 tsp sugar
1 Tbsp oil
1/2 tsp salt
1 tsp dried parsley
1 - 3 cups flour

Toppings
1/2 to 1 cup pizza sauce (tomato sauce)
1 1/2 cups cheddar cheese, shredded
1 1/2 cups mozza cheese, shredded
1 cup deli ham, sliced
1 can pineapple chunks (or crushed), drained well
1/2 green pepper, diced
1/2 cup onion, diced

Directions
Prepare crust - In a mixing bowl, combine hot water, yeast, and sugar. Set aside and let bloom for 5 minutes. 
After yeast has bloomed, add in oil and salt and parsley and stir. Slowly add in flour until a stiff but soft dough forms. Knead for 1 - 2 minutes, until dough is no longer sticky - you may need to add a spoonful or two of flour. 
Place in an oiled bowl, cover with a tea towel, and set somewhere warm to rise for an hour. 


After dough has risen, press out into a pizza pan, or, if you don't have a pizza pan, onto a cookie sheet. I line my pans with parchment but this is optional. If you have a pizza stone you can go ahead and use it. 


Have your toppings ready to go. Preheat oven to 425. 


Cook the crust for about 5 - 7 minutes. Just enough that it starts to puff up a bit, no longer. 
Remove from heat and spread on the pizza sauce, then half of the cheese, then the ham, pineapple, pepper, and onion. 
FYI - keep in mind you can use more or less of the ingredients as you prefer! 


Top with remaining cheese. 


Place back in 425 oven and cook until cheese is all melty and crust is brown on the bottom. 


Let sit for a couple of minutes before slicing. 


Best Hawaiian pizza ever. Some people would argue that green pepper doesn't belong on a Hawaiian but I'm going to respectfully disagree. You don't want a lot on there but you still need a little bit. 


If you want to make this up ahead of time and freeze it for later you can! Just follow the instructions up to where you parbake the crust. When you take it out of the oven let it cool completely before placing the toppings on it. Then cover it in plastic wrap and a layer of tinfoil (or double plastic wrap) and freeze it. 
When you want to cook it, preheat the oven to 425 and pop it in frozen for about 15 or so minutes - until cheese is melty and crust is brown! Easy peasy and way tastier than store bought frozen pizzas! 

Sunday, May 24, 2020

Keto Sex In A Pan


I'm always on the look out for keto recipes that don't give off keto vibes, if you know what I mean. A lot of time low carb/gluten free recipes just aren't spectacular. For me it's generally a texture thing. 
Anyway, our Keto Nanaimo Bars (Recipe HERE) have pretty much been the peak of gluten free desserts for me to this point and I really wanted to try and convert our "normal" Sex In A Pan (Recipe HERE) dessert to keto because it's the peak of "normal" desserts when I'm not doing keto. 
Long story short.... this recipe is a hit. 
You'd never know it was keto/gluten free. It's a bit fussy to make because there are 4 layers but it's totally worth it. The portions are big (always a plus) and the net carbs are impressive - only 3.7 net carbs per serving, recipe makes 12 servings! (303 calories, 28.3 fat, 6.3 carbs, 2.6 fiber, 5 protein - keep in mind it is always best to enter your own brands/weights into a nutritional calculator to be exact.) 
Do you have a favorite keto/gluten free recipe that you love? Share with us in the comments below!


Keto Sex In A Pan

Ingredients
Crust
1 1/4 cup almond flour
1/3 cup unsweetened baking cocoa powder
1/4 cup powdered Swerve
pinch salt
1/4 cup butter, melted
1 Tbsp water

Cheesecake Layer
8 oz cream cheese, room temp
1/4 cup whipping cream
1/4 cup powdered Swerve
1/2 tsp vanilla

Pudding Layer
1 cup whipping cream
1 cup unsweetened almond milk
1/2 cup powdered Swerve
4 egg yolks
1/2 tsp xanthan gum 
1/3 cup unsweetened baking cocoa powder
3 Tbsp butter, cut up
1/2 tsp vanilla

Whip Cream Layer
1 1/2 cups whipping cream
2 Tbsp powdered Swerve
1/2 tsp vanilla

Chocolate Sprinkles
1 oz (approx 2 Tbsp) sugar free chocolate (I use Lily's chocolate chips)

Directions
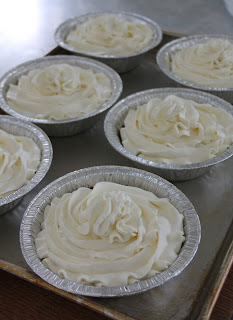
Prepare crust - Preheat oven to 325. Lightly spray the bottom of a 10 inch pan with cooking spray (OR, I used 6 X 5 inch individual mini pie pans) 
Mix almond flour, cocoa powder, Swerve, and salt together in a bowl. Stir in the melted butter and water until well combined. Spread evenly into prepared pan(s) and press down firmly. 


Bake at 325 for about 10 - 15 minutes. 10 minutes in the individual pans or 15 in one large pan. 
FYI - If you are using smaller pans it helps to place them on a cookie sheet for easier transportation. 
After the crusts have baked, remove them from the oven and place them into the fridge or freezer while you prepare the next layer. 
Prepare cheesecake layer - In a mixing bowl, beat the cream cheese until it is lump free, scraping sides as needed. In another bowl, beat the whipping cream, Swerve, and vanilla until stiff peaks form.
Slowly beat the whipping cream mixture into the cream cheese, until smooth. 
Spread evenly over the crust layer. 


Place in fridge or freezer while you prepare the pudding layer. 
Prepare pudding layer - In a saucepan bring whipping cream, almond milk, and Swerve to a simmer over medium heat. 
Whisk the egg yolks in a bowl and slowly whisk in the cream/milk to temper the eggs. Return everything to the saucepan and place back over medium-low heat. Sprinkle with the xanthan gum and whisk in. Whisk in the cocoa powder. Stir fairly vigorously over the medium-low heat until thickened. 
Once thickened, remove from heat and whisk in butter and vanilla. Stir until smooth. Set aside and let cool. (You can set in the freezer and stir every 15 minutes to speed the process.)
Once it reaches room temperature, spread evenly over the cheesecake layer. 


Chill until cool and set, about 2 hours. 
Prepare whip cream layer - Beat together whip cream, Swerve, and vanilla until stiff peaks form. Divide and spread evenly over the pudding layer.


Prepare chocolate sprinkle - Pulse 1 oz (approx 2 Tbsp) of chocolate in a blender or food processor until fine. Sprinkle evenly over the whipped cream layer. 


Chill until ready to serve. Can be made a day ahead of time. 


FYI - You want to keep it covered. 


The recipe makes 12 servings. Generous servings, if I do say so! 
This keto Sex In A Pan is rich, creamy, low carb, gluten free, and super de duper delicious. 


The crust has a hint of almond flour taste but I find by the third bite I'm tasting more chocolate and it's all good. Texture is pretty much spot on to our original Sex in a Pan, maybe a bit creamier, but I'm not complaining about that!. 
FYI - This will last a few days, covered, in the fridge. 
Feel like you are missing out by following keto or gluten free? You won't with this decadent dessert. It's got all the bells and whistles! 

Mom's Macaroni Salad (AKA: Best Macaroni Salad Ever)


I know you saw the title of this recipe and came here to see what makes it the best macaroni salad ever. 
You're skeptical, I get it. 
Thing is.... it's ridiculously simple and delicious and has absolutely nothing but the basics in it but it's magic and will have you hooked in 1 bite. Maybe 2 bites...
There are no measurements, you've got to make it like mom does... with your heart. 
Ha. Sappy. But accurate. 
Eyeball it. You got this. 


Mom's Macaroni Salad

Ingredients
elbow macaroni
green peas
radishes
pickles
green pepper
onion
aged cheddar cheese
mayo or miracle whip
salt & pepper 

Directions
Boil macaroni as per package directions until soft. (Mom likes hers a little more well done than al dente so do it up right!) At the end of cooking, throw in a handful of frozen green peas and let cook for a minute. Drain and let cool to room temp. 
Cut up a few radishes into slices. About 2 - 4, just enough to add some color to the pasta.
Cut up one or 2 pickles into tiny cubes. 
Cut up about 1/4 of a green pepper into tiny cubes.
Finely dice about 1/4 of an onion.
Cube up aged cheddar cheese into tiny cubes. (Do NOT shred it, that is not mom's way. Cube it.)


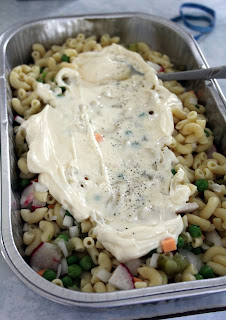
Give it a good stir. Can you see little bits of all the different color ingredients?
If yes, you're good to go. If no, add a bit more of whatever ingredient isn't showing up enough. When you think it looks good, stir in the mayo.


Make it good and creamy. Stir it well then let it sit for 5 minutes so the pasta can soak up some of the mayo. Creamy enough? Ok. Still seem dry? Add in more mayo a spoonful at a time. 


Chill until ready to eat. Definitely give it at least an hour or two in the fridge. Just before serving, season with salt and pepper!
Word of advice - if you want to make this ahead of time: mix in the ingredients but DO NOT mix in the mayo. Cover and chill until ready to serve. Mix in mayo about half an hour before serving and place back in fridge until ready to use.


One of the best things about this salad is you can make a little bit or a huge amount. 
For those of you insisting on measurements. *Sigh* I get it. I'll do my best to guesstimate here, but you really do have to go by how it looks. 
For about 4 cups cooked macaroni I'd say 1/3 cup peas, 3 radishes, 2 baby pickles, 1/4 of a green pepper, 1/3 cup onion, 1/2 cup cheese, and 1 cup mayo. Totally guesstimating here guys.... use your mom-senses to make sure it feels right. 
You should be able to see all the ingredients every time you give it a stir. And if you're unsure about the mayo, start low and add slow. You can't take it out after if you've added too much. 
Let us know if you give it a try! We're pretty sure you'll fall in love with it! 

Saturday, May 23, 2020

Sunshine Cake (12 Egg Yolk Cake)


I decided to give this cake a try because I had 12 egg yolks left over after making an angel food cake for our nephew's birthday. (Our Angel Food Cake recipe can be found HERE). 
From now on, whenever I make an angel food cake I will be making this cake as well. 


Never again will I have trouble using up 12 egg yolks!
You can use a 10 inch (12 cup) bundt pan or an angel food cake pan, either will work. This cake is kind of like a chiffon cake but not exactly. You have to make it to see what I mean. The texture is different as there is no fat in the cake other than the egg yolks. I'm calling it a sunshine cake because of the color it gets from the yolks! Very bright and cheery (more so if you use farm fresh eggs!) 


Sunshine Cake

Ingredients
3 cups flour
2 1/2 tsp baking powder
1/2 tsp salt
12 egg yolks
2 cups sugar
1 tsp vanilla
1 tsp lemon extract (or coconut)
1 cup cold water

Glaze
1 1/2 cup icing sugar
3 Tbsp milk
1 tsp lemon extract (or coconut)

Decoration (if desired)
black berries
lemon slices

Directions
Preheat oven to 350. Spray a 12 cup bundt pan (or angel food pan) with cooking spray and line the bottom with parchment paper, set aside.


 Sift together flour, baking powder, and salt. 
In a separate bowl, beat egg yolks until thick and fluffy, about 5 minutes. Gradually beat in sugar. beat for 2 minutes on high, stopping to scrape the bowl. Reduce to low speed and add in extracts and cold water. 
Gradually, but quickly, add sifted flour mixture. Beat only long enough to blend, about 1 - 2 minutes. Pour into prepared pan. 


Bake 50 - 60 minutes at 350, until golden brown or when a pick inserted near the center comes out clean. Remove from oven and cool at least 15 minutes on wire rack.


Run a knife around the edge of the pan (and the center) to loosen the cake. Invert onto wire rack and then invert again to another wire rack. Let cool completely. 


Whisk together the icing sugar, milk, and extract to make the glaze. It should be the consistency of glue (pour-able but not thin), add more milk if necessary. 
Pour the glaze evenly over the cake and let it drip down the sides. 


If you are using fruit to decorate the cake then do it before the glaze dries. They will stick when the glaze is wet. 


Of course, you can always go with coconut extracts and sprinkle it with toasted coconut too. 
Your options are pretty varied. 
I love the look of the berries and lemons. 


If you have 12 egg yolks to use up then I recommend you give this cake a try. It's pretty impressive looking. And very springy/summery. 
Decorate it with your favorite berries. 


You can definitely change up the flavors a bit with what extracts you use. Coconut, lemon, lime, strawberry.... you see where I am going here. The base flavor is very vanilla so a little extra flavor is a good idea. This is also a fairly large cake so perfect to bring to a gathering (or freeze the extras for later!) 

Friday, May 22, 2020

Pierogi Pizza


On my list of "If you could only have 5 foods for the rest of your life what would they be", pierogies and pizza are 1 and 5 respectively. 
Believe it or not, until now, I have never had the two of them combined. I'd heard tales of pierogi pizza and it always sounded so amazing so I decided to finally give it a go. 
Best. Decision. Ever.
Hawaiian pizza (recipe coming soon) is still my number 1 but Pierogi pizza has come in strong at number 2. So much cheesy, bacony, pierogi goodness! 

 
Pierogi Pizza 

Crust
3/4 cup hot tap water
1 1/2 tsp yeast
2 tsp sugar
1 Tbsp oil
1/2 tsp salt
2 - 3 cups flour

Toppings
2 cups mashed potatoes (leftovers work fine)
1 large onion, diced
1 lb bacon, chopped
1 cup mushrooms, diced
3 cloves garlic, minced
3 cups aged (or extra aged) cheddar, shredded & divided 

Serve With
sour cream
chives

Directions
Prepare crust - In a bowl, whisk together hot water, yeast, and sugar and let sit to bloom for 5 minutes. 
Stir in oil and salt and add in flour slowly until stiff dough forms. Knead for 2 minutes - dough should be smooth and not sticky. Set in an oiled bowl, cover with a tea towel, and let rise somewhere warm for an hour. 


Dough should double in size.


After dough has risen, press out into a pizza pan. 


Cover and let rest while you prepare your toppings. 
Heat the mashed potatoes in the microwave and mix in 1 cup of the shredded cheddar. Set aside and let cheese melt into the potatoes. Stir once or twice to combine.
Fry the onion and bacon until bacon is cooked. Add in mushrooms and cook until mushrooms soften. Add in the garlic and fry for 1 - 2 more minutes. Remove from heat.
Preheat oven to 450. 


Drop the potatoes by the spoonful over the crust. Press gently to spread evenly. Sprinkle with a pinch more cheese. 
Spread the cooked bacon filling over the potatoes. Then sprinkle with the remainder of the cheese. 


Place in 450 oven and bake until heated through, crust is browned around the edges, and cheese is melty and bubbly. 


Let cool for about 5 minutes before slicing.


Top with a dollop of sour cream and a sprinkle of chives. 


Now enjoy the best pierogi pizza ever. 
FYI - If you find the addition of mushrooms odd, just leave them out. We always serve our pierogies with fried onions, mushrooms, and bacon but I know a lot of people only do onions and bacon. 
Not sure why I waited so long to try pierogi pizza but I definitely won't wait so long for the next one! 

Sunday, May 17, 2020

Giant Pork and Apple Ravioli in Browned Butter Garlic Sauce


Guys! I finally won.
For those of you who don't know... Sue and I have been hosting a Chopped-style cooking contest on Facebook every week while everyone is self isolating. Something to keep us distracted and have some fun. Anyway.... I think we've done 6 or 7 of the contests and I have NEVER won. I came close once - made 2nd place in a three way tie - but have never won. This week though! Wooooooooo. 
The ingredients we had to use were apple and butter. I knew most people would go sweet with apple apple pie and such, so I went savory. It paid off! 
Not only did I have a heck of a lot of fun making my own pasta BUT I also got first place! I'm sharing my recipe here so you all can give it a try. It's a bit finicky but if you take your time it will all work out. (That's not me being zen. Seriously. Don't rush it.)


Giant Pork and Apple Ravioli in Browned Butter Cream Sauce

Ingredients
Filling
2 Tbsp butter
1 medium onion, diced fine
1 apple, shredded
2 stalks celery, diced fine
1 lb ground pork
1 tsp sage
1 tsp rosemary
salt & pepper to taste
sprinkle red pepper flakes

Pasta
2 cups flour
3 eggs
1 Tbsp olive oil
1 tsp salt
1/8 tsp pepper

Browned Butter Sauce
1/3 cup butter
1 Tbsp fresh chives
2 tsp garlic
1 Tbsp flour
1 cup milk

Decorations
fresh chives

Directions
Prepare filling - In a large frying pan over medium heat, saute butter and onion about 4 - 5 minutes, until onion softens. Add in the shredded apple and celery and cook, stirring, another 10 minutes. Add in pork and herbs/spices.


Cook, stirring, until pork no longer pink. 
Remove from heat and let cool completely. Filling can be made up ahead of time and kept in fridge until needed. 
Prepare pasta - place flour in bowl. Add in eggs, olive oil, salt & pepper. Stir until dough comes together and then use your hands to briefly knead dough until it is smooth. Cut dough into 4 even pieces. Cover with a tea towel and let rest 20 - 30  minutes. 
Once dough has rested - take one of the pieces and put it through your pasta roller until it is really thin. I used setting 7 to finish mine. If you don't have a pasta roller: roll with a rolling pin until super thin. 
Roll out a second piece. One will be the bottom of the ravioli, one will be the top. 
Place a medium sized cookie scoop of the cooled filling about 2 - 3 inches apart along the bottom piece of dough. Brush the edges and around the filling with a little bit of water. This will help the top dough stick and seal better. 
Place the second rolled out piece of dough on top of the bottom piece and carefully, using your fingers, smooth the dough together to seal. Press as much air as you can out from around the filling so it doesn't expand when cooking and blow apart! (See photo below)


Use a pasta trimmer or sharp knife to trim around each ball of filling to cut the ravioli apart. 


Save any excess scraps of dough because you can roll them through the roller one more time. 
Repeat with the remaining 2 pieces of dough. I ended up with 17 giant ravioli (after rolling the scraps). 


Place the ravioli on a parchment paper lined tray and cover tightly until ready to use. Don't stack them or overlap them or the dough will stick together. 
You can cook them right away or chill them until you need them. They are good for about 5 - 6 hours in the fridge before they start going soggy. 
When ready to cook the ravioli you will first want to make your browned butter garlic sauce as the pasta only takes a few minutes to boil.


Prepare sauce - in a medium pan over medium heat, brown your butter. When it has just started to turn golden, add in the chives and garlic and cook for 1 minute. Add in the flour and cook, stirring, another minute. Slowly whisk in the milk a little at a time until sauce is smooth. Reduce heat to low while you cook the ravioli. 
Bring a large pot of salted water to a boil. Drop in 4 - 5 giant ravioli and boil 3 - 4 minutes. Don't be tempted to add too many or the temperature of the water will drop and your pasta will not cook as fast and risks popping open or getting soggy! 
Remove the ravioli from the boiling water with a slotted spoon and place 3 or 4 pasta in a bowl. 


Top with the browned butter garlic sauce. 


And then decorate with a few more fresh chives!


And jump right in!


New favorite pasta. It kind of reminded me of making dumplings or pierogies but for some reason it was more fun. Maybe because it my first time making homemade ravioli? 
The flavors and textures are going to blow your mind in this dish, I promise. A hint of sweetness from the apple, a hint of spice from the red pepper flakes, and don't even get me started on the nuttiness from the browned butter!


I'm happy I got to win our Chopped: Quarantine Edition challenge with this recipe. It totally deserved a win! I can't wait to make more pasta dishes - nothing beats the taste and texture of homemade pasta.