Showing posts with label vegetables. Show all posts

Friday, May 31, 2024

Pork and Veggie Ramen Bowls


Whenever I make a pork roast I end up with leftovers and I'm always looking for recipes that will use them up. I saw a similar idea to this over on Tik Tok and decided to experiment. 
Peeps, this recipe is sooooo good! 
It only takes about 20 minutes from start to finish and makes 4 generous servings. I use my leftover pork roast but you could use pork tenderloin or even pork chops. It's a simple combination of flavors but the end result is amazing! I used carrots, broccoli, snow peas, and bok choy but you could easily sub your favorite veggies. 


Pork And Vegetable Ramen Bowls

Ingredients
2 (85 gr/3 oz) pkgs ramen noodles
1 lb pork, cooked, sliced thinly 
1 Tbsp oil
1/4 cup brown sugar
1/2 cup soy sauce
1/2 cup carrots, sliced thinly
1/2 cup broccoli, chopped
1/2 cup bok choy, sliced thinly
1/2 cup snow peas, cut in half
green onions & sesame seeds for serving

Directions
Open ramen noodles and discard flavor packages (save for another use). Cook noodles in boiling water for 3 minutes. Drain and set aside. 
First photo is the brand of noodles I used, for reference (Amazon link provided above).


Set drained noodles aside while you prepare veggies and pork.


While noodles are cooking, heat oil over medium heat in a large pan. Add the vegetables and stir fry until done - about 5 - 8 minutes. (I like to cook them for about 5 minutes then add a few tablespoons of water and put the lid on so they steam for another 2 - 3 minutes.) Add in the brown sugar, soy sauce, and chili garlic sauce. Reduce heat and simmer about 5 minutes, until vegetables are cooked to your preference and sauce is sticky. 


Add in the cooked, sliced pork.


Cook until pork is heated through. 
Add the cooked noodles to the pan and cook and stir until the noodles are heated and coated in sauce. 
Serve in bowls, sprinkled with green onions and sesame seeds. 


The brand of noodles I buy (see photo above) comes with little packets of soy sauce and chili sauce so I serve the ramen bowls with those packets for guests who like to add more to their noodles. 


Pork and Veggie Ramen Bowls make a quick and easy lunch or dinner and work well to make ahead as they will keep, covered, in the fridge for a few days. 
If you don't have leftover pork you can use raw pork - in the step where you would heat up the leftovers, simply cook the raw pork instead. 


Wednesday, May 1, 2024

Mediterranean Brown Rice Salad


Sometimes you need to step outside your comfort zone and just try something new. 
We don't generally eat rice in salads but after trying this recipe that will be changing. The textures and flavors and colors of this salad are amazing. It does take a little bit of prep but nothing too crazy. 
If you are looking for something different to bring to a potluck or family dinner, try this! Mom brought it to her church dinner and they loved it. A healthier alternative to the usual heavy macaroni or potato salad. 


Mediterranean Brown Rice Salad

Ingredients
Dressing
3 Tbsp olive oil
2 Tbsp apple cider vinegar
1 Tbsp honey
2 cloves garlic, minced
2 tsp dried dill 
juice of 1 lemon
salt & pepper

Salad
1 cup brown rice, uncooked
2 bell peppers, diced
1/2 cucumber, diced
1 1/2 cups cherry tomatoes, halved
1 (341 ml) can corn 
1 small purple onion, diced
1 (540 ml) can chickpeas, rinsed and drained
3 cups spinach, chopped
1 (210 ml) jar sundried tomatoes, drained and chopped
1/2 cup feta (divided)
1/2 cup pine nuts (divided)

Directions
Whisk together dressing ingredients until well mixed. Set aside.
Cook brown rice as per package instructions. Let cool.
In a large bowl, mix together cooled rice, peppers, cucumber, tomatoes, corn, onion, chickpeas, spinach, sundried tomatoes, and 1/4 cup of the feta and pine nuts. 


Drizzle the dressing over the salad and toss gently to coat. 


Chill, covered, until ready to eat - at least 2 - 3 hours. When ready to serve, sprinkle with remaining 1/4 cup feta and pine nuts. 


Easy peasy, good for a crowd, full of healthy ingredients, and, most importantly, super delicious!
As with most salads, you can sub ingredients or switch them up to suit your preferences. Throw in some olives if you like olives, add more spinach or less corn.... you get the point! 
The next time I make this I might at some chicken and just have it as a meal instead of a side. 

Monday, December 25, 2023

Yam Mochi in Sticky Gochujang Garlic Sauce


This year for Christmas I decided to try something new. I had never had mochi before and I saw several absolutely delicious looking recipes on Pinterest and knew I had to give it a try. 
I ended up searching through several dozen recipes because there are a million different ways to make it. I combined a few to come up with this one and the family was pretty happy with the results. 
I will definitely be making this for future dinners. It takes a little time to roll all the balls out but is otherwise super simple! 


Yam Mochi In Sticky Gochujang Garlic Sauce 

Ingredients
Mochi 
3 cups mashed yams (about 2 medium)
1 Tbsp salt
Olive oil
Sauce
4 Tbsp soy sauce
4 Tbsp water
2 Tbsp sugar 
2-3 tsp gochujang 
5 cloves garlic, minced
2 tsp cornstarch
1/3 cup chicken broth
Garnish 
Green onions

Directions
Boil yams until very soft  - about 20 minutes. Let cool completely. 


Mix the cooled, mashed yams with the cornstarch, tapioca flour, and salt. Mixture should form a firm yet pliable dough.


If it is too sticky, add a bit more tapioca flour a little at a time. If it is too dry, add a little water. 
Pinch off grape sized pieces of dough and roll into balls. Place on parchment paper lined sheet. 
If you don’t want to use all of the dough you can freeze it for a later time. 


Once the balls are ready bring a large pot of salted water to a boil. Drop about 1/4 of the balls in (not too many as you don't want the water to stop boiling). 


Boil until the balls float to the surface - about 3 - 5 minutes. Using a slotted spoon, remove the mochi from the water and drop into a bowl of cold water to stop the cooking process. Drain and set aside. Repeat until all the balls are cooked. 


Toss in a little bit of olive oil to prevent the balls from sticking together. 
At this stage you can refrigerate the balls until ready to make the sauce and serve. 
When ready to eat - prepare the sauce.


Place soy sauce, water, sugar, gochujang, fish sauce, garlic, and sesame oil in a large pan. Bring to a simmer over medium heat. Add in the mochi and stir to coat. Whisk together cornstarch and chicken broth and add to pan. Turn heat to low and cook until heated through, stirring often.
If sauce thicken too much, add a bit more chicken broth. 


Remove from heat and sprinkle with green onions and sesame seeds. 


You can make this with potatoes, sweet potatoes, or yams. The yams give them that beautiful orange color. A great recipe to use up leftovers.  
I sampled the mochi without the sauce and they taste just like plain yams. It’s the texture that makes these so intriguing. Chewy and sticky and deliciously different. 
The gochujang adds so much flavor but it also adds heat. Start with a little and add more as you like it. I went with about 1 Tbsp total and it was just spicy enough. 
We love trying foods we haven’t had before and this one is definitely going into regular rotation! 


Monday, January 31, 2022

Keto Sushi Bowl


If you are cutting down on carbs or even doing strict keto, you'll want to try this recipe. Heck, even if you aren't doing those things, you'll want to try this recipe!
It's so tasty and very sushi-ish. I have tried to make roll sushi several times and am terrible at it. I blame my knife not being sharp enough but it could also be my technique.... When you make a sushi bowl you don't have to worry about that! It looks pretty even if you just throw it all in the bowl. Of course, you can get as fancy as you like by layering the toppings. Completely up to you!


Keto Sushi Bowl

Ingredients
"Rice"
20 oz (2 1/2 cups or approx 1 medium head) cauliflower rice
2 Tbsp rice vinegar
2 tsp sesame oil

Sauce
4 Tbsp mayo
1 - 2 tsp sriracha

 Toppings
2 avocado, sliced
1 medium cucumber, sliced
1 cup prawns, chopped
2 - 3 packages of nori seaweed snacks (or 1 sheet nori)
1 tsp sesame seeds
2 diced green onions

Directions
Grate cauliflower and cook in microwave for about 2 - 3 minutes. (Does not have to be thoroughly cooked, just softened a little. If you prefer you can leave it raw) Mix in rice vinegar and sesame oil. Divide into 4 bowls and set aside to cool.


In a small bowl, stir together mayo and sriracha.


Set aside. (I put mine in a small plastic baggy so I can drizzle it over the finished bowls)

Assemble toppings and prep them.


Tip: I leave the avocados until I am ready to serve the bowls. You can make everything up to this point and refrigerate until ready to serve. Chop the avocados right before servings so they don't go brown. Similarly, chop the nori right before hand so it doesn't go soggy. 
Assemble the bowls:


Layer the toppings on the cauliflower rice however you like. I always end with the sesame seeds and green onions and the sriracha mayo.... no particular reason other than I think this looks nicest. 


Recipe, as written, makes 4 servings. Per serving (according to MyFitnessPal) is: 345 calories, 25.6 fat, 14 carbs, 7.7 fiber, and 16 protein. That means 6.3 net carbs per bowl. 
If you are tracking macros be sure to enter your own ingredients into a tracker for exact counts. 


You can change up the toppings however you like! Don't like prawns? Use crab, fake crab, or even tuna. Don't like avocados? Leave them out! Of course, changing toppinggs will change the nutritional counts but it will still be a tasty and healthier meal! 

Monday, January 18, 2021

Keto Oven Fried Mushrooms


One of the things I find tricky about eating keto is finding interesting veggie side dishes to accompany whatever meat dish I'm having. Green beans and asparagus are great but a girl needs more options!
I came up with this recipe after seeing some deep fried mushrooms on Pinterest. I initially was going to deep fry them but figured it would be too messy and, honestly, seemed like too much effort at the time.
Anyway, I went with the oven and they worked out amazingly well! 
Recipe as written below will make 2 servings. Nutritional counts per serving are: 185 calories, 10.4 fat, 5.5 carbs, 1.4 fiber, 13.2 protein. So 4.1 net carbs total. 


Keto Oven Fried Mushrooms

Ingredients
1/3 cup ground pork rinds
1 tsp garlic powder
salt & pepper
1/4 tsp paprika
1/4 tsp parsley
1 Tbsp powdered Parmesan
1 egg
12 medium button mushrooms

Directions
Preheat oven to 400. Line an oven safe dish with parchment paper. Set aside. 
Combine ground pork rinds, garlic powder, salt & pepper, paprika, parsley, and parmesan in a large ziplock bag. 
Beat egg in a small bowl. 


Dip mushroom in egg to coat. Then toss into the pork rind mixture to coat. 


Place on prepared pizza pan and repeat with remaining mushrooms. 
Cook at 400 for approx 15 minutes, flipping halfway through cook time. 


If you want to crisp up the top more then place them under the broiler for 1 minute. 


Serve hot. 
Mushrooms are a great keto vegetable and putting a tasty pork rind coating on them makes them a great side dish. You could serve them with a keto ranch dip or garlic aioli if you wanted to but I didn't find it necessary! 
For a potluck you could make up a whole tray of them by easily double or tripling the recipe. 

Monday, January 11, 2021

Veggie Pakoras with Raita


I had a friend gift me a bag of chana/gram flour a little while ago. I wasn't sure what I was going to do with it until Sue reminded me that pakoras are made with chana flour! 
Pakoras are pretty much the most delicious things on the planet. I decided to go with veggie pakoras as I have made them a few times before so kind of had an idea of what I was doing. 
A friend passed down this recipe to me and gave me permission to share it with everyone. Keep in mind that there are a bazillion different recipes for pakoras out there. Everyone has a special tweak to their recipe! What is your favorite ingredient to add to pakoras?


Veggie Pakoras With Raita

Ingredients

Raita
1 cup plain Greek yogurt
1/4 cup onion, finely diced
2 Tbsp lemon juice
1 Tbsp sugar
1 Tbsp cilantro, chopped
1/4 tsp salt
1/4 tsp cumin

Pakoras
1 cup gram/chana flour
1 Tbsp cornstarch
1/2 cup spinach, chopped
1/2 cup potatoes, juliened
1 onion, thinly sliced
2 Tbsp fresh coriander, chopped
1/2 can diced green chilis
1 small head cauliflower, chopped fine
1 tsp crushed coriander
1 tsp garam masala
1 tsp crushed cumin
pinch salt
1/8 tsp baking soda
1/4 cup water

Oil for deep frying


Directions
Prepare raita - combine the yogurt, onion, lemon, sugar, cilantro, salt, and cumin. Let sit so flavors can blend. Raita can be made a day or so ahead of time. 


Prepare pakoras - mix all pakora ingredients together in a large bowl. If you need to a bit more water then do so a little at a time. It should not be soupy! It will be quite thick. I usually end up adding a few more tablespoons. 


Heat oil in a large pot to 350 degrees. Line a cookie sheet with paper towel and set aside. 
Scoop up about a golf ball sized amount of the mixture in your hand and carefully drop it in the hot oil. Don't crowd the pot - only add about 4 or 5 balls of mixture at a time. 
Cook about 1 minute and then turn over and cook another minute - until golden brown and cooked through.


Use a slotted spoon to remove the pakoras and place them on the paper towel. 
Repeat until all the mixture is used up. Be sure to keep your oil at about 350 - if it lowers too much the pakoras will get oily, if it is too high they will burn. 


Serve warm with the raita for dipping.


This makes a fairly large batch of pakoras so you can share them, eat them aaaaallllll, or freeze some for later! Simply line a container with paper towel, place the pakoras in a single layer, cover and freeze. 


When it comes time to reheat them all you have to do is preheat your oven to 350 and place the frozen pakoras on a cookie sheet. Cook until heated through - about 20 - 30 minutes. 


This is a great dish to bring to a potluck because they reheat so well and they are still delicious at room temperature. A bit of a pain in the butt because of all the deep frying but so worth it IMO. 
Looking for a game night treat? Give these a try. 
And don't forget the raita! Everything is better with dip. :)

Sunday, May 24, 2020

Mom's Macaroni Salad (AKA: Best Macaroni Salad Ever)


I know you saw the title of this recipe and came here to see what makes it the best macaroni salad ever. 
You're skeptical, I get it. 
Thing is.... it's ridiculously simple and delicious and has absolutely nothing but the basics in it but it's magic and will have you hooked in 1 bite. Maybe 2 bites...
There are no measurements, you've got to make it like mom does... with your heart. 
Ha. Sappy. But accurate. 
Eyeball it. You got this. 


Mom's Macaroni Salad

Ingredients
elbow macaroni
green peas
radishes
pickles
green pepper
onion
aged cheddar cheese
mayo or miracle whip
salt & pepper 

Directions
Boil macaroni as per package directions until soft. (Mom likes hers a little more well done than al dente so do it up right!) At the end of cooking, throw in a handful of frozen green peas and let cook for a minute. Drain and let cool to room temp. 
Cut up a few radishes into slices. About 2 - 4, just enough to add some color to the pasta.
Cut up one or 2 pickles into tiny cubes. 
Cut up about 1/4 of a green pepper into tiny cubes.
Finely dice about 1/4 of an onion.
Cube up aged cheddar cheese into tiny cubes. (Do NOT shred it, that is not mom's way. Cube it.)


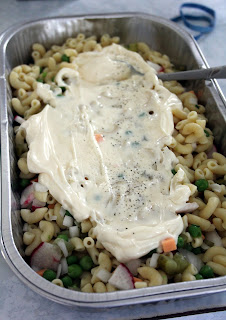
Give it a good stir. Can you see little bits of all the different color ingredients?
If yes, you're good to go. If no, add a bit more of whatever ingredient isn't showing up enough. When you think it looks good, stir in the mayo.


Make it good and creamy. Stir it well then let it sit for 5 minutes so the pasta can soak up some of the mayo. Creamy enough? Ok. Still seem dry? Add in more mayo a spoonful at a time. 


Chill until ready to eat. Definitely give it at least an hour or two in the fridge. Just before serving, season with salt and pepper!
Word of advice - if you want to make this ahead of time: mix in the ingredients but DO NOT mix in the mayo. Cover and chill until ready to serve. Mix in mayo about half an hour before serving and place back in fridge until ready to use.


One of the best things about this salad is you can make a little bit or a huge amount. 
For those of you insisting on measurements. *Sigh* I get it. I'll do my best to guesstimate here, but you really do have to go by how it looks. 
For about 4 cups cooked macaroni I'd say 1/3 cup peas, 3 radishes, 2 baby pickles, 1/4 of a green pepper, 1/3 cup onion, 1/2 cup cheese, and 1 cup mayo. Totally guesstimating here guys.... use your mom-senses to make sure it feels right. 
You should be able to see all the ingredients every time you give it a stir. And if you're unsure about the mayo, start low and add slow. You can't take it out after if you've added too much. 
Let us know if you give it a try! We're pretty sure you'll fall in love with it!