Showing posts with label candy. Show all posts

Friday, December 28, 2018

Strawberry Cheesecake Bites


This Christmas I was able to get my hands on a tin of freeze dried strawberries from walmart.ca. Have you tried freeze dried fruit yet? The texture is weird but the flavor is amazing. 
Best of all? If you powder it, it makes for amazing desserts!
There is only 4 ingredients in these little bad boys and they only take about 15 minutes to whip up BUT they rival the most complicated of cookies or truffles. The color is perfect for the Christmas holidays but works for Valentine's Day or Canada Day as well. 
If you like strawberry cheesecake then you will love these little bites. 


Strawberry Cheesecake Bites

Ingredients
2 cups freeze dried strawberries
1 brick (8 oz) cream cheese, room temp
1/2 cup icing sugar
1 cup graham cracker crumbs

Directions
Take the 2 cups of freeze dried strawberries and pulse them in a blender or food processor until finely ground. You should have just shy of 1 cup of powder. 
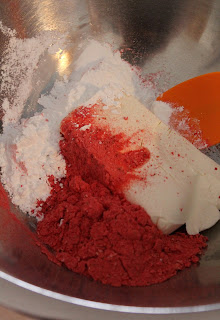
In a mixing bowl, combine strawberry powder, cream cheese, and icing sugar.


Stir until well combined.
Using a small cookie scoop (about 1 tbsp) scoop out the bites and place them on a platter lined with plastic wrap. Dip the bottoms of the bites into the graham crumbs. (You can roll the bites in the crumbs but then you will lose most of the lovely pink color!) Chill until ready to serve.


Add them to a tray of cookies/balls for a pop of color - or serve them on their own!


You could also roll them in more powdered strawberries and skip the graham crumbs, if you prefer. 


These bites have all the creaminess of cheesecake in a teeny little bit sized treat. 
Try to eat just one! It can't be done. 


I am excited to try some more strawberry recipes with the freeze dried berries. They pack a huge flavor punch! These will last several days, covered, in the fridge but the graham crumbs will get a bit soggy. No one seemed to mind around here though! If you want to make them up early you could wait until just before serving to dip them in the crumbs. Up to you! 

Tuesday, November 20, 2018

Reindeer Candy


Don't ask why this is called reindeer candy. All we know is that our Aunty Pat called it reindeer candy and she is the one who made this for us growing up. Every Christmas time she would whip up a batch of this magical treat and we would eat soooooo much of it! I have memories of her sitting on her couch cutting it and wrapping each piece in wax paper while we would sneak in and steal a piece. 
As we grew older she would always make sure to send us a package in the mail filled with a bag of reindeer candy. A tradition we miss dearly since her passing. 
This year I was missing my aunt and happened to go through a pile of old recipes she had sent me and came across this one. I knew I had to give it a try. Word of advice - get yourself a candy thermometer. You need to get it to the right stage for it to be justright


Aunty Pat's Reindeer Candy

Ingredients
1 cup corn syrup 
1 tin (300 ml) Eagle Brand condensed milk 
1 cup butter
4 1/2 cups brown sugar

Directions
Prepare a pan that is approx 12 X 15 by greasing VERY well with butter. NOTE - I rolled up some tinfoil and placed it on my 12 X 17 cookie sheet as a wall to get it to a smaller size and held it in place with clips. The exact size of the pan can vary, it just means your candy will be a bit thicker or thinner. It will stick to the pan if it is not completely greased so grease it well.
Prepare caramel - Place all ingredients in a large pot over medium heat. 


Stir constantly until candy thermometer is in the area between soft ball stage and firm ball stage (approximately 245 F or 117 C). Basically, it is done when it just comes off soft ball stage by a degree or two. 


Immediately pour it onto the prepared pan.


Set somewhere to cool completely. You can place in a fridge to speed up the process, if desired. Be careful handling the pan, it will be hot from the candy!
Once it is completely cool, I ran a large spatula under it to free it from the pan and then flipped it onto some wax paper on a cutting board to make it easier to cut. 
Cut the candy into approximately 1 inch strips.


Then cut each strip into approximately 8 pieces. 


Roll each of the pieces into a smooth log shape (kind of like a tootsie roll)


Wrap each piece in a square of wax paper.


And the twist the ends to hold it in place.


Repeat until all candy is wrapped. I got 120 pieces (10 dozen) from one batch. You may want to recruit some help for this - it can take a while. (NOTE - you can, of course, cut them into any sized piece you like! This is how I cut them to get 10 dozen) 


Rolling it into a log is not necessary but this is how our aunt used to do it so this is how we do it.
You could just wrap it in the flat shapes you get when you cut it. 


This is THE BEST Christmas candy ever. Ok, it's not necessarily just for Christmas BUT it totally is for us. Getting it to just the right stage is the secret to perfect gooey caramels. 


Just passed soft ball stage is where you want it. From when I put it on the stove to start cooking to the time I took it off the heat was 16 minutes exactly. DO NOT only go by the time though! Many things can affect how fast caramel cooks. Get a candy thermometer! If you boil it to the firm ball stage or hard ball stage your candy will be rock hard (think: brittle, not gooey). Which is still delicious but not as much fun to eat. 


Aunty Pat's reindeer candy might be known to you by a different name but to us it will always be Aunty Pat's Reindeer Candy. It's funny how only 4 ingredients can create such a wonderful memory of a truly beautiful human being. 


We're sharing over at Carole's Chatter. Be sure to pop over and say Hi!

Saturday, February 10, 2018

Valentine's Cake In A Can


Sue and I realized we haven't done anything really fun for Valentine's Day for a while and wanted to try and remedy that. I came across a post on Pinterest that showed a woman baking a birthday cake in a can and things kind of snowballed from there. 
I didn't want to bake the cake in the can as I wasn't sure how to tell if it was actually safe to do that. I decided to bake the cake separately and then place it in the can after. It worked like a charm. 
You could use any kind of cake and frosting you like - being this was for Valentine's I went with chocolate and more chocolate. 
This is a super fun way to make treats for someone special and is totally customizable. I used Word to print my labels but you could also just cut paper and have the kids draw their own art on each label for a perfect gift for Gramma and Grampa.  


Valentine's Cake In A Can

Ingredients (non-edible)
7 cans with a "pop top"
7 can labels
7 forks
hot glue gun with glue sticks
ribbon

Ingredients (edible)
2 cups chocolate frosting
2 cups sixlets (or sprinkles)

Directions
Using a can opener, remove the BOTTOMS of the cans. Pour the contents into a bowl to use for something else. (Make sure you use canned fruit cans. You don't want any lingering weird flavors in your cake from soup or something.) Wash and dry the cans. Be sure to hang on to the bottoms that you removed, you will need them after the cake is placed inside. 


Use a cookie cutter the same size as the opening in the can to cut out your cake.


Assemble the cakes: 1. divide the sixlets between the cans evenly.  


2. Pipe in icing to cover the candies.


3. Place one of the cake circles you cut out in the can and lightly press down. Top with a bit more icing.


4. Cut a second round of cake in half and press half down lightly on top of the frosting. Your cake should come as close to the rim of the can as possible. 


5. Place the bottom of the can on top and then carefully run a bead of hot glue around the outside to hold the lid in place. 
Don't worry if the glue looks messy. It is on the bottom and you won't see it. (NOTE - if you don't have a glue gun you can put an "X" with tape across the bottom of the can to hold the tin in place. Any tape on the sides of the can will be covered with the label.) Let glue cool and solidify before turning cans over. 


Place the labels on the can using a small bit of hot glue. You can also use tape if you don't have a glue gun. Tie a fork to each can using a bit of ribbon. 


How cute are they?
*eeeeeeeeeeeeee*
But wait, they get even cuter when you open them. 


Let's go in for a closer look, shall we?


All those tasty candies hiding what lies beneath....


Ooooooh.... so much chocolate. 


I could just crawl right in there. 


These cakes in a can were part of what we donated to a local bake sale fundraiser. They are a fabulous idea for bake sales! Something a little different from the normal cupcakes and muffins. 
Make these for the kids, your significant other, friends, or even for yourself. 
Change the label and they are good for all sorts of celebrations - the possibilities are endless!


We're sharing over at Carole's Chatter. Be sure to pop by and say hi!

Sunday, July 5, 2015

Funfetti Overnight Oats


I've never really been a sprinkles kind of girl.
Weird, right?
I mean.... who doesn't love sprinkles?
Anyway.... a little while ago I made a Funfetti Mousse (click HERE) that changed how I felt about sprinkles. I'm now all about adding sprinkles to things and making them taste like cake batter. 
These overnight oats, for example, are not only adorable with all those cute little sprinkles, they are super cake-batter delicious. 
The best part.... you don't actually have to add any cake mix to the oats. So many recipes call for a spoonful or two of actual cake mix. I don't know about you but I'm not opening a cake mix just to use a spoonful of it. 
This only takes 5 minutes to whip up and then put it in the fridge for breakfast the next day. 
According to Myfitness pal, one serving (entire recipe is one serving) is:
216 calories, 29 carbs, 7 fat, 13 protein, 4 fiber.


Funfetti Overnight Oats

Ingredients
1/3 cup vanilla almond milk (no sugar) (I use Blue Diamond)
1/3 cup no fat, plain Greek yogurt
1/3 cup old fashioned oats (I use Quaker)
1 pkg Stevia (or other sugar substitute)
1 tsp ground flax
1 tsp vanilla extract
1/4 tsp almond extract
1 1/2 tsp sprinkles (divided)

Directions
In a small bowl, whisk together the almond milk and Greek yogurt until smooth. Stir in oats, Stevia, flax, vanilla, and almond extract. Stir in 1 tsp of the sprinkles.


Scrape mixture into a container, cover, and refrigerate until oats have soaked up the liquid. 
When you are ready to eat them.... sprinkle with remaining 1/2 tsp of sprinkles. 


Dive in.


Perfect for breakfast, snack time, or even dessert. Only 216 calories!!
I am really loving the overnight oat thing. So easy and fast to prepare, yet very filling and tasty. 
Are you a fan of overnight oats?

Saturday, August 9, 2014

Salted Maple Bacon Truffles


Sue and I are happy to declare this week as BACON WEEK here at joandsue.blogspot.com.
As we all know, bacon makes everything better. Sue and I have decided to prove that point to everyone by sharing recipes this week that feature/highlight bacon. Sometimes in a "normal" way and sometimes in a very creative and unconventional way.
For example....these Salted Maple Bacon Truffles. 
We used our Chocolate Chip Cookie Dough Truffles  (click HERE for link)as the base for this recipe and then went all wild and crazy and turned them into something ridiculously bacon-y. 
Not sure about the whole "sweet & salty" thing? These are a good way to ease into it. 
I mean, come on, they have bacon. 
Bacon is the candy of the meat world. 


Salted Maple Bacon Truffles

Ingredients
1/2 cup butter, softened
3/4 cup brown sugar
2 cups flour
1 can (14 oz) sweetened condensed milk
1 tsp maple extract
1/2 cup finely chopped, cooked bacon

Topping
2 - 3 cups chocolate chips
1/3 cup very finely diced, cooked bacon
coarse sea salt

Directions
In a large mixing bowl, cream the butter and brown sugar until fluffy.
Add in the flour, condensed milk, maple extract, and bacon.


Stir until well combined. 
Using a small cookie scoop (about 1 Tbsp), scoop dough onto a cookie sheet covered with plastic wrap or parchment paper. I like to roll the dough into balls so they are round but you can leave them with a flat bottom if you want to. 


Freeze balls for about 20 - 30 minutes to firm up.
When dough is chilled; melt chocolate in a microwave safe dish - or on the stove top in a pan - whichever you prefer. Be careful not to over heat the chocolate or it will seize. 
Dip a ball into the melted chocolate and then shake off any excess. Quickly sprinkle a pinch of the very finely diced bacon and a smaller pinch of sea salt onto the top of the truffle before the chocolate solidifies.
Repeat with the rest of the truffles.


I believe I got 56 truffles out of one batch using a small cookie scoop. If you don't have a cookie scoop then you can just pinch off a ping pong ball sized amount of dough and roll it in a ball. 
Once they are all dipped they do not have to be frozen. You only freeze them for a short time to make them easier to dip. 
Because of the bacon they should probably be kept in the fridge until ready to serve. 
You can use whichever chocolate chips you like. I find most people like the milk chocolate better so I tend to use them more often. For the ones pictured above I used 2 cups milk chocolate 1/2 cup dark chocolate, as that is what I had on hand. 

Remember to keep coming back to check out what other crazy and delicious bacon recipes we are sharing this week!

Be sure to pop over to My Turn (for us) and The Chicken Chick and Table For Seven and Moore or Less Cooking for some fun crafty and tasty links!
Interested in tons of great bacon recipes and other fun, bacon related things? 
Follow our Bacon Board on Pinterest -- 

Tuesday, December 24, 2013

Candy Cane Ice Cream


Merry Christmas to all of our readers!
It is Christmas Eve so Sue and I are busy getting things ready for our families. We wanted to take a moment to wish everyone Merry Christmas and Happy Holidays and all the best for the New Year.
Sue and I hope to continue sharing recipes and stories on our blog and we hope you continue to visit us and share us with your family and friends. 
We have Twitter, Facebook, Instagram, Pinterest and we would love for you to follow us. (You can find the direct links on the side of the blog!!)
If you have any suggestions or questions or just want to leave us a comment then you can contact us directly at the "contact us" link at the very top of the blog.
And, just in case you need something for Christmas dinner dessert tomorrow - we are sharing our Candy Cane Ice Cream. Nothing says Christmas quite like candy canes do so making them into delicious, creamy ice cream seems like the smart thing to do!


Candy Cane Ice Cream

Ingredients
2 cups whipping cream
2 candy canes, broken into pieces
3 egg yolks
1 cup icing sugar
2 cups half & half cream

2 candy canes, crushed

Directions
Place whipping cream and the 2 candy canes broken into pieces into a medium saucepan over medium heat. Heat and stir until cream starts to steam.
Remove from heat and cover and let steep for 20 minutes. After 20 minutes give mixture a stir and then pour through a strainer to get rid of any bits.
Place cream back into the saucepan. Heat back up to steaming.
In the bowl of a stand mixer, beat together the egg yolks and icing sugar until light. Very slowly beat in the hot cream, a little at a time, until completely mixed in. (Do this very slowly so you don't curdle your eggs!)
Pour mixture back into saucepan and place back over medium heat. 
Cook and stir until mixture thickens enough to coat the back of a spoon.
Place half & half cream in a bowl. Place the strainer over the bowl. Pour the heated mixture through the strainer into the half & half.
Place mixture into fridge until completely chilled - at least several hours. 
When chilled, pour into canister of ice cream machine and process according to manufacturer's directions. 
When ice cream is ready in the machine, scoop into bowl and sprinkle with the remaining 2 crushed candy canes.


Stir to mix in.
Freeze several hours until firm. 


Mmmm...Christmas in a bowl. 
**All the best to you and yours**

Be sure to visit Carole's Chatter for tons of great links!