Friday, February 18, 2022

Raspberry Cheesecake Muffins


I love cheesecake. 
Love it.
So why not put it in the middle of muffins? 
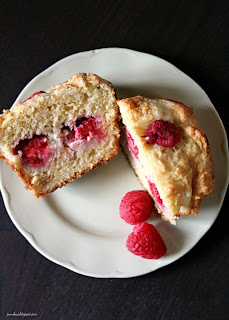
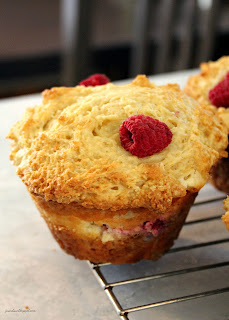
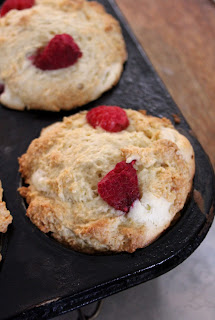
Elevate your regular muffins to a work of art by making them cheesecake stuffed muffins. I made raspberry but you could definitely do pretty much any flavor. It makes them a little more moist and interesting. Can a muffin be interesting? Well... yes... if you add cheesecake. 


Raspberry Cheesecake Muffins

Ingredients
Muffins
1/2 cup heavy cream
1 1/2 cups sour cream
2 eggs
1/2 cup melted butter
2 tsp vanilla
4 cups flour
1/2 cup brown sugar
2/3 cup sugar
2 tsp baking powder
1 tsp baking soda
pinch salt
1 cup raspberries

Cheesecake
8 oz cream cheese, room temp
1 egg
1 tsp vanilla
1/2 cup sugar

Directions
Preheat oven to 375. Lightly grease a large muffin tin (6) or a regular sized one (12).
Beat together heavy cream, sour cream, eggs, butter, and vanilla. In a separate bowl, whisk together flour, sugars, baking powder, baking soda, and salt. Mix the dry ingredients into the wet ingredients until just mixed. Scoop half of the batter evenly into the muffin cups. 
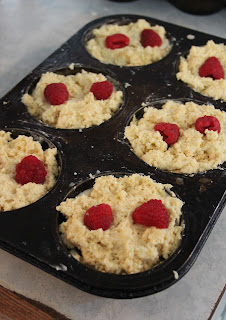
Prepare cheesecake - beat together cream cheese, egg, vanilla, and sugar. Distribute evenly on top of the batter in to muffin cups. Place 2 or 3 raspberries in each muffin tin on top of the cheesecake batter. 
Fill the muffin cups with the remaining batter and then top with an extra 2 or 3 raspeberries. 


Bake at 375 for 20 - 25 minutes (depending on the size of your muffin tins, keep an eye on them) or until a toothpick inserted near the center comes out clean and tops are lightly browned.


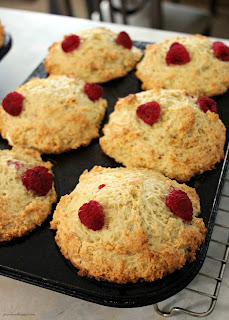
Let cool in tins for about 8 - 10 minutes before removing. 


Serve warm or room temp. Be sure to store these muffins, covered, in the fridge. They also freeze very well. 


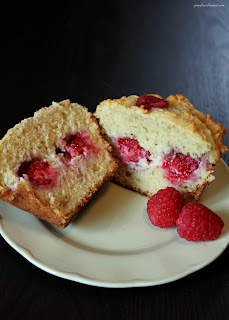
You could use any kind of fruit in this or switch it up and make a cinnamon sugar to sprinkle in the middle and on top.... I love the jumbo muffins but these also work for regular sized muffins. That ribbon of cheesecake in the middle is sooooo tasty. Add it to your favorite muffin recipe! You won't regret it! 

Monday, January 31, 2022

Keto Sushi Bowl


If you are cutting down on carbs or even doing strict keto, you'll want to try this recipe. Heck, even if you aren't doing those things, you'll want to try this recipe!
It's so tasty and very sushi-ish. I have tried to make roll sushi several times and am terrible at it. I blame my knife not being sharp enough but it could also be my technique.... When you make a sushi bowl you don't have to worry about that! It looks pretty even if you just throw it all in the bowl. Of course, you can get as fancy as you like by layering the toppings. Completely up to you!


Keto Sushi Bowl

Ingredients
"Rice"
20 oz (2 1/2 cups or approx 1 medium head) cauliflower rice
2 Tbsp rice vinegar
2 tsp sesame oil

Sauce
4 Tbsp mayo
1 - 2 tsp sriracha

 Toppings
2 avocado, sliced
1 medium cucumber, sliced
1 cup prawns, chopped
2 - 3 packages of nori seaweed snacks (or 1 sheet nori)
1 tsp sesame seeds
2 diced green onions

Directions
Grate cauliflower and cook in microwave for about 2 - 3 minutes. (Does not have to be thoroughly cooked, just softened a little. If you prefer you can leave it raw) Mix in rice vinegar and sesame oil. Divide into 4 bowls and set aside to cool.


In a small bowl, stir together mayo and sriracha.


Set aside. (I put mine in a small plastic baggy so I can drizzle it over the finished bowls)

Assemble toppings and prep them.


Tip: I leave the avocados until I am ready to serve the bowls. You can make everything up to this point and refrigerate until ready to serve. Chop the avocados right before servings so they don't go brown. Similarly, chop the nori right before hand so it doesn't go soggy. 
Assemble the bowls:


Layer the toppings on the cauliflower rice however you like. I always end with the sesame seeds and green onions and the sriracha mayo.... no particular reason other than I think this looks nicest. 


Recipe, as written, makes 4 servings. Per serving (according to MyFitnessPal) is: 345 calories, 25.6 fat, 14 carbs, 7.7 fiber, and 16 protein. That means 6.3 net carbs per bowl. 
If you are tracking macros be sure to enter your own ingredients into a tracker for exact counts. 


You can change up the toppings however you like! Don't like prawns? Use crab, fake crab, or even tuna. Don't like avocados? Leave them out! Of course, changing toppinggs will change the nutritional counts but it will still be a tasty and healthier meal! 

Tuesday, January 18, 2022

Keto Apple Crisp


We're not even one sentence into this post and I've already lied to you. 
See... the thing is... there's no apples in this apple crisp. Apples have a lot of natural sugars so aren't really keto friendly. 
I promise though, this is still an apple crisp. It's magic. It tastes just like an apple crisp even though you are not using apples. Want to know what the secret ingredient is that makes this magic? 
It's zucchini. No, really. It is. 
We already have a recipe on the blog called What Do You Mean Its Not Apple Apple Crisp (HERE) but I've takes it one step further and made it low carb \ keto friendly by switching up the topping and using sugar replacement. 
According to MyFitnessPal, this recipe per serving (makes 8) is: 274 calories, 27 fat, 6.1 carbs, 2.7 fiber, and 4.6 protein. That's 3.4 net carbs per serving. Throw on some keto ice cream (like KetoSkream and some sugar free syrup and it comes out at about 5 net carbs)


Keto Apple Crisp

Ingredients
2 Tbsp butter
4 cups zucchini, diced
1/3 cup lemon juice
1/2 cup brown sugar Swerve
2 tsp cinnamon
1/4 tsp xanthan gum

Topping
1/2 cup butter, room temp
3/4 cup pecans, chopped
1/2 cup brown sugar Swerve 
1 cup almond flour
1 tsp cinnamon

Directions
Preheat oven to 350. Lightly spray a 10 inch pan (or 2 - 8 inch pans) with cooking spray, set aside.
Melt butter in pan over medium heat. Add zucchini, lemon juice, Swerve, and cinnamon. Stir to combine. Reduce heat to medium-low and add in xanthan gum. Simmer for 15 - 20 minutes, stirring often, until thick. Spread into prepared pan (s).


Combine topping ingredients and then sprinkle evenly over the zucchini.


Bake in 350 oven until bubbly and browned, about 30 minutes.


Can serve hot or room temperature. 


If you peel the zucchini it looks even more like apples but you don't have to. I often leave the skin on.


You will be amazed at how much this smells, looks, and tastes like "real" apple crisp. 


Throw on some caramel and ice cream and you will fool even the pickiest of eaters. 


Don't skimp on the cinnamon and try to use fresh lemon juice. I've made it with bought lemon juice and it is still delicious but fresh is better! FYI - you can also use regular granulated Swerve if you don't have the brown sugar Swerve. 
Only 3.4 net carbs for a ridiculously tasty dessert (5 net with ice cream and syrup).
Even if you are not low carbing it, give this a try! It's magic. For real.
(Or try our original recipe HERE)

Thursday, January 6, 2022

Freezable Personal Pizzas


Make ahead meals are great, right? You do all the work, pop it in the freezer, and then when you need it, it only takes a few non-messy moments! 
This recipe is basically for the dough with steps on how to make ahead and freeze. The actual toppings and shape of the pizza are totally customizable. I made snowmen because... obviously, they are adorable, d'uh!
This recipe will make between 6 - 8 personal size pizzas or 2 regular sized. 


Make Ahead (Freezable) Personal Pizzas

Dough Ingredients
2 Tbsp instant yeast
2 cups hot water
2 Tbsp oil
1 tsp sugar
4 - 6 cups flour
2 tsp salt

Directions
In a bowl, whisk together the yeast, hot water, oil, and sugar. Set aside to activate yeast for about 5 - 8 minutes, until bubbly. 
Stir in about 4 cups of flour and the salt. Add more flour as needed to form a soft but not sticky dough. Knead on a floured surface for 2 minutes. Place in an oiled bowl, cover with a tea towel, set somewhere warm to rise for about an hour. 
After dough has risen, preheat oven to 425.
Separate dough into 6 equal pieces. 


Shape dough into desired shape. Place onto parchment paper lined cookie sheets. 


Par-bake the dough for 5 - 8 minutes, until puffy but not cooked through. It should still be pale. 


Top pizzas as desired. 


For snowmen I used: pizza sauce, onions, pepperoni, then mozzarella, olives, more pepperoni, and yellow pepper.


Sooooooo cute. Once you have topped the pizzas simple double wrap them in plastic wrap and freeze.
When ready to cook: preheat oven to 425, unwrap pizzas and place on parchment paper lined tray, cook for about 15 minutes. Just until heated through and cheese is bubbly. 


I also made jack-o-lanterns for Halloween....


After par-baking, these are topped with: pizza sauce, onions, cheddar cheese, deli ham, and green pepper.


Then simply double wrap with plastic wrap and freeze!


And, just thought I would share this too....
I made 2 regular pizzas to freeze and cook later for a friend who broke their leg. They were made exactly the same way except for bigger. Cooking time was a little bit longer, maybe about 5 minutes, but otherwise everything was the same!


I will update with photos if I make more for for other holidays! I feel some heart shaped pizzas may be happening for Valentine's Day or shamrocks for St. Patrick's Day! 


Tuesday, January 4, 2022

Keto Thai Peanut Chicken Curry on Zoodles


This is one of my absolute favorite keto dishes.  It's a little messy to make but still easy peasy and a whole bowl of this ridiculously delicious comfort food is only 10 net carbs. 
According to MyFitnessPal, one servings (recipe makes 4) is: 420 calories, 22 fat, 14.5 carbs, 4.5 fiber, 42 protein. (So 10 net carbs). Of course, as always, macros can vary depending on brands, cut of meat, and sizes so if you are tracking be sure to enter your own into a nutritional calculator! 
The flavor and texture of this dish are what make it so addicting. The fact that it is healthy is a bonus!


Keto Thai Peanut Chicken Curry on Zoodles

Ingredients
1 Tbsp coconut oil
1 clove garlic
1 lb chicken (breasts, thighs, or drumsticks will work)
1 1/2 cups of unsweetened coconut milk
2 Tbsp red curry paste
3 tsp fish sauce
6 Tbsp crunchy peanut butter
salt and pepper 
pinch of Swerve (or other sweetener)

4 medium zucchini, spiralized

Directions
Heat oil in a large skillet. Add in garlic and chicken. (If you are using drumsticks, leave them whole, if you are using breasts/thighs, dice them up). Cook until chicken is almost done, turning over as necessary. While chicken is cooking, whisk together coconut milk, red curry paste, fish sauce, peanut butter, swerve, and salt & pepper. 
Pour sauce over the chicken in the pan. Turn heat to low and continue simmer for about 10 - 15 minutes, stirring as needed to prevent sticking. 


While chicken is cooking: prepare your zoodles. If you don't have a spiralizer to make your zoodles you can simple slice the zucchini into very thin strips. This is more time consuming but will work. 


Cook zoodles in a pan just until heated through; about 5 - 8 minutes, stirring frequently. Do not overcook the zoodles or they will be mushy. You just need to heat them through!
When ready to eat: place zoodles in a bowl (one serving of a medium zucchini is about 2 cups of zoodles)


Spoon chicken and sauce over the zoodles and serve hot.


This also reheats very well the next day or so but, FYI, zoodles do not freeze well. 


Whether you make it with pieces of chicken or cut up meat, it's equally as delicious. Use your favorite!


Whether or not you are following low carb eating, this dish is a fabulous one to try. Healthy, filling, affordable, and delicious. What's not to love?