Showing posts with label casserole. Show all posts

Saturday, April 1, 2023

Keto Chicken Fajita Casserole


This is one of those meals that you can enjoy even if you aren’t following a low carb or keto eating plan. 
It’s very rich and hearty, super tasty, and goes perfectly with a (keto or not) cheese quesadilla on the side. 
MyFitnessPal puts one serving (recipe as written makes 8) at: 
300 calories, 19 fat, 5 carbs, 1 fiber, 25 protein. That’s 4 net carbs. 
I make the full 8 servings because this meal is great for meal prepping. You can cut the recipe in half if you need to though. 


Keto Chicken Fajita Casserole

Ingredients
4 boneless, skinless chicken breasts cut into bite sized pieces
1 pkg taco seasoning
2 large bell peppers, cut into strips
1/2 large onion, sliced
1/4 cup diced tomato
1/4 cup green chilies, finely diced (or use canned)
8 oz cream cheese, cubed
1/4 cup heavy cream
1 cup shredded cheddar (or mozza) 

Directions
Preheat oven to 350. Spray 9x13 with cooking spray and set aside. (If I am meal prepping I will use individual dishes to make things easier, but this is totally optional) 
In a large pan, cook chicken until no longer pink. Sprinkle with the taco seasoning and stir to evenly coat. Drain any excess liquid from the pan. Place chicken on plate. 


Add peppers, onions, chilies, and tomato to the pan. Cook over medium heat until vegetables soften, about 5-8 minutes.


Add in cream cheese and heavy cream and stir until smooth and evenly mixed in. Stir the chicken back in.


Scrape into 9x13 pan (or individual pans - see photo below). Top with the shredded cheese. 
Bake at 350 for about 30 minutes - until cheese is melted and casserole is bubbly. 
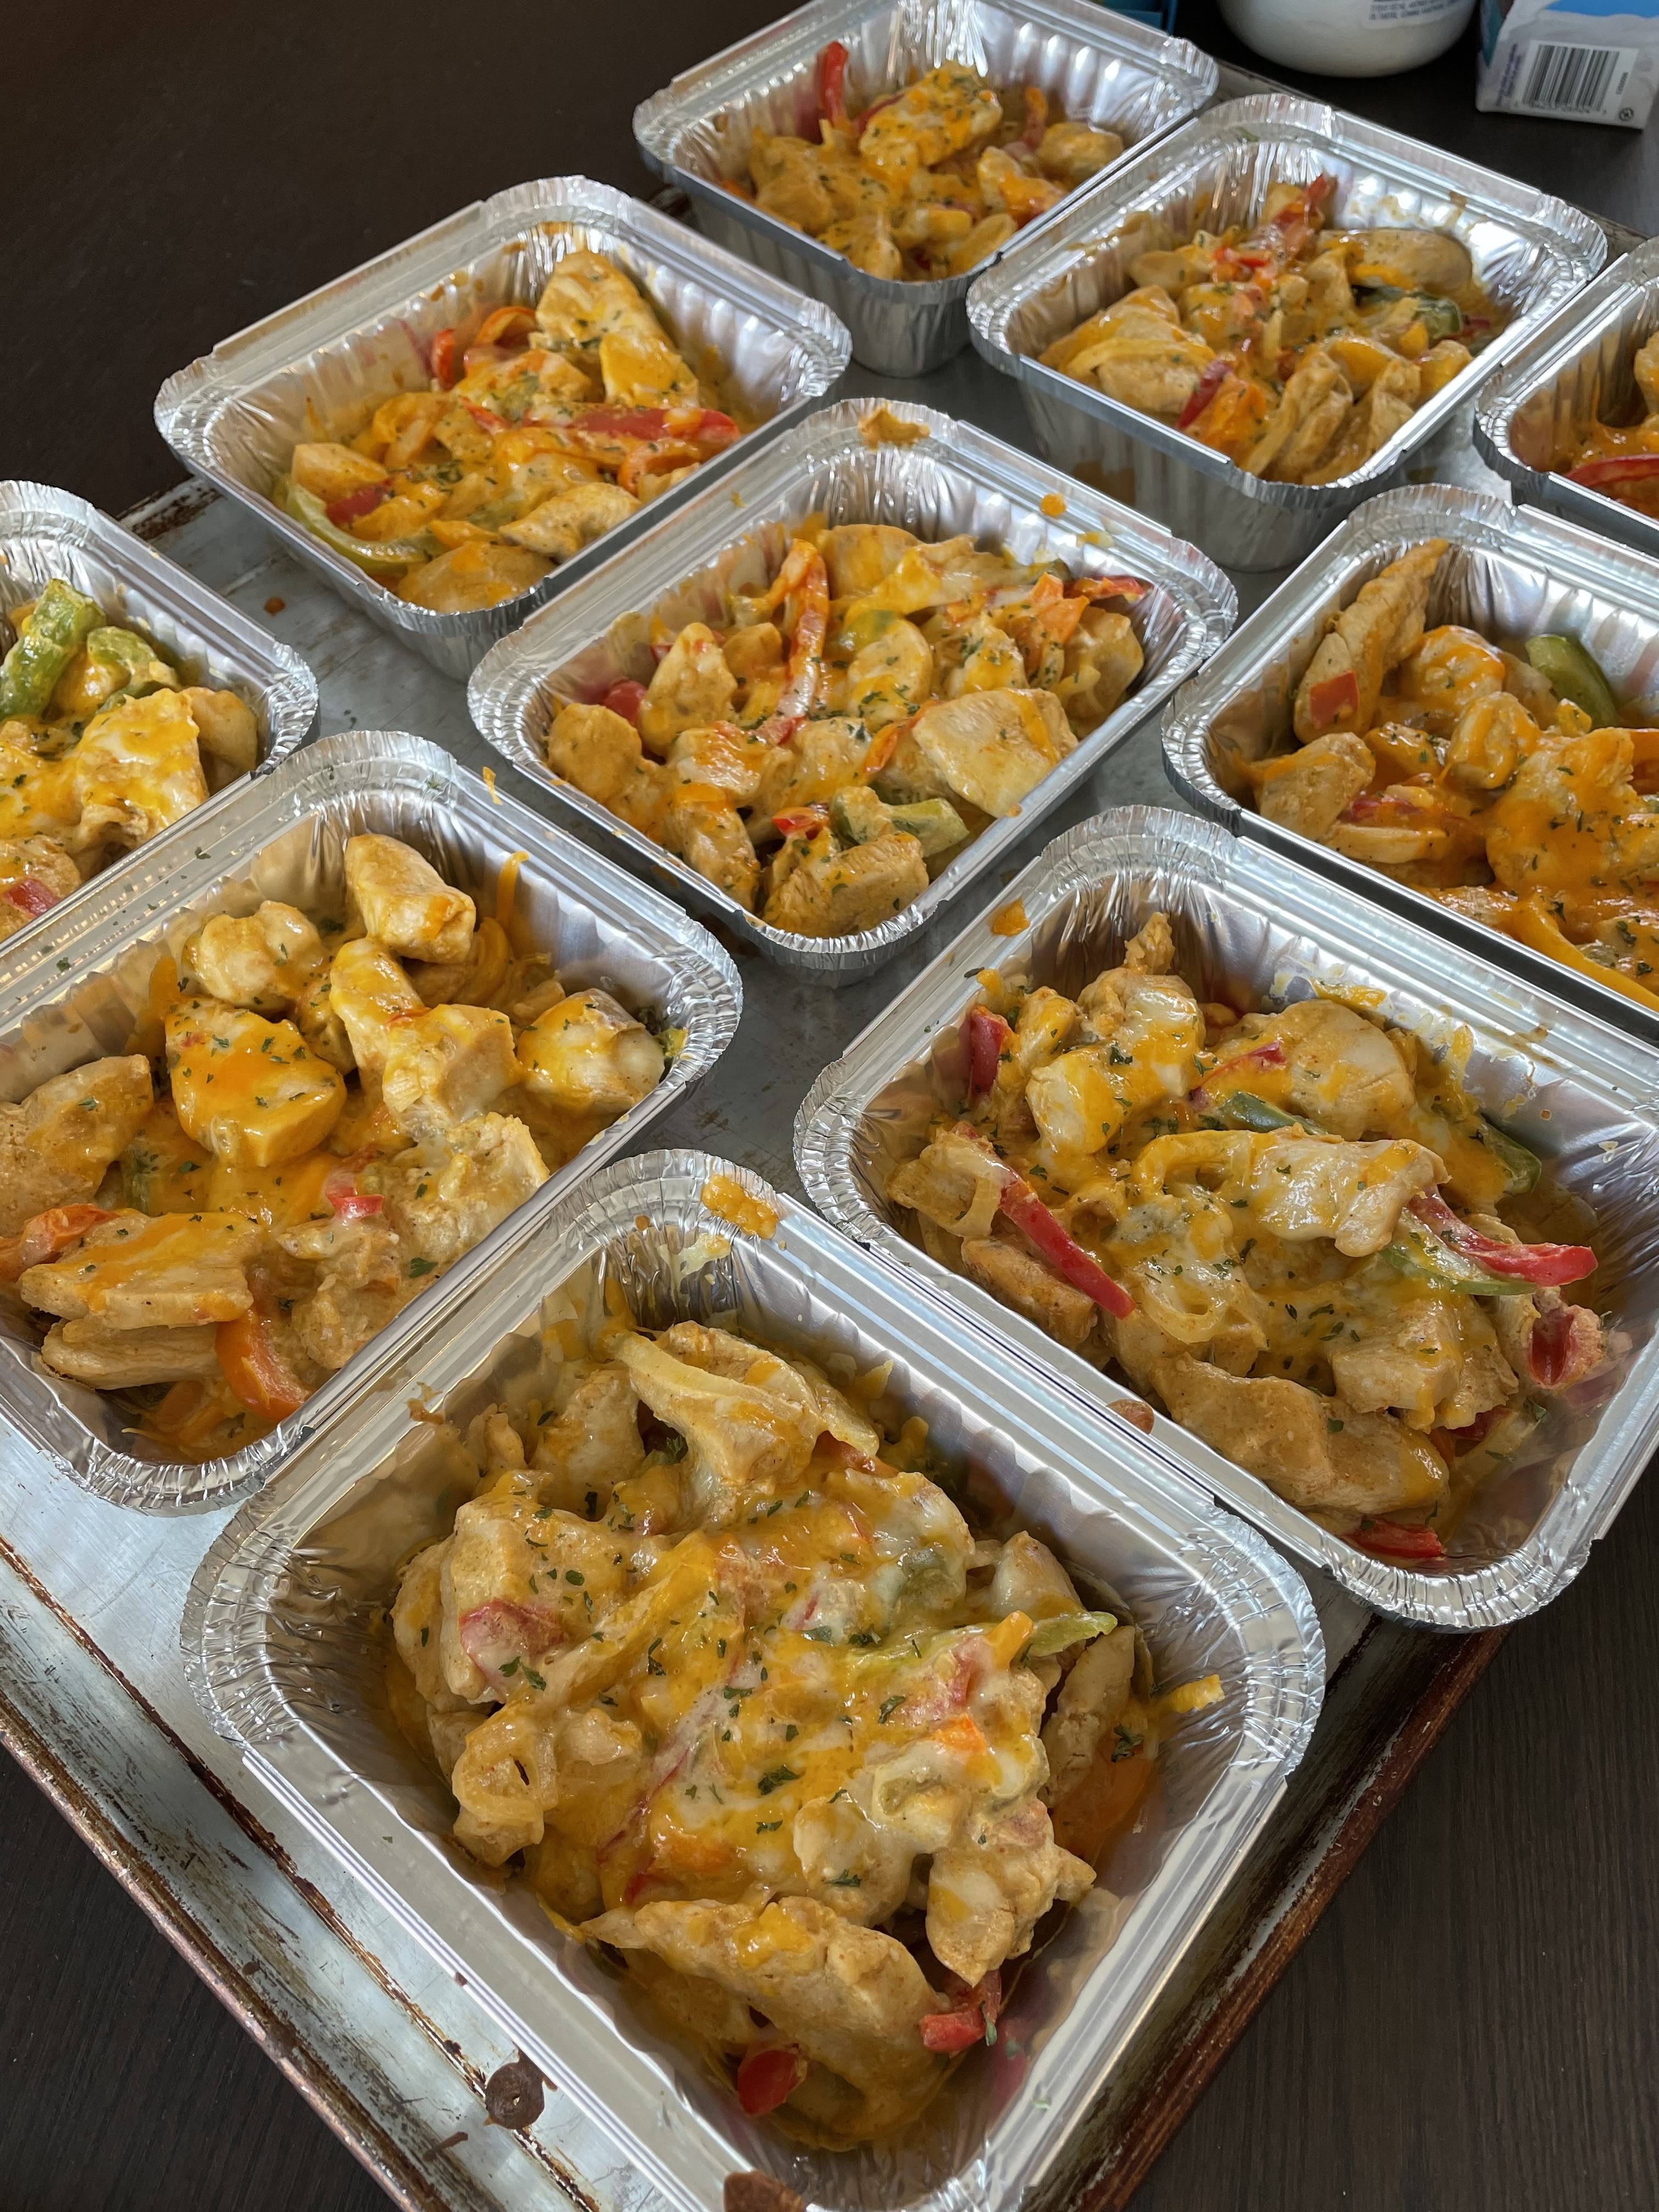

Serve hot. 
This casserole will last for several days, covered, in the fridge. It can be frozen as well but will release a little water when reheated in the microwave. I just drain it off and it’s good to go. 


From start to finish in about an hour, if you include all the prep. A healthy and filling meal that is gluten free, keto friendly, and easy peasy to whip up. 
I turn a keto friendly tortilla into a cheese quesadilla and *voila* full keto friendly meal that doesn’t leave me feeling hungry. 


Tuesday, April 30, 2019

Keto Tuna Cabbage "Noodle" Casserole


Tuna noodle casserole has never been one of my favorite meals. Mom loves it though so we used to have it quite a bit growing up. Chow mein noodles, cream of mushroom soup, tuna, and peas. 
I was excited to try and make something similar but low carb as I am on a keto eating plan. I wanted to show mom that it's possible to make comfort food that is low carb and high protein that still tastes great. 
Turns out I actually prefer this version of the classic dish. I know it sounds a bit sketchy... I mean... tuna and cabbage isn't the first thing you think of when you think delicious food, am I right? 
Seriously though... give this a try. Even if you aren't following keto it's a yummy alternative to old fashioned tuna noodle casserole. 
According to MyFitnessPal one serving (recipe makes 4 servings) is: 342 calories, 10 carbs, 4 fiber, 25 fat, 22 protein, and 5 sugar. (6 net carbs)


Keto Tuna "Noodle" Casserole

Ingredients
1 Tbsp oil
1 Tbsp butter
1 medium cabbage, shredded
1/2 cup onion, chopped
1 1/2 celery stalks, chopped
1 clove garlic, minced
1 tsp dill
1 tsp dry mustard
3/4 cup heavy cream
1/2 cup Parmesan cheese, shredded (divided)
2 cans (170 gr each) tuna, drained
1/4 cup peas

Directions
Heat oil and butter in a large, oven safe frying pan. Cook cabbage, onion, celery, and garlic for about 10  minutes - until cabbage is softening. 
Mix in the dill and mustard.
Stir in the cream and half of the Parmesan cheese until cheese is melty. Simmer to thicken. 
Add in the tuna and peas.


Sprinkle with the remaining Parmesan.


Broil for 3 - 5 minutes, until top is golden.


Serve immediately. 


It does taste like tuna noodle casserole but you're not going to fool anyone. I mean... it's cabbage.
BUT... if you are doing keto or low carb, it's a great alternative. 
Mom loved it. She said she still prefers noodles but this was tasty in it's own right. 
I agree. As a low carb, high protein, high fat meal it is very filling and totally qualifies as comfort food. 

Sunday, November 18, 2018

Easy Overnight Hashbrown Casserole


Way way back in 2011 Sue and I shared some of our favorite breakfast casserole ideas. There was a crock pot tater tot casserole, a blueberry and cream cheese french toast casserole, and a wifesaver french toast. Check those recipes out HERE. This is another breakfast casserole that you make the night before, making it perfect for the holidays or even super busy mornings. All you do is pop it in the oven in the morning and you are done! 
This recipe is great for picky eaters as it is a very simple and basic dish - meaning it is not spicy and it does not have any "weird" ingredients in it. That doesn't mean you can't customize it though! You can totally add in your favorite ingredients or spice it up, as you prefer!
Just a quick note - while this requires almost no effort, it does require time to cook! Give yourself a good hour and a half for it to cook. Don't try to rush it! 


Easy Overnight Hashbrown Casserole

Ingredients
1 cup cherry tomatoes, halved
1/2 cup onion, diced
3 Tbsp chives, finely chopped
1 kg pkg frozen hashbrowns (cubed)
1 1/2 cups finely diced ham
2 cups shredded, aged cheddar cheese
12 eggs
3/4 cup whole milk
salt and pepper
1 tsp garlic salt
1 tsp onion powder
1 tsp dried parsley

Directions
In a large bowl, stir together the cherry tomatoes, onion, chives, frozen hashbrowns, and cheese. Spread into a 9 X 13 pan lightly sprayed with cooking spray. 
In the bowl you just used, whisk together the eggs, milk, salt & pepper, garlic salt, onion powder, and dried parsley. Pour evenly over the hashbrowns in the pan. 


Cover with tin foil and place in fridge overnight OR, you can cook immediately. 
When ready to cook - place casserole on counter while oven preheats to 375. 
Bake, covered, in 375 oven for one hour. Remove tin foil and continue to bake until casserole is lightly brown on top and set in the center - about another 30 minutes. Keep an eye on it. (NOTE - I usually rotate the pan at the 45 minute mark.) If you find the edges browning too quickly and the center is still not set, turn the heat down to 350 and continue cooking. 


The center does take a long time to be cooked through. Remove from heat and let sit for 5 minutes before serving. 


Remember, if this seems a little too simple for you, feel free to jazz it up however you like! Add in some chopped green pepper or black beans, stir in some hot sauce, use different flavors of cheeses, minced garlic, bacon or sausage instead of ham... you can see there are tons of options here! 
I usually serve it with a little ketchup, just in case it gets a little dry from over cooking. If you find you need to keep it warm in the oven, be sure to cover it with tinfoil again to help prevent it drying out. Leftovers can be reheated in the microwave. 
10 minutes of prep the night before and you a get a no muss, no fuss breakfast for your guests. (You can cook it immediately after making it too, if you want.) 
FYI - If I remember correctly, you should get 12 good sized servings out of this recipe. You could stretch it out to a few more if you served it with some toast or fruit! 

Saturday, April 21, 2018

Jackfruit Cowboy Casserole


I love experimenting with jackfruit. I think it's because of the texture. It's very meat-like. It pretty  much takes on the flavor of whatever you cook it with, much like tofu, but it doesn't have that weird squishy texture that tofu has. 
This casserole is usually made with ground beef - and is equally as tasty when made as such - but this way is a bit healthier and lighter. In fact, it's gluten free and vegan as well. Give it a try for your next Meatless Monday, I'm betting even the biggest meat eaters in your house will enjoy it. 
A hearty, home cooked casserole that takes almost zero effort as you just throw everything in the slow cooker / crock pot. My favorite kind of meal!


Jackfruit Cowboy Casserole

Ingredients
1 large onion, cut in 1 inch pieces
4 cloves garlic, cut in half
2 cups baby carrots
2 pkgs (2 X 200 gr) plain jackfruit 
5 large potatoes, peeled and sliced thin
1 can red kidney beans, rinsed and drained
1 can (284 ml) condensed tomato soup
salt & pepper
1 tsp garlic granules
1/2 cup water

Directions
In the bottom of your crock pot/slow cooker place the onion, garlic, and carrots.


Layer the jackfruit on top and then the potatoes. Top with the kidney beans and then the tomato soup, salt & pepper, garlic granules, and then gently pour the water over the top. 


Cover and cook on high for 4 - 5 hours. You can also cook on low for about 7 - 8 hours. Potatoes should be fork tender. 


Serve immediately. Store any leftovers in the fridge and simply reheat when ready to eat. 


I believe I got 6 or 7 good sized servings. 
When I made this I actually forgot to put the potatoes in after I had finished layering everything. I simply scraped the soup and beans off the top and then layered the potatoes in, then spread the soup and beans back on top of the potatoes. It worked just fine. 
Basically the only prep involved is peeling and slicing the potatoes. Gotta love that, am I right?

Tuesday, December 8, 2015

Pierogi Lasagna


This is what I like to call "how can I take two separate, delicious, meals and combine them into one over the top ridiculous, heart attack inducing, oh-my-goodness I'm going to eat until I explode, new favorite dish".
Or... pierogies + lasagna = true love.
 I'm counting this as one of my better inventions. It's got everything that you could possibly need. Meat, cheese, pierogies, and, yes, even vegetables. 
I threw in the veggies so then I could at least claim some health benefit. 
True story - throw in a handful of vegetables and *voila* now it's healthy. 
You're welcome. 


Pierogi Lasagna

Ingredients
40 (approx) pierogies (frozen)
1 lb extra lean ground beef
1 small onion, finely diced
3 cloves garlic, minced
1 cup coleslaw mix (or mixed shredded veggies)
1 jar spaghetti sauce
3 (approx) cups shredded cheese

Directions
Preheat oven to 350. 
Place a generous scoop of spaghetti sauce in the bottom of a 9 X 13 pan. (Can also be made in a deep 9 X 9 pan). 
Place a layer of frozen pierogies in the bottom of the pan. Set aside.
In a large frying pan, cook the beef, onions, and garlic until beef is no longer pink. Add in the veggies and continue to cook another 2 - 3 minutes. Stir in the spaghetti sauce. Remove from heat. 
Layer half of the meat sauce over the pierogies.
Sprinkle with half of the cheese.


Repeat the layers again - remaining pierogies, remaining meat sauce, remaining cheese.


Cover with tinfoil.
Now pop that bad boy into the oven until it's good and bubbly - about an hour to an hour and 20 minutes. **I cooked it for 50 minutes, covered, then another 15 minutes, uncovered.**
Let sit for about 5 minutes.


Serve hot.


So much meaty, cheesy, pierogi-y goodness.


A small piece goes a long way, by the way.
Serve it with a salad (totally makes it even healthier, FYI) and maybe a piece of garlic toast (because carbs, that's why).


Hubbies everywhere will thank you. 
Oh, and teenagers. 
Yes, the ladies too will be clamoring at your door to shake your hand if you serve this to them. 
Everyone needs to indulge once in a while.  


We're sharing over at Carole's Chatter and Wondermom Wannabe and Cookin and Craftin and Adventures of Mel and Dizzy Busy and Hungry ! Be sure to pop over and say hi! 

Thursday, October 1, 2015

Hawaiian Spaghetti Squash Lasagna


I love Hawaiian pizza. Double ham, double pineapple.
That's always the way to go.
ALWAYS.
Thing is..... I'm trying to go without bread for a while as I tend to overindulge. Bread is my kryptonite. Anyways... 
This has all the amazing cheesy, Hawaiian-y goodness without the bread. 
Or pasta for that matter.
This is a healthy, good for you lasagna that doesn't even taste healthy. Not even a little.
Feel free to indulge away and not feel the least bit guilty.
One serving of this (according to Myfitnesspal) is only - 315 calories, 39 carbs, 11 fat, 29 protein, and 4 fiber. **That's for 1/5th of the recipe**
Know how big a serving size that is??? Check out this pic...


Yup.  That's ONE serving.
Quick, make your shopping list. You need this right now.


Hawaiian Spaghetti Squash Lasagna

Ingredients
1 medium spaghetti squash (yield approx 4 cups shredded)
salt & pepper
1 small onion, diced
3 cloves garlic, minced
2 cups 1% cottage cheese
3/4 cup partly skim mozzarella cheese, shredded
2 Tbsp Parmesan cheese, shredded
1 cup spaghetti sauce
1 can (14oz) pineapple chunks, drained
2 pkgs (about 110 gr) Buddig deli ham, chopped

Topping
1/4 cup partly skim mozzarella cheese, shredded
1/4 cup Parmesan cheese, shredded

Directions
Preheat oven to 350. Lightly spray a 9 X 13 pan with cooking spray, set aside.
Cut spaghetti squash in half lengthwise and scoop out the seeds. Season with salt and pepper. Now, you can either place them on a cookie sheet and roast them in the oven for about an hour OR you can place them on a plate and microwave them for 10 - 15 minutes. You just need to cook them long enough that you can easily shred the squash with a fork. 
When they are down, shred the squash into a bowl and set aside. You will need about 4 cups for this recipe. (You can, of course, use more but I used 4 cups to figure out the nutritional info.)
In a frying pan, cook onions and garlic until translucent, about 5 or so minutes. Set aside to cool a little.
In a mixing bowl, stir together cottage cheese, first amount of mozza and Parmesan cheese, and the cooked onions and garlic.


Layer your lasagna:
First spread half of the spaghetti squash in the prepared pan.
Then top with half of the spaghetti sauce. 
Then top with half of the cottage cheese mixture.
Then top with half of the pineapple and ham.


Repeat the layers one more time - squash, sauce, cottage cheese, pineapple and ham.
Sprinkle with the remaining mozza and Parmesan cheese.


Bake at 350 until lasagna is bubbling, about 45 - 55 minutes. 
Let sit for 5 - 8 minutes before serving. 


Cut into 5 portions.


It tastes like the topping off a Hawaiian pizza but is way more filling because of the squash.
I cannot begin to explain how excited this made me.


You can put waaaaaaaay more cheese and filling in there if you want to - just keep in mind that it will completely alter the nutritional counts. 
It freezes very well too. Just pop it in the microwave for a few minutes to re-heat it and you are good to go! I brought it to the office for lunch and everyone was trying to steal it because it smelled so amazing! 
 
Be sure to visit Carole's Chatter for tons of great links!
 

Sunday, August 9, 2015

Spicy Tomato Cobbler


My favorite thing about running a food blog is the fact that I come across so many food ideas that I otherwise would never have heard of. 
For example - a savory cobbler. 
Never heard of such a thing. Oh sure.... I've had peach cobbler and blueberry cobbler and insert-fruit-name here cobbler. But never, in the history of ever, have I heard of a savory cobbler. 
I've been missing out.
This is amazeballs. 
So many different spices and textures and ooey gooey cheesy goodness. Not to mention this is a fantastic way to use up the buckets and buckets of cherry tomatoes that our dad's garden is now providing. 
All aboard the savory cobbler train!


Spicy Tomato Cobbler

Ingredients
Filling
3 lbs cherry tomatoes
1 Tbsp olive oil
2 medium onions, thinly sliced
pinch salt
4 cloves garlic, minced
2 Tbsp white wine (or cooking sherry)
1/4 cup flour

Biscuits
1 1/2 cups flour
1/2 cup cornmeal
1 Tbsp baking powder
1/2 tsp baking soda
pinch salt
1 fresh jalapeno pepper, seeded & finely chopped
2 Tbsp finely chopped fresh basil
1 cup Mozzarella cheese, grated (+ 1/2 cup Mozza cheese, grated for sprinkling)
1/4 cup Parmesan cheese, grated
1/2 cup cold butter
1 cup buttermilk

Directions
Preheat oven to 375. 
Rinse and de-stem the cherry tomatoes. Set aside. 
In a large frying pan over medium heat, drizzle in the olive oil. Add in the sliced onions and salt and stir.


Reduce heat to low and cook and stir (every so often) until onions have caramelized, about 15 or so minutes.


Add in the garlic and white wine and cook and stir to deglaze the pan - another 1 to 2 minutes.
Remove from heat and stir in the flour until well combined. (Mixture will be a little glue-y.)
Stir in the tomatoes. 


If you are using an oven safe frying pan you can leave the tomato mixture in the pan. If not, scrape the tomato mixture into a 9 X 13 baking/casserole dish. Set aside.


Prepare biscuits. 
In a blender container (or food processor), add the flour, cornmeal, baking powder, baking soda, salt, jalapeno, basil, 1 cup Mozza and the Parmesan cheese. Pulse several times to combine. 
Place in the cold butter and pulse until mixture resembles coarse crumbs. Dump mixture into a bowl.
Using a fork, stir in the buttermilk until a thick, sticky dough forms.
Drop by the spoonful on top of the tomatoes.


Bake at 375 for about an hour - until mixture is very bubbly and biscuits are golden brown.
About 10 minutes before removing from oven, sprinkle with an addition 1/2 cup of mozzarella cheese. 


Remove from heat when cheese is all melty and biscuits are browned. 


Let sit for 10 minutes before serving.


Admire how pretty it is and how wonderful it smells.


Dive in! Be careful the tomatoes are HOT HOT HOT.


So. Much. Tastiness.


Now that I have discovered that savory cobblers are a thing, I'm definitely going to do some experimenting. With fall coming up I will have lots of veggies to work with. 
Maybe some green beans, zucchini, squash,.... hmmmm..... I've got some planning to do. 
If you've made different savory cobblers, we'd love to hear your ideas!
 
Be sure to pop by Carole's Chatter for more fun foody links!