Tuesday, April 30, 2019

Keto Tuna Cabbage "Noodle" Casserole


Tuna noodle casserole has never been one of my favorite meals. Mom loves it though so we used to have it quite a bit growing up. Chow mein noodles, cream of mushroom soup, tuna, and peas. 
I was excited to try and make something similar but low carb as I am on a keto eating plan. I wanted to show mom that it's possible to make comfort food that is low carb and high protein that still tastes great. 
Turns out I actually prefer this version of the classic dish. I know it sounds a bit sketchy... I mean... tuna and cabbage isn't the first thing you think of when you think delicious food, am I right? 
Seriously though... give this a try. Even if you aren't following keto it's a yummy alternative to old fashioned tuna noodle casserole. 
According to MyFitnessPal one serving (recipe makes 4 servings) is: 342 calories, 10 carbs, 4 fiber, 25 fat, 22 protein, and 5 sugar. (6 net carbs)


Keto Tuna "Noodle" Casserole

Ingredients
1 Tbsp oil
1 Tbsp butter
1 medium cabbage, shredded
1/2 cup onion, chopped
1 1/2 celery stalks, chopped
1 clove garlic, minced
1 tsp dill
1 tsp dry mustard
3/4 cup heavy cream
1/2 cup Parmesan cheese, shredded (divided)
2 cans (170 gr each) tuna, drained
1/4 cup peas

Directions
Heat oil and butter in a large, oven safe frying pan. Cook cabbage, onion, celery, and garlic for about 10  minutes - until cabbage is softening. 
Mix in the dill and mustard.
Stir in the cream and half of the Parmesan cheese until cheese is melty. Simmer to thicken. 
Add in the tuna and peas.


Sprinkle with the remaining Parmesan.


Broil for 3 - 5 minutes, until top is golden.


Serve immediately. 


It does taste like tuna noodle casserole but you're not going to fool anyone. I mean... it's cabbage.
BUT... if you are doing keto or low carb, it's a great alternative. 
Mom loved it. She said she still prefers noodles but this was tasty in it's own right. 
I agree. As a low carb, high protein, high fat meal it is very filling and totally qualifies as comfort food. 

Thursday, April 25, 2019

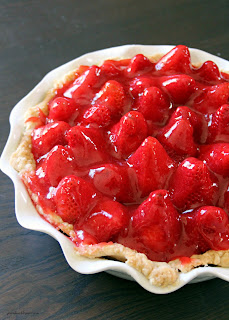
Old Fashioned Strawberry Pie


Our mom used to make strawberry pie when we were little. It was always in the summer when berries were plentiful in our yard. The whole family used to go crazy for it. I decided to give it a go for our Easter dinner this year as we hadn't had any strawberry pie for years. 
We don't grow strawberries anymore so I hit up a sale at the local grocers and then added a little powdered freeze dried strawberries as well to help make the taste stronger. I find the large store bought berries can often be lacking in flavor. You can skip adding the powder if you are lucky enough to use home grown strawberries. 
This version of strawberry pie doesn't use any jello powder BUT you can always throw in a tablespoon or 2 if you want your pie to have a brighter red color or you are worried about your pie not setting. Totally optional!


Old Fashioned Strawberry Pie

Ingredients
1 baked pie shell
8 cups strawberries, washed and hulled 
3/4 cup sugar
3 Tbsp cornstarch
1/2 cup water
1/4 cup freeze dried strawberry powder *OPTIONAL*
1 - 2 Tbsp strawberry jello powder *OPTIONAL*

Topping
whipped cream

Directions
Dice up 1 heaping cup of the strawberries and puree them in a blender. 
In a medium saucepan, whisk together sugar and cornstarch. Add in the water, pureed strawberries, and strawberry powder. Bring to a boil and stir constantly for 3 - 5 minutes, until thick and translucent. 


(If you are using the strawberry Jello powder, now is the time to stir it in.) 
Press mixture through a sieve, scraping as much of the mixture from the sieve as possible.  Cool about 10 - 15 minutes. 
Cut up 2 cups of the strawberries and stir in about 1/3 of the glaze. Spread into the baked pie shell.


Place the remaining strawberries on top so the peaks are pointing up. Then slowly pour the glaze over, being sure to coat all the berries. Do your best to fill in all the nooks and crannies. (NOTE - you can chop all the strawberries and simply stir them into the glaze and then spread in crust if you prefer.) 


Let chill at least 2 hours. 
Top with whipped cream, if desired.


Slice and serve!


I am attempting to grow strawberries this year because I sooooo want to make this with my own berries! It's such a pretty and simple pie. You can leave out the freeze dried strawberry powder and Jello and then this delicious pie filling is only 4 ingredients. 
I know people have made it with a graham cracker crust but I have never tried it that way. It would definitely change up the flavors a bit. 
What's your favorite version of strawberry pie? 

Tuesday, April 16, 2019

Eclair Cupcakes


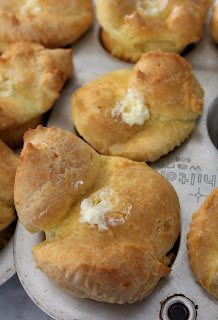
I've just recently started making eclairs so this recipe was a bit of a challenge. It came about because my lovely niece, Heather, sent me a photo she had seen on Instagram of these decadent eclair cupcakes from a shop in the US. I decided to do a little research and see if I could recreate them. 
I did find one or two recipes making eclairs in muffin tins but they were small and flat and not at all as impressive looking as the Instagram photo. After a little trial and error I came up with this version and it seems to be a hit! 
They can be a little tricky once they come out of the oven because you have to be careful they don't deflate, but other than that they are pretty simple to whip up! You can make a true pastry cream to fill them or just use the "cheat" I use here. It's still amazingly tasty! 


Eclair Cupcakes

Ingredients
Eclairs
1 cup water
1/2 cup butter
1 Tbsp sugar
1 cup flour
4 eggs

Cream Filling
2 cups heavy cream
1 pkg vanilla pudding

Chocolate Ganache
1 cup chocolate chips
1 tsp coconut oil

Directions
Preheat oven to 425. Line 11 muffin cups with paper baking liners. Set aside.
In a saucepan, boil water, butter, and sugar. Stir in flour until well combined.  Remove from heat and rest 2 minutes. 


Beat in the eggs, one at a time, until dough is glossy.


Drop into the lined paper cups. (I used one scoop of a large cookie scoop, and one scoop of a small cookie scoop.) Don't smooth the top, you want it to be bumpy so there is nooks and crannies on top. 


Bake at 425 for 8 minutes. 
Reduce heat to 350 and continue to bake for 30 more minutes, until tops are golden brown.
Turn the oven off and let sit in the oven for an additional 10 minutes. 


I originally took them out and placed them on a wire rack but the weight started to deflate the bottoms. So I placed them into another muffin tin (one that hadn't been in the oven) and let them cool to room temp. 
While they are cooling, prepare the cream.
In a mixing bowl, beat together the whip cream and vanilla pudding until stiff. Place in piping bag and squeeze into cooled eclairs. Be sure to squeeze a lot in there!!! You want to fill the bottom of the eclair - you should see it bulge out a little. 


Prepare chocolate ganache - place chocolate chips and coconut oil in a microwave safe bowl. 


Heat for one minute and then stir. Microwave in 15 second intervals, stirring well in between, until smooth. Use a spoon to spread the ganache on top of each eclair cupcake, making sure to cover all the little nooks. You may have a little leftover. 


Chill until ready to serve.


The chocolate will solidify once it is chilled. This makes things a little less messy. 


Look at all that lovely cream stuffed in there! 
You should use all the cream on the 11 eclair cupcakes. 


You could probably stretch this out and get 12 cupcakes BUT then they won't be as large. I was going for big and puffy and bumpy.... not small and smooth. But you could totally go that route if you wanted to. 
FYI - these freeze quite well if you want to make them up ahead of time otherwise they are best eaten the day they are made - the next day at the latest. They will start to go a little weird after that. 
And... don't worry if the bottoms deflate a bit! When you squish all that cream in there it will puff out again. :) 

Saturday, April 13, 2019

English Muffins


I bought rings to make English muffins about 5 years ago. They have been sitting in my closet in my bucket-o-kitchen-things since then. I was doing a bit of a clean out when I found them again. 
I decided I had better finally give them a try. 
The recipe that came with the rings was different than any recipe I had seen before. Just in it's cooking method, that is. All the recipes I found online required you to cook the muffins in a skillet but the ring recipe called for baking. 
I decided for my first go I would try the skillet method. That is the recipe here. I will get back to you when I try the baking method! These ones certainly look like they are supposed to and have that lovely crispy crust with a chewy inside. I'm still curious to try the baked method though...just to see how it differs! What is your preferred way to make English Muffins?


English Muffins

Ingredients
1 3/4 cup warm milk
2 1/4 tsp yeast
3 Tbsp melted butter
1 1/4 tsp salt
2 Tbsp sugar
1 egg
4 1/2 cups flour

Also needed
about 1/2 cup cornmeal

Direction
In the bowl of a stand mixer, mix together warm milk and yeast. Let stand for 5 - 10 minutes so yeast can bloom. Add in the rest of the ingredients and beat on low (with dough hook) until flour is incorporated. Turn to medium and beat 3 minutes. 
Place dough in well oiled bowl, cover, and set somewhere warm to rise for 2 hours. 
After dough has risen, punch down and place on floured work surface. 
Roll to 1/2 inch thick (about half the thickness of the English muffin rings). Use a cookie or biscuit cutter the same size as the rings to cut out circles. 
Sprinkle a cool skillet with some cornmeal. Grease the English muffin rings and then shake on some cornmeal. Place the rings on the cooled skillet and then place the circles of dough inside the rings.


Place the rest of the circles of dough onto a cookie sheet lined with parchment paper and then sprinkled with cornmeal. 
Cover and let all the circles rest for 30 minutes. 
Turn skillet on medium-low and cook for 10 - 12 minutes. The dough should rise in the rings as it cooks.


Gently turn over and cook an additional 8 - 10 minutes more.


NOTE - as you can see in the above photo, when I flipped my muffins they weren't very browned. I upped the heat to medium and after this side had cooked I flipped them back to the first side just to brown a bit. You need to keep a close eye on them if you turn up the heat so they don't burn. 
When done, remove from the skillet and carefully add the dough circles that were on the cookie sheet. There is no need to try and get them in the rings - they will deflate. They hold their shape pretty well at this point. 


Cook as you did the first batch.


They should look golden brown and toasty. 


FYI - the only difference between using the rings and not using them is the sides will be straighter with the ring ones. It's pretty hard to tell though IMO.


Cut them in half and pop them in the toaster for a lovely breakfast treat. 

OR...


Male yourself a delicious bacon and egger!!
All you need to do is fry yourself an egg: use the muffin ring to get the egg the same size as the muffin.


Cook up some bacon....


Layer it on with a little butter/mayo and cheese...


Drooling yet?


Want to know something fabulous about these breakfast sandwiches? 
You can totally freeze them!


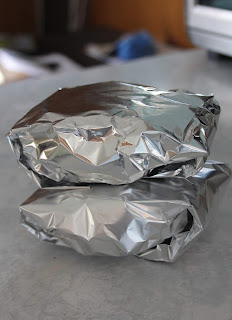
Just place your sandwich on top of a piece of paper towel on top of a piece of tinfoil...


Fold up the tinfoil so the sandwich is wrapped nicely. Then freeze. If you are doing a bunch of them then be sure to pop them into a freezer bag as well. 
When ready to eat... simply toss the tinfoil and place the sandwich in the microwave with the paper towel, on a plate. Heat 40 seconds, flip over, and then heat another 30 - 40 seconds - until cheese is melty. 


*Tah-Dah*
Sorry for the poor photo quality of the pic above. I had ravenous breakfast guests that were not patient. lol
FYI - I believe I got 18 English muffins out of this recipe. 
I found they were perfect reheated just like this but, if you find the English muffin a bit soft, then you can always take off the top half and toast it so it is crunchier. 


I'm such a sucker for a pretty yeast bread. 
How about you? 

Tuesday, April 9, 2019

Keto Asian Inspired Cabbage Rolls With Dipping Sauce


When I first came across a similar recipe to this it was called low carb potstickers. I was super excited because I LOVE potstickers but the wrappers have too many carbs for me as I am currently following a keto eating plan. 
While the cooking method is more potsticker-esque, the overall feel of the dish is definitely more cabbage roll-ish. I made a few tweaks and have decided to call them Asian inspired cabbage rolls because I think it's a more accurate description. 
According to MyFitnessPal, a serving of the rolls with sauce (recipe as written makes 4 servings) is: 239 calories, 5 carbs, 15 fat, 22 protein, 2 fiber, and 3 sugar. (So 3 net carbs!) Keep in mind this will vary a bit with brands and size of leaves, etc... Throw on a side of cauliflower fried rice and you've got yourself an amazing low carb/keto meal. (Average 1/2 cup of cauliflower fried rice would be about 5 carbs, 3 net carbs - this will vary greatly depending on what you put in it!)
The flavor in these is wonderful and with a little sauce - don't even get me started. So worth the bit of prep that goes into it. FYI - these freeze very well or work great for meal prepping.


Keto Asian Inspired Cabbage Rolls

Ingredients
Dipping Sauce
3/4 tsp peanut butter
3/4 tsp sriracha sauce
1/4 tsp minced, fresh ginger
1/4 tsp minced garlic
1/4 tsp soy sauce
1/4 tsp rice vinegar
3/4 tsp olive oil
3/4 tsp salt
juice from 1/4 of a lime

Cabbage Rolls
1 lb ground chicken
3/4 tsp salt
pinch cayenne
pinch red pepper flakes
1/4 tsp minced, fresh ginger
1/4 tsp minced garlic
3/4 of a small red onion, grated
3/4 Tbsp sesame oil
10 medium cabbage leaves

Also need
1 - 2 Tbsp sesame oil for frying

Directions
Prepare sauce - whisk together peanut butter, sriracha, ginger, garlic, soy sauce,  and rice vinegar. Whisk in olive oil and salt. Lastly, whisk in the lime juice. Set aside. (Flavor improves the longer it sits. Can be made a day ahead, if desired.)


Prepare rolls - as an FYI: cut the core out of the cabbage and place the whole head of cabbage in a pot of boiling water for 5 minutes. Leaves will peel off quite easily. Just place on paper towel to blot dry. 


Mix together the chicken, salt, cayenne, red pepper flakes, ginger, garlic, red onion, and sesame oil. Form into 10 equal sized balls and then roll them so they are an oblong shape about the same length as the palm of your hand. (Depending on the size of the cabbage leaves, these may need to be a little shorter or a little longer!)


Place one of the meat parcels on a cabbage leaf. (In the photo below I cut off the tough part of the vein, this is optional!)


Fold the bottom of the leaf up over the meat, then fold the sides in, and then roll tightly towards the top of the leaf. Repeat with remaining leaves and meat parcels. 


Place cabbage rolls into the top of a double boiler (or steamer) and steam for 10 minutes. Depending on the size of your cooker, you may need to do this in batches. (I wouldn't stack them.)


After 10 minutes of steaming, heat a bit of sesame oil in a non-stick frying pan over medium heat. Place the rolls into the pan and fry until browned.


Flip and repeat on other side. Continue until all cabbage rolls are cooked through. 
Serve immediately with the dipping sauce.


I love a side of cauliflower rice with mine.


Look at all that meaty goodness inside...


A serving is 2 1/2 cabbage rolls but I found I could only eat 2 and I was stuffed. They are quite large. 


It may seem like there is not enough sauce for 4 servings but you only need a spoonful to get all that yummy flavor! Steaming and then frying ensures that your leaves are nice and soft with a lovely hint of crispness. 
In case you were wondering about meal prepping: I made a batch of these and froze them for future meals. They reheated very well in the microwave. They also last for 2 - 3 days in the fridge.