Showing posts with label breakfast. Show all posts

Monday, October 21, 2024

Mini Monkey Bread


Monkey bread is one of those foods that is super fun to eat. you get to pull apart gooey, sugary pieces of bread and eat them with your fingers.... what's not to love?
I am calling this mini monkey bread because it's not made in one large pan, instead, it is made in muffin tins. These could also be called individual monkey breads as they are the perfect size for one person. 
I made these in jumbo muffin tins but you could certainly use smaller muffin tins, you would just need to make the balls a bit smaller and you would get more than 12. 


Mini Monkey Bread

Ingredients
Dough
1 1/2 cups warm milk
2 1/4 tsp yeast
1/4 cup sugar
2 eggs
1/3 cup butter, melted
1 tsp salt
4+ cups flour

Coating
1 1/4 cup sugar
1 Tbsp cinnamon
2/3 cup butter, melted

Optional**
1/2 cup chopped walnuts or pecans

Optional** 
1/2 cup icing sugar
1/2 tsp vanilla
1 Tbsp milk (approx)

Instructions
Prepare dough - stir warm milk, yeast, and 1/4 cup sugar together. Let sit for about 5 minutes to activate yeast. 
In another bowl, whisk together eggs, butter, salt, and 1 cup of flour. Stir in the activated yeast mixture. Add remaining flour in, about a cup at a time, until soft - but not sticky - dough forms. Knead for 2 minutes on floured surface. Place dough in a lightly oiled bowl, cover with a tea towel, and place somewhere warm to rise for an hour. 
Prepare coating by mixing sugar and cinnamon together. Set aside until ready to coat balls. 
Line 12 extra large muffin cups with paper liners, set side. 
After dough has risen for an hour, punch dough down and place on lightly floured surface. Divide dough into 48 equal sized pieces. 
Roll each piece into a ball. Dip each ball into the melted butter and then roll in the cinnamon sugar. Repeat with all 48 pieces. Place 4 balls into each muffin cup. 
After all balls have been placed in cups, drizzle with any remaining melted butter and sprinkle each with a tsp of the cinnamon sugar. **If you'd like to sprinkle on a few nuts, do so now. 


Cover with a tea towel and let rise somewhere warm for another hour. 
After an hour, preheat oven to 350. Bake mini monkey bread until tops are golden brown and dough is fairly firm - about 20 minutes, rotating pans at 10 minutes. 


Let cool at least 15 minutes before attempting to remove from pans. They will fall apart if you try to take them out to soon. 


The papers will peel off easily. 


I served them in bowls to ensure they didn't pull apart on their own. 


I also drizzled them with a little glaze - this is completely optional and not at all necessary. I just thought it looked pretty! 


You can make this recipe in a Bundt pan for more traditional monkey bread. It will take a much longer time to cook though. The walnuts and drizzle are optional. You can change up this recipe pretty easily if you like. Make a caramel or chocolate glaze, leave it completely plain, add more cinnamon if you really like cinnamon, sprinkle with Skor bits or chocolate chips...
These make a good additional to a continental breakfast bar, great after school snacks, are perfect for holiday entertaining, will sell well at a bake sell... the possibilities are endless!

Friday, February 18, 2022

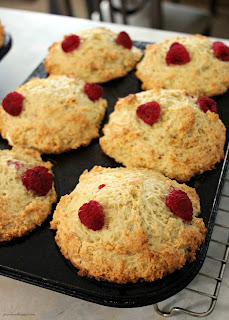
Raspberry Cheesecake Muffins


I love cheesecake. 
Love it.
So why not put it in the middle of muffins? 
Elevate your regular muffins to a work of art by making them cheesecake stuffed muffins. I made raspberry but you could definitely do pretty much any flavor. It makes them a little more moist and interesting. Can a muffin be interesting? Well... yes... if you add cheesecake. 


Raspberry Cheesecake Muffins

Ingredients
Muffins
1/2 cup heavy cream
1 1/2 cups sour cream
2 eggs
1/2 cup melted butter
2 tsp vanilla
4 cups flour
1/2 cup brown sugar
2/3 cup sugar
2 tsp baking powder
1 tsp baking soda
pinch salt
1 cup raspberries

Cheesecake
8 oz cream cheese, room temp
1 egg
1 tsp vanilla
1/2 cup sugar

Directions
Preheat oven to 375. Lightly grease a large muffin tin (6) or a regular sized one (12).
Beat together heavy cream, sour cream, eggs, butter, and vanilla. In a separate bowl, whisk together flour, sugars, baking powder, baking soda, and salt. Mix the dry ingredients into the wet ingredients until just mixed. Scoop half of the batter evenly into the muffin cups. 
Prepare cheesecake - beat together cream cheese, egg, vanilla, and sugar. Distribute evenly on top of the batter in to muffin cups. Place 2 or 3 raspberries in each muffin tin on top of the cheesecake batter. 
Fill the muffin cups with the remaining batter and then top with an extra 2 or 3 raspeberries. 


Bake at 375 for 20 - 25 minutes (depending on the size of your muffin tins, keep an eye on them) or until a toothpick inserted near the center comes out clean and tops are lightly browned.


Let cool in tins for about 8 - 10 minutes before removing. 


Serve warm or room temp. Be sure to store these muffins, covered, in the fridge. They also freeze very well. 


You could use any kind of fruit in this or switch it up and make a cinnamon sugar to sprinkle in the middle and on top.... I love the jumbo muffins but these also work for regular sized muffins. That ribbon of cheesecake in the middle is sooooo tasty. Add it to your favorite muffin recipe! You won't regret it! 

Wednesday, April 15, 2020

Masala French Toast (Savory French Toast)


I don't know why I have never thought to attempt a savory french toast until now. I know "regular" French toast is delicious and doesn't really need any improving BUT making it savory is just brilliant. 
This version is a popular Indian toast that I discovered while searching Pinterest for some ideas. Sue and I have been running a "Chopped" style contest for everyone on Facebook while we are all self isolating and the ingredients for one particular challenge were eggs and carrots. 
I took inspiration from several recipes and came up with this version here. It only takes about 2 minutes to whip up and would be great for breakfast, lunch, or dinner. 
While I didn't win our Chopped: Quarantine Edition with this recipe, I have added it to my weekly rotation as it is totally addicting. Serve it with some raita for an extra special treat! (Our Raita recipe can be found HERE but there are tons of simpler ones out there if you Google them!)


Masala French Toast

Ingredients
2 eggs
2 Tbsp finely diced onion
3 Tbsp shredded carrot
1 clove garlic, minced
pinch curry powder
pinch coriander
1/4 tsp cumin
2 Tbsp flour
pinch salt & pepper
2 - 3 slices of bread
1 - 2 Tbsp butter for frying

Directions
In a small bowl, whisk together the egg, onion, carrot, spices, and flour. 


Heat a frying pan over medium (to medium low) heat and melt the butter in it. Place your slices of bread in the pan and top evenly with half of the mixture, spreading it over the entire surface. Carefully flip the bread over and top the other side with the remaining mixture. Spread it evenly over the bread. 


Cook for about 3 - 5 minutes, until golden, and then flip the bread over and continue to cook the other side for another 3 - 4 minutes. 


Serve immediately. You can sprinkle a little cilantro on top, if desired. 
Or serve with a dollop of raita. 


I can't decide if I like sweet French toast better or savory. They are both equally delicious. I find that French toast works best with a grainy or seedy bread... but that is a personal preference. This will cover 2 larger pieces of bread or 3 smaller. It is super easy to double or tripe if you are making it for more than one person. I count this as one serving! 

Wednesday, January 29, 2020

Hearty Brunch Bowls


We decided to call these hearty brunch bowls but they work equally as well for breakfast, lunch, or dinner. Potatoes, bacon, and eggs are pretty much the trifecta of deliciousness. 
The Little Potato Company ran a recipe contest where they were looking for 30 minute meals using their little potatoes. I entered this recipe (didn't win but it's still fabulous). This recipe only takes about 15 - 20 minutes from start to finish. I'm all about quick, easy, inexpensive, and delicious meals. 
This recipe is for 1 serving but can easily be sized up for more people. 


Hearty Brunch Bowls

Ingredients
Sauce
1 Tbsp BBQ sauce
1 Tbsp honey
1 Tbsp prepared mustard
1 tsp lemon juice
2 Tbsp mayo

Bowl
(note - if you can't find Little Potato Company potatoes just use new potatoes)
2 pieces of bacon
1/4 cup green onions
1/4 cup smoked cheddar
1 egg
salt & pepper

Directions
Prepare sauce - whisk together BBQ sauce, honey, mustard, lemon juice, and mayo. Set aside. This can be made up to a few days ahead of time, if desired. 
Quarter enough potatoes to fill a serving bowl (you can also use a plate but a bowl is more fun, just sayin'). Place in a microwave safe container and microwave the potatoes for 5 minutes. 
While the potatoes are in the microwave, chop 2 pieces of bacon and cook in frying pan until crispy. Chop the green onions and shred the cheese. 
When potatoes come out of the microwave, place on a cookie sheet lined with parchment paper. 


Top with the cooked bacon, green onions, and cheese. 


Broil in the oven just long enough to melt the cheese. 


While the potatoes are broiling, in the pan you cooked the bacon in, fry up an egg. I like to leave it sunny side up so the yolk can break and add a bit more sauciness. 
Assemble your bowl - Place your cheesy potatoes in a serving bowl. Drizzle as much sauce as you would like over the potatoes. 


Top with the fried egg. Add salt & pepper to taste. 


Dig in!


So fast and easy and tasty! 
I like to make up a good sized batch of the sauce as it goes really well with so many other things! (Burgers, chicken, fries, etc...) 
I might not have won the recipe contest but I did find a great go-to meal for when I am super busy and just don't have time to do any prep. Little Potato Company potatoes work great for quick meals like this one, but if you can't find them near you I would suggest using new potatoes or fingerling potatoes - they should work just as well! 

Sunday, January 19, 2020

Keto Chaffles


If you've been following a keto eating plan for any length of time you have most likely heard of chaffles. The magic 2 ingredient dish that can sub for bread, waffles, tacos, pizza base, and the list goes on. Of course, there are a million variations of a chaffle but I prefer the simple, 2 ingredient version that takes about 2 seconds to make. 
If you are new to keto then you will want to invest in a mini waffle maker (I use a Dash Mini Waffle Maker) - just Google them, they are everywhere and go from about $10.00 to $30.00 depending on what you are looking for. You will use it, I promise. 
You can add 1 Tbsp of almond flour and 1/4 tsp baking powder for a fluffier chaffle but this will affect the carb count. You can also add sweetener and cocoa powder for a kind-of chocolate cake dessert. 
Chaffles have become a staple in my keto journey and once you give them a try you will see why! 


Keto Chaffles

Ingredients
1 egg
1/2 cup shredded mozzarella cheese

Directions
Whisk together the egg and cheese.


Scoop half onto your heated mini waffle maker. 


Close lid and cook for 4 minutes - or until cooked to your preferred level of darkness. Repeat with remaining half of mixture. 


Recipe above is 1 serving (2 waffles) and, according to MyFitnessPal, is 252 calories, 16.8 fat, 2.4 carbs, 0 fiber, and 20.3 protein (2.4 net carbs). This will vary according to size of egg and brand of cheese so be sure to enter into your own nutritional counter to be exact.) 


If you are eating them as waffles then top with sugar free syrup, berries and whipped cream, peanut butter, or whatever your favorite keto topping is. 


The waffles made with this recipe can be used as a bun for a burger, a taco, a base for pizza, anywhere you want to use bread. You can use any kind of cheese you like: cheddar, marbled, jalapeno jack, etc... I find the mozza is the mildest flavor and best to use if you want a "plain" flavor. 
Double, triple, quadruple the recipe if desired. Make the waffles up and freeze them - they freeze and thaw very well. (I pop them in the microwave for about 20 seconds and then the toaster on low and they are perfect.) 
I will update with more photos of dishes I have made with them as I go! 

EDIT: By folding the chaffles gently in half and letting them cool you can make keto soft tacos!


Hint: use jalapeno jack cheese for a little bit of spice in the chaffle tacos. Chacos? 


Second EDIT - Breakfast sammie anyone?


Sausage and egger on chaffles will cure any breakfast sandwich cravings you are having without all the carbs!! 

Sunday, November 24, 2019

Okonomiyaki (Japanese Savory Cabbage Pancake)


I've been wanting to make okonomiyaki for a long time. I saw it on Pinterest ages ago and thought it looked amazingly delicious. 
Okonomiyaki is a Japanese savory cabbage pancake (okonomi - meaning "how you like" or "what you like", and yaki - meaning "cooked") and there are as many recipes for it as there are for Western pancakes. They are super simple, inexpensive, and easy to make. I hesitated to make them because I thought they would be tricky and fall apart easily. Nope. Not the case at all. 
Like most pancakes, these are best eaten when they are made BUT do work well reheating them in the following few days. Definitely make the sauces to go with them. Without the sauce they are pretty plain. The sauces make them irresistible. 
I made them as a side to go with our braised roasted duck dinner (Recipe HERE) but they work on their own for breakfast or just as a snack!


Okonomiyaki

Ingredients
Okonomiyaki Sauce
6 Tbsp ketchup
2 Tbsp Worcestershire
2 1/2 Tbsp coconut aminos (or tamari)

Wasabi Mayo
1/2 cup mayo
1 Tbsp wasabi powder
1 tsp wasabi paste
2 tsp lemon juice

Pancakes
1 cup flour
pinch salt
1 cup chicken broth
1 egg
1/4 head of medium cabbage, cut into thin strips
1/4 cup onion, diced
2 green onion, diced

1 - 2 Tbsp sesame oil for frying

Garnish
green onions, diced
seaweed snacks, crumbled

Directions
Prepare sauces - For the okonomiyaki sauce: whisk together the ketchup, Worcestershire, and coconut aminos (tamari) until smooth. Place in a small container and leave in fridge until ready to use. Can be prepared a few days ahead of time as it keeps well in the fridge.
For the wasabi mayo: whisk together mayo, wasabi powder, wasabi paste, and lemon juice until smooth. Place in a small container and leave in fridge until ready to use. Can be prepared a few days ahead of time as it keeps well in the fridge. 
Prepare pancakes - place the cabbage and onions in a large bowl. 


In a separate bowl, whisk together the flour, salt, chicken broth, and egg until smooth.
Stir in the cabbage and onion until well mixed.


Scoop a generous amount (about 1/3 to 1/2 cup) onto a hot skillet drizzled with sesame oil. Use your flipper to shape the pancakes into circles as best you can. 


Cook until bottom is browned and pancakes are sticking together, about 4 minutes. Turn down your heat if they are browning too fast. Carefully flip the pancakes over and cook the other side for another 3 - 4 minutes.


Remove from heat, set aside and keep warm while you continue cooking the rest of the batter. (I believe I got 8 pancakes)


Serve hot, drizzled with a spoonful or two of the okonomiyaki sauce and wasabi mayo. Sprinkle with green onions and seaweed.


They keep well, covered, in the fridge for 2 - 3 days. Reheat the leftovers in a frying pan drizzled with a little sesame oil over medium heat. 
NOTE - You could shred the cabbage if you want it finer than the thin slices... just watch your cooking time because you want the pancakes to retain that cabbage crunchiness and not become soggy! 
NOTE - I used coconut aminos in the okonomiyaki sauce as that is what I had on hand. You could use tamari instead. You could even use soy sauce but I would go with 2 Tbsp instead of 2 1/2 as it is thinner in consistency. 
NOTE - you can make these smaller or bigger, as you like. They are very forgiving! 
NOTE - I actually meant to throw some cooked bacon in the batter but didn't have any on hand. Do it! It's delicious. 
Cabbage pancakes don't exactly sound like the most delicious things out there but I bet they will surprise you! So good. So different. So flavorful. So quick and easy! 

Saturday, November 2, 2019

Make Ahead Big Batch Buttermilk Belgian Waffles


Waffles are one of the best breakfasts EVER. I'm going to risk the backlash and say, perhaps even better than pancakes. All those little pockets that hold extra syrup (and peanut butter) make them irresistible. The only thing about them is they can be kind of a pain in the butt to make for breakfast. They are a little messy and time consuming when you just want to get your day started. 
Here's the thing.... we've solved that problem so now you can have waffles at the drop of a hat any time you want them. (Helloooo breakfast for dinner!)
You're welcome. 


Make Ahead Big Batch Buttermilk Belgian Waffles

Ingredients
6 cups flour
1 tsp salt
4 1/2 Tbsp sugar
4 1/2 tsp baking powder
2 1/4 tsp baking soda
6 cups buttermilk
6 eggs
3/4 cup butter, melted
1 Tbsp vanilla

Also Needed
Melted butter for brushing on waffle iron

Directions
In a large bowl, whisk together flour, salt, sugar, baking powder, and baking soda. In a smaller bowl, whisk together buttermilk, eggs, melted butter, and vanilla. Stir the wet ingredients into the dry ingredients until just combined and no flour streaks remain. 


Let sit while your waffle iron heats up. When the iron is ready, brush with melted butter. 
Scoop enough batter to cover the bottom of the waffle iron, spreading as necessary so it is not too thick - about 1/2 to 3/4 of a cup. Cook in waffle iron until just lightly golden. (NOTE - only cook to light golden if you are preparing them for use later. If you are eating them right away then cook to a bit deeper brown!) Remove from the waffle iron and place on wire racks to cool.


Continue with remaining batter. I always get between 12 and 13 Belgian waffles. 


When they are cool you can wrap them individually in plastic wrap and freeze them (or place them all in a large Tupperware-type container that is air tight). 
When ready to eat: remove a waffle from the freezer and unwrap. Place in microwave for 1 minute (until just thawed) and then place in toaster to crisp up. NOTE - you can also thaw them at room temp and place on a griddle to crisp up)
Top with your favorite toppings! (Pictured here: warm apricot puree with whipped cream)


Pictured below: warm apple pie compote with whipped cream.


12 giant Belgian waffles that you can eat whenever you like! What's not to love?
I cook them a bit longer if we are eating them straight off the waffle iron but leave them a little softer if I am going to be re-heating. You could use these to make regular style waffles but I'm not sure how many you would get.  Instead of 12 maybe 18 or so? If you do try it please let us know!