Thursday, October 31, 2013

Halloween Dinner 2013


I don't know how people can NOT love Halloween.
So many fun things to make!
Sue and I had our annual Halloween dinner and went a little crazy, as usual. 
We will be doing some tutorials on a few of the recipes here so be sure to check back for the how-to's - hopefully we will have them all done within the next few days.
Let's start off with that photo above. 
We were inspired by Beth over at Hungry Happenings and her Mini Monster Cheese Balls. Sue had the brilliant idea to make a "mommy" monster with all her babies. We laughed so hard while making these guys. I mean...how adorable are they?
Well...except that one guy to the left....


He looks a little shifty....
Speaking of Hungry Happenings....
We love Beth's blog and really encourage you to go check her out! We also got this idea to make witch's hat cheese balls from her site. She had made one large one but we decided to make teeny ones again. 
We made our own cheese ball recipe and added a strip of carrot for a band. We didn't have the small, black, round tortilla chips available in Lillooet so we simply painted a large tortilla with black food coloring and then cut out circles with a cookie cutter and baked them at 350 for about 10 minutes to firm them up. We rolled our cheese balls in crushed black tortilla chips and then shaped them into hats.


They look so cute on a platter.


Our older sister, Orra, brought some spicy curry pumpkin soup. We gave her a hard time stating "we all hate pumpkin!!". She made us taste the soup though and, guess what, we all loved it! 
Curried pumpkin soup is so tasty!


We've been making Mummy Wieners forever with bread dough. This year we decided to use some Pillsbury Crescent Dough for a bit of a short cut. They turned out sooooo cute.
Just cut the crescent dough into strips. Then cut the wiener in half, lengthwise - about a third of the way up the wiener - then cut 2 little slits on the sides of the wiener (for arms). Wrap the crescent dough strips around the wiener and in between the legs and arms. Leave a little space at the top of the wiener for the eyes. Bake at 375 until golden brown.
We used edible candy eyes but you can just use dabs of mustard or ketchup. 


The wieners weren't the only mummies we made this year. Sue found the cutest bread mummy on Bent On Better Lunches. One of the easiest mummies to make EVER.
Simply stack bread and slices of white cheese with a bit of mayo to stick them together on a wooden skewer, then add 2 edible candy eyes. *voila* done. Just like that. 


I had been wanting to make these adorable Chicken Pot Pie Monsters since I saw them Not Martha last year. I used my own recipe for pot pie and Pie Crust. I think I may have made my tentacles a little too skinny as some of them broke off...but I salvaged enough to serve at dinner!


This next recipe/photo did not turn out as I had expected. We found some deep fried rat-looking creatures on Instructables and decided to give it a try. We were going for a "fried rat" looking morsel but I think we may have ended up with a "fried frog" looking one instead. We will be doing a separate "how to" for our Baked Rats, so be sure to check back for that link!. (Update: Click HERE for the how-to!)


These Spooky Tarantula Buns turned out better than I had hoped. They looked really spider-y on the dinner table. I had originally photographed them without eyes.....


But then decided to add some olives for eyes. I think it makes them look even more spider-y. We will be doing a separate "how to" on how to make these bad boys...be sure to check back for the link! (Update -- Click HERE for the how-to and recipe!)


The dish that got the greatest reaction from people was our Puking Pumpkin Spinach Dip. We used Our Spinach Dip Recipe and then simply carved a teeny pumpkin to fit our serving platter. 
Eeeew!


Another big hit of the evening was Sue's Skull Mushrooms. All you need is some white button mushrooms and a sharp knife...and some patience. Cut out a triangle nose, circle eyes, and then carefully cut little strips into the stem for teeth.


A very Halloween-y way to dress up your veggie tray...


And now.... a few of the decorations of the night....


Dollar store black roses with a dollar store hair clip spider. Inexpensive and very spooky.


A giant gummy worm and some dollar store bottle labels change some adult beverages into Halloween adult beverages....


And for the kid-lets..... some cranberry juice and ice served in a spooky skull pitcher (also from the dollar store!) 
There you have it! Halloween Dinner 2013. Another fantastically fun and spooky meal. 
Let us know which was your favorite....we'd love to hear from you!


Sunday, October 27, 2013

Halloween Sweets #3


Sue and I, once again, went a little crazy with our Halloween sweets this year.
These were all made for a bake sale to help out the grads of 2014. Sue's daughter, Kenzie, and our youngest nephew, Nick are both graduating this year. 
We hope you enjoy the following photos and links to the "how-to's". 


I decided to make this adorable Frankenstein monster as soon as I received my Twinkie cake pan. We used Confessions Of A Cookbook Queen's images for inspiration to decorate our homemade "Twinkie" cakes.
She used black licorice for his mouth but we used chocolate sprinkles. 


Some candy pumpkins and fall leaf sprinkles made decorating this pumpkins a breeze. We made a simple spice cake with cream cheese frosting. 


Chocolate cake with white frosting, red gel frosting, and a store bought hatchet pick made these a popular seller at the bake sale. 


Our marshmallow fondant ghosts were super popular last year so we decided to make more this year. All we did was stick an unwrapped sucker into the center of the cupcake and place a round of fondant on top, 2 little dots of black food gel for eyes, and a little candy pumpkin to sit on top!


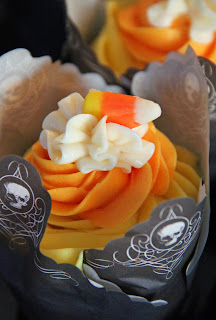
I love how pretty these candy corn cupcakes look. You can click over to The Curvy Carrot for recipe and how-to that inspired us.


Lil' Luna was where we got the inspiration and recipe to make these Googly Eye Monster Cookies. 
They look so adorable!


I think these Chocolate Spider Chip Cookies were my favorite. I was inspired by Beth over at Hungry Happenings. I used mini chocolate chips in my cookies and then used regular sized chips to place a few on top when the cookies came out of the oven. I let them soften for a few minutes and then used tweezers to place chocolate sprinkles into the slightly softened chocolate chips on top. 
Yes, it took a while.


Cake pops are always a hit at Halloween. These Jack O'Lantern cuties were pretty simple. Dipped in orange melting wafers and then a few melted black melting wafers to pipe on some smiles. 


Also super simple were these little mummy cake pops. Dipped in white melting wafers and then just dip a spoon into the melted white wafers and drizzle it over the ball. Two mini chocolate chops are the eyes. 


We also made a few Eyeball Cake Balls on forks and then a few with some Halloween sprinkles just to round out the collection.


These Peanut Butter Cup Spider Brownies were super simple and super tasty. Click over to Cookies & Cups for the recipe and how to. 


This little pie guy did NOT turn out how I envisioned him. He was pretty cute though. I called him the creature from the red lagoon. He is made of pie crust and strawberry rhubarb pie filling. 
Next time I attempt him I will go bigger, he was just too tiny. 


Sue was dying to make caramel apples this year after her trip to Disneyland. Apparently Disneyland has some wicked caramel apples. While ours may not have been as fancy, they were pretty darned tasty. 
We decorated them with some foot long gummy worms.


It's just not Halloween without some of our favorite Easy Caramel Popcorn. You can get our recipe by clicking THIS LINK. We found these adorable tins at the dollar store. 


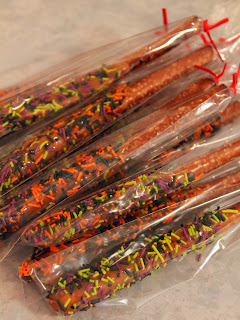
Super easy and super tasty. Some salted bread sticks dipped in melted caramel and rolled in Halloween sprinkles. A quick and easy way to Halloween-up a table. 


Sue made 2 giant chocolate chip/M&M cookie pizzas for the bake sale. These are always a hit!


She also made these adorable sugar cookie stick monsters. A few dabs of green frosting and mini marshmallows with mini chocolate chips for eyes and *voila* cutest cookie monsters ever. 
She made some mummy stick cookies too (see below).


There is a round up of our sweets for Halloween so far. I may have to add more as we have not yet had our annual Halloween dinner party. :)
Don't forget to check out our Halloween Sweets and Halloween Sweets #2 for more spooky Halloween food inspiration!
 
Be sure to visit Love Bakes Good Cakes and Dizzy Busy & Hungry and The Inspiration Network for some great links!

Thursday, October 24, 2013

Hearty Apple Bundt Cake


I started making this cake years ago for one of the doctors at the clinic where I work. He doesn't like the overly sweet chocolate/caramel/peanut butter/tons of frosting cakes that I usually make for birthday treats.
This cake is sweet but not as sweet as the others. 
I dust it with icing sugar instead of frosting it BUT you could leave it plain. A nice caramel or browned butter frosting drizzle would be good too.
This cake is dense, full of apples, dates, pecans, coconut, and maraschino cherries and looks pretty darned impressive on a serving platter. 


Hearty Apple Bundt Cake

Ingredients
3 cups flour
1 tsp baking soda
1 tsp cinnamon
pinch salt
3 eggs
2 cups sugar
1 1/2 cups oil
2 tsp vanilla
3 cups apples, diced
1 cup coconut flakes
1 cup pecans, toasted & chopped
1 small jar maraschino cherries, quartered (about 1/4 cup heaped of pieces)
1 cup dates, diced
icing sugar, for dusting

Directions
Preheat oven to 325. Spray a 12 cup bundt pan with cooking spray, set aside.
In a small bowl, stir together flour, baking soda, cinnamon, and salt. Set aside.
In a large bowl, beat eggs and sugar until very well blended (scrape bowl with a spatula a few times). Beat in oil. Beat in the flour mixture.
Add in the apples, coconut, pecans, cherries, and dates.


Stir in until well mixed. Batter will be very thick!
Scrape into prepared pan and smooth top.


Bake in prepared pan until toothpick inserted near center comes out clean - approximately 1 to 1 1/2 hours. 


Let cool on wire rack for 10 minutes. Run a butter knife around the edge of the pan to loosen. Invert cake onto a wire cooling rack to cool completely.


When cool, dust with icing sugar. 
For best results, cover and let sit a few hours (or overnight) before trying to slice. If you try to cut it while warm it is a bit crumbly.


Perfect for fall or when you have an abundance of apples, this cake is hearty and tasty and definitely a great alternative to the usual chocolate or vanilla cakes you may usually make. 
 
Be sure to visit: Or So She Says and Horrific Knits and The Chicken Chick and Jam Hands and The Velvet Moon Baker for some great links!

Wednesday, October 23, 2013

Donut Bacon Cheeseburger


So. Yeah.
This actually happened.
Sue has been dying to try this sweet-savory combination ever since we saw it on tv forever ago. 
I would just like to state something before we go any further here.
Yes.
We are aware that this is not healthy.
In fact, we are aware that this is probably in the running for the most unhealthy thing on the planet.  There is no need to scold us, okay? 
We get it.
We're not going to eat this everyday.
Not that we don't want to eat it every day....this is crazy good. Each bite is a taste explosion of sweet - savory - cheesy - bacon-ness. 
You need this in your face.


Donut Bacon Cheeseburger

Ingredients
donuts, cut in half horizontally
(We used Krispy Kreme glazed donuts)

Burger
lean ground beef
onion, finely diced
garlic, minced
salt & pepper

Toppings
aged cheddar cheese, sliced
Monterey Jack cheese, Sliced
bacon, cooked

Directions
Make up your burger patties by mixing the lean ground beef, onions, garlic, and salt & pepper. (Adjust measurements to suit the amount of burgers you are making - ex: 1 lb beef, 1/2 onion, 2 or 3 cloves garlic makes 4 - 1/4 lb burgers) 
Form into patties and cook on a grill, in the oven, or in a frying pan until desired level of done-ness is achieved. 
Prepare burgers - For each burger you will need 1 donut, cut in half, 1 burger patty, cooked, and at least 2 slices of your favorite cheese and 2 slices of bacon, cooked.  
Layer the burger as such - bottom of donut, burger patty, cheese slices, bacon, top of donut. (DON'T put any ketchup or mustard or BBQ sauce on it - it will overpower the other flavors!)
Eat and enjoy!!


You can see Sue was pretty excited to taste this. Eating a Donut Burger was actually on her bucket list. 
You definitely have to actually taste one to be able to understand it. The whole sweet and savory thing is pretty amazing. 
If you are looking for something fun and different to try then definitely give this a try. 


Be sure to stop by Carole's Chatter for some fun food links! T