Showing posts with label marshmallows. Show all posts

Tuesday, May 5, 2020

Bourbon Bacon Marshmallow Macadamia Nut Brownies


If you ever want to be pushed into coming up with recipes you normally wouldn't think of then I recommend hosting a Chopped-type contest. You give your participants 2 mystery ingredients that they have to use to create a recipe. I have been hosting a Chopped: Quarantine Edition contest for just over a month now and it has been so much fun. It definitely has been helping me think outside the box when developing recipes.
I came up with this recipe when I chose bacon and brown sugar as the 2 mystery ingredients. I went a little crazy and threw in some bourbon and marshmallows and macadamia nuts because... why not? Some people say less is more, but when we are talking brownies: more is more. 


Bourbon Bacon Marshmallow Macadamia Nut Brownies

Ingredients
1/2 cup flour
2 tsp instant coffee
1/4 tsp salt
1/2 cup + 2 Tbsp butter
3/4 cup cocoa powder
3/4 cup sugar
1/2 cup brown sugar
2 eggs + 1 yolk
3 Tbsp bourbon + 4 Tbsp of bourbon
1 tsp vanilla
3/4 cup macadamia nuts
1/2 cup bacon bits (divided)
1 jar marshmallow creme

Directions
Preheat oven to 350. Line a 10 inch pan with parchment paper, set aside.
Stir together flour, instant coffee, and salt. Set aside. 
In the top of a double boiler, cook and stir butter, cocoa powder, and sugars for 8 minutes. 


Add in eggs and yolk, bourbon, and vanilla. Stir to combine well. Remove from heat and stir in flour mixture, macadamia nuts, and half of the bacon bits. 
Pour into prepared pan.


Drop the marshmallow creme by the spoonful on top. Swirl in with a butter knife. Top with the other half of the bacon bits. 


Bake at 350 for approx 30 - 40 minutes. Do not over bake or brownie will be dry.


Remove from heat and, using a pastry or basting brush, brush the 4 Tbsp of bourbon over the top of the brownie. 
Let cool completely. Run a knife around the edge of the pan and use parchment paper to help remove the brownie from the pan. Cut into 16 pieces. 


Can I just say.... these are perfect with a little bourbon on the side too. 
Father's Day is coming and I'm pretty sure a lot of dad's out there that would enjoy this!


A glass of milk would work too. Just sayin'


The bacon adds a salty crunch and the macadamia nuts have a wonderful crunchy yet not too crunchy texture. The marshmallow gets nice and toasty on top which is a whole other layer of flavor and texture. 
So. Much. Going. On. 


Rich and gooey and chocolaty. Everything a brownie should be. 

Tuesday, January 7, 2020

Peanut Butter Butterscotch Donuts


Our peanut butter butterscotch donuts are a hybrid of two of our favorite treat recipes. Our Old Fashioned Jelly Donuts (HERE)  and our Butterscotch Dream Bars (HERE). 
I'm not sure why it took us so long to put the two together - I mean... best of ALL the treat worlds right here. Donuts... peanut butter.... butterscotch..... marshmallows... yes, yes, yes, and.... yes. 
Are they a bit of trouble to make...yes... they take a little investment of your time... BUT the rewards are SOOOO worth it. You're going to be making a whole bunch of new friends with this recipe!


Peanut Butter Butterscotch Donuts

Ingredients

Directions
Prepare the donuts as per the original recipe up to point where you roll out the dough to cut it out. Instead of doing round donuts, I recommend making them square, although this is not necessary. 


Let them rise and then continue on as per the recipe. Set them aside to cool. 
While they are cooling, prepare the butterscotch dream square, as per the original recipe instructions.


Alternatively - you can prepare the original recipe but do not combine it to make the square. Leave the butterscotch peanut butter mixture in a bowl and dip the tops of your donuts in them!


Then sprinkle them with additional mini marshmallows and butterscotch chips. 


If you prefer to make the square - once it has cooled and set, cut it into tiny squares a little smaller than the donuts themselves. Put a little bit of melted peanut butter on top of a donut and very gently press a square on top of it. Set aside to set. 


Continue until all the donuts are covered!


Yes. They are sweet, in case you were wondering. 


With the square on top it's like you're getting 2 ridiculous desserts in one. It's a little less crazy if you just dip them and sprinkle on the marshmallows and chips - but still crazy. 


This is one of those projects to tackle on a day when you have nothing else to do. You end up with a good sized batch though so all your hard work will be rewarded! Share with friends and neighbors - they'll enjoy them too! :) 

Thursday, September 26, 2019

Red Velvet Brain Cake


Halloween is getting closer! I know it's only the end of September but really.... I mean.... it's basically Halloween. Sue and I start planning our Halloween shenanigans in the summer as we are both a little holiday crazy so by the time we get to September we're anxious to get things started. 
#HalloweenRules
Anyway, I made this gruesome cake last year and decided it needs to be a staple at all our Halloween parties. It's just sooooo gross yet delicious. And really, how often do we get to say that about things?


Brain Cake 

Ingredients
Red Velvet Cake
3 cups cake flour
1 tsp baking soda
2 Tbsp baking cocoa
pinch salt
1/2 cup butter, softened
2 cups sugar
1 cup oil
3 eggs
1 Tbsp vanilla
1 Tbsp vinegar
2 - 3 Tbsp red food dye
1 cup buttermilk

Marshmallow Fondant
1 lb bag mini marshmallows (16 oz)
3 Tbsp water
1 tsp red food dye
2 lb icing sugar
(Butter, to grease your hands)

Also needed
1 jar Raspberry Jam
1/2 cup-ish Vanilla Frosting

Directions
Prepare the red velvet cake - preheat oven to 350. Using a "soccer ball sized", oven safe bowl, first spray with cooking spray and then place a couple of strip of parchment paper criss cross in the bowl (See photo below for clarification.) Set aside.
In a mixing bowl, whisk together cake flour, baking soda, cocoa, and salt. In a separate bowl, beat together butter and sugar until creamy, scraping sides of bowl as needed. Beat in the oil and then the eggs and vanilla, beating well in between each addition. Add in the vinegar and red food coloring. 
Alternately beat in the dry ingredients with the buttermilk into the wet ingredients. 
Pour into the prepared bowl. 
Place a small, shallow, "cereal bowl sized", oven safe bowl, into the middle of the cake batter and press down gently. This helps the cake to cook faster.  
Cook at 350 until toothpick inserted near the center of the cake comes out clean - about 20 - 30 minutes. Remove from oven and let cool about 20 minutes in the bowl on a wire rack. 


Gently remove the small bowl from the middle. Let cool completely. (Don't worry if you have a hole right through the cake. You will be covering the cake in fondant so you won't see it. 


Gently invert cake onto a serving tray and remove from the bowl. 


Using a serrated knife, trim the cake so it is more brain shaped. (NOTE - I used the trimmings to cover the hole on top and create a little more domed appearance.) 
Crumb coat the cake with a thin layer of vanilla frosting. Use a knife to carve a shallow line down the middle of the cake separating the two brain halves. 


Place cake in fridge while you make the marshmallow fondant. 
Prepare fondant - Place marshmallows and water in a microwave safe bowl. Heat approx 40 seconds and then stir. If marshmallows are not completely melted, heat another 20 seconds, stir, repeat if needed. Stir until smooth. Stir in the red food dye. 
Add in the icing sugar about 1/3 at a time. You may need a little bit more icing sugar if it is very sticky. 
Place some icing sugar on a flat work surface and scrape the fondant onto it. Cover your hands in a bit of butter to prevent sticking and then knead the fondant until it is not sticky and is fairly firm. You may need to add more icing sugar as you knead. 
Pull off tablespoon sized pieces of the fondant and roll them between your hands to form "worms" about 2 - 3 inches long. Start placing these on the cake in a wiggly, zig zag pattern so as to look like a brain. See the photo below to get a better idea of what we mean. Make sure to NOT cover up the line down the middle so the brain looks like it has 2 halves. 


Warm a bit of raspberry jam in the microwave for about 20 seconds. I use about 1/2 cup at a time. 
Use a pastry or basting brush, brush the melted jam over the fondant liberally. Be sure to cover all the fondant and the white bits of frosting peeking through. The gooier the better! 


Chill until ready to serve!
We also made poison pudding shots and they looked extra creepy sticking out of the cake!


You can fill the cake center, if you want to.... we actually placed the small bowl we baked in it back in there for more stability. You can see it peeking out in the photo below. 


So gruesome!


The most time consuming part of this cake is rolling all the little "worm" shapes to make the brain squiggles. 


Totally worth it though. You'll have people talking if you bring this to your next Halloween get together. 
A couple of notes: 
1.) The brain squiggles do not have to be uniform. In fact, it looks better if they are not. 
2.) If you are not filling the center of the cake then definitely put the bowl back in there for stability. It can start to collapse under the weight of the fondant. 
3.) The cake can be made ahead of time and frozen until needed. The fondant can be made a few days ahead of time and refrigerated until needed. Just remember to take it out and let it come back to room temperature before trying to work with it. 
4.) I use canned vanilla frosting to crumb coat the cake as you only need a little bit - but feel free to make your own if you prefer. 
5.) You can use any red jam you like to cover the cake but just be sure it doesn't contain seeds!

Tuesday, June 11, 2019

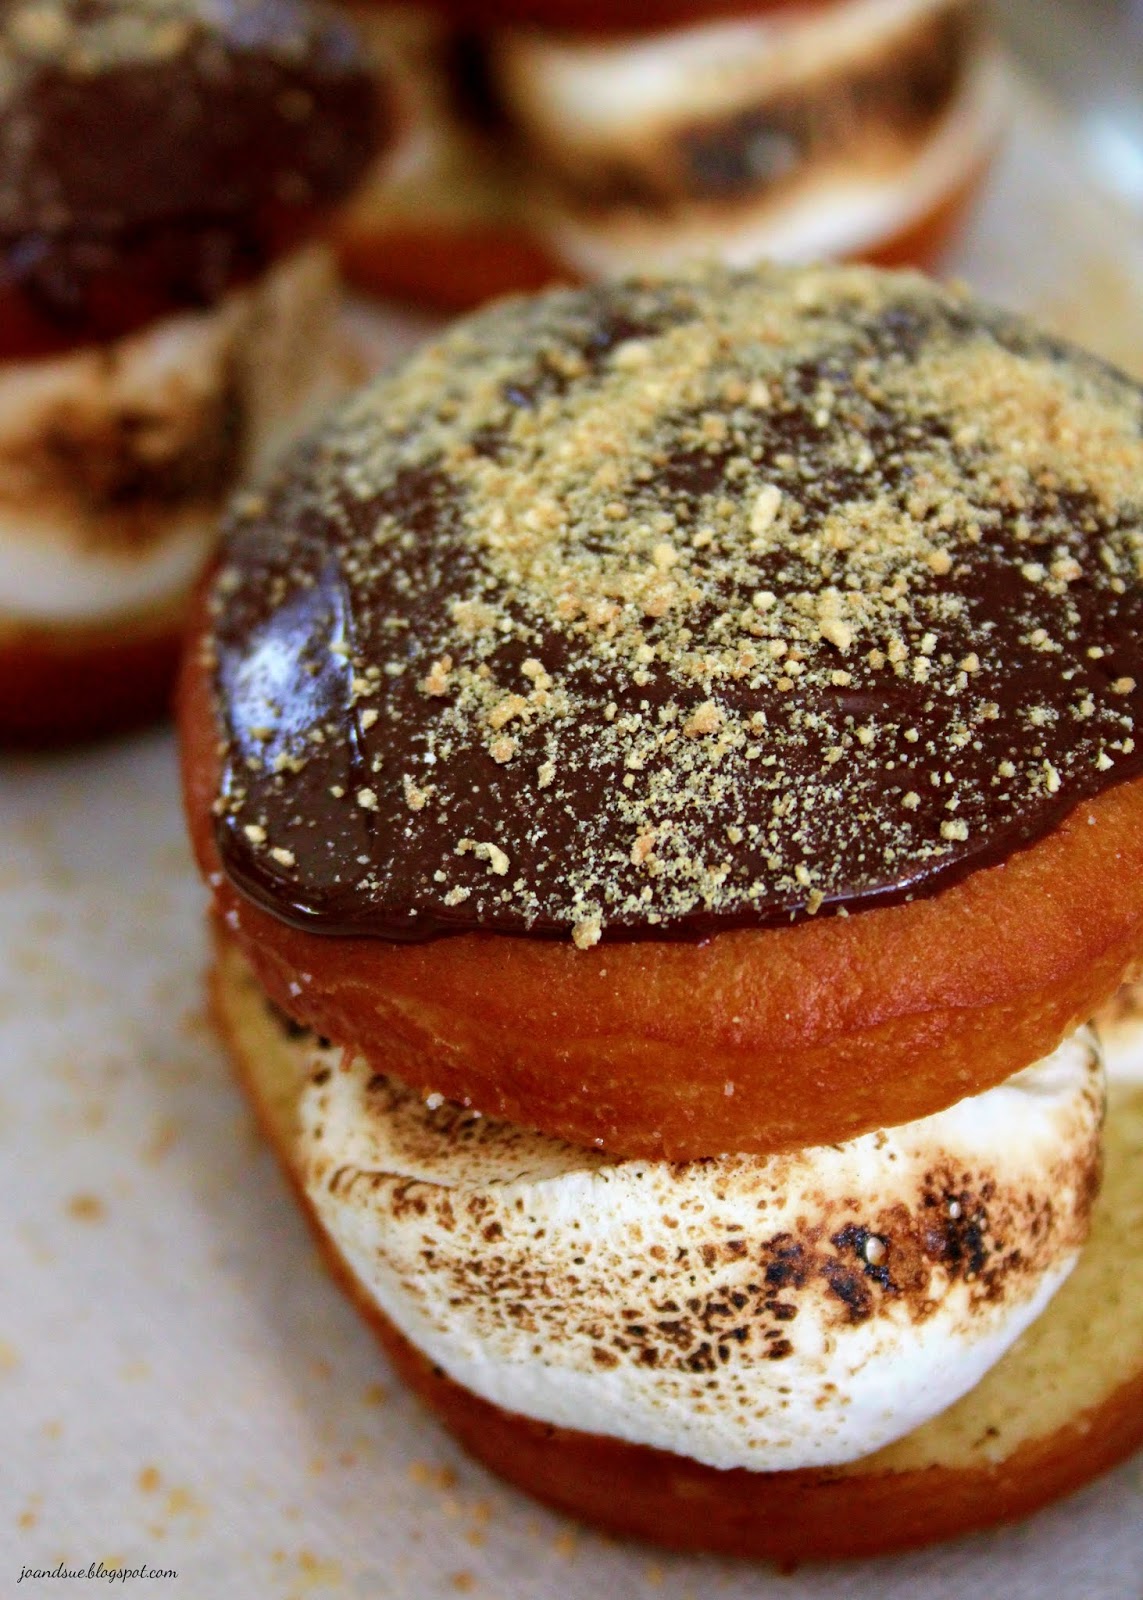
S'More Donuts


Summer is synonymous with camping and everyone knows you can't go camping without s'mores. 
Therefore, s'more donuts are awesome. 
The end.
I'm not sure where I was going with that but s'more donuts ARE amazing and are perfect for summer and camping and just about everything else. 
Yep, they are sweet. Kind of the point, actually. All that chocolate and graham crackers and ooey gooey marshmallows make the world go 'round. Share them with your family and friends and you'll be everyone's new favorite person (like you aren't already, psssht!). 


S'More Donuts

Ingredients

1/2 cup graham crackers crumbs
bag of giant marshmallows
1 cup chocolate
1 tsp coconut oil

Special equipment needed
kitchen torch

Directions
Make donuts as per recipe instructions (CLICK HERE). 
When donuts have cooled to room temp, cut them all in half horizontally. 
Cut giant marshmallows in half and place 3 halves on the bottom of each doughnut. Using your torch, lightly brown the marshmallows.


Place the top of the donut back on top of the marshmallows and press down firmly. 
Place the chocolate chips and coconut oil in a bowl and microwave for 30 seconds. Stir, and microwave in 15 second intervals until smooth. 
Spoon a glob of chocolate on top of a donut and spread it to cover. Sprinkle generously with graham crumbs. Continue with remaining donuts. 


Let sit until chocolate hardens up. It's less messy. You can, of course, serve immediately!


Your new favorite summer treat has arrived. 
I believe I got about 24 donuts from this recipe. 
If you like more chocolate - you could easily spread  some inside the donut too before you place the marshmallows on. You can never have too much chocolate....

Monday, July 30, 2018

Bourbon Marshmallow Salted Caramel Bacon Bark


I just want to warn you. If you aren't a fan of sweetness then you will want to leave now. 
Because this is sweet. Suuuuuuper sweet. Like, melt your face off sweet. 
But that's okay. That just means a little goes a long way and you can share with lots of people and make lots of new friends. 
Because this will make you friends. Trust me. 
Everyone's going to want in on this. 


Bourbon Marshmallow Salted Caramel Bacon Bark

Ingredients
16 oz dark chocolate, divided
4 cups mini marshmallows
1/4 cup bourbon
1 cup bacon bits

Directions
Line an 8 X 8 pan with parchment paper. 
Melt 8 oz of the chocolate until smooth (either on the stove top or in the microwave). Spread into the prepared pan. Set in fridge to chill until chocolate has solidified.


In a microwave safe bowl melt marshmallows for 1 minutes. Remove from microwave and stir until smooth. (If need be, microwave for another 10 - 15 seconds). Once smooth, mix in bourbon. Stir to combine well. Let cool for about 2 minutes. Pour the marshmallow/bourbon mixture over the solidified chocolate in the pan. 
Pour the salted caramel over the marshmallow. Spread it out the best you can. It is okay if the caramel and marshmallow mingle a bit. Set in freezer for 5 minutes. 


Check that the caramel has started to set up a bit. If not, leave in the freezer another 5 minutes. 
Melt the remaining 8 oz of chocolate and drizzle as evenly as possible over the caramel layer. Spread as evenly as possible. 


Quickly sprinkle with the bacon bits.


Let chill completely.
Cut into bite sized pieces. FYI - let it come back up to room temp before cutting. It's a bit easier that way. 


I used this bark to top a cake I made for Sue's birthday. It is great on a plate of squares for something out of the ordinary. The bourbon flavor really shines through so these are definitely not for the kidlets. 


You can use our Salted Caramel Sauce (find the recipe HERE) - which doesn't require a candy thermometer and is very easy to whip up! or used store bought. Either will work. We used our recipe and it tasted delicious. 
You will also want to use real bacon bits in this. The artificial flavored ones just will not taste nearly as good. This is best stored, covered, in the fridge until ready to eat. 
Don't you just love how easy no bake bars are to whip up?!

Monday, July 2, 2018

Caramel Marshmallow Cookies


Sue and I, and our sister, Orra, recently went on a sister's trip to the US. It is always soooo much fun to discover all the candies and such that we just can't get here in Canada. 
Okay, maybe they are available some places in Canada but certainly nowhere around where we are! These cookies were developed based on two of the treats we bought while on our trip: teeny tiny marshmallows and Kraft caramel bits. 
Can we talk about how awesome the caramel bits are for a second? I mean, no more peeling the little cubes of caramel and then having to cut them while your knife gets all sticky. Let's bring those to Canada, okay? Thank you. 
That being said - if you don't have access to the teeny marshmallows and caramel bits then you can resort to cutting up mini marshmallows and Kraft caramel squares. Not as cute but it gets the job done!


Caramel Marshmallow Cookies

Ingredients
1 cup butter, room temp
1 3/4 cup brown sugar
1/2 cup peanut butter
2 eggs
2 tsp vanilla
2 cups flour
1 cup old fashioned oats
2 1/2 tsp baking powder
1/2 tsp salt
1 bag Kraft Caramel Bits (About 11/2 cups)
1 cup teeny tiny marshmallows

Topping (optional)
coarse sea salt

Directions
Preheat oven to 350. Live a large cookie sheet with parchment paper, set aside. 
In a large bowl, beat together the butter and brown sugar until creamy, scraping sides of bowl as needed. Beat in peanut butter, eggs, and vanilla until well combined. 
In a smaller bowl, place flour, oats, baking powder, salt, caramels, and marshmallows.


Stir the dry ingredients together to combine. Then stir the dry ingredients into the wet ingredients until stiff dough forms. 
Using a large cookie scoop, scoop dough onto prepared cookie sheet, about 2 inches apart. Flatten the cookies slightly with the palm of your hand. (NOTE - I always press one or two caramels and marshmallows onto the top of the cookie so they show when the cookie is baked. This is optional but makes the cookies look prettier.)


Bake at 350 for 7 minutes, rotate the pan, and then bake about 7 minutes more - until cookies are golden brown around the bottom. 


Sprinkle each cookie with a pinch of sea salt as soon as they are out off the oven (optional).
Let cool on pan for about 5 minutes before removing to wire rack to cool completely. 
NOTE - you can bake these right away or chill the dough for about 30 minutes. If you bake them right away they spread a teeny bit more. If you chill them then they don't spread as much. 


Be sure to take them out as soon as the edges appear golden, if you over cook them they will be crunchy instead of chewy. 
You can also make up the dough and scoop it onto a cookie sheet, freeze it, then put the frozen scoops into a Ziplock bag. When you want to bake them: take out as many cookies as you want, place them on a lined cookie sheet and let them sit on the counter while the oven preheats. Then, bake as per recipe.
Using a large cookie scoop, I got 32 cookies out of the recipe. 
You can use a smaller scoop but remember to adjust your baking time then too.