Wednesday, October 31, 2018

Cockroach Donuts


Looks like a big bug on the windowsill, no?
It's a donut so you can eat him. I mean.... you could eat him if he really were a bug too, I suppose. If you're into bugs. Me? Not so much. Bug donuts? Absolutely. 
We turned a Boston cream donut into a creepy Halloween treat and everyone loved it. Or hated it. Depending on where they stood on eating bugs. Anyway.... I'm sharing the recipe here but I'm recommending you go to Instructables (click HERE) for the directions. It looks complicated but it's really not. The link above has step-by-step photos and instructions to make it easier. 


Cockroach Donuts
(Slightly adapted from Instructables)

Ingredients
Donuts
1/2 cup hot water
4 1/2 tsp active dry yeast
2 cups buttermilk
1/2 cup butter
2 eggs, beaten
4 - 5 cups flour
1/2 cup sugar
2 tsp salt

Oil for frying

Filling
2 cups whipping cream
1 pkg vanilla instant pudding

Chocolate Glaze
1/2 cup milk chocolate chips
3 Tbsp butter
1 cup icing sugar
4 Tbsp hot water

Also needed
soft caramels
black food color

Directions
Prepare donuts - In a large bowl, add yeast to the hot water and stir until dissolved. Let sit 5 - 10 minutes to activate yeast. Heat buttermilk and butter in a saucepan over medium heat until just steaming and butter is melted. Remove from heat and let cool a couple of minutes. 
While cooling, whisk 4 cups of flour, sugar, and salt in a small bowl. 
Add milk mixture and eggs to the yeast and whisk to combine. Stir in the dry mixture. Add in enough flour so dough forms and is not sticky. Knead for about 2 minutes. 
Place in an oiled bowl, cover, and let rise in a warm place for an hour (until doubled in size). 
After an hour, punch dough down and place on floured work surface. Roll out to 1/3 of an inch thickness.
Okay, so here is where I'm going to recommend heading over to Instructables for the full step-by-step instructions (again, you can click HERE for the link). I wouldn't be able to explain as completely and thoroughly as they do at the Instructables site. 
FYI - I use a different and much easier filling than on the Instructable site. See below for my filling instructions. (But feel free to use theirs instead, if you prefer)


There are the bodies after being deep fried. 


And there are the bits that will make the legs and antennae. 


There are the bodies after being dipped in the chocolate glaze. 


And there they are after putting on the caramel strips. Just a note - if you are doing this by yourself without any helpers, be patient. Rolling, cutting, and placing the caramel stripes takes a long time. 
Actually, making 2 dozen of these fun and creepy cockroach donuts took me about 6 hours straight (including the rise times for the dough) so don't try to rush things. Having a helper would definitely make things easier. 


Adding the black food coloring makes them really start to look like bugs!


Popping in the antennae and legs and *voila* delicious cockroaches for dessert. 


I definitely had way too much fun with these. Granted, they were a lot of work BUT so worth the effort. 


FYI - these freeze well so you can make them up in advance.


I stuffed mine with pudding and whipped cream instead of a more traditional Boston cream filling. 
All you have to do is pour the whipping cream in a bowl, add in the pudding mix, and beat until it is a frosting consistency. It pipes into the donuts beautifully. 


Sue and I alternate between cute and creepy for Halloween. I think this one leans more towards creepy. I made these for our mom's seniors' center Halloween coffee hour and they loved them. 
Next time I make these I will make sure I have an oval cookie cutter. The Easter egg shape worked but just made a bit more work than it would have been otherwise. 

Wednesday, October 24, 2018

InstaPot Split Pea Soup


Sue and I shared our Crock Pot Split Pea Soup recipe (HERE)  and it turned into a family favorite. 
It just made sense when Sue bought me an InstaPot this year for our birthday to try it in the new machine. It's basically the exact same recipe with a few slight adjustments to fit the new cooking method. In the pressure cooker you go from start to finish in under 40 minutes. 
I usually use green split peas but our local grocery store was out so I used yellow split peas. It actually is a much prettier color than the green. The taste is the same though, in case you were wondering. 


InstaPot Split Pea Soup

Ingredients
3 Tbsp butter
1 onion, diced
2 celery stalks, diced
3 medium carrots, diced
2 cloves garlic, minced
1 ham bone
1 lb split peas, rinsed
6 cups chicken broth
1/2 tsp thyme
2 bay leaves
salt & pepper

Directions
Turn InstaPot to saute. Melt the butter and saute the onion, celery, carrots, and garlic for about 5 minutes - until vegetables soften. 
Add in the ham bone, split peas, chicken broth, thyme, bay leaves, and salt & pepper. 


Cover the InstaPot and set to manual high for 17 minutes. 
When complete, allow pressure to release naturally for 10 minutes.
Remove ham bone from the pot and cut off any ham from the bone.


I like to then take a hand blender and puree the soup for a few seconds. You want to leave some chunks so a few pulses in the soup should do the trick. (You don't have to do this, I just like the texture better.) Now place the ham back into the soup and discard the bone.
Serve hot with a little hot sauce, if desired.


Remember to save your ham bone from the next big dinner so you can make a batch of this! It freezes very well too so no need to worry about making too much. 
My favorite way to eat it? With soooo many crackers, of course. 


Split pea soup is hearty and healthy and delicious and inexpensive. It's also a great recipe to introduce you to cooking in an InstaPot. 
The perfect cold weather meal!

Sunday, October 21, 2018

Nanaimo Bar Donuts


I think all Canadians know that Nanaimo Bars are just about the best squares on the planet. {You can click HERE for our original Nanaimo Bar recipe.} Sue and I have had a lot of fun making different Nanaimo Bar inspired treats: from Nanaimo Bar Ice Cream (click HERE), to Nanaimo Bar Cupcakes and Whoopie Pies (click HERE), to Nanaimo Bar Cheesecake (click HERE), and even Nanaimo Bar Rice Krispie Treats (click HERE)
I think we have outdone ourselves this time with these Nanaimo Bar Donuts. We basically took our original recipe for a classic Nanaimo Bar, deconstructed it, and magically turned it into these delectable bad boys. 
Start practicing now so by the time Canada Day rolls around you'll be a master at making these and everyone at your get together will love you. Well, love you more than they already do now. 
I've made these a few times already because they disappear as soon as they are done and someone always wants more!


Nanaimo Bar Donuts

Ingredients
Donuts
2 cups buttermilk
2/3 cup sugar
4 1/2 tsp yeast
1/2 cup butter, melted
2 eggs, beaten
1 Tbsp vanilla
2 tsp salt
4 - 5 cups flour
Oil for deep frying (about 1 liter)

Chocolate Glaze
1 1/3 cup semi-sweet chocolate chips
8 Tbsp butter

Topping
1/4 cup butter
2 Tbsp sugar
2 1/2 Tbsp baking cocoa
1/2 of one beaten egg 
3/4 cup graham crumbs
1/4 cup finely chopped pecans
1/2 cup fine coconut

Filling
1/2 cup butter, room temp
3 Tbsp milk
2 Tbsp Birds Eye custard powder
2 cups icing sugar
1 cup whipping cream

Directions
Prepare donuts - Heat buttermilk over medium heat in a saucepan until milk starts to steam. Stir in sugar and pour into large mixing bowl. Sprinkle yeast over the warm milk and set aside for 10 minutes for yeast to get foamy. 
After yeast is foamy, beat in butter, eggs, vanilla, and salt until smooth. Add in 2 cups of flour and beat until smooth. Add in more flour, stirring with a wooden spoon or spatula, until soft dough forms. Sprinkle flour onto a work surface and place dough on top. Knead dough, adding a bit more flour if too sticky, for about 5 minutes. 
Oil a large bowl and place dough into the bowl. Cover with a towel and place somewhere warm to rise for an hour. 
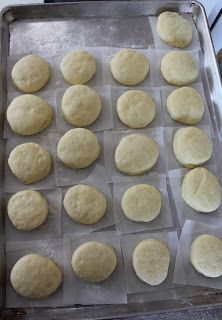
After dough has doubled in size, line 2 cookie trays with parchment paper and set aside. Roll out the dough to 1/2 inch thickness and cut with a 2.5 to 3 inch round cookie cutter.


Place the rounds on the prepared cookie sheets about 2 inches apart. 


Re-roll dough and cut out more circles. 
Cover the dough circles with a towel and set somewhere warm for an hour to rise. 

NOTE - as you can see, I cut my parchment paper into individual squares to make it easier to lift the dough for cooking. Not necessary but I find it easier.
Heat oil in a large pot to 350 degrees. Cook donuts 3 or 4 at a time until golden brown, about one minute on each side.


Carefully remove the donuts from the oil and place on paper towel to drain.


Repeat until all donuts are done. Set donuts aside to cool while you prepare the glaze, topping, and filling.
Prepare topping - In the top of a double boiler on medium heat, stir together butter, sugar, and baking cocoa. Stir in the egg to thicken. Remove from heat and stir in graham crumbs, pecans, and coconut until well combined. Set aside. 


Prepare filling - beat together butter and milk until smooth, scraping sides of bowl as needed. Beat in Birds Eye custard powder. Beat in the icing sugar.
In a separate bowl, beat the whopping cream until stiff peaks form.
Beat the whipped cream into the Birds Eye mixture until well mixed. 


Place the filling into a piping bag with a long tip. Fill each donut with some of the filling. You can use a chopstick to press a hole into each donut to make the tip easier to fit in. You will have some filling left over. 


Prepare chocolate glaze - Place chocolate chip and butter in a shallow bowl. Microwave in 30 second intervals, stirring in between, until smooth. 
Dip the top of each donut gently into the chocolate, scraping off any excess. 
Hold the donut over the bowl with the coconut topping and sprinkle some of the topping on the chocolate. Gently shake off any extra. Repeat until all donuts are done. 


Let sit for at least ten minutes for chocolate to set a bit.


I know these take a bit of time and effort but they are totally worth it. 
I make these a bit smaller than usual donuts because they are quite rich and decadent. I believe I got 4 dozen donuts in total. 


NOTE - if you find the chocolate glaze solidifying too fast simply microwave for a few seconds to melt again. 
These are another great bake sale/fundraising idea/gift idea for Canada Day or any day. 
Be prepared to fall in love with these. #ForRealTho

Friday, October 19, 2018

Cherry Almond Muffins


I never know what to bake with fresh cherries. I mean, besides cherry pie, of course. 
I could eat buckets of fresh cherries just off the tree, obviously not a great idea for my poor tummy, so baking with them is the next best thing. I decided to whip up some easy peasy muffins and throw some cherries and almonds in there for good measure. 
It only requires a handful of fresh cherries so in the off season you won't break the bank getting them at the store. During the cherry season it's a great way to use up the leftovers after making a cherry pie. 
Do you have 20 minutes? Then you could be eating delicious cherry almond muffins. What are you waiting for?


Cherry Almond Muffins

Ingredients
2 cups flour
1 Tbsp baking powder
1/2 tsp baking soda
pinch salt
1/2 cup butter, melted
2/3 cup sugar
2 eggs
1 cup buttermilk
1 tsp vanilla
1/2 tsp almond extract
1 cup fresh cherries, pitted and quartered

Topping
sliced almonds

Directions
Preheat oven to 400. Lightly spray a 12 cup muffin tin with cooking spray (or line with paper baking cups), set aside.
In a bowl, whisk together flour, baking powder, baking soda, and salt. 
In a separate bowl, whisk together melted butter and sugar until well combined. Beat in eggs. then beat in buttermilk, vanilla, and almond extract. 
Stir the dry ingredients into the wet ingredients until barely combined - some flour streaks will still be visible. Fold in the chopped cherries.
Scoop into the prepared muffin tins. Sprinkle each one with some sliced almonds. 


Bake at 400 for about 15 minutes, until tops are lightly golden brown and a toothpick inserted in the center of a muffin comes out clean.


Let cool 5 minutes before running a butter knife around the edge of the muffin and removing from pan. Let cool completely on a wire rack. Serve warm or room temp.


Muffins are a perfect meal for after school, after work, hiking, picnics, breakfasts on the go, car trips, pretty much any time! Eat as is or warm up and serve with butter/jam. 
From start to finish in under half an hour. Nothing to complain about there. 
FYI - these freeze really well too. 


We're sharing at Carole's Chatter. Click over and say Hi. 

Wednesday, October 10, 2018

Individual Breakfast Pizzas


This post is sponsored by Egg Farmers of Canada and we have been compensated monetarily for our post. Our opinions, as always, are our own!


Friday, October 12th is World Egg Day - a global celebration dedicated to eggs. Sue and I are pretty excited about that. We use a lot of eggs around here. Like... a looooooooot.
We welcome the fact that Canadian eggs are produced in every province by more than 1,000 farm families! Local farmers (Canadian egg farms are family run, by the way) ensure that, on average, eggs travel from the farm to the grocery store in less than a week. Fresh is always good in our books. 
And Canadian egg farmers all adhere to the same National Animal Care and food safety programs, ensuring hens are always well cared for, and that your eggs are always clean and fresh. 


And can we talk about the nutritional benefits of eggs for a second?
Eggs have 6 grams of protein and 14 key nutrients - including: omega-3, iron, vitamins A, D, E and B12. Eggs are a natural choice for a healthy, active lifestyle. 
So. Much. Healthiness. 
For more information on eggs you can visit eggfarmers.ca or follow @eggsoeufs on Twitter, Instagram, and like GetCracking on Facebook. 


Sue and I decided to share our Breakfast Pizzas for #WorldEggDay. They are super easy, can be customized to each person's preferences, and only take a minute to whip up. Perfect for those busy mornings! 


Individual Breakfast Pizzas

Ingredients
whole wheat pitas
pizza sauce
shredded cheese
mushroom, sliced
onions, diced
bacon, cooked and cut into pieces
tomatoes, sliced
spinach leaves, torn
eggs

Directions
Preheat oven to 400. 
Take a whole wheat pita and spread a little pizza sauce on it. Sprinkle your cheese around the outside of the pita, forming a ring (this is to prevent your egg from sliding off). Top with your favorite toppings. Be sure to leave an empty space in the center of the pita for your egg. 
Once you have topped it as desired, place your pita on a cookie sheet and gently crack an egg into the center of the pizza. 


Bake at 400 until egg whites go from clear to white and center is as set as you like it. (About 15 minutes or so, keep an eye on it!) (See step by step below)


Let cool for a minute before serving. 
Don't worry if your egg yolk breaks when you top your pizza. It will still work! 


There are so many ways you can make this! Use your favorite toppings.


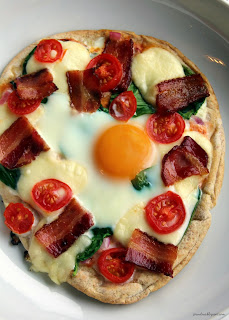
Above is a simple cheese pizza with a little bacon and spinach.


And this one is topped with bocconcini slices, spinach, bacon, tomato, and onion. 


I just think they look so pretty. 
You may have noticed I didn't include amounts with the ingredients. This is because you can use as much or as little as you like. You can make one pizza or a dozen pizzas. 
So. Easy. 


All those colors, and textures, and flavors!


Breakfast doesn't get much better than that. 

Sue and I were cleaning up and our mom came in and said, "I'd like one of those. They look tasty."


15 minutes later. *Voila* 
Eggs are definitely the star of the show. You can leave the yolk a little runny or let it set fully. Up to you.


Even our broken yolk pizza was ridiculously good. 
Seriously, is there anything Canadian eggs can't do? 

How are you going to be enjoying your eggs this Friday? We'd love to see what you're making - take a picture and share it on social media! Just be sure to include #WorldEggDay on all of your social posts! 


Pop over to Carole's Chatter for some fun links!