Tuesday, December 22, 2015

Coconut Cake With Raspberry Buttercream And Toasted Meringue


Are you prepared to have your mind blown?
Like.... bells and whistles, stars and little birds flying in a circle above your head... mind blown?
Well then... read on my friends.
This cake is just ridiculous and is like 99.9% guaranteed to cause some degree of brain explosion.
So.... sorry but not sorry.


Coconut Cake with Raspberry Buttercream and Toasted Meringue

Ingredients
Cake
1 cup butter, softened
1 tsp coconut extract
2 cups sugar
4 eggs
1 cup coconut, shredded
3 cups flour
3 1/2 tsp baking powder
pinch salt
1 3/4 cup coconut Greek yogurt
2/3 cup cream

Raspberry Frosting
1 1/2 cups butter, softened
1 1/2 cups fresh raspberries
2 tsp vanilla
7 cups icing sugar

Meringue
1/2 cups egg white
1 cup sugar
pinch salt

Directions
Preheat oven to 350. Line 3 - 8 inch pans with parchment paper and spray lightly with cooking spray, set aside.
Prepare cake - Beat butter, coconut extract, and sugar in a large bowl until smooth, scraping sides as necessary. Beat in eggs - one at a time - until well combined.
In a separate bowl, whisk together shredded coconut, flour, baking powder, and salt. 
Beat in half of the dry ingredients to the wet ingredients.
Beat in half of the Greek yogurt and 1/2 of the cream.
Then add remaining dry ingredients, beat well, then add remaining Greek yogurt and cream and beat until smooth.
Spread evenly into the 3 prepared pans. Batter will be very thick. 


Bake at 350 until toothpick inserted near center of cakes comes out clean - about 30 - 40 minutes. Tops will be golden brown.


Let cool in pans about 10 minutes. Run a knife around the outer edge of the pan to loosen cakes. Invert onto wire racks and remove pans. Let cool completely. Chill in fridge until ready to frost. (Can be made ahead and frozen until ready to use.)


Prepare Buttercream - In a large mixing bowl, beat butter until smooth, scraping sides of bowl as necessary. Beat in raspberries until most of the berries are broken up. Don't worry if it looks like a disaster - it will become more smooth as you add the rest of the ingredients. 


Beat in the vanilla and then slowly start to add in the icing sugar, 1/2 cup at a time, scraping sides of bowl as needed, until frosting reaches a spreadable consistency. Chill until ready to use. 


Assemble Cake - Place one cake on a serving plate. Top with a generous scoop of the buttercream and spread to edges of cake. Top with second cake and more buttercream. Finish with the third cake but do not frost the top of the cake.


Generously frost the sides of the cake with the remaining buttercream. You may have  little bit left over. I used the little bit I had leftover to pipe a little decorative swirl around the base of the cake. I also put a VERY thin layer of frosting on top of the cake (but this is not necessary).
Chill cake until very cold - at least 2 hours.


When cake is thoroughly chilled - prepare meringue. 
Prepare Meringue - Whisk together egg whites, sugar, and salt in the bowl of a stand mixer for about 1 minute.
Place the bowl over a pot of simmering water to form a double boiler. Scrape down the sides of the bowl so that all the sugar is off the sides of the bowl. Continue to stir the mixture until all the sugar is melted and you no longer feel any graininess when you rub a bit of it between your fingers - about 3 - 5 minutes.
Place the bowl back into the stand mixer and beat on high speed until the meringue forms thick and glossy peaks and the bowl is just above room temp - this can take up to 8 minutes. 
Pipe or spread the meringue on top of the chilled cake. 


Using a cooking torch, toast the meringue until it is nice and brown. Be careful to keep an eye on it so you don't burn it!


You may have some meringue leftover. You can always pipe this onto a cooking sheet covered with parchment paper and bake it at 250 for 2 hours to make meringue type cookies. 
Chill cake until ready to eat.


This cake not only looks beautiful but tastes amazing as well. The dense moist coconut cake pairs superbly with the tangy raspberry buttercream and the ooey gooey meringue. 
I made this for a birthday at my office but wasn't there to take a photo of the cut cake. I had a coworker take some photos and send them to me.


This would also be a perfect cake for Christmas dinner - the color of the raspberry buttercream would certainly fit the season. I'm thinking fresh berries in the summer would make this even better, if that is even possible. 


Definitely worth the effort to make. 
The raspberry buttercream is seriously some of the best frosting I have ever had!! 


Saturday, December 19, 2015

Stuffed Pepper Soup


It's chilly outside and we all know what that means....
Soup time!!
Our dad makes the best stuffed peppers in the universe, hands down, but since he doesn't have a recipe ("a little of this, a little of that, Hmm... maybe some of this."..) we can't seem to duplicate it. My niece, Kenzie, and I came up with THESE delicious Quinoa Stuffed Peppers that are super tasty, using quinoa instead of rice.
For this stuffed pepper soup I was going to use rice but it turns out I didn't have any BUT I did have some Israeli couscous which worked like a hot darn. If you don't have Israeli couscous then feel free to use rice or quinoa or even barley as a substitute. (Just keep in mind that barley may need more liquid!) 
According to Myfitnesspal, a serving of this soup (recipe makes approx 8 servings), is 190 calories, 20 carbs, 1 fat, and 14 protein. Which makes it a hearty, healthy, tasty choice to warm you up!


Stuffed Pepper Soup

Ingredients
1 lb ground turkey
1 onion, finely chopped
1 red pepper, roughly chopped
1 orange pepper, roughly chopped
1 yellow pepper, roughly chopped
1 green pepper, roughly chopped
3 cloves garlic, minced
1 tsp garlic powder
1 tsp onion powder
1/2 tsp chili powder
1/2 tsp paprika
salt & pepper
4 cups beef broth
2 cups water
1 (14 oz) can diced tomatoes
3/4 cup Israeli couscous

Topping
1/2 cup shredded Parmesan cheese

Directions
In a large sauce pan, cook turkey, onion, peppers, garlic, and spices until turkey is no longer pink. 


Add in the beef broth, water, and tomatoes and bring to a simmer.
Add in Israeli couscous and simmer, stirring occasionally,  for about 20 minutes - until couscous is cooked. 
Ladle into 8 soup bowl...


Then top each with 2 tbsp of shredded Parmesan cheese.


Serve immediately.
Store any leftovers in the fridge. Easy to reheat in the microwave or on the stove top. 
From start to finish in under an hour. Not too shabby. 
 
Be sure to stop by Carole's Chatter for tons of great links!

Friday, December 11, 2015

Peanut Butter Oatmeal Chocolate Chip Cookies (Gluten Free)


3 of my favorite cookies rolled into one.
Peanut butter - yes...
Oatmeal - yes...
Chocolate chip - yes... d'uh
Aaaand there is no flour or butter in these, believe it or not. 
Sue is one of those weirdos that doesn't like cookies. Not me. Cookies are my kryptonite. I developed these gluten free little devils for Sue's daughter, Kenzie, but then went ahead and ate them all because they were delicious. 
Too bad for Kenzie. (It's okay - I'm a good aunty, I will make her more.... and try not to devour them... no promises...)


Peanut Butter Oatmeal Chocolate Chip Cookies

Ingredients
1 cup peanut butter
2/3 cup dark brown sugar
2 tsp vanilla
2 eggs
2/3 cup rolled oats
1 tsp baking soda
pinch salt
2/3 cup chocolate chips (or mini M&M baking chips)

Directions
Preheat oven to 350. Line a cookie sheet with parchment paper, set aside.
In a large bowl, beat together peanut butter, brown sugar, vanilla, and eggs. 
In a separate bowl, whisk together oats, baking soda, salt, and chocolate chips (or mini M&M baking chips).  Stir the dry ingredients into the wet ingredients until well combined.
Using a cookie scoop (or about 2 Tbsp), drop onto prepared cookie tray.


Very, very lightly flatten the tops of the cookies with your palm.
Bake at 350 for 9 - 11 minutes, until light golden brown.
Remove from oven and let cool on cookies sheet for 10 minutes before removing to wire rack to cool completely. 


Depending on the size of the cookie scoop you should get between 12 (large) and 24 (small). 
These are just the way a good cookie should be - crispy around the edges but soft and chewy in the middle. 
From start to finish in about 30 minutes. 
Better get making them!

Tuesday, December 8, 2015

Pierogi Lasagna


This is what I like to call "how can I take two separate, delicious, meals and combine them into one over the top ridiculous, heart attack inducing, oh-my-goodness I'm going to eat until I explode, new favorite dish".
Or... pierogies + lasagna = true love.
 I'm counting this as one of my better inventions. It's got everything that you could possibly need. Meat, cheese, pierogies, and, yes, even vegetables. 
I threw in the veggies so then I could at least claim some health benefit. 
True story - throw in a handful of vegetables and *voila* now it's healthy. 
You're welcome. 


Pierogi Lasagna

Ingredients
40 (approx) pierogies (frozen)
1 lb extra lean ground beef
1 small onion, finely diced
3 cloves garlic, minced
1 cup coleslaw mix (or mixed shredded veggies)
1 jar spaghetti sauce
3 (approx) cups shredded cheese

Directions
Preheat oven to 350. 
Place a generous scoop of spaghetti sauce in the bottom of a 9 X 13 pan. (Can also be made in a deep 9 X 9 pan). 
Place a layer of frozen pierogies in the bottom of the pan. Set aside.
In a large frying pan, cook the beef, onions, and garlic until beef is no longer pink. Add in the veggies and continue to cook another 2 - 3 minutes. Stir in the spaghetti sauce. Remove from heat. 
Layer half of the meat sauce over the pierogies.
Sprinkle with half of the cheese.


Repeat the layers again - remaining pierogies, remaining meat sauce, remaining cheese.


Cover with tinfoil.
Now pop that bad boy into the oven until it's good and bubbly - about an hour to an hour and 20 minutes. **I cooked it for 50 minutes, covered, then another 15 minutes, uncovered.**
Let sit for about 5 minutes.


Serve hot.


So much meaty, cheesy, pierogi-y goodness.


A small piece goes a long way, by the way.
Serve it with a salad (totally makes it even healthier, FYI) and maybe a piece of garlic toast (because carbs, that's why).


Hubbies everywhere will thank you. 
Oh, and teenagers. 
Yes, the ladies too will be clamoring at your door to shake your hand if you serve this to them. 
Everyone needs to indulge once in a while.  


We're sharing over at Carole's Chatter and Wondermom Wannabe and Cookin and Craftin and Adventures of Mel and Dizzy Busy and Hungry ! Be sure to pop over and say hi! 

Sunday, December 6, 2015

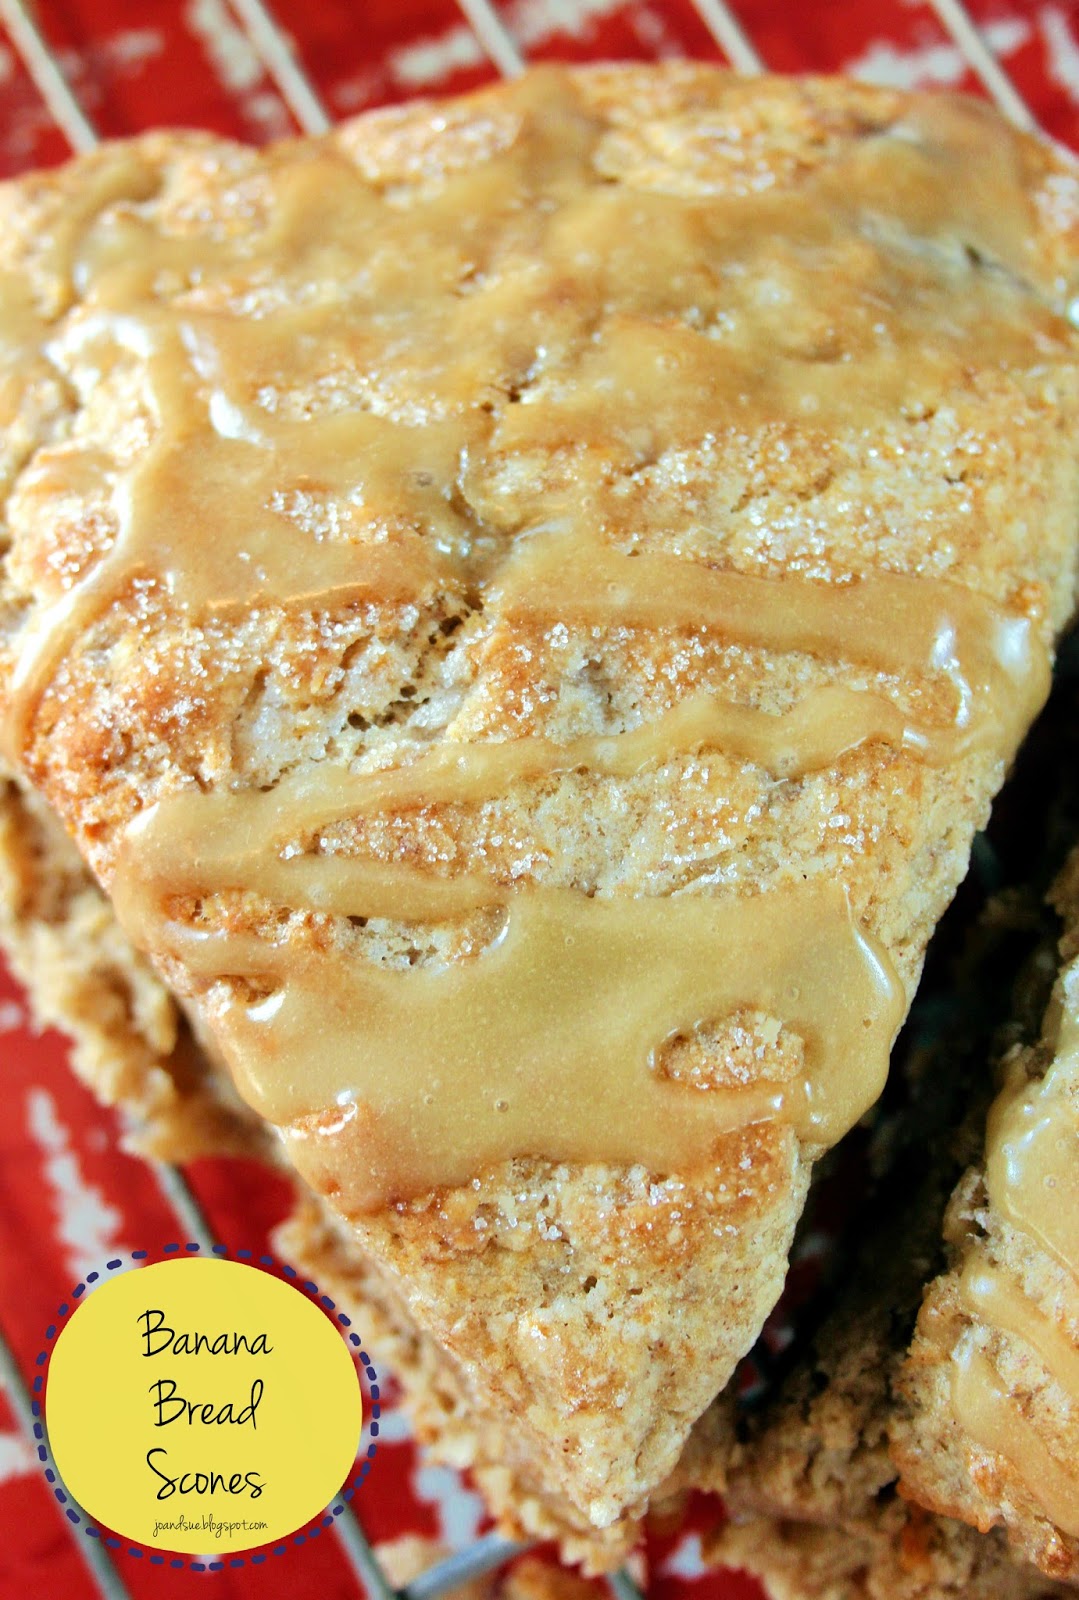
Banana Bread Scones


If you have skimmed through our blog at all you have probably seen several recipes for scones and biscuits and muffins. See.... we LOVE our quick breads. 
Love. 
Yes, we would marry them if we could.
These lovely little flaky bits of goodness are no exception. 
Banana bread meet scone... scone meet banana bread.... 
Book the church and buy the ring.
I see a wedding in my future. 


Banana Bread Scone

Ingredients
Scone
2 cups flour
1/3 cup brown sugar
1 tsp baking powder
1/2 tsp baking soda
pinch salt
1 tsp cinnamon
1/2 cup butter, cold
1/4 cup walnuts, toasted & chopped
1 cup mashed banana (about 2 bananas)
1 egg

Caramel Drizzle
2 Tbsp brown sugar
1/2 tsp vanilla
1 Tbsp milk
1/2 cup icing sugar

Directions
Preheat oven to 350. Line a cookie sheet with parchment paper, set aside.
In a large mixing bowl, stir together flour, brown sugar, baking powder, baking soda, salt, and cinnamon. Using a pastry blender or two butter knives, cut in cold butter until mixture resembles coarse crumbs. (Alternatively - you can pulse the mixture briefly in a food processor.) Stir in chopped walnuts. 
In a separate bowl, whisk together mashed banana and egg.


Stir the wet ingredients into the dry ingredients until stiff dough forms. (If too dry then add a few spoonfuls of milk. If too wet, add a few spoonfuls of flour.) Try to handle the dough as little as possible - it will make your scones tough!
Dump dough onto a lightly floured surface.


Pat or roll to one inch thickness. 
**You have several options here - you can pat it into a 9 inch circle, cut into about 8 wedges, and bake as such. OR, you can roll into a rectangle, 1 inch thick, and cut with a biscuit or cookie cutter, and bake. OR, you can roll into a 1 inch thick rectangle and cut into wedges (this is what I did).**
Place your scones on the prepared cookie sheet and bake at 350 until tops are golden - about 15 - 20 minutes. 
Remove from oven and let cool on wire racks.
While scones are still warm - prepare caramel glaze.
In a small bowl, whisk together brown sugar, vanilla, milk, and icing sugar. (You may need to add a tsp more milk or pinch more icing sugar to get to drizzling consistency.)
Using a spoon, drizzle caramel glaze over scones.


Serve warm.
Can also be frozen and then reheated in the microwave.
Of course, you can serve these at room temp too. I just prefer them warm...


So yummy for breakfast, brunch, tea time, and snack time. Perfect to have in the freezer for when unexpected guests drop by. Simply pop them in the microwave and *voila* just like freshly made. 
Soft, crumbly-but-not-too-crumbly, caramel and banana-y deliciousness. 
Don't like walnuts? Leave them out entirely or sub them with mini chocolate chips! 

Wednesday, December 2, 2015

BCT Roll Ups


Everyone has heard of BLT's but how many have heard off BCT's?
Bacon, lettuce, and tomato sandwiches are the bomb. We all know it's true. I wanted to duplicate the flavors in a roll up for an appie for our mom's church group but I knew the lettuce would make the rolls soggy. Instead... I took out the lettuce and added some shredded, aged cheddar. 
Problem solved. 
Meet the BCT roll up.
Perfect as an appie for just about anything you can imagine.... pot luck - yup, after school snack - yup, game night - yup, office party - yup, ladies night - yup, church group - yup, and the list goes on.


BCT Roll Ups

Ingredients
Filling
1 pkg (8 oz) cream cheese (softened)
1/2 cup light mayo
1 lb bacon, cooked & crumbled
1/2 cup seeded, chopped tomatoes
3 Tbsp finely diced onion
1/2 cup shredded, aged cheddar cheese
salt & pepper

Wrap
10 - 8 inch tortillas

Optional (on our platter for presentation)
black seedless grapes (or purple)
Strawberries
cubed cheddar cheese

Directions
Mix cream cheese and mayo in a bowl until well combined and smooth.
Stir in bacon, tomato, onion, cheddar cheese, and salt & pepper until well mixed.


Spread mixture evenly onto the 10 tortillas - about 3 Tbsp or so per tortilla.


Roll up tightly.


Slice into approx 1 inch slices. Place on serving platter.


Serve immediately or cover and chill until ready to serve.


We put our roll ups on a platter and piled the center with strawberries and black grapes and a few more cubes of cheese for a pretty presentation.


You don't want to make them up too far in advance - a few hours is okay - because you don't want the tortillas to get soggy. 
A quick and easy appetizer that looks very impressive when served. 

Be sure to check out these fab linky parties for tons of great links - The Chicken Chick, Joy Love Food, Carole's Chatter