Friday, May 31, 2024

Pork and Veggie Ramen Bowls


Whenever I make a pork roast I end up with leftovers and I'm always looking for recipes that will use them up. I saw a similar idea to this over on Tik Tok and decided to experiment. 
Peeps, this recipe is sooooo good! 
It only takes about 20 minutes from start to finish and makes 4 generous servings. I use my leftover pork roast but you could use pork tenderloin or even pork chops. It's a simple combination of flavors but the end result is amazing! I used carrots, broccoli, snow peas, and bok choy but you could easily sub your favorite veggies. 


Pork And Vegetable Ramen Bowls

Ingredients
2 (85 gr/3 oz) pkgs ramen noodles
1 lb pork, cooked, sliced thinly 
1 Tbsp oil
1/4 cup brown sugar
1/2 cup soy sauce
1/2 cup carrots, sliced thinly
1/2 cup broccoli, chopped
1/2 cup bok choy, sliced thinly
1/2 cup snow peas, cut in half
green onions & sesame seeds for serving

Directions
Open ramen noodles and discard flavor packages (save for another use). Cook noodles in boiling water for 3 minutes. Drain and set aside. 
First photo is the brand of noodles I used, for reference (Amazon link provided above).


Set drained noodles aside while you prepare veggies and pork.


While noodles are cooking, heat oil over medium heat in a large pan. Add the vegetables and stir fry until done - about 5 - 8 minutes. (I like to cook them for about 5 minutes then add a few tablespoons of water and put the lid on so they steam for another 2 - 3 minutes.) Add in the brown sugar, soy sauce, and chili garlic sauce. Reduce heat and simmer about 5 minutes, until vegetables are cooked to your preference and sauce is sticky. 


Add in the cooked, sliced pork.


Cook until pork is heated through. 
Add the cooked noodles to the pan and cook and stir until the noodles are heated and coated in sauce. 
Serve in bowls, sprinkled with green onions and sesame seeds. 


The brand of noodles I buy (see photo above) comes with little packets of soy sauce and chili sauce so I serve the ramen bowls with those packets for guests who like to add more to their noodles. 


Pork and Veggie Ramen Bowls make a quick and easy lunch or dinner and work well to make ahead as they will keep, covered, in the fridge for a few days. 
If you don't have leftover pork you can use raw pork - in the step where you would heat up the leftovers, simply cook the raw pork instead. 


Wednesday, May 1, 2024

Mediterranean Brown Rice Salad


Sometimes you need to step outside your comfort zone and just try something new. 
We don't generally eat rice in salads but after trying this recipe that will be changing. The textures and flavors and colors of this salad are amazing. It does take a little bit of prep but nothing too crazy. 
If you are looking for something different to bring to a potluck or family dinner, try this! Mom brought it to her church dinner and they loved it. A healthier alternative to the usual heavy macaroni or potato salad. 


Mediterranean Brown Rice Salad

Ingredients
Dressing
3 Tbsp olive oil
2 Tbsp apple cider vinegar
1 Tbsp honey
2 cloves garlic, minced
2 tsp dried dill 
juice of 1 lemon
salt & pepper

Salad
1 cup brown rice, uncooked
2 bell peppers, diced
1/2 cucumber, diced
1 1/2 cups cherry tomatoes, halved
1 (341 ml) can corn 
1 small purple onion, diced
1 (540 ml) can chickpeas, rinsed and drained
3 cups spinach, chopped
1 (210 ml) jar sundried tomatoes, drained and chopped
1/2 cup feta (divided)
1/2 cup pine nuts (divided)

Directions
Whisk together dressing ingredients until well mixed. Set aside.
Cook brown rice as per package instructions. Let cool.
In a large bowl, mix together cooled rice, peppers, cucumber, tomatoes, corn, onion, chickpeas, spinach, sundried tomatoes, and 1/4 cup of the feta and pine nuts. 


Drizzle the dressing over the salad and toss gently to coat. 


Chill, covered, until ready to eat - at least 2 - 3 hours. When ready to serve, sprinkle with remaining 1/4 cup feta and pine nuts. 


Easy peasy, good for a crowd, full of healthy ingredients, and, most importantly, super delicious!
As with most salads, you can sub ingredients or switch them up to suit your preferences. Throw in some olives if you like olives, add more spinach or less corn.... you get the point! 
The next time I make this I might at some chicken and just have it as a meal instead of a side. 

Saturday, April 13, 2024

Garlic Pickle Pizza


If you love pizza and pickles then have we got the recipe for you!
To be fair, I don't really love pickles but they go really well on this pizza. You start with a garlic sauce instead of tomato based so it's deliciously different. The recipe, as written makes 2 large pizzas. 
I cut the second into slices and individually wrapped and froze them. Just pop them in the microwave for a minute or two and they are a great, quick lunch/snack. 
Bring this to your next get together and impress your friends!


Garlic Pickle Pizza

Ingredients
Garlic Sauce
1/2 cup sour cream
1/4 cup mayo
1 tsp dried dill
1 Tbsp pickle juice
1 clove garlic, minced
1/4 tsp pepper

Pizza
2 (1 lb each) balls of pizza dough
(We double THIS RECIPE for dough)
1 jar sliced pickles (about 3 cups)
1/2 cup sliced onions
3 cups mozzarella cheese, shredded
1 cup parmesan cheese, shredded

Directions
Preheat oven to 425. Lightly grease 2 large pizza pans (or line with parchment paper). You can also use one large cookie sheet or 4 - 8 inch pans. 
Prepare the garlic sauce by mixing the sour cream, mayo, dill, pickle juice, garlic powder, garlic, and pepper together well. Set side. (This can be made a day ahead if you want more intense flavor.) 
Press the pizza dough to the edges of the prepared pan. 
Spread half of the sauce on each pizza. 
Top with pickles, onions, mozza, parmesan. 
Bake at 425 for about 15 - 20 minutes, rotating once halfway. Top should be bubbly and brown. 


Cut into pieces and serve hot. 


You can use store bought pizza dough or make your own. Our recipe can be found HERE. (Just remember to double it)  You can even use pita shells, Pillsbury crust,  or tortillas as a base if you prefer. 


Garlic pickle pizza is super simple to whip up and freezes very well. 


There is no need to add extra salt as the pickle themselves are quiet salty. 
Our mom loves this and she is not a big pizza fan. She says it reminds her of a grilled cheese with pickles on it. FYI - do yourself a favor and make extra of the garlic sauce. It's delicious as a veggie dip or salad dressing! 

Thursday, March 7, 2024

Keto Almond Biscotti


If you are looking for keto, diabetic friendly, gluten free cookie with a little crunch then you have come to the right place. These Keto Almond Biscotti are super tasty and will definitely satisfy a cookie craving. 
The nutritional counts on these are: 110 calories, 10 fat, 3 carbs, 2 fiber, 3 protein. That’s 1 net carb per cookie! 
(Recipe makes 32 cookies)
I made these fairly small, about finger size, but you can make them a little longer if you prefer, just watch your bake time. I enjoy these with my coffee or tea in the afternoon for a little 1 net carb snack. 
They are easy to switch up if you want to swap out the nuts and cranberries for sugar free chocolate chips or maybe even pumpkin seeds. That will change the nutritional counts a little but they will still be low carb/keto friendly. 


Keto Almond Biscotti

Ingredients
3 1/2 cups almond flour
1 tsp baking soda
Pinch salt
1/2 cup almonds (or pecans), finely chopped
2 Tbsp dried cranberries, chopped
 1 tsp cinnamon
2 eggs
1/2 cup butter, melted

Directions
Preheat oven to 325. Line a cookie sheet with parchment paper, set aside. 
Combine the almond flour, baking soda, salt, almonds, cranberries, and cinnamon. In a separate bowl, whisk together the eggs, keto honey (or syrup), butter, and almond extract. 
Stir together and form into 2 logs about 1 inch wide and 8 inches long on top of the parchment paper.


Bake at 325 for 20 minutes. Remove from oven and let cool 5 minutes. 
Using a serrated knife, cut the logs into slices approximately 1/2 inch wide. Place cut side up on the cookie sheet. 


Return to oven, reduce heat to 250, and bake 15 more minutes. 


Gently flip the cookies over and bake another 10 or so minutes, until they are golden brown. 


If you like your biscotti super crunchy then leave them in longer. 


These cookies are a little more crumbly than regular biscotti so can be frustrating to cut. If you find you are having trouble just cut them a little thicker. 


These keep very well covered, at room temp, for several days or they can be frozen for up to 3 months. 
The nutritional counts are going to change a little depending on what brands you use so, as always, if you are strictly tracking macros you will want to enter the recipe into your own counter. 

Wednesday, December 27, 2023

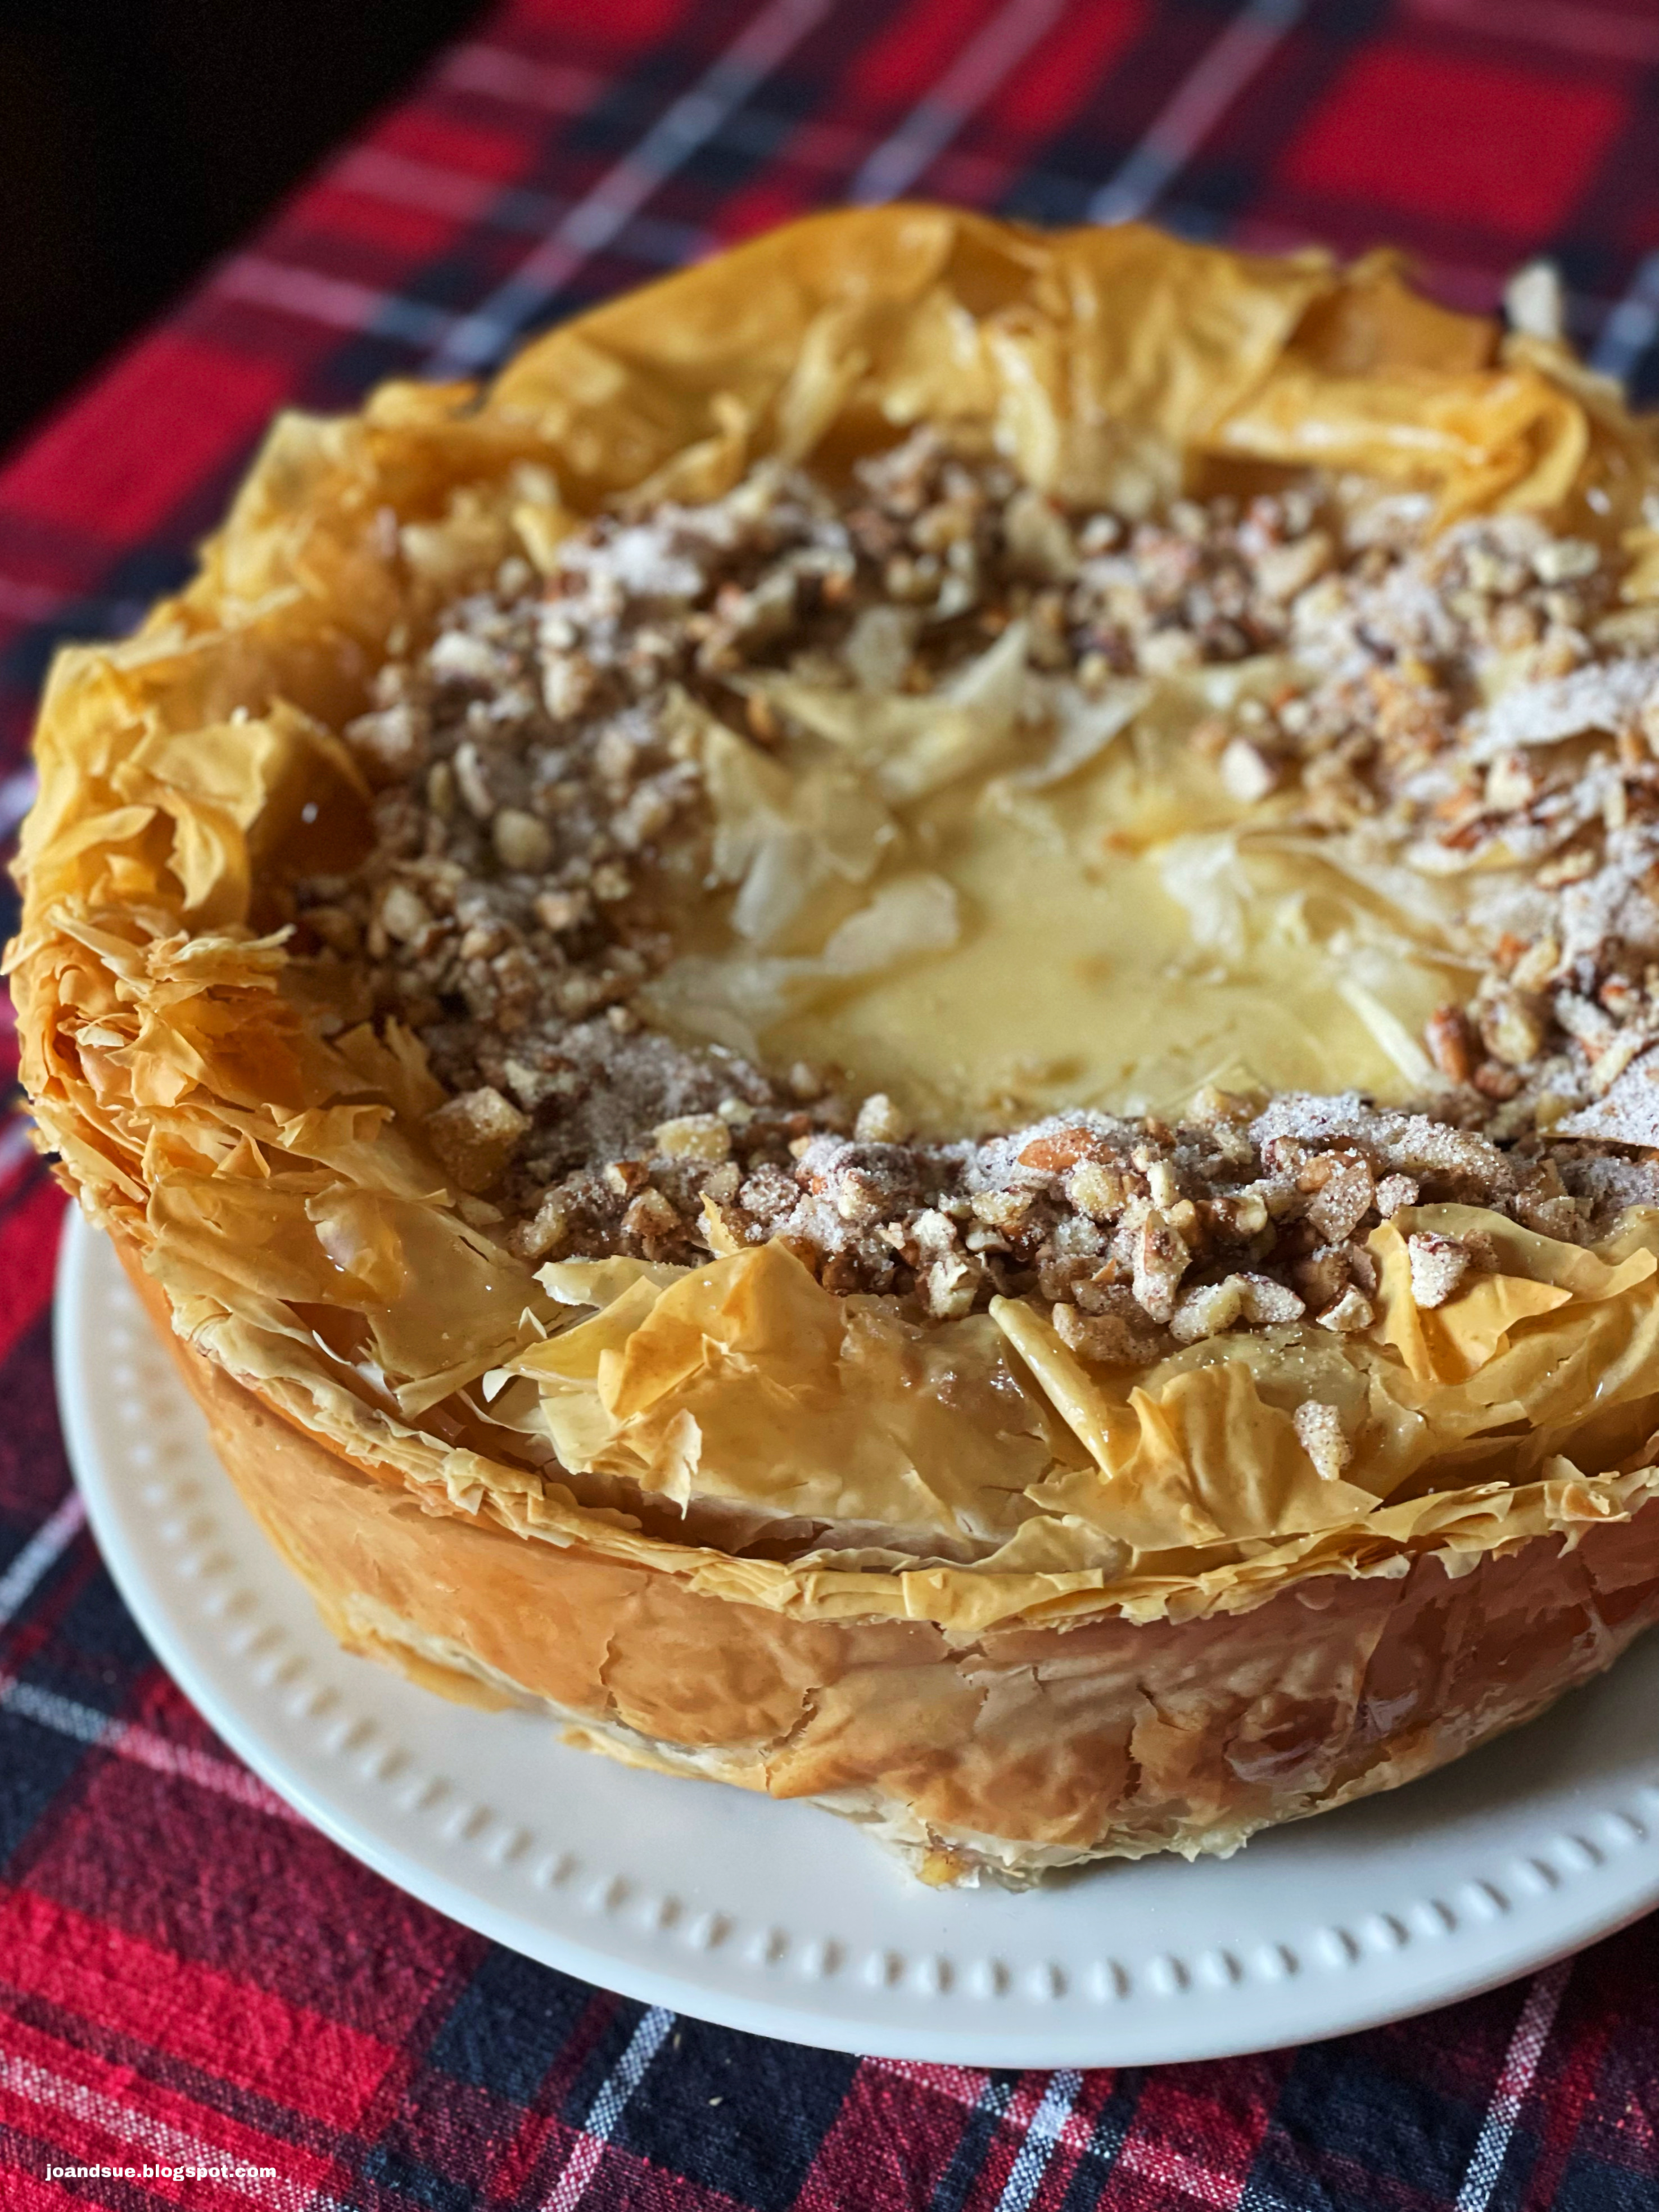
Baklava Cheesecake


This just might be the best cheesecake… nay, dessert… in the universe. 
Bold claim, I know, but it’s true. The combination of the crispy sweet baklava and the smooth and creamy cheesecake is *chef’s kiss*. 
My sister’s boyfriend said I could become a millionaire if I decided to sell it. I think he’s right. Once you have a taste you want more. The only thing that is a bit of a bummer is the fact that it takes a bit of time and effort to put it together. If you’ve ever made a baklava and a cheesecake then you know what I’m talking about. Totally worth it though. 
Do it.


Baklava Cheesecake

Ingredients
Baklava Base
20 phyllo sheets
1 cup butter, melted
1 cup finely chopped walnuts
1 cup finely chopped pecans
1/4 cup sugar
1 1/2 tsp cinnamon

Cheesecake Layer
3 bricks cream cheese (24 oz), softened
1 1/2 cups sugar
Pinch salt
3 tsp vanilla extract
3/4 cup sour cream
1 Tbsp lemon juice
3 eggs

Honey Syrup
1/2 cup sugar
1/4 cup water
1/4 cup honey

Directions
Preheat oven to 325. Line the bottom of a 10 inch springform pan with parchment paper.
Layer 1 phyllo sheet in the prepared pan. Gently press the sheet against the sides of the pan and over the top. Brush all over with a little melted butter. Continue layering a phyllo sheet and butter until you have used 10 phyllo sheets. 
Combine the chopped walnuts, pecans, sugar, and cinnamon in a small bowl. (Reserve 1/3 of a cup for decorating the top of the cheesecake later). Spread half of the mixture into the pan. 
Layer 5 more phyllo sheets and butter on top of the nuts.
Spread the remaining chopped nuts mixture in the pan. 
Layer in the last 5 phyllo sheets and butter. 
 Set aside and prepare the cheesecake.


Prepare cheesecake - Beat cream cheese until smooth, scraping down sides of bowl as needed. Beat in sugar, salt, and vanilla. Beat in sour cream and lemon juice. Lastly, beat in eggs until just combined. 
Pour into the pan and spread evenly. 


Gently fold the excess phyllo up and over the top, leaving the centre of the cheesecake open. It’s okay to trim off some phyllo if you don’t want it too thick on top. IMPORTANT NOTE - Set the cheesecake on a cookie sheet as it will drip and smoke up your oven otherwise! 


Bake at 325 for 60 - 70 minutes. FYI - I actually ended up baking mine for almost 2 hours before it was done. The centre should be almost completely set with just a slight jiggle to it if you gently shake the pan. The phyllo should be golden brown.
When the cheesecake is done, shut the heat off and let it sit while you prepare the honey syrup.
Prepare the syrup - Bring sugar, water, and honey to a boil over medium heat. Simmer for 5 - 6 minutes. 
Remove cheesecake from oven to a wire rack. Slowly drizzle the honey syrup over the phyllo pastry. Make sure to try and get it in all the cracks and crevices. Drizzle a little over the centre of the cheesecake as well. 


Let cool to room temperature before removing the sides of the pan. Don’t worry if a bit of the phyllo falls off as you do this, it’s normal. 
Chill the cheesecake in the fridge for at least 4 hours, up to overnight.


Before serving, sprinkle the reserved 1/3 cup of chopped nut mixture around the edge of the cheesecake. Slide a spatula under the chilled cheesecake to remove the bottom of the springform pan and transfer the cake to a serving plate. 


This makes a huge cheesecake so is perfect to bring to a family gathering or potluck. It also lasts for several days, covered, in the fridge. I had a piece 3 days after first making it and it was totally fine. The phyllo was a teeny tiny bit not as crunchy but it was not soggy or anything like that. 


Look at all those delicious layers!
So. So. So. Good.
I will definitely be making this again. 

Monday, December 25, 2023

Yam Mochi in Sticky Gochujang Garlic Sauce


This year for Christmas I decided to try something new. I had never had mochi before and I saw several absolutely delicious looking recipes on Pinterest and knew I had to give it a try. 
I ended up searching through several dozen recipes because there are a million different ways to make it. I combined a few to come up with this one and the family was pretty happy with the results. 
I will definitely be making this for future dinners. It takes a little time to roll all the balls out but is otherwise super simple! 


Yam Mochi In Sticky Gochujang Garlic Sauce 

Ingredients
Mochi 
3 cups mashed yams (about 2 medium)
1 Tbsp salt
Olive oil
Sauce
4 Tbsp soy sauce
4 Tbsp water
2 Tbsp sugar 
2-3 tsp gochujang 
5 cloves garlic, minced
2 tsp cornstarch
1/3 cup chicken broth
Garnish 
Green onions

Directions
Boil yams until very soft  - about 20 minutes. Let cool completely. 


Mix the cooled, mashed yams with the cornstarch, tapioca flour, and salt. Mixture should form a firm yet pliable dough.


If it is too sticky, add a bit more tapioca flour a little at a time. If it is too dry, add a little water. 
Pinch off grape sized pieces of dough and roll into balls. Place on parchment paper lined sheet. 
If you don’t want to use all of the dough you can freeze it for a later time. 


Once the balls are ready bring a large pot of salted water to a boil. Drop about 1/4 of the balls in (not too many as you don't want the water to stop boiling). 


Boil until the balls float to the surface - about 3 - 5 minutes. Using a slotted spoon, remove the mochi from the water and drop into a bowl of cold water to stop the cooking process. Drain and set aside. Repeat until all the balls are cooked. 


Toss in a little bit of olive oil to prevent the balls from sticking together. 
At this stage you can refrigerate the balls until ready to make the sauce and serve. 
When ready to eat - prepare the sauce.


Place soy sauce, water, sugar, gochujang, fish sauce, garlic, and sesame oil in a large pan. Bring to a simmer over medium heat. Add in the mochi and stir to coat. Whisk together cornstarch and chicken broth and add to pan. Turn heat to low and cook until heated through, stirring often.
If sauce thicken too much, add a bit more chicken broth. 


Remove from heat and sprinkle with green onions and sesame seeds. 


You can make this with potatoes, sweet potatoes, or yams. The yams give them that beautiful orange color. A great recipe to use up leftovers.  
I sampled the mochi without the sauce and they taste just like plain yams. It’s the texture that makes these so intriguing. Chewy and sticky and deliciously different. 
The gochujang adds so much flavor but it also adds heat. Start with a little and add more as you like it. I went with about 1 Tbsp total and it was just spicy enough. 
We love trying foods we haven’t had before and this one is definitely going into regular rotation!