Tuesday, February 7, 2012

Mustard Sauce for Fish


Two blogs in one day! I'm on fire today :)
Actually, I thought I would add a second blog today because the recipe is really simple and more of an accoutrement than an actual dish.
I had a beautiful salmon steak to eat last night but needed something to flavor it up a bit.
My fridge was a little bare so I came up with this recipe out of what I could scavenge around the kitchen. Turns out it is very tasty and I plan on making it again!


Mustard Sauce for Fish

Ingredients
2 Tbsp sour cream
1 Tbsp prepared mustard
generous pinch of dried dill
1 garlic clove, minced
1 Tbsp finely chopped purple onion

Directions
Mix ingredients together in a small bowl.


Place your fish (de-boned and skinned) on a large piece of tinfoil. Spoon sauce on top of fish.


Bring edges of tinfoil together and pinch to seal. Either place in fridge until ready to bake, or preheat oven to 350 and place tinfoil package on to rack in oven.
Bake about 20 - 30 minutes, depending on size and thickness of fish, until fish is cooked.
Remove from oven, carefully open tinfoil - be careful, it's hot!
Serve immediately.

Sometimes being short on groceries is a good thing. It leads to developing interesting and sometimes delicious new recipes.
If you give this a try please let us know what you think.
It is a little garlicky - which I prefer - so I just thought I would warn you!

UPDATE: One of our blog followers made this recipe and sent us a photo of her creation.


Thank you for sharing this with us, Christina :) Your photo is amazing!

Be sure to stop by Carole's Chatter for more fun foody links!

Broccoli Salad


Need something simple to serve with dinner tonight?
This can be thrown together in a few minutes and can feed a big group or a small group - you can adjust the recipe to suit your needs.
It also makes a great healthy lunch :)
I hate to admit it...but.....this is Sue's recipe...
I don't know if mentioned this before but....she's kind of a genius in the kitchen.
For Pete's sake though....don't let on that you heard that from me. I'll deny I said it.

Broccoli Salad

Ingredients
1 head broccoli, broken into small florets
1/4 of a purple onion, finely diced
5 -6 strips bacon, cooked and crumbled
1/2 cup coarsely chopped cashews

Dressing
1 cup mayonnaise
2 Tbsp vinegar
1 tsp sugar
Sprinkle of salt & pepper
Sprinkle of garlic powder

Directions
Toss broccoli, onion, bacon, and cashews.
In a small bowl, mix together dressing ingredients. Add a little more sugar if it is not sweet enough for your tastes - conversely, add a bit more vinegar if it is not tart enough for you.
Start with about half of the dressing and toss it on your salad. Add more as you deem necessary to make it creamy but not soggy.
Serve immediately.
*Note* - If you are not serving immediately - wait to add the cashews until just before serving. Also wait to add your dressing until just before serving.

See...how simple is that?
It takes like 15 minutes to make but is impressive enough to serve for a fancy dinner.
Plus, one of the good things about this recipe is you can sub ingredients as you like.
Don't like cashews.... try almonds...
Not in love with broccoli....try mixing some cauliflower with the broccoli...
You don't have to use purple onions...they are just prettier....use white onions...
Want to add some raisins? Go for it.
Ewww... Seriously? Raisins?
But go for it...I won't judge you....
Too much....


Monday, February 6, 2012

Pavlova


I have no idea why it has taken me this long to try pavlova.
It's amazing.
Meringue on its own kind of scares me...the chalkiness of the outside is yucky. BUT, pile on some whipped cream and fruit and *cue angels singing* you have heaven on a plate.
And, it's easy. It was one of the dishes that I told myself was going to be complicated to make so I just never tried it.
Clearly I need to start ignoring my inner giver-upper a little more.
If you have a stand mixer then this almost makes itself.
Really.


Pavlova

Ingredients
4 egg whites
1 1/4 cup sugar
1 tsp vanilla
1 tsp vinegar
2 tsp cornstarch
(plus a little extra for sprinkling on parchment paper)
1 cup whipping cream
1 Tbsp sugar
fruit of your choice
(I used a mixture of approx 1 1/2 cup strawberries, 1/2 cup raspberries, 1/4 cup blueberries, 1/4 cup blackberries - and I did have some leftover. It made a tasty smoothie!)

Directions
Preheat oven to 300. Line cookie sheet with parchment paper. Draw a 9 inch circle on the paper and then flip paper over. Very lightly sprinkle paper with cornstarch.
In a large bowl, beat egg whites unil soft peaks form. Gradually start to add in the sugar, 1 Tbsp at a time. DO NOT dump all the sugar in at once. Beat well after each addition.
Beat until thick and glossy.
Gently fold in vanilla, vinegar, and cornstarch.

 Oooooh...it's so shiny!

Just look how shiny it is...seriously!

Spoon mixture inside the circle drawn on the parchment paper. Working from the center, spread mixture towards the outside edge, building edge slightly. You should have a slight depression in the center.
Place in oven and turn down temp to 275. Bake for 1 hour. Turn off oven, crack open door a little, and let cool in oven. 
Gently remove from parchment paper when cool.
.
It's supposed to crack a little. Don't panic!

In a medium bowl, whip whipping cream with 1 Tbsp sugar until stiff peaks form.
You can either cut up fruit and serve as is OR, what I did: combine the fruit in a medium saucepan and heat until fruit breaks down - this only takes a few minutes - then mash with a potato masher. Cool completely and chill in fridge.
To assemble your pavlova: gently place your meringue on a serving plate. Fill center depression with whipping cream.

Mmmm...whipped cream :)

Top with fresh fruit or your chilled fruit compote.

Close up

Serve within about an hour or two of assembling as your meringue will get soggy. The meringue part of your pavlova can be made a couple of days in advance and stored in a cool, dry place in an airtight container then all you have to do is whip the cream and add the fruit when you are ready to enjoy it.


Are you drooling yet?

Now, a couple of notes:
1. The original recipe said it made 1 - 9 inch circle. I got 4 - 4 inch circles. I thought I would only get 2 but...I got 4. Go figure!
2. Make sure there is NO grease in your bowl or on your beaters so your egg whites will reach maximum volume.
3. Make sure NO egg yolk gets into your whites. For the same reason you do not want grease in there.


This is so pretty, and tasty, and...I am note sure why it has taken me so long to make it. Now that I have made it though, rest assured I will be making it again.
If you haven't tried it yet, you really should.
Really.
Right now.
Why are you still sitting there?

Be sure to stop by Carole's Chatter for links to tons of other great recipes! 

Sunday, February 5, 2012

Maple Bacon Cornmeal Waffles


I always laugh when I see recipes that list off pretty much all of the ingredients in the title.
You know - chocolate chip oatmeal raisin cake with maple whiskey cream cheese buttercream topped with white chocolate and strawberry sauce.
Okay.
I made that up...but - you get my point.
I never really saw a reason to make the recipe title so long.
That being said...I felt the need to list off three of the main ingredients in this recipe title so people wouldn't be mislead.
The maple and bacon part are pretty obvious. They taste sooooo good and are really hard to miss in these waffles. It was the cornmeal that was the dilemma.
You can't really see it in the waffles but it certainly adds another level of texture. I wouldn't normally have mentioned it in the title EXCEPT I know some people *cough* Sue *cough* do not like the texture that cornmeal can add.
And some people *cough* Sue *cough* definitely do not like when it is a surprise in their dish.
So...be forewarned....
These wonderful, amazing, delicious waffles contain cornmeal.
And bacon.
And maple.
And some other stuff...


Maple Bacon Cornmeal Waffles

Ingredients
1 1/2 cups cornmeal
3/4 cup flour
3 tsp baking powder
pinch salt
6 strips bacon, cooked and crumbled
2 eggs, separated
1/4 cup maple syrup
2 tsp vanilla
1/2 cup melted butter
1 1/2 cup buttermilk

Directions
In a medium bowl, whisk together cornmeal, flour, baking powder, and salt. Stir in crumbled bacon.
In a large bowl, whisk together egg yolks, maple syrup, vanilla, and buttermilk.
In a third bowl, beat egg whites until they hold a peak.
Combine dry ingredients with the egg yolk, maple syrup, etc...mixture until just combined. Gently fold in egg whites.

 Plop the whipped egg whites in and gently fold in.

You can still see a few tiny bits of white after it is gently folded.

Batter should be very light and fluffy.
Spray your waffle iron with cooking spray and heat your waffle iron.
Let the waffle cooking begin!

I guess in the end it doesn't really matter what you title a recipe. It's how it tastes that counts.
If you want to call these Maple Bacon Cornmeal Buttermilk Vanilla Flour Sugar Egg Waffles, then you go ahead and do that.
They will still taste scrumptious.
Or...just call them Waffles. Plain and simple.
That works too.

Friday, February 3, 2012

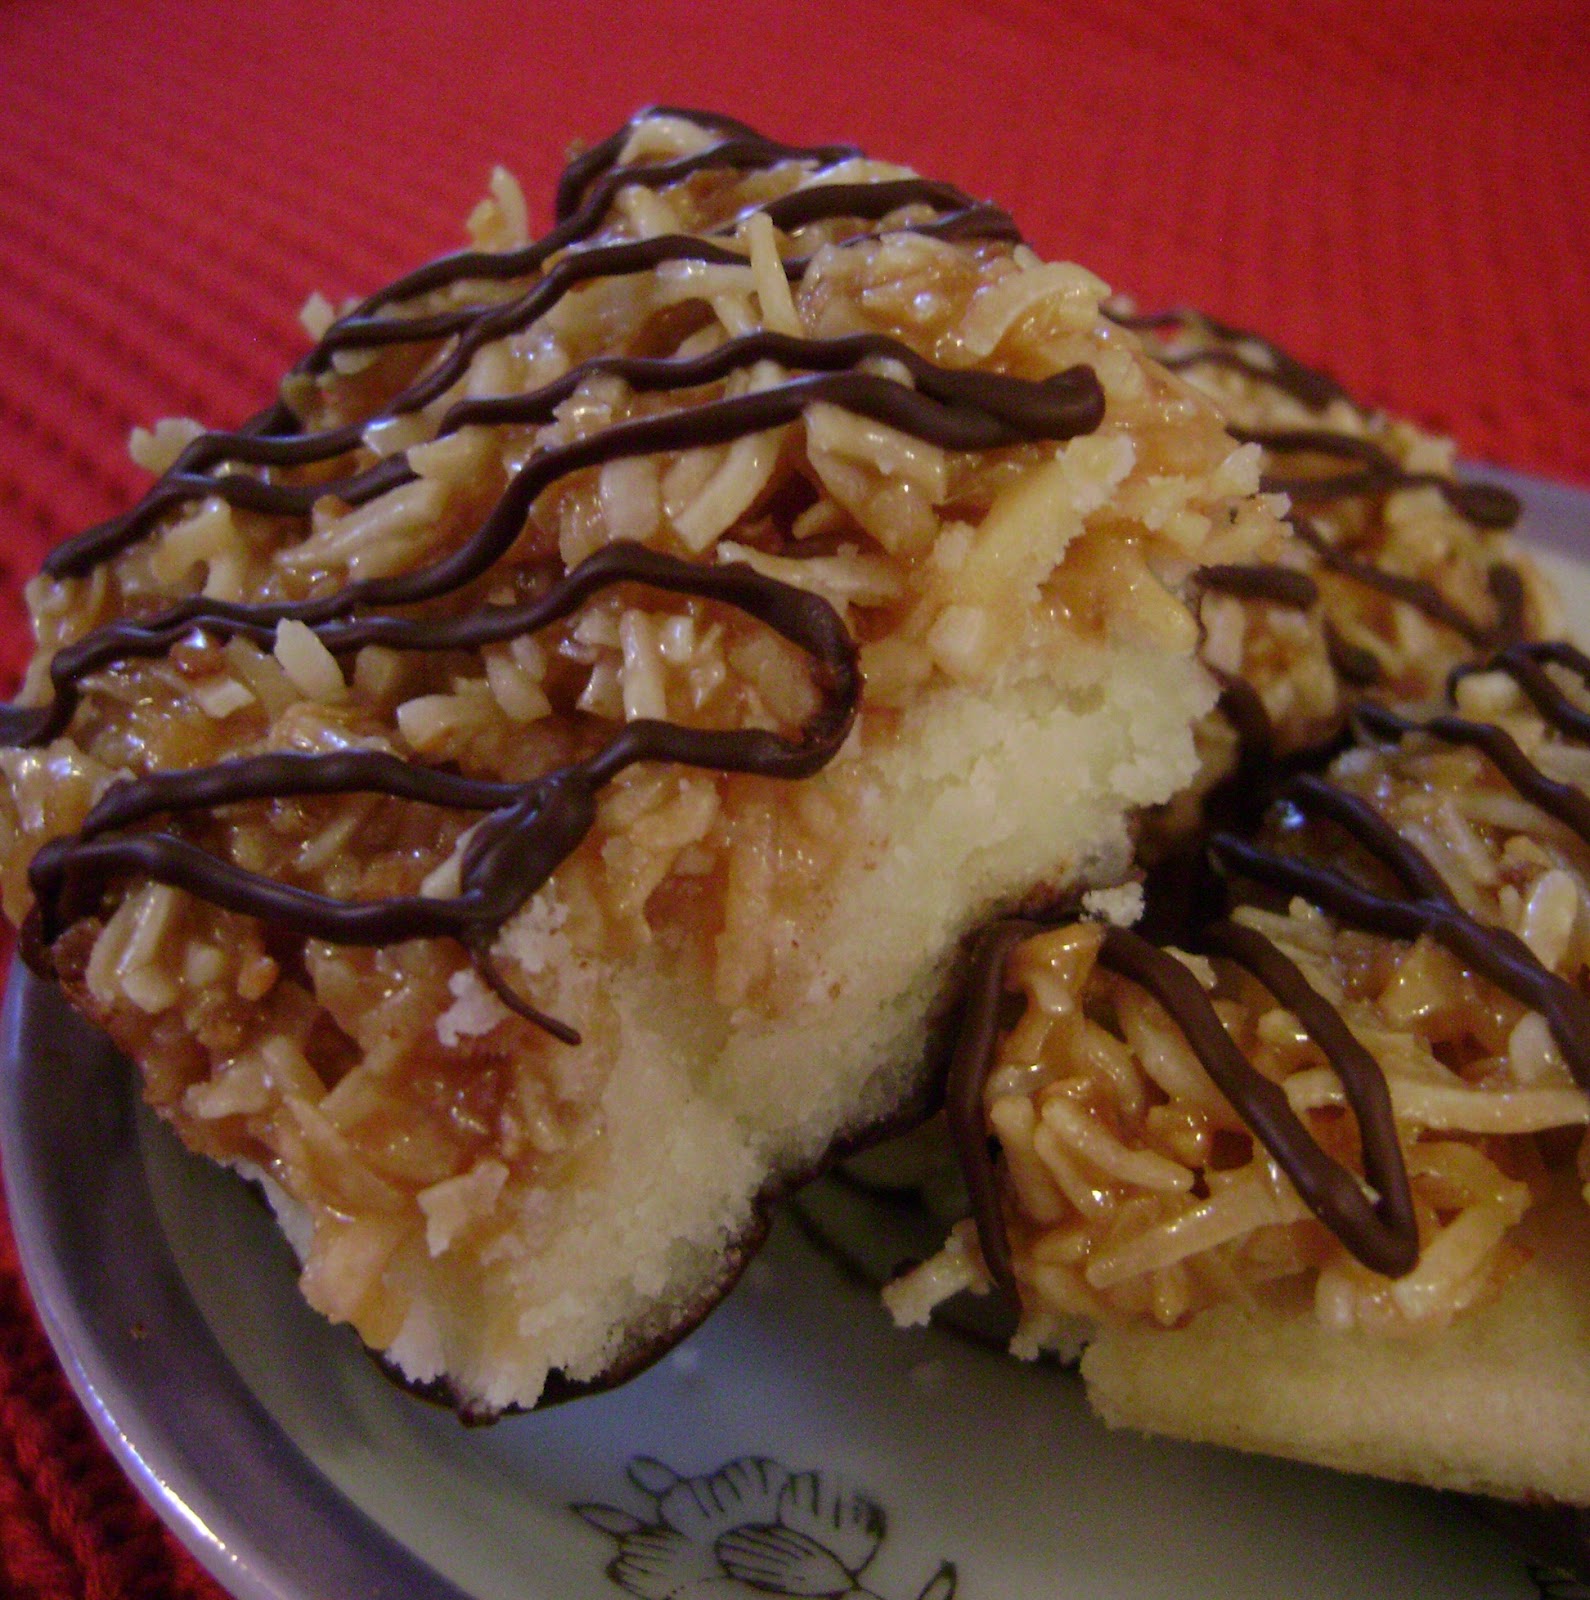
Samoas Bars


Looks pretty, doesn't it?
It tastes pretty good too.
Apparently Samoas are Girl Scout Cookies which, I'm assuming, are available in the States. I've not ever seen them in Lillooet. Of course, Lillooet is kind of in the boonies.....they may be available all across Canada and I am just unaware.
Anyway....back to how pretty they are.
The layers of caramel and chocolate and toasted coconut really make this a stand out bar.
Now, here's the thing......
These are a kind of a pain in the patootie to make. Like...the kind of pain where after fussing with 4 or 5 of these squares I was thinking "why did I make these again?"
To be fair...these are originally made as a cookie. Specifically, a round cookie with a hole in the middle. Check out this website to see where the idea came from - Once Upon A Plate. I decided to make it into a bar believing it would be easier.
Not so much.
I made it to the second-to-last step with ease and then the trouble began.
You have to dip the bottom of these in chocolate.
The bottom is shortbread.
In case you didn't know this....shortbread is crumbly.
Crumbly enough that when you try to dip just the bottom of it in chocolate it flakes and pieces break off.
It's okay. I got through it. There may have been some cursing involved. There was a lot of chocolate on my fingers, hands, arms, the counter, the sink, etc...etc... as I tried to "brush" it on the bottom of the bar so I didn't have to dip them.
Chocolate is not cool to have to wipe up off of everything. Just so you know.
Anyway.....in the end they turned out beautiful. And everyone commented on how yummy they were.
Will I be making them again?
I'm going to say, not in the near future.
Not until I figure out how to make shortbread not crumbly. Let me know if you have that secret!


Samoas Bars

Ingredients

Cookie Base
1 cup butter, softened
1/2 cup sugar
2 cups flour
1/4 tsp baking powder
pinch salt
1/2 tsp vanilla
2 Tbsp milk


Topping
3 cups chredded coconut (Sweetened OR unsweetened)
12 oz chewy caramels
(I used 34 Kraft caramels)
1/4 tsp salt
3 Tbsp milk

Chocolate (To dip and to drizzle)
8 oz chocolate is what the original recipe called for
(I used about 2 cups chocolate chips - but I had some trouble with the dipping so I used more than the original recipe called for)

Directions
Preheat oven to 350. Spray a 9 X 13 pan with cooking spray, line with parchment paper - leaving some folded over as a "handle" - then lightly spray the parchment paper.
Cookie base - cream butter and sugar in a large bowl. Mix in flour, baking powder, and salt at low speed. Add in the vanilla and milk. You may need to add a bit more milk to make the dough come together. The dough should come together into a soft, pliable ball. If the dough seems too sticky, add a bit more flour.
Press dough firmly into prepared pan. Prick all over with a fork.

Ready to go into the oven.

Bake at 350 for about 15 - 20 minutes, until edges are lightly golden brown.

Juuuuuuust right :)

Remove from oven and let cool on wire rack for about 15 minutes. Then place in freezer while you prepare the topping.
Topping - In a large skillet, toast coconut over medium-high heat until golden brown. Stir often as once it starts to turn brown it burns very quickly.

Nice and toasty!

Immediately remove from skillet and place in bowl to cool.
Unwrap the caramels and place in microwave safe bowl.

Unwrapping these bad boys is NOT fun...booo little caramel plastic wrappers!

Add the milk and salt to the caramels in the bowl. Heat in microwave in 30 second intervals, stirring after each interval to help caramels melt. This could take 3 - 4 minutes. (You could also melt them in a double boiler, if you prefer) When smooth, fold in the toasted coconut with a spatula.
Spoon topping over crust.
Working as quickly and as carefully as you can, gently press the topping evenly over the crust with your fingertips. It helps to have a bowl of water next to you to dip your fingers in - this prevents the topping from sticking to you and makes it way, way easier to spread.

Topping spread....prepare for the hard part....

Set pan in the fridge for about 15 - 20 minutes to let the topping cool and set. (Longer if necessary)
Remove the bar from the pan by gently loosening the edges with a butter knife then lifting out by using the parchment paper "handles".
Using a sharp knife, cut into squares. I think I did about 2 inch squares. Dip knife in hot water and wipe with a paper towel between cuts to prevent sticking.
Line a cookie sheet with plastic wrap.
In a small, microwave safe bowl, melt about half the chocolate in the microwave in 30 second intervals, stirring thoroughly to prevent scorching. (Again, you can use a double boiler if you prefer)
Dip the base of each bar into the chocolate and place on prepared cookie sheet.
Place in freezer to chill and set the chocolate, about 10 minutes.
Melt remaining chocolate in microwave following the above directions. You can either pour the melted chocolate into a plastic bag and snip a small corner off then proceed to drizzle on top of bars OR you can leave in the microwave safe bowl and use a spoon to drizzle the chocolate.

Finished product!

Set back in freezer for a few minutes to set the chocolate drizzle.

Voila. Samoas in bar form.
If you have a lot of trouble with the dipping then you can try tipping a square upside down in your hand and spooning some chocolate onto the shortbread. Gently use the spoon to spread the chocolate and then place, chocolate side down, onto the cookie sheet.

I saw this on Pinterest and had to give it a try. I'm glad I did - I would have been wondering what they tasted like forever if I didn't. That being said, they were fairly complicated to make, as squares go.
If you are looking for a bar that will challenge your culinary skills then give this one a try. The taste and appearance are worth the effort.
Just remember to take it slow and don't have a meltdown when you have to clean chocolate out of every nook and cranny in your kitchen.
I made up some pretty creative new swears so my meltdown wasn't a complete waste of time.
"Fudge crackers"
Feel free to use it.
Your welcome.

Wednesday, February 1, 2012

Reuben Dip


I admit... it's not the prettiest dip out there.
In fact, it is not really visually appealing at all. At least to me.
But I have to tell you, the flavor is out of this world.
It is very reminiscent of a reuben sandwich so you have to like sauerkraut and corn beef and such.
It is creamy and rich and extremely decadent.
Definitely a must try if you are looking for something a little different to bring to the next potluck.


Reuben Dip

Ingredients
1 16 oz jar sauerkraut, drained
1 8 oz pkg cream cheese, cubed
2 cups shredded Swiss cheese
1 pkg (4 oz) deli corned beef, chopped
3 Tbsp prepared Thousand Island salad dressing

Directions

Mix ingredients all together and place into slow cooker.

Before the melting begins!

Cover and cook on low for about 2 hours, until cheeses are melted. Stir a few times to blend.
Serve with rye bread or rye crackers (I used Triscuit Rye crackers).

Easy peasy.
I admit I didn't really measure 4 oz of deli corned beef. I just threw in a couple of handfuls until it looked good. The strongest flavor is the cream cheese, followed by the sauerkraut, and then the corned beef so the amount of corned beef doesn't have to be exact. 

So...don't judge a book by its cover.
This is a scrumptious dip that deserves a chance to show you just how scrumptious it really is!
It could be a good choice for the next super bowl party you are attending too....amaze your friends with how creative you are :)