Sunday, July 26, 2015

Disney Party and Shark Party


Sue and I may be twins but we have totally different ideas on how to celebrate our 43 birthday. 
Sue is a die hard Disney fan and I'm all about sharks (read: Sharknado, Sharktopus)
We decided to compromise and hold a half shark party and half Disney party. 
We wanted to share our fun and easy ideas for both parties with everyone. 
Some of the photos we will link to other posts where we will have recipes and/or how-to's. If you have questions on how we made anything, please feel free to leave us a comment or question in the comment section below. 

First up THE SHARK PARTY:


Sue made me my cake - this awesome Shark Attack Cake.


She even put a photo of me on the doll.
I admit it. Sue comes up with some fun-tastic ideas sometimes.


One of the cutest shark party treats was this Bagel and Cream Cheese Snorkeler. (Click HERE for the how-to and recipe) He was super easy and super tasty! 


This guy isn't a shark but he is a scary water related monster soooooo....
he counts towards the shark party half of the party.


I carved this cucumber shark to put on the veggie tray. I thought he turned out pretty great. 
He only took a few minutes - the hardest part was carving all those spooky teeth.


Speaking of teeth....
How about some (mozzarella) shark teeth. Doesn't get much simpler than that.


Speaking of simple --- toss some shrimp in some seafood sauce and you have the perfect shark bait.


Sue and I worked together to carve this watermelon shark. Another quick and easy addition to the shark party. 


What shark wouldn't love to dive into a bowl of goldfish crackers? (This beautiful wood shark is Gary, my niece, Kenzie, brought him back from Cuba for me!)


Delicious gummy sharks from Orientaltrading.com.
So Yummy.


And some after dinner mints with a shark twist go perfectly. 


Another Orientaltrading.com purchase. 
Adorable shark cups. They actually hold a lot and make you feel really cool while drinking out of them. 


To drink in the shark cups?
Well, that would be Chum Punch, of course. (Otherwise known as lemon-aid, strawberries in syrup, grenadine, and ice.) 


I made a paper mache shark to act as a table center.


He turned out pretty cute - except he kept getting into the snacks. Sneaking the shrimp and...


He kept trying to eat our bagel guy. 


And of course, we had to have some sushi too.
We all know how much sharks love sushi.


There is the over view of the shark table. 

And now, on to THE DISNEY PARTY:


Since Sue and I had to make each other's cakes, I decided to find something that was cute but not too, too difficult. Then I recruited our other sister, Orra, and our friend, Taylor, and we came up with this Ratatouille Cake. 


Doesn't he look adorable in the fridge sneaking some cheese? Sue was happy with him and that is all that matters!


What's a Disney party without at least one reference to Cinderella? Sue made this Bread bowl carriage drawn by 2 fine steeds (dollar store finds). (Click HERE for our Spinach Dip Recipe
Pretty sure Cinderella would have preferred this ride.


Sue has several Mickey shaped bowls.
Chips and Dip in one....


Nachos and salsa in one....


And BBQ's Farmer's sausage in her casserole dish. 


All you need is some Pillsbury Pizza dough and a Mickey cookie cutter and you can whip up these Disney-rific Mickey Pizzas.


Or these Mickey Mouse Sandwiches....


Or even these Mickey Mouse tortilla chips.


One of my favorite Disney movies is Emperor's New Groove so I made some of Kronk's Spinach Puffs. A little fiddly with the filo pastry but otherwise tasty.  


To up the cuteness factor we made these Mike Wazowski Rice Krispie Treats. Super simple! All you need is the usual Rice Krispie ingredients plus some green food coloring and some candy eye balls. 
*Voila* Done.


This one isn't immediately recognizable but it's supposed to be Rapunzel's braid. (From the movie Tangled). Those are pepper flowers in the braid. 


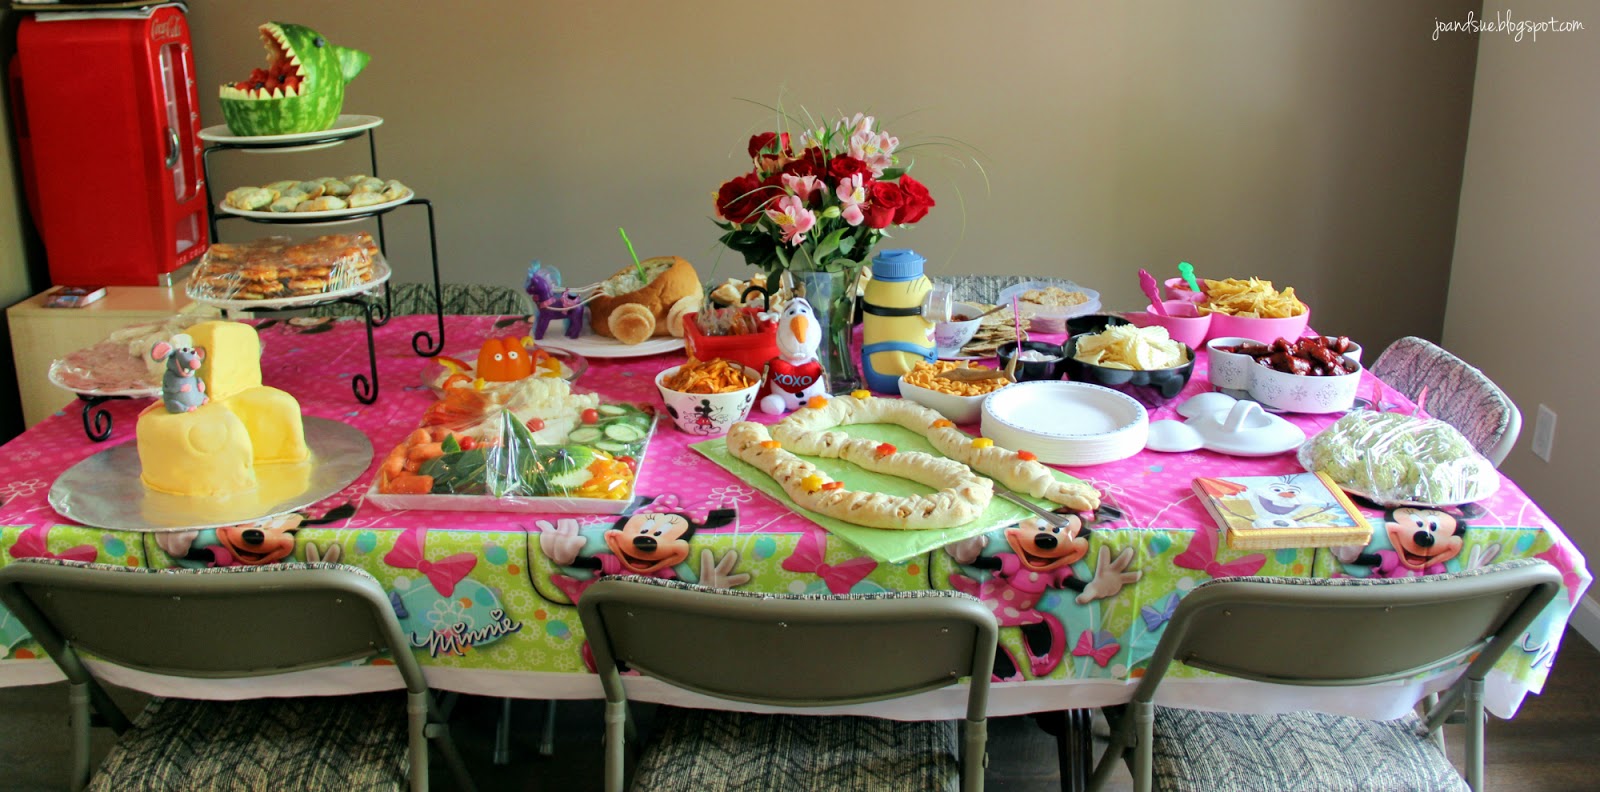
And there is an over view of the Disney table. 
Our mom gave us the beautiful flowers in the center for our birthday. 
Now.... what to do for next year's birthday.....

We're sharing at these fun linky parties - Kitchen Fun With My 3 Sons, Wondermom Wannabe, Carole's Chatter


Bagel & Cream Cheese Snorkeler


I just had to share one of the cute little treats Sue and I made for our birthday this weekend.
We had a half shark party (for me) and a half Disney party (for Sue). I know... I know.... could we be any more opposite.... especially for twins...
Anyway.
One of the shark party treats was this adorable little cream cheese snorkeler. 
He makes a perfect snack for summer. Okay, actually anytime BUT extra perfect for summer. 
You can whip him up in a few minutes with only a few ingredients!


Bagel & Cream Cheese Snorkeler

Ingredients
1 plain bagel
1 red pepper
1 green pepper
1/2 to 1 tsp finely shredded cheddar cheese
Goldfish crackers

Directions
Place bagel on a plate - preferable a blue one so it looks like water!
Scoop the salmon cream cheese into a piping bag (or a large plastic bag and snip off the corner). Pipe 2 "legs" onto the plate, attached to the bagel using a small, zig-zag motion. Then pipe 2 thinner lines on top of the bagel for arms, using the same small zig-zag motion.


Pipe some of the cream cheese into the center of the bagel, then pile some on top for the body & head.


Let chill in fridge (or freezer) while you cut out decorations.
Take a small piece of the red pepper and cut out two flipper shapes for his feet and a skinny snorkel for his mouth (like a very long and skinny "L"). 
Take a small piece of green pepper and cut out a small sunglasses shape (like a capital "B")
Pile a tiny bit of the shredded cheese on top of his head for hair.


Sprinkle some Goldfish crackers on the plate and he is ready to serve!


Just watch he doesn't get too close to the sharks....


They like him for a snack too!
 
Be sure to check out these fun linky parties:
 

Friday, July 17, 2015

Overnight Cinnamon & Almond Buns AND Overnight Blueberry Lemon Buns (1 recipe, 2 treats)


One thing I love about making yeast bread is how versatile it can be. 
This recipe is a very basic sweet bread that turns out soft and fluffy and can be filled with whatever filling you like. I've used a traditional cinnamon bun filling for half and a lemon blueberry filling for the other half. 
This was my first time doing an overnight yeast bread.
Okay. That's not entirely true. I make our Butterhorns (Click HERE for that recipe) every year at Christmas and they are an overnight yeast recipe. But that is a completely different recipe and a different method as well. 
The method I used to make these buns is perfect if you have company for breakfast or if you are just not wanting to have to clean up in the morning. All the prep and mess is made the night before. All you have to do is pop your tray in the oven in the morning and *voila* done.  
The recipe here is for 2+dozen buns. I made half into the cinnamon buns and the other half into the blueberry buns. You can, of course, use all of the dough to make one type of bun - keep in mind then that you will have to double the filling. As written below, the fillings are for half of the dough recipe. 
First up: Overnight Cinnamon & Almond Buns.


Overnight Cinnamon & Almond Buns

Ingredients
Dough
5 - 7 cups of flour (all purpose)
2/3 cup sugar
4 1/2 tsp active dry yeast (2 pkgs)
1/4 tsp salt
3/4 cup butter
1 1/2 cups almond milk (or use regular milk)
6 eggs, whisked

Filling (for 1/2 of dough)
1/2 cup butter, softened
1 cup brown sugar
3 tsp cinnamon (or more, to taste)
1/2 cup slivered almonds 

Cream Cheese Frosting
1 (8 oz) pkg cream cheese, softened
1/2 cup butter, softened
2 tsp vanilla
3 cups icing sugar

Directions
In a large mixing bowl, stir together 5 cups flour, 2/3 cup sugar, yeast, and salt. Set aside. 
In a medium saucepan over medium heat, stir together the butter and almond milk until butter is melted and temperature is about 110 - 120 degrees (check your yeast packet for proper temperature). 
Stir the heated milk mixture and the beaten eggs into the dry ingredients until soft dough forms.
Add in a little more flour - about a tablespoon at a time - until firm but still sticky dough forms. (Do not add to much flour or your buns will be chewy and dense, not fluffy.)
Place dough into a lightly greased bowl.


Cover and place in warm place to rise for an hour or so, until doubled in size. 


When risen, lightly flour your hands and punch the dough down. 
Divide dough in half. Cover half - to be used for the lemon blueberry rolls. 
Prepare a cookie sheet (with sides) or a jelly roll pan by lining with parchment paper. Set aside.
Roll out half of the dough on a lightly floured work surface to an approximately 16 X 12 rectangle. 
Spread the softened butter evenly over the rectangle.
Sprinkle with the brown sugar and cinnamon and almonds. 
Starting with the long edge closest to you, roll up jelly roll up jelly roll style into a log. Pinch the seam closed. Using a serrated knife, dental floss, or a sharp knife, cut the log into approximately 1 inch pieces. Place the rolls onto the prepares cookie sheet, about 1 inch or so apart to leave room for rising. Cover rolls with plastic wrap and place in fridge over night.
Next morning, remove tray from fridge and place somewhere warm for about an hour to rise.
After the dough has risen, heat oven to 350. 
Place buns in oven and bake at 350 for approx 20 - 25 minutes, until tops are golden brown. 


Above is the "before & after". 
Remove buns to a wire cooling rack.


Now, you could eat them like this....


Or you can take them up a notch by adding a dreamy cream cheese frosting.
Prepare cream cheese frosting - in a mixing bowl, beat together cream cheese and butter until smooth, scraping sides as necessary. Beat in vanilla. Gradually beat in icing sugar until smooth. 
Spread frosting on warm buns. (Use half of recipe for the Cinnamon and Almond Buns and half of the recipe for the Blueberry Lemon Buns) 


Are you drooling yet?
I mean.... look at how light and fluffy they are inside....


Now.... on to the blueberry lemon version.


Overnight Blueberry Lemon Buns

Ingredients
Dough
See above for recipe

Filling (for 1/2 of dough)
1/2 cup butter, softened
1/2 cup sugar
zest of 1/2 a lemon
1 - 1 1/2 cups fresh blueberries

Cream Cheese Frosting
See above for recipe

Directions
Prepare dough as written above to point where you divide dough in half. 
Cover half (to be used for the cinnamon almond rolls). 
Prepare a cookie sheet (with sides) or a jelly roll pan by lining with parchment paper. Set aside.
Roll out half of the dough on a lightly floured work surface to an approximately 16 X 12 rectangle. 
Spread the softened butter evenly over the rectangle. 
Mix the sugar with the lemon zest.


Sprinkle the lemon sugar evenly over the rectangle. Sprinkle with the blueberries. 


Starting with the long edge closest to you, roll up jelly roll up jelly roll style into a log. Pinch the seam closed. 


Using a serrated knife, dental floss, or a sharp knife, cut the log into approximately 1 inch pieces. Place the rolls onto the prepares cookie sheet, about 1 inch or so apart to leave room for rising. Cover rolls with plastic wrap and place in fridge over night.
Next morning, remove tray from fridge and place somewhere warm for about an hour to rise.
After the dough has risen, heat oven to 350. 
Place buns in oven and bake at 350 for approx 20 - 25 minutes, until tops are golden brown. 
(Photo below: First is after slicing, 2nd is after being in the fridge all night, 3 is just out of the oven) 


Remove buns to a wire cooling rack. As you can see in the photo below the blueberries release a bit of juice and you don't want the buns to sit in the juice and get soggy. 


Look how pretty they look.
Only one more step to go.


Prepare frosting as directed above.
Spread frosting on warm buns - or drizzle the frosting, whichever you prefer. 


So much flavor... let's go in for a closer look, shall we?


There you have it. One dough two treats. Of course, feel free to fill these rolls with whatever you like.  Nutella, perhaps? Peanut butter and jelly? 
So many choices. 
Making yeast dough is always a bit of a bother - what with the rise time and all. This overnight method is great if you want fresh, warm cinnamon buns in the morning but don't want to have to do the clean up in the morning. 
 
We're sharing at these fun linky parties - New Mrs Adventures