Sunday, December 30, 2018

Ukrainian Scuffles


Our Ukrainian Christmas just had to include some scuffles. These delectable little bites are a cross between a cookie and a cinnamon bun. I also found them to be remarkably close to our Butterhorns (Click HERE for recipe). It is a yeast dough that rests overnight and then is rolled and baked in the morning. Perfect for the holidays when you have guests and are super busy. Split the work up and it hardly seems like work at all! 
Plus - cinnamon sugar. It's everything that's right with the world. 


Ukrainian Scuffles

Ingredients
2 1/4 tsp active dry yeast (1 packet)
1/4 cup hot water (between 105 - 115 F)
3 cups flour
1/2 tsp salt
3 Tbsp sugar
1 cup butter, room temp
1/2 cup milk
2 eggs

For Rolling
1 1/2 cup sugar
1 Tbsp cinnamon

Directions
In a small bowl, combine yeast and hot water. Let sit for 5 - 10 minutes to allow yeast to bloom. 
In a separate bowl, stir together flour, salt, and sugar. Work the butter into the flour using your fingers until mixture resembles coarse crumbs.
In another bowl, whisk together milk and eggs. Gently whisk in the yeast.
Add this to the flour mixture, stirring well. Turn onto a floured work surface and knead briefly. The dough will be sticky. Place in an oiled bowl, cover, and refrigerate overnight. 
The next morning: Preheat oven to 350. Line 2 cookie trays with parchment paper and set aside. 
Combine sugar and cinnamon in a small bowl until well combined. 
Remove dough from fridge and cut into 6 equal pieces. 
Working with one piece at a time: sprinkle some cinnamon sugar on a counter top. Place the dough on top and roll into a circle about 1/8th inch thick. Sprinkle a little more cinnamon sugar on top. Cut the circle into 12 wedges, like pieces of pie. Roll up each wedge, starting from the wide end to the pointed end. Place on the prepared cookie sheet about 1 inch apart. Repeat with remaining dough. (Tip: Try to have the pointed tip under the scuffle so it doesn't unroll as it cooks.)


Bake at 350 for 15 - 20 minutes, until light golden brown. 


Remove from oven and let cool. (Although they are absolutely addicting while warm!)


Ukrainian Scuffles are perfect for breakfast treats or on a tray of Christmas cookies. The recipe makes 72 (6 dz) and freezes very well. 


Don't worry if your scuffles are not all uniform in size. That is what makes them even better. Get the kids in on the fun by having them roll up the scuffles as you slice them. 

Saturday, December 29, 2018

Ukrainian Festive Walnut Torte


This year for Christmas Sue came up with the idea of doing a traditional Ukrainian Christmas (Click HERE to see our dinner post). I'm all about pierogies and cabbage rolls so I said, heck ya! Let's do it. 
I searched Pinterest for research on Ukrainian desserts and came across this torte from Suburban Grandma (Click HERE to see the original recipe). I was sooooo excited to try it. I love chocolate and coffee flavors. Unfortunately, I had an elbow injury on Christmas Eve and was not able to make it. Our sister, Orra, was my savior and volunteered to do it for me! It is a bit of fuss - there are 3 recipes you have to make - but, trust me, it is totally worth it! I cannot stress enough how much I LOVED this dessert. It is very rich and decadent so a little goes a long way. It also makes a large torte so is perfect for serving a larger crowd. This is normally a holiday recipe BUT I know I'm going to be making this more often than that. 


Ukrainian Festive Walnut Torte
(Ever so slightly adapted from Suburban Grandma

Ingredients 
Torte
10 oz walnuts, finely ground (approx 2 1/2 cups)
1/3 cup flour
2 tsp cornstarch
1 tsp baking powder
12 large eggs, separated
pinch salt
1 1/4 cup sugar
1 Tbsp vanilla

Mocha Frosting
3/4 cup butter, room temp
2 tsp vanilla
6 oz unsweetened chocolate, melted
6 cups icing sugar
3/4 cup strongly brewed coffee

Coffee Cream Filling
2 cups heavy cream
2 tsp instant coffee granules
1/4 cup icing sugar

Topping 
3 Tbsp walnuts, chopped

Directions
Prepare torte - Preheat oven to 350. Line 2 - 10 inch pans with parchment paper and lightly spray with cooking spray. Set aside.
Combine the ground walnuts, flour, cornstarch, and baking powder. Set aside.
In another bowl, combine egg whites and salt. Beat to stiff peaks, then set aside. 
In another bowl, beat the egg yolks on medium speed for 2 minutes. Add in the 1 1/4 cup sugar and vanilla and beat until mixture becomes thick and fluffy - about 5 minutes. Set aside.
Sprinkle the walnut mixture over the egg yolk mixture and stir briefly. Fold in half the egg whites until still streaky. Fold in the remaining egg whites until combined. 
Divide the batter evenly between the 2 prepared 10 inch pans. Bake for about 30 minutes - or until toothpick inserted near center comes out clean. 
Remove from oven and let cool for 5 minutes. Run a knife around the edges of the pan and then invert cakes onto wire racks to cool completely. 
Prepare Mocha Frosting - In a mixing bowl, beat together butter, vanilla, melted chocolate, and 1 1/2 cups of the icing sugar until creamy. Alternately add in the coffee and remaining 4 1/2 cups icing sugar. Set aside.
Prepare Coffee Cream Filling - In a mixing bowl, beat together cream, coffee granules, and 1/4 cup icing sugar until stiff peaks form. 
Assemble the torte - Split each torte in half diagonally making 4 equal discs. Place one disc on a serving platter, cut side up. Spread about 3/4 cup mocha frosting on top. Then spread 1/3 of the coffee cream filling. Repeat with the second and third disc. Place the final disc on top (cut side down) and decorate with the last of the mocha frosting. Sprinkle with the 3 Tbsp of chopped walnuts. 


Chill until ready to serve. 


Guuuuuys! It's ridiculous. 


So. Many. Yummy. Layers. 


Someone ate a lot of this. Not saying who. It may or may not have been me. I'm not admitting to anything. Just saying.... it was really good. 
The torte layers are quite fragile - Orra said she was going to try and frost the sides of the cake but decided against it because she was afraid it would tear apart. I love the rustic look she created by leaving the sides bare. It makes it easier to see all those gorgeous layers. 
FYI - I mentioned it above but I will say it again. This is very rich and a little goes a long way. Unless you are me.... and can eat mocha frosting and coffee cream by the bucket full.... you will only need a small piece. 

Friday, December 28, 2018

Strawberry Cheesecake Bites


This Christmas I was able to get my hands on a tin of freeze dried strawberries from walmart.ca. Have you tried freeze dried fruit yet? The texture is weird but the flavor is amazing. 
Best of all? If you powder it, it makes for amazing desserts!
There is only 4 ingredients in these little bad boys and they only take about 15 minutes to whip up BUT they rival the most complicated of cookies or truffles. The color is perfect for the Christmas holidays but works for Valentine's Day or Canada Day as well. 
If you like strawberry cheesecake then you will love these little bites. 


Strawberry Cheesecake Bites

Ingredients
2 cups freeze dried strawberries
1 brick (8 oz) cream cheese, room temp
1/2 cup icing sugar
1 cup graham cracker crumbs

Directions
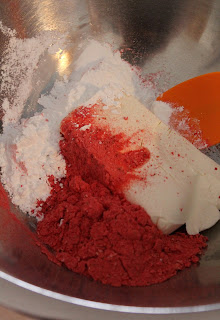
Take the 2 cups of freeze dried strawberries and pulse them in a blender or food processor until finely ground. You should have just shy of 1 cup of powder. 
In a mixing bowl, combine strawberry powder, cream cheese, and icing sugar.


Stir until well combined.
Using a small cookie scoop (about 1 tbsp) scoop out the bites and place them on a platter lined with plastic wrap. Dip the bottoms of the bites into the graham crumbs. (You can roll the bites in the crumbs but then you will lose most of the lovely pink color!) Chill until ready to serve.


Add them to a tray of cookies/balls for a pop of color - or serve them on their own!


You could also roll them in more powdered strawberries and skip the graham crumbs, if you prefer. 


These bites have all the creaminess of cheesecake in a teeny little bit sized treat. 
Try to eat just one! It can't be done. 


I am excited to try some more strawberry recipes with the freeze dried berries. They pack a huge flavor punch! These will last several days, covered, in the fridge but the graham crumbs will get a bit soggy. No one seemed to mind around here though! If you want to make them up early you could wait until just before serving to dip them in the crumbs. Up to you! 

Wednesday, December 26, 2018

Christmas Dinner 2018


This year for Christmas Sue wanted to do a Ukrainian Christmas feast. Orra and I helped out - me, not so much, due to an unfortunate turkey incident on Christmas Eve. (I pulled the muscles in my elbow trying to get the turkey out of the pan and was told by the doctor to completely rest my arm.) 
Our Ukrainian feast featured some new recipes and some family favorites. Below are the photos of the dishes and links to the recipes and how-to's. If you don't see the one you are interested in, just comment below and we will get back to you as soon as we can. 


Starting with the appetizers....
We had the usual fare of meat and cheese, deviled eggs, fruit, some sausage biscuits, and Sue made Ukrainian Studinetz. (See photo below)


Ukrainian Studinetz is jellied pork hocks. It is a definite taste and texture adventure. This one is not for the picky eaters BUT is very good in its own way. (Click HERE for the recipe and how-to.)


An overview of the dinner...


Ready for everyone to dig in. 


Sue made this delicious Ukrainian Chicken in Cream with Dill that everyone was crazy for. So rich and decadent - it's a keeper for sure. (Be sure to check back for the link to that recipe)


Our favorite! Pierogies with onion and bacon. Is it even Christmas if you're not having homemade pierogies? (Click HERE for the recipe!


We didn't make cabbage rolls but Sue did make a delicious cabbage roll casserole. I actually prefer the casserole to the rolls but our mom disagrees. We do agree that this is a delicious and easy dish though. (Click HERE for the recipe!


Broiled Ukrainian sausage with a little BBQ sauce is always a big hit. This works as an appie or a main. Simply slice, broil, and brush with a little sauce. *Voila* crispy, sticky, addicting sausage!


It wouldn't be family dinner without a delicious salad to go along. I don't know if this is necessarily Ukrainian per se.... but it is delicious!


Sue made a fabulous new dish this year which will be getting added to the must-make-every-year list. Scalloped Cabbage. So good. (Be sure to check back for the recipe soon!) 


We included a veggie tray and some ham just in case the picky eaters didn't want to try the new dishes! Better safe than hungry we always say!


Our desserts were also very exciting this year. I made Strawberry Cheesecake Bites (okay, not Ukrainian but sooooo good!). I finally got my hands on some freeze dried strawberries so had to make something with them! (Click HERE for the recipe!)


I also made some Ukrainian Scuffles before I was put out of commission by the turkey. They are classified as cookies but are made with a yeast dough. They are very easy to whip up and look so cute! (Click here for recipe and how-to!)


Favorite Ukrainian dish of the whole dinner? It has to be this Ukrainian Festive Walnut Torte. I had plans to make it but our sister, Orra, ended up coming to the rescue when I was unable to use my arm. Layers of fluffy torte, decadent chocolate, and heavenly coffee cream made this my new favorite dessert ever. For real though. (Click HERE for recipe!)  


The above photo is of our Christmas Eve dinner. Yes, we do tend to go a little crazy for the holidays!
Sue made these beautiful Ukrainian Kolach. 


A candle is placed in the middle and is an essential part of the Christmas Eve supper (Sviata Vechera). The bread isn't eaten until Christmas Day because it contains eggs and Orthodox Christians fast for Advent. 


They made a beautiful centerpiece for Christmas Dinner and we were able to pull off pieces to eat with our meal. 
I felt a little guilty I wasn't able to contribute as much as I would have liked to due to my turkey troubles.... but Sue and Orra and family certainly came through with a memorable holiday meal. 
We are already planning on what to make next year!

Saturday, December 15, 2018

Hot Chicken And Vegetable Salad


Is this really a salad though?
I've gone back and forth trying to decide what else I could call this meal. I'm sticking with salad because it has a dressing. It is a very filling meal; full of flavors and textures so your taste buds definitely won't be bored! With the chicken and egg it is also full of protein to keep you full longer. I love this for meal prepping...


A quick pop in the microwave and *boom* you are good to go. Of course, you can also eat it cold if you prefer. As written below, it makes 4 servings but is super easy to double if you have company. 


Hot Chicken And Vegetable Salad

Ingredients
Dressing
4 Tbsp lemon juice
4 Tbsp white wine vinegar
1 Tbsp chopped parsley
1 Tbsp chopped chives
1/ 2 Tbsp chopped dill
1/4 tsp onion powder
1 1/2 Tbsp prepared mustard
1 tsp sugar

Salad
4 chicken breasts (boneless & skinless)
1 lb green beans
2 cups diced beets
1/2 cup olive oil
salt & pepper
2 cups cherry tomatoes
4 hard boiled eggs

Directions
Prepare dressing - whisk together the lemon juice, vinegar, parsley, chives, dill, onion powder, mustard, and sugar until well combined. Chill until ready to use. 
Prepare salad - Preheat oven to 425. Line a cookie sheet with parchment paper, set aside. 
In a bowl, toss the chicken breasts, green beans, and beets with the olive oil and salt & pepper. 
Spread the green beans and beets on the prepared cookie sheet and roast in preheated oven for 25 minutes. Remove from oven, stir, and then place chicken breasts on to the cookie sheet as well. Place back in oven and continue to cook for another 20 - 30 minutes or so - until vegetables are soft and chicken is cooked. 
Remove from oven and divide among 4 serving dishes, slicing the chicken before placing it on the dish. 
Divide the cherry tomatoes evenly among the dishes and place a boiled egg on each dish as well. Note - If you want your boiled egg hot then cook it after you place the chicken on the cookie sheet in the oven. If you don't mind it cold - then you can cook the eggs earlier and have them in the fridge until ready to use. 
Drizzle with the dressing. 


One of my favorite meals! Other than peeling and dicing the beets, there is very little prep involved. 


The dressing provides a lovely bright flavor without covering up the taste of the vegetables. 
Technically, this also works as a Christmas dish because of the red and green. Just saying. 


Like I said above, I'm not really sure if this should be called a salad or not... but it is full of veggies and other good things AND it does have a dressing so...... that's what we're sticking with. 
Hot salads are totally a thing. Right? 

Monday, December 10, 2018

Crunchy Pickle Rice Balls with Spicy Red Pepper Jelly


This post was sponsored by USA Rice Canada. We were compensated monetarily but all opinions and experiences, as always, are our own!

Sue and I really cannot get enough rice. I mean, seriously, can we talk about the nutritional advantages of rice for a second?
·         Rice is a delicious and versatile, slow burning complex carb that provides long lasting energy
·         It’s naturally sodium, cholesterol, and gluten free AND low allergen
Plus, it’s delicious, it’s incredibly versatile, and so easy to make. You can cook a huge batch on the weekend and refrigerate or freeze for later use (It will hold in the freezer for up to 6 months!). Pop over to www.riceinfo.com for some short how-to videos on how to reheat your rice so it’s just like freshly cooked!
Sue and I are also big fans of the fact that U.S. grown rice is as local as it gets for Canadians, and rice is super affordable so great for feeding a hungry family!  
You can find tons of great recipes and tips over at www.riceinfo.com! Be sure to pop over and have a look.
For this post Sue and I wanted to create a fun and different holiday appetizer that, while perfect for this time of year, would also work all year ‘round. Sue is a bit of a pickle freak while I am a definite sushi lover… Sue said, “Hmmm… what would happen if deep fried pickles and sushi had a baby?”
I know what you’re thinking.
Whaaaaaaat kind of hybrid would that be?
Well, turns out a delicious, crunchy-squishy hybrid.


Crunchy Pickle Rice Balls with Spicy Red Pepper Jelly

Ingredients
Rice
1 cup uncooked sushi rice
3 Tbsp rice vinegar
1 Tbsp sugar
1/4 tsp salt

Batter
1 cup flour
1 tsp baking powder
3/4 cup water
1/4 cup pickle juice
1 egg

Topping
2 cups Panko bread crumbs
1 tsp dried dill

Filling
4 - 5 small pickles, chopped into chunks

Oil for deep frying (about 1 litre) 

Dip
Spicy Red Pepper Jelly

Garnish
green onion, sliced

Directions
Prepare rice - Cook the rice according to the package directions. Once done, let cool for about 15 minutes. In a small bowl, whisk together rice vinegar, sugar, and salt. Pour into the cooked rice and stir well to combine.


 Set aside to cool completely. When rice is cool, you are ready to make your pickle balls!
Prepare the batter - whisk together flour, baking powder, water, pickle juice, and egg to form a pancake-like batter. Set aside.
Prepare the topping - in a large, shallow bowl, combine panko crumbs and dill. Set aside. 
Before you begin, fill a bowl full of water and have it sitting on your work surface beside you. You will need to keep your hands wet to prevent the rice from sticking to you. 
See photo below - you should have your rice, bowl of water, chopped pickle, batter, and topping all ready to go. 
Place oil for frying in a large pot and start heating while you make the balls. You want the oil to be at 350° degrees. 


Wet your hands and pinch off a ping pong ball sized amount of rice. Flatten in it in the palm of your hand and place a pickle piece in the middle.


Gently squish the rice around the pickle and press into a ball. Continue with the rice and pickles until your are out of rice. We usually get between 18 to 20. 


Using a fork (or your fingers but that is messier), dip a ball in the batter and roll it to coat evenly. Then lift the ball and gently shake off any excess batter. Transfer the ball to the topping and roll to coat all the sides. 


Repeat with all the balls. 


Deep fry 4 - 5 balls at a time in the 350° degree oil until golden brown, about 1 - 2 minutes.


Remove from the oil with a slotted spoon and let excess oil drip back into the pot. Place on a wire rack with paper towel underneath OR directly onto paper towel to let any excess oil drip off. 


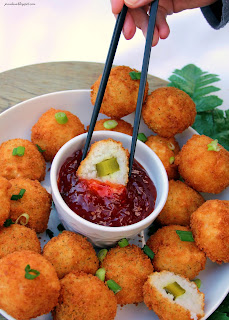
You can serve now OR you can serve at room temp OR you can even serve cold. Place the balls on a serving platter with the Spicy Red Pepper Jelly. 


You can sprinkle with a little sliced green onion, if desired.


These make a lovely addition to the holiday table with those pops of red and green!


You can cut them in half for presentation - this will also double your servings from 18 to 36. 


Sue's hubby, Rob, loved the squishy texture of the rice with the crunchy pickle and crisp coating. (So did we!) 


They are delicious when first made and are hot BUT, the beauty of this recipe is that they are also amazing at room temp or even the next day, chilled. 


We served the red pepper jelly in a bowl for dipping but you could also place it in a plastic bag, snip the corner off, and drizzle it on top of the balls. The little bit of heat in the red pepper jelly pairs really well with the tang of the dill. 


I found that without any red pepper jelly the crunchy pickle balls had a buttery taste from the batter and crumbs that was delicious on its own as well. Because of the sushi aspect of these, you could also serve them with a little wasabi or sriracha mayo. 
Like things even spicier? Throw a slice of jalapeno in there with your pickle!
Rice makes this fun holiday appetizer affordable and, other than the deep frying, fairly nutrient dense (think B vitamins, phosphorus, and zinc!) 
Be sure to pop over to www.riceinfo.com for more recipes and information on rice.