Sunday, November 26, 2017

Homemade Bits & Bites


For some reason homemade bits and bites always seems like a Christmas time treat. Which is a bit weird because there is really no "Christmas-y" ingredients in it. 
Maybe it's because it is the perfect snack to munch on while snuggled up watching all those lovely holiday movies. Every year I have to watch How The Grinch Stole Christmas (the cartoon version), National Lampoon's Christmas Vacation, Home Alone, and Elf. If you ever need help getting in the holiday spirit - these are the movies you can rely on. 
Anyway..... this recipe also make a great gift for family and friends as it makes A LOT. I like to bag it up in cookie bags and tie it with a pretty ribbon. FYI - if you are looking for something for a bake sale that isn't sweet - look no further!


Homemade Bits & Bites

Ingredients
1 box Cheese Nips
1 bag Goldfish crackers
6 cups Cheerios
6 cups Shreddies
6 cups pretzel sticks
2 cups butter, melted
1/3 cup Worcestershire Sauce
2 Tbsp Tabasco Sauce
 1 Tbsp garlic powder
1 Tbsp onion powder
1 Tbsp salt
1 tsp chili powder

Directions
Preheat oven to 250 F.
In a large bowl, mix Cheese Nips, Goldfish crackers, Cheerios, Shreddies, and pretzels.  


In another bowl, mix together melted butter and spices.


Pour the butter mixture over the bits and bites and stir gently but thoroughly, making sure to coat all the bits. Spread the bits and bites into a large roasting pan or on a large cookie sheet.


Bake in the 250 oven for about 2 hours - stirring the mixture every 15 minutes, making sure to pull the ones from the bottom up to the top. After 2 hours the moisture should be gone - if not, and some of the pieces are still moist, bake another 15 or so minutes. (FYI - They bake a bit faster on the cookie sheet than they do in a roaster.)
Remove from oven and let cool before placing in an air tight container (or bags). 


Move over popcorn, there's a new movie snack in town. 
Note - If you are wondering what the DVD is in the photo, it's Clash Of The Titans. The 1981 version.... one of the best movies ever, just so you know. 

Friday, November 24, 2017

Overnight Pecan Cinnamon Buns With Caramel Drizzle


I love overnight recipes. You have all the muss and fuss the night before so when you wake up you only have about 2 seconds of effort to exert and *voila* delicious breakfast treats. 
These amazing cinnamon rolls are one of my favorite overnight recipes. 
You don't even have to put the dough in the fridge! Weird right? It sits on the counter and rises all night so when you bake them in the morning they are sooooo light and fluffy. 
If you are not terribly familiar with baking with yeast then these are a great recipe to try. Read - SUPER easy. 


Overnight Pecan Cinnamon Buns With Caramel Drizzle

Ingredients
Buns
1 Tbsp active dry yeast
3 cups warm water
1 cup sugar
2 tsp salt
2 eggs, beaten
1/2 cup oil
5 cups flour + 4 (to 5) cups flour

Filling
1/2 cup butter, melted
1 1/2 cup brown sugar
2 Tbsp cinnamon
1/2 cup pecans, chopped

Drizzle
2 Tbsp brown sugar
1/2 tsp vanilla
1 Tbsp milk
1/2 cup icing sugar

Directions
In a mixing bowl, combine the yeast, warm water, and 1 cup sugar. Let sit for 10 minutes - until yeast is foamy. After 10 minutes, add in the salt, eggs, oil, and first 5 cups of flour. Mix together for 5 full minutes. After 5 minutes, stir in the next 4 cups of flour. Mix for another 5 minutes. Your dough should be fairly stiff. If it still seems rather sticky add a bit more flour until it is no longer sticky. 


Place dough in an oiled bowl, cover, and let sit in a warm spot to rise for one hour. 


After an hour, cut dough in half and roll out half of the dough into a large rectangle (about 12 X 15)
Spread the dough with half of the melted butter, half of the brown sugar, half of the cinnamon, and half of the chopped pecans. 


Roll up jelly roll style, pinching edges to seal. Cut into approx 1 inch slices. (I believe I got 16 slices per half batch of dough.) 


Place slices, cut side down, into a 9 X 13 pan. (FYI - You will need 2 - 9 x 13's, and 1 - 9 X 9 pan)
Repeat with the other half of the dough.


Cover the pans with towels and leave on the counter overnight (8 hours give or take). In the morning the buns should have risen to fill up the space in the pans....


Now, simply preheat your oven to 350 and bake the buns for 15 - 20 minutes, until they are golden brown on top and sound hollow when tapped. (Note - you may have to leave them in up to 30 minutes, just keep an eye on them!) 


Remove the buns from the oven and prepare the caramel drizzle. 
Prepare caramel drizzle - In a small bowl, whisk together brown sugar, vanilla, milk, and icing sugar. You may need to add a tsp more milk or a pinch more icing sugar to get to drizzling consistency.
Drizzle over the buns while they are still a little warm. 


Serve the buns warm or room temp. You can also freeze them and reheat them later!


The caramel drizzle is not necessary BUT is so amazing you are definitely not going to want to leave it off. 


I always find yeast bread so pretty. 


These worked wonderfully for an office breakfast. All I had to do was pop them in the oven while I was eating my breakfast and they were hot and ready to go by the time I went to the office. 
NOTE - you will want to place these in pans with sides (and not a cookie sheet) so the buns rise in height and don't spread out to much. 


Sunday, November 19, 2017

Banana Upside Down Cake


I don't make this cake as often as I should. 
I should be making it every day. It's super easy and incredibly tasty. 
Ok.... maybe I shouldn't be eating cake every day but... come on.... wouldn't we all like to? And, to be fair, it has bananas and bananas are healthy.... so, there's that. 
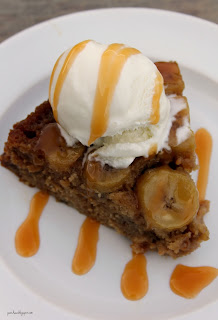
Most of the cakes I make are rather large ones - better for family gatherings and celebrations type of thing. This one makes a single layer so is great for a nice after dinner treat when there aren't a lot of people around. Of course, vanilla ice cream isn't a necessity but... well..... it doesn't hurt. 


Banana Upside Down Cake

Ingredients
Caramel Sauce
1/4 cup butter
1/2 cup brown sugar
2 bananas, sliced

Cake
1 3/4 cup flour
1/2 tsp baking soda
1 tsp baking powder
pinch salt
1 tsp cinnamon
1/2 cup butter, softened
3/4 cup brown sugar
2 eggs
1/2 cup sour cream
2 bananas, mashed
1 cup salted caramel chips (or butterscotch chips) - optional, but delicious

Directions
Preheat oven to 350.
Make caramel sauce - melt together the 1/4 cup butter and 1/2 cup brown sugar and pour into an 8 inch cake pan. 


Place the banana slices in a single layer covering the caramel sauce. Set aside.


Make the cake batter - In a large mixing bowl, whisk together the dry ingredients (flour, baking soda, baking powder, salt, and cinnamon.) In a separate bowl, beat together the butter and brown sugar until smooth. Beat in the eggs, sour cream, and mashed bananas. 
Add the dry ingredients to the wet ingredients along with the salted caramel chips. 


Beat until just mixed. Pour over the bananas in the cake pan.


Bake at 350 until cake is golden brown and toothpick inserted in the middle comes out clean, about 35 - 40 minutes.


Remove from oven and let cool for about 5 minutes. Invert the cake onto a serving platter and remove the pan.


Serve warm or room temp. 


Throw on some vanilla ice cream with a little caramel drizzle and *voila* best dessert ever!


Easy enough for every day, fancy enough for company!
My favorite way to eat this is warmed up a little. You can serve it from the oven warm or reheat for a minute in the microwave. 
NOTE - don't let the cake cool for too long before inverting it on to a serving plate. The caramel can start to harden and the sauce and bananas can end up sticking in the pan. FYI - You can always scrape it out but then it won't look nearly as pretty. 


Be sure to stop by Carole's Chatter for some fun foody links!

Sunday, November 12, 2017

Pork Stuffed Squash Dinner


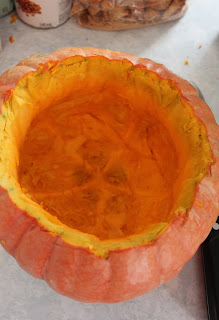
I picked up a kabocha squash from our local U-pick farm (Old Airport Gardens, Lillooet, BC) and had no idea what to do with it. I went searching online for ideas and came across a stuffed pumpkin recipe that sounded amazing and looked like it was easy enough to convert to a kabocha. 
This makes quite a large amount and would be great for the holidays. Because I made it for only 4 people I simply froze the leftovers. They reheated quite nicely after freezing. 
While this sounds like a stuffing recipe it really is a complete meal on its own. 


Serve it with a side salad and *voila* dinner full of veggies and protein ready to go. 
If I had to count how many servings this made, I would say probably 10 good sized portions. 


Pork Stuffed Squash Dinner

Ingredients
1 large Kabocha squash, top cut off and seeds scooped out
1 lb pork sausage
1 Tbsp olive oil
3 cloves garlic, minced
1 large onion, diced
3 celery stalks, diced
5 mushrooms, diced
3 carrots, shredded
1/2 tsp garlic powder
1/2 tsp onion powder
1 tsp tarragon
1 can (540 ml) lentils, rinsed and drained
1 can (540 ml) chickpeas, rinsed and drained
2 pears, cored and diced
1/2 cup craisins
1 pkg (120 gr) Stove Top Stuffing
3 cups large dried bread crumbs (ie: croutons)
2 cups chicken broth
2 eggs

Directions
Preheat oven to 350. Place scooped out squash on a cookie sheet, set aside. 


In a large frying pan over medium heat, cook the pork until no longer pink. Add in the olive oil, garlic, onion, celery, mushroom and carrots. Cook and stir until veggies are softened - about 5 minutes. 
Add in the spices, lentils, chickpeas, pears, and craisins. Cook and stir for about 5 more minutes. 


Remove from heat and set aside. 
In a mixing bowl, combine Stove Top Stuffing and larger bread crumbs. 


Pour the chicken broth and eggs over the bread and mix well. 
Combine the bread crumb mixture with the cooked pork mixture until well mixed. 
Scrape into the squash. (Note - you may have extra filling. Simply place in an oven safe dish, cover, and bake at the same time as the squash. It will not need as much cooking time as the squash - check after about 30  minutes.)


Place the lid back on the squash and place in preheated oven.


Bake at 350 until completed heated through and cooked well - about two hours. Remove the lid at the one hour mark and give the stuffing a bit of a stir to see how hot it is. Leave the lid off for the remaining cook time. (If you poke the outside of the squash with a fork it should be soft when it is cooked). 


Let sit for 5 minutes before serving.


Simply slice and serve. The filling may be a bit crumbly but you can just use a spoon to place it by the slice of squash. 


So good. And with all those lentils and chickpeas and veggies and pork it is soooooo filling. 
Any leftovers will last for a couple of days in the fridge OR, as I mentioned above, you can freeze leftovers for later. I use the microwave to reheat them. 
What is your favorite way to eat a kabocha? 

Saturday, November 11, 2017

Vegan Sausages


I am by no means a vegetarian or vegan. I do, however, like to enjoy vegan and/or vegetarian dishes every now and again. We have posted several veggie burger and meatball recipes on our blog but have not posted any sausages until today. 
Sausages and wieners are pretty hard to replicate as far as texture goes - in my opinion. They are usually just too funky for me. This recipe though.... I really like the texture and the flavor is pretty tasty too. I made them a bit smaller - like breakfast sausage size - but when I make then again I'm going to make them the size of a hot dog wiener so I can try it on a bun like a hot dog. 
This recipe makes a good amount - I believe 21 smallish sausages - and, once steamed, they freeze beautifully.


Vegan Sausages

Ingredients
2 cans (540 ml each) chickpeas (garbanzo beans), rinsed & drained
2 Tbsp tomato paste
3/4 cup potato starch
3 Tbsp vegetable bouillon powder
1/4 cup water
2 Tbsp soy sauce
1/2 tsp liquid smoke
2 Tbsp olive oil
2 Tbsp onion powder
1 tsp garlic granules (or 2 cloves minced garlic)
1 tsp paprika
1 tsp oregano
1/4 tsp black pepper

Directions
In a food processor or blender, process chickpeas until smooth paste. Note - this can take some time as you have to keep stopping and scraping the sides, just be patient. :)
When smooth, scrape into a mixing bowl. Add in the tomato paste and potato starch.
In another mixing bowl, mix together the remaining ingredients. 


Stir all the ingredients together in one bowl. Pinch off some of the mixture and form into a sausage shape. I made mine about the size of a large finger. Repeat until all the mixture is used up. 


Take a piece of plastic wrap and wrap each sausage - leaving enough on each end to twist up like a candy wrapper. (See photo below for clarity) 


Place sausages in a double boiler (or steamer) and steam for 20 minutes. Be sure to only cook them in a single layer at a time - I had to do 3 separate steaming batches. (FYI - remember to check the double boiler/steamer that the water in the bottom has not evaporated off in between cooking the sausages)
After 20 minutes, remove from the double boiler (or steamer) and let cool. When cool enough to handle, gently remove the plastic wrap. 


Place in fridge until ready to eat. They are good in the fridge for 3 or 4 days BUT can be frozen in an airtight container for much longer. 
When ready to eat - you can BBQ them or fry them in a pan. They hold together wonderfully. 
I fried a big pan of onions and mushrooms first......


Then cooked my sausages in a nonstick pan until heated through. I didn't add any extra oil but you certainly can add a little if you like.  


Then I served the sausages on top of the caramelized onions.


They look like "real" sausages, don't you think? (FYI - the larger sausages on the end are another experiment of mine. They are vegetarian sausages, not vegan, and I will post the recipe for those once I tweak the recipe a bit!)


Even the inside looks sausage-y. 
I would love to hear your opinion if you give these a try. I made my office coworkers who are vegetarian taste them and give me feedback. Overall I think they were a hit. 
I really enjoyed them and will definitely add them to my "Meatless Monday" rotation. 
FYI - I believe these are also gluten free if you use a gluten free soy sauce or a sub like coconut aminos.
***
According to MyFitnessPal, the nutritional counts are: 76 calories, 12 carbs, 2 fat, 2 protein, 2 fiber, 0 sugar (5 sugar in the whole recipe). This is per sausage if you make 21 sausages. 


We're sharing over at Carol's Chatter. Be sure to click over and say Hi!