Thursday, June 30, 2011

Kenzie's Kolorful Kake


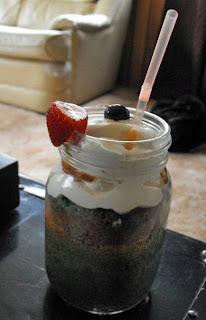
So I (Sue) have decided to write the blog today as the subject is the cake for my baby. I decided to make my daughter, Mackenzie, a cake for her 15th birthday as I am tired of making cupcakes. Don’t get me wrong, cupcakes are great! Jo and I have just made sooooo many lately I needed to switch things up. I still wanted to do something special though so I thought this cake was a good choice. I made it in two different ways just to try things out. The “normal” way and in mason jars.


Kenzie’s Kolorful Kake
Ingredients
White cake mix
2 eggs
1 cup sour cream
1/2 cup milk
1/3 cup oil
1 pkg Jello lemon pie filling
2 cups whipping cream
1 Tbsp sugar
1 tsp vanilla
Directions
Prepare lemon pie filling according to package directions. Chill in fridge until set. (I made it the day before and it worked great) One package did the entire 8 layers you see in the pics so, if you are NOT doubling this, you may not need to use all of the pie filling.

- Hi, Jo here, I suggest if you don’t use it all up then eat it. Lemon pie filling is delicious. You could save it for another use but…hey, eating it on it’s own is just as fun. Just a thought…

Preheat oven to 350. Spray 4, 8 inch cake pans with cooking spray. In a large bowl, whisk together cake mix, eggs, sour cream, milk, and oil. Batter will be thick. Divide into 4 different bowls. Using food coloring, color each bowl a different color. Pour each color into a different prepared pan, layers will be quite thin. Bake at 350 until done (about 10 - 15 minutes. Toothpick inserted in center will come out clean) Cool 5 minutes before inverting onto wire cooling rack. Let cool completely on wire rack.

Layer cake with lemon pie filling. It should go - cake, pie filling, cake, pie filling, cake, pie filling, cake, pie filling. (That’s starting with a cake, ending with pie filling on top) Just spread the lemon pie filling as you would frosting.
Beat whipping cream with a Tbsp of sugar and tsp of vanilla. Spread on sides and top of cake.

For the cake in the photos I doubled the recipe to get 8 layers! It was a giant….it probably served about 30 people.
When beating the whipping cream be careful your beater blade does not snap off into bits and fill your whipped cream with shrapnel because then you have to go the store and buy more whipping cream and start again……true story…..
Now, to make them in the mason jars!!


Follow instructions above for making the cake and coloring it. Instead of using regular cake pans you can spoon the filling into mason jars. I used the 2 cup sized jar. Fill them about ¾ of the way full. Place the jars on a cookie tray and bake in a 350 oven for about 40 minutes. (Toothpick will come out clean)
Don’t worry about any cake that puffs up over the top - just scoop that off.
Remove from oven and let cool on wire racks.
When cool, hollow out the middle of the cake using an apple corer. Fill with fruit. (I used strawberries and blueberries.) I sprinkled the strawberries with sugar and let them sit for a few minutes so some of the juices would be released. That way, when you fill the cakes, some of the juice is absorbed into the cake. Top with whipped cream.
*Note * The 2 cup mason jars hold a large amount of cake. Next time I might try the smaller, 1 cup variety. Let me know how it works if you try it out.


- I’m thinking when we are talking about cake, bigger isn’t necessarily a bad thing… just sayin’

Anyways… Happy birthday to my baby! She is getting older and more beautiful every day but she will always be my baby.

Wednesday, June 29, 2011

Raspberry Cheesecake Donut Cake


Our friends all know how much Sue and I love to bake and cook and experiment with food. If one of them finds a cool new kitchen gadget or baking accessory or recipe they say “Hey, you guys should try this!” I love that. I love that we pop into their thoughts when they see these things.
The other day my friend, Marina, got a new cake pan that she so very generously let me try out first. Who let’s someone else be the first to try out their NEW cake pan?? My wonderful friends, of course! It was from Avon, I believe. A donut cake pan made out of silicone. I don’t usually like to bake in the silicone molds but I have to say that this pan was pretty cool. The cake cooked evenly and popped right out after cooling for 5 minutes. I decided to make a “Homer Simpson” looking pink donut with sprinkles.
Raspberry Cheesecake Donut Cake
Ingredients
1 box yellow cake mix
1 cup sour cream
½ cup vegetable oil
½ cup water
2 eggs
½ cup raspberry jam
4 oz cream cheese, cut into small cubes
Directions
Preheat oven to 350. Spray donut pans with cooking spray. Place pans on cookie sheet.
In a large bowl, stir together cake mix, sour cream, oil, water, and eggs until well blended. Batter will be thick. Using only half of the batter, cover the bottom of both pans. Spoon the jam evenly into both cakes – only down the middle of the cakes so it doesn’t show through after cooking. Sprinkle cream cheese cubes evenly over both cakes, again – only down the middle. (See photo below)
Top with remaining cake batter
Bake at 350 for 30 – 40 minutes. Cakes are done when toothpick inserted near the center comes out clean and cakes are golden brown. Remove from oven and let cool in pans for 5 minutes. Invert onto cooling rack and let cool completely before icing.
I made a pink cream cheese frosting and added sprinkles because I was going for the “Homer Simpson” donut look. My recipe is a little sketchy because I tend to kind-of “wing it” when it comes to some icing. I wanted it fairly runny so it would drip off the sides... You may have to tweak this if you decide to use it.
Pink Cream Cheese Icing
Ingredients
4 oz cream cheese, softened
¼ cup butter, softened
1 tsp vanilla
2 – 4 cups icing sugar (I didn’t really measure – just dumped a little in at a
time)
1 Tbsp Maraschino cherry juice
Red food coloring
Milk
Directions
Beat together cream cheese and butter. Add vanilla. Beat in 1 cup of icing sugar. Add cherry juice and a few drops of red food coloring. Slowly blend in another cup or so of icing sugar until you get the spreading texture you are looking for. If it gets too thick, add more cherry juice or a bit of milk –
about a tsp at a time.
(I was looking for a glossy, glazed look so I actually microwaved my icing for about 10 seconds and then slowly drizzled it on the cake. Just a warning if you decide to try this though: too long in the microwave makes your icing way too runny so watch it carefully!)
I then sprinkled generously with multicoloured sprinkles. Voila! The cutest donut cake ever.
I will be delivering this cake to Marina as a thank you for letting me experiment with her new cake pan. I love our friends! Keep those cool and interesting gadgets headed this way guys...

Tuesday, June 28, 2011

Breakfast Casseroles

Tater Tot, Ham, and Cheese Slow Cooker Casserole

So I have decided that I love breakfast casseroles. You know, the ones you put together the night before and let sit in the fridge and then all you have to do is pop them in the oven in the morning... Yeah, those breakfast casseroles. They are so easy and so tasty!
We recently had relatives up to celebrate our nephew’s graduation with us so we needed something that would be fairly quick for the morning. I found three breakfast casserole recipes that sounded tasty and were different enough from each other that there was something for everyone’s liking.
Broccoli, Ham, and Cheese Bake and Blueberry Cream Cheese French Toast

Broccoli, Ham, and Cheese Bake

Ingredients
12 slices white bread, crusts removed, cut into cubes
3 cups cooked, cubed ham
3 - 4 cups cooked and cooled, chopped broccoli
2 cups shredded, aged cheddar cheese
2 1/2 cups milk
5 eggs, beaten
1 tsp dry mustard
salt and pepper

Directions
In a 9 X 13 baking dish, evenly distribute the bread cubes. Layer ham, broccoli, and cheese. In a medium bowl, whisk together milk, eggs, dry mustard, salt and pepper. Evenly pour over layers.
Place in fridge over night.
In the morning, remove from fridge and let sit on the counter while you preheat oven to 350. Bake for 30 - 45 minutes. (Until set) Let cool for 10 minutes before serving.

Blueberry Cream Cheese French Toast Casserole
Ingredients
1/2 cup flour
1 1/2 cup milk
2 Tbsp sugar
1 tsp cinnamon
1 tsp vanilla
5 large eggs
10 - 12 slices of french bread, cut into 1 inch cubes
4 oz cream cheese, diced into tiny cubes
1 cup blueberries
1/2 cup chopped nuts
2 tbsp sugar
1/2 tsp cinnamon
Directions
Generously grease a 9 X 13 baking dish. Beat flour, milk, sugar, cinnamon, vanilla, eggs until smooth. Stir in bread cubes until well coated, then pour bread mixture into 9 X 13 dish.
Sprinkle evenly with cream cheese cubes and blueberries. In a small bowl, combine nuts, 2 tbsp sugar, and  1/2 tsp cinnamon. Sprinkle over casserole.
Cover and refrigerate overnight.
Remove dish from fridge while you preheat oven to 400. Bake, uncovered, for 20 - 25 minutes, until golden brown. Serve warm with syrup!

Tater Tot, Ham and Cheese Slow Cooker Casserole

Ingredients
1 lb package of frozen tater tots
4 cups diced, cooked ham
1 large onion, finely chopped
2 cups shredded, aged Cheddar cheese
1/2 cup Parmesan cheese
5 eggs
1/2 cup milk
2 Tbsp flour
salt and pepper

Directions
In large crockpot insert, layer ingredients in order: one third of tater tots, ham, onions, and cheeses. Repeat layers 2 more times.
In a medium mixing bowl, whisk eggs, milk, flour, salt and pepper. Pour mixture over layers in crockpot insert. Cover and chill in fridge until ready to cook.
Remove from fridge and set into crockpot. Cook on low for 6 - 8 hours (depending on your crockpot).
I believe I cooked mine on low for 5 hours and it was done so I turned it to warm and it was fine for another hour.


I’m not sure which one was my favourite. I am partial to sweet things so I’m going to vote for the Blueberry Cream Cheese French Toast, but I was also fond of the Tater tot, Ham, and Cheese Slow Cooker Casserole. I didn’t actually get to try the Broccoli, Bacon, and Cheese Bake as it was gobbled up before I had a chance to get to it.

Sue has a Wifesaver French Toast recipe that is AMAZING..... You make a brown sugar and butter caramel sauce for it...I know, CARAMEL SAUCE for breakfast!! We didn't make it this weekend but I am including her recipe here as well. If you love sweet stuff then you will have to try this.


Wifesaver French Toast

Ingredients
1 cup brown sugar
1/2 cup light corn syrup
1/4 cup butter
10 slices French bread
2 eggs
2 1/2 cups 1% low-fat milk
1 teaspoon vanilla extract
1 tablespoon all-purpose flour
pinch salt
2 tablespoons white sugar
1 teaspoon ground cinnamon

Directions
Grease a 9x13 inch baking dish.
Stir the brown sugar, corn syrup, and butter together in a saucepan over medium-high heat until bubbly. Pour into the prepared baking dish, then arrange the sliced French bread evenly over the syrup. Whisk together the eggs, milk, vanilla extract, flour, and salt until smooth. Pour over the French bread. Cover, and refrigerate overnight.
Remove from fridge and let sit on counter while you preheat the oven to 350. Stir together the white sugar and ground cinnamon; sprinkle over the French toast. Bake in preheated oven until golden brown on top, about 50 minutes.Serve hot.

So there you have it. Four completely different breakfast casseroles to try! Let us know which is your favorite.

Sunday, June 19, 2011

Aunty Pat's Smartie Cookies


I love cookies. Pretty much any kind. I don't like crunchy cookies though....unless you can dip them in something to make them squishy. Cookies should be chewy with a slight hint of crunchy around the outside.
Just like...ooooh....say.....THESE COOKIES...
That being said, this recipe was one my Aunt used to make for us when we came to visit her up in Prince George in the summer when we were little. I had forgotten about them for years until I had a dream about them just a little while ago. 
Weird, right? 
Cookie dreams. 
(Sue is shaking her head at me right now) 
In the dream I was eating them and eating them and eating them....so many cookies... and they were sooooooooo good. 
Anyway, when I woke up I emailed my Aunt and asked if she still had the recipe. She sent it to me and I baked them that day. Tasted just like they did when we were growing up. 


Aunty Pat's Smartie Cookies

Ingredients
2 1/4 cup flour
3 tsps baking powder
pinch salt
1 cup butter, room temp
1 cup brown sugar
2 eggs
2 tsp vanilla
1 1/2 cup Smarties

Directions
Preheat oven to 375 F. Line a cookie sheet with parchment paper, set aside. 
In a small bowl, sift together flour, baking powder, and salt.
In a large bowl, beat together butter, brown sugar, eggs (add one at a time until mixed in), and vanilla.
Stir dry ingredients into wet ingredients (use spoon - not electric mixer). 
Gently mix in Smarties.


Use a medium cookie scoop OR, if you want jumbo cookies, use a 1/4 cup measuring cup as your scoop, place cookies about 2 inches apart on prepared cookie sheet. Flatten slightly with the palm of your hand.
Bake at 375 for about 10 - 12 minutes. Cookie should be golden brown around the outside/bottom and a very light brown in the middle.


Remove from oven and let cool 5 minutes on cookie tray before moving to a wire rack.


If you find your cookie are spreading when you bake them, chill the dough for about an hour before you bake it. That should help. 


These keep well in a closed container at room temp. 
You can, of course, freeze them in Ziplock bags as they keep very well frozen. 


Maybe you'll be lucky enough to dream of cookies too!
Thanks Aunty Pat. 

Thursday, June 16, 2011

Cheese and Bacon Biscuits


I love buying new kitchen gadgets. Yesterday on Sue and I's daytrip to a friend's house I was able to buy something I have been wanting for a while now. I got a Magic Bullet! You know, the mini blender that can do a million things. Okay, I admit it....the infomercial sucked me in.
Don't judge me!! It's cool.

See, cool - right?

That being said, I now had to make something that involved using the new gadget. I wanted something quick and easy that involved little clean up. You know, start slowly and work my way up to the complicated messy stuff. I decided on these delicious Cheese and Bacon Biscuits. (Why? Well, because my fridge was a little empty but I did have cheese that I could grind in the Magic Bullet!)
These biscuits (or you could even get away with calling them scones if you want to be fancy schmancy) are light and airy and very flavorable. I took a basic biscuit recipe and tweaked it a little and came up with this recipe.

Cheese and Bacon Biscuits

Ingredients
3 cups flour
1 Tbsp baking powder
1 Tbsp sugar
big pinch salt
1/4 black pepper
1/2 Tbsp Oh! So Garlic (from Sunset Gourmet) - optional
1/2 cup butter, chilled
1 1/2 cups aged cheese, shredded
5 slices bacon, cooked, crumbled
1 cup + 2 Tbsp milk (or cream)

Directions
Preheat oven to 400 F.
In a large bowl, whisk together flour, baking powder, sugar, salt, and pepper (and Oh! So Garlic if using). Cut in the butter using 2 knives or a pastry blender until mixture resembles coarse crumbs. Stir in cheese and bacon.
Add 1 cup of milk and stir together just until it becomes a sticky dough - do not over work or your biscuits will be tough. Add the remaining 2 Tbsp of milk if you need to, to bring it together.  
Turn onto a lightly floured surface and pat until it comes together. Gently roll out to 1 inch thick. Use a 2 inch cookie or biscuit cutter to cut out biscuits. Bring together scraps and roll out gently again.(I got about 15) 
Bake until golden brown, about 20 - 25 minutes. Best served warm.


I thought I should also mention that my new Magic Bullet is also handy for crumbling bacon as well as shredding cheese. I will keep you updated on what else can be put into a Magic Bullet Blender.

*Note - I was going to buy a really, really cool SQUARE muffin pan. But, Sue wouldn't let me. "Honestly, how many times are you REALLY going to use it?", she asked.
"But, but, but...it's SQUARE!" I responded.
It's okay... It will be added to my collection one day :)

Monday, June 13, 2011

Butterscotch Dream Square


Here is a recipe you can whip up in 10 minutes. It only has 4 ingredients, and I’m going to guess you probably have most of them on hand at all times. I know I do...
Well, except for marshmallows.
 I don’t usually keep those on hand. I did have them this week though as they were on sale!
Oh, and butterscotch chips... I don’t usually keep those around either.
Okay, let me try that again. You might have at least half of the ingredients on hand all the time. Maybe.
Anyway, this square is called Butterscotch Peanut Butter Marshmallow Square. (Hmmm.... the title includes all the ingredients and seems a bit wordy...maybe we’ll just call it....Jo and Sue’s Mom’s Favourite Square....hmmm..... no less wordy, is it?
Okay, how about... Butterscotch Dream. Yeah, that’ll work.)


Butterscotch Dream

Ingredients
½ cup butter
1 cup smooth peanut butter
300 gr bag of Hershey's Butterscotch Chips (approx 2 1/4 cups)
16 oz mini marshmallows 

 Directions
Line a 9 X 13 pan with parchment paper (or wax paper). Set aside.
Mix butter and peanut butter in large pot over low heat until melted. Remove from heat and add butterscotch chips. Stir until melted.
Let cool for about 5 minutes.
Stir in marshmallows. Stir until marshmallows are evenly coated.
Spoon into prepared pan. Press down lightly. Chill until set. Cut and serve.


See...easy peasy. This is one of those things I don’t make that often because it is dangerous to the waistline. You can’t eat just one piece of this.
Seriously.... I’m giving you fair warning, you may be tempted to eat the whole thing.

Saturday, June 11, 2011

Pear and Blackberry Pie


There are a million ways to make a pie. Maybe more, I haven't actually counted. That being said, of all the pie crust recipes I have made this one seems to be the favorite of most samplers. It is really flaky but not crumbly.  I found it in the Cayoosh Elementary Cookbook, submitted by Ginny Byrne.

Never Fail Pastry

Ingredients
5 cups flour
1 lb lard
1 tsp baking powder
1/2 tsp salt

1 egg
3 Tbsp brown sugar
1 tsp vinegar
water

Directions
Mix together first 4 ingredients using 2 knives or a pastry blender, until mixture resembles coarse crumbs.
Mix next 3 ingredients together in a 1/2 cup measuring cup, beating with a fork. Add enough water to fill the 1/2 cup. Add to dry mixture. Use fork to mix initially then bring together with your hands. (Try not to work it too much or it gets tough. The least amount you can handle the dough the better)
Divide into 3 parts. Wrap in plastic wrap and store in fridge. Will keep in fridge for about a week. Can be frozen. Simply thaw in fridge overnight to use. Makes enough for 3 double pie crusts.

You can, of course, use this for whatever kind of pie you like. Today I made a pear and blackberry pie. Why a pear and blackberry pie you ask. Well, because that is what I had on hand. It actually worked pretty good as a flavor combination. A little sweetness, a little tartness, some nutmeg and cinnamon, good to go!

I would like to give you the exact recipe I used but, unfortunately, this was one of those throw everything into a bowl, give it a stir, and hope for the best kind-of recipes.  It went something like this:

Pear Blackberry Pie Filling

Ingredients
6 pears, peeled and sliced
1 1/4 cup blackberries
3 Tbsp flour
3 Tbsp brown sugar
1 tsp cinnamon
1/4 tsp nutmeg

Directions
Toss all ingredients in a bowl. (Pretty tricky, right?) 


Okay, now to assemble the pie. Roll out your pie dough and place it in a pie pan. Sprinkle with a little more flour, sugar and cinnamon. (You don't want to miss this step. The extra flour thickens the juices as the fruit cooks and prevents the crust from getting too soggy.)  Now, neatly dump the bowl of fruit into the shell. Roll out another piece of dough and cover the fruit filling. Seal the edges of the pie together, gently pressing with a fork or between your fingers. Poke several holes in the top crust so the steam can escape. (That photo above was me being all fancy schmancy. I used a cookie cutter to cut rounds of dough and layered them in a circular pattern on top of the fruit.)
Bake at 400 F for 10 minutes then turn the oven to 350 F and bake another 50 minutes. Depending on how stuffed full of fruit - and how ripe the fruit is - your pie may take more, or less, time. Keep an eye on it and check for doneness with a fork. Remove from oven and let cool on wire rack. Let sit for at least half an hour before serving so the juices have time to thicken.
.


Helpful tip - I have an oven liner in the bottom of my oven but, if you don't have one of those, you may want to place an old baking sheet on the bottom rack of the oven as fruit pies tend to bubble over and cause quite a mess. Fires even. Yup. Fires. Learned my lesson the hard way.

Another helpful tip - if you have had a fire in your oven do not, I repeat DO NOT bake anything else in the oven until you completely clean your oven. Trust me when I say everything tastes like burnt oven crunchies if you bake in an oven that had a fire and you didn't clean it before baking something else. Learned that lesson the hard way too.


Friday, June 10, 2011

THE BEST Tomato Soup and THE BEST Grilled Cheese Sandwiches


I am going to go out on a limb here and say that tomato soup and grilled cheese should be in the top 5 for best meals ever. I don’t know if they make number one spot (that’s got to be pierogies and Ukrainian sausage in my books) but they are pretty close.  There is something about eating the middle out of a gooey grilled cheese sandwich and then dunking the crusts in the tomato soup that just makes me feel good. (Life is about enjoying the small things.)
You can use regular store bought tomato soup and spice it up with some added onions and bacon but to truly experience THE BEST Tomato Soup and THE BEST Grilled Cheese Sandwiches you have to make the soup from scratch.
Sue discovered the best tomato soup recipe a few years ago via her mother-in-law. Now every year she and dad spend a day (or two) making several batches for the family.  It’s a little messy and time consuming but once you have tasted it you will never go back to store bought.
.
.
Concentrated Tomato Soup

Ingredients
12.5 lbs tomatoes, skin removed (2.5 ice cream buckets full)
6 onions, quartered
1 bunch parsley (a good handful)
1 head celery (leaves and all), roughly chopped
2 bay leaves
8 whole cloves

Roux
¾ cup flour
½ cup sugar
½ tsp cayenne
¼ cup salt
½ lb butter (1 cup)

 .
 Directions
Boil first 6 ingredients for 2 hours. (Bring to a boil then simmer on low to medium) Strain by pressing mixture through a sieve.  Remember to strain over a large pot so you keep the liquid. That’s the good stuff. Place this mixture back in a large pot over medium heat. 
Prepare the roux - Sift flour, sugar, cayenne, and salt together, set aside. In a separate medium pot, melt butter over medium heat. When butter is melted, stir in dry ingredients. Add a ladle full of strained liquid to the roux and stir until smooth. Add another 4 – 5 ladles full of liquid and stir until blended. Pour this mixture back into the remaining strained tomato liquid in the larger pot.
Bring to a boil, stirring constantly, until thick and smooth.
Pour hot liquid into sterilized jars. Seal with canning lids.
Process jars in hot water bath for 20 minutes.

When preparing the finished, canned soup – add equal parts milk or water to the amount of soup you are using. IE: Dump the jar of soup in a pot, fill up the empty soup jar with milk and dump that into the pot!
2 jars of soup? 2 jars of milk.


As for the grilled cheese, you can’t just slap two pieces of bread together with a piece of cheese in the middle. No..no..no. That just doesn’t work. You have to follow this recipe and you will be in grilled cheese heaven. (Okay, you don’t HAVE to...but you should)
.

THE BEST Grilled Cheese Sandwich

Ingredients
2 slices of bread
(We prefer whole grain for the texture it adds, but you can use your favorite)
2 slices of processed cheese (Or, as I like to call it, plastic cheese)
(You can use whichever cheese you like but plastic cheese adds the best gooeyness)
1 Tbsp of garlic butter (Recipe below)
3 slices of pre-cooked bacon
1 thin slice of onion

Directions
Spread garlic butter on both slices of bread - inside and out. Put 1 piece of plastic cheese on a slice of bread, layer - bacon, onion, second piece of cheese, and second slice of bread.
Cook using your favorite method - in a toaster oven, regular oven, or in a frying pan. Use low heat so the cheese will melt but you don't burn the bread!


Garlic Butter

Ingredients
 1 cup of room temp butter
2 – 3 cloves of garlic, minced
¼ tsp garlic salt
Optional: ½ Tbsp Oh! So Garlic (From Sunset Gourmet Foods)
.
Directions
Stir all together until smooth. Spread on things that need garlic. Enjoy.


Remember - eat the middle of the grilled cheese and save the crusts for dunking in the soup. 
Definitely the best way to eat THE BEST tomato soup and THE BEST grilled cheese. 

Thursday, June 9, 2011

Number 2 on Jo's Chocolate Chip Cookie List

2nd most delicious Chocolate Chip Cookie. Ever.

My favorite chocolate chip cookies have to be the Pillsbury ones in the tube you can buy in the grocery store. The dough eaten raw is fantastic and warm, straight out of the oven is heaven. I could honestly eat a whole tube of them.
I know, I know.... not from scratch?
Blasphemy!
But, to redeem myself, I do have a recipe that is pretty close to being number one on my list. (That would be #2) I found it one day whilst perusing Allrecipes. They have a bazillion chocolate chip cookie recipes. (I'm not kidding - a bazillion) Take a look here - Allrecipes .  I believe they are called Best, Big, Fat, Chewy Chocolate Chip Cookies.
As usual, we tweaked the recipe a bit. We can't help it!
They are amazing - maybe because they are HUGE, or maybe because they taste awesome and are chewy yet crispy on the edges. I think you will agree - but, hey, you won't know until you try!

#2 on Jo's List Chocolate Chip Cookie Recipe
(Slightly adapted from Allrecipes)
 
Ingredients
2 cups all-purpose flour
1/2 teaspoon baking soda
Pinch salt
3/4 cup butter, melted
1 cup packed brown sugar
1/2 cup white sugar
1 tablespoon vanilla extract
1 egg
1 egg yolk
2 cups semisweet chocolate chips
 Directions
Preheat the oven to 325 degrees F (165 degrees C). Line cookie sheet with parchment paper.
Sift together the flour, baking soda and salt; set aside.
In a medium bowl, cream together the melted butter, brown sugar and white sugar until well blended. Beat in the vanilla, egg, and egg yolk until light and creamy. Mix in the sifted ingredients until just blended. Stir in the chocolate chips by hand using a wooden spoon.
Drop cookie dough 1/4 cup at a time onto the prepared cookie sheets. Cookies should be about 3 inches apart. Bake for 15 to 17 minutes in the preheated oven, or until the edges are lightly toasted. Cool on baking sheets for a few minutes before transferring to wire racks to cool completely.
We make them big - I use my 1/4 cup measuring cup to scoop them on the cookie sheet. I think about 6 fit on a sheet at a time.
You can, or course, make them smaller, but - why would you want to do that? My theory is if I only eat 1 cookie the calories are the same whether it is teeny or huge. 1 cookie = 1 cookie. (Shhhhh....let me have this one!)

Tuesday, June 7, 2011

Vanderwolf's Family Secret Chocolate Cake Recipe


If you promise not to tell anyone - Here is our secret family recipe for the best chocolate cake EVER!
This has to be the recipe I make more often than anything. I don’t want to say it’s a “never fail” recipe because then I will jinx it but.... it’s really hard to do something wrong with this cake.
The best part about this recipe is you are only dirtying 1 bowl and 1 whisk.
Okay, that’s soooooo not the best part.
The best part is the taste! So moist and chocolately it could get by without being iced. (Of course we do ice it though. Pffft...like we’d miss a chance to pile on even more calories)
Okay, get ready for the tastiest cake ever!
 

Vanderwolf’s Family Secret Chocolate Cake Recipe
 
Ingredients
1/2 cup baking cocoa
2 cups flour
2 tsp baking soda
pinch of salt
2 cups sugar
1 cup sour milk or cream
2 eggs
2 tsps vanilla
1/2 cup oil
1 cup boiling water (do not use hot tap water, use boiling water)
 
Directions
Preheat oven to 325 (Yes, 325, not 350). 
In a large mixing bowl, whisk together first 5 ingredients.
Make a hollow in centre of bowl and add the remaining 5 ingredients into centre.
Whisk all together until well blended (you can use electric beaters if you want but a whisk also works fine)
Pour into prepared baking pan. (It makes 2 – 8 inch cakes, 1 – 9X13 cake, or 24 – regular cupcakes. It makes a bazillion mini cupcakes. Okay, not a bazillion...maybe 48). I find spraying with cooking spray and then lining the bottom with parchment paper works best.
Bake 35 mins or until toothpick inserted in centre comes out clean. (Depending on pan size this varies greatly. Keep an eye on it!)
Remove from oven to cool 5 minutes on wire rack. If you are not going to serve it in the pan you should remove it from the pan after about 5 mins.
When completely cool, ice with your favourite icing.

Here is the recipes for the two frostings in the photos of the cake.

Creamy Peanut Butter Icing
 
Ingredients
1 cup confectioners' sugar
1 cup creamy peanut butter
5 tablespoons unsalted butter, at room temperature
3/4 teaspoon vanilla
Pinch of salt
1/3 cup heavy cream

Directions
Place the confectioners' sugar, peanut butter, butter, vanilla, and salt in the bowl. Mix on medium-low speed of electric mixer until creamy, scraping down the bowl with a rubber spatula as you go. Add the cream and beat on high speed until the mixture is light and smooth.
(Add more confectioners’ sugar or cream as necessary to get to smooth consistency.)
**
 
Old Fashioned Cocoa Frosting

Ingredients
1/2 cup plus 2 tablespoons (1 1/4 sticks) unsalted butter, room temperature
1 cup unsweetened cocoa powder
4 – 5 cups powdered sugar
8 tablespoons (about) whole milk
2 teaspoons vanilla extract

Directions
Beat butter until creamy. Add cocoa powder and about 4 cups of sugar. Beat well. Add vanilla. Add milk – 1 tbsp at a time – until frosting reaches desired consistency.
(You may need to add up to a cup more of icing sugar to get right consistency or more milk.)


We also added some chopped Reese's Peanut Butter Cups for decorations and between the layers. You know, because there wasn't enough calories in it yet.
Here are some step-by-step photos of the icing and peanut butter cups coming together!


First layer.


First layer with 1/2 of the peanut butter icing and some peanut butter cups.


Second layer.


Second layer with the remaining peanut butter icing and more peanut butter cups.


Third layer and covered in the old fashioned cocoa frosting.
So good.

Just in case you needed proof that this recipe has been used in our family for a while - this is what the ancient book looks like. I believe it is a Lillooet Crafts & Things Cookbook from 1974.

It looks like a treasure map..... and it is, in a way.

And, for good measure. One more photo. Here is how this recipe looks as cupcakes....

Pretty Flowers!

And here is a photo a reader of our blog sent us:


Thanks for sending us the photo Angel. It turned out fantastic :)

Hope you enjoy this recipe as much as we do. Please leave a comment if you get a chance to try it out and let us know how it turned out for you.

Sweet and Salty, Chewy, Crunchy Bars

Photo from Taste of Home (http://www.tasteofhome.com/)

I am the kind of girl who can sit down and eat a bucket of cookie dough or a bazillion chocolate bars (a bazillion may be a bit of an exaggeration but you see where I am going with this.) I am addicted to sweets. I can admit it. Sugar is my one fault.
 - Really? One fault? Riiiiiiight......(It's me, Sue, in italics, in case you are wondering. I had to interject on this one. Someone has to tell the truth about Jo)
ANYWAYS.....as I was saying. I am all about sweets but there are those people who prefer savoury. I never really understood them. Don't get me wrong, I also enjoy savoury foods but, come on, who can choose anything over chocolate? Sue does. She's a potato chip girl. Weird, right?
 - No, it's not weird. I'm just sweet enough already.
Okay, we are not here to debate how people who don't prefer sweets are wrong. (Because they are.)
- No, we're not wrong. You're wrong.....and weird.
We are here to discuss this delicious recipe that combines the perfect amount of sweet and salty (and also chewy and crunchy - but that is another debate entirely) so we can have the best of both worlds. *Cue angels singing*
We tweaked this recipe just a tiny bit from a recipe in Taste Of Home Fall Baking Magazine. (2009)

Sweet and Salty, Crunchy, Chewy Bars

Ingredients
2 cups corn chips, lightly crushed, divided
2 cups salted peanuts, divided
1 cup light corn syrup
1 cup sugar
1 cup peanut butter

Directions
Place half of the corn chips and half of the peanuts in a greased 9 X 9 pan, set aside. In a large saucepan, bring the corn syrup and sugar to a boil. Stir in peanut butter until blended. Drizzle half over corn chip mixture in pan.
Add remaining corn chips and peanuts to remaining syrup; stir until smooth. Spoon over mixture in pan, press down lightly. Cool before cutting.
Yield: 2 dozen.
Now enjoy the peace and tranquillity that comes from knowing sweet and salty can coexist in the world!