Monday, August 27, 2018

Chicken Cordon Bleu Meatballs


Our sister Orra used to make the best chicken cordon bleu. I can remember her having to pound out the chicken, bread it and then fry it. I usually have a hard time trying to pound out a chicken breast. It can go sideways for me very quickly. I thought maybe using ground chicken would be easier for me. 
While it doesn't really save any time compared to Orra's way, I do find it much more simple. I believe I got 4 servings of 3 meatballs each out of this recipe when serving it with egg noodles.  
Cheese, chicken, creamy sauce - so many things to love here. 


Chicken Cordon Bleu Meatballs

Ingredients
Mustard Cream Sauce
2 Tbsp butter
2 Tbsp flour
1 cup milk
salt & pepper
1/4 cup whipping cream (heavy cream)
2 tsp prepared mustard
1 tsp chicken bouillon powder
1 tsp Worcestershire sauce
1/4 cup white wine
1/4 cup Parmesan cheese, shredded 

Meatballs
1 lb ground chicken
salt & pepper
1 egg, beaten
1/2 cup panko breadcrumbs
4 slices deli ham
4 slices Swiss cheese
3/4 cup panko breadcrumbs
1/4 cup Parmesan cheese, shredded
2 eggs beaten
1 Tbsp milk

To Cook
canola oil (enough to cover 1/3 up the sides of the skillet)

Directions
Prepare the mustard cream sauce - Melt the butter in a medium skillet over medium heat. Sprinkle the flour in and whisk until smooth. Continue whisking as you slowly pour in the milk, salt & pepper, and cream. Whisk until smooth. 
Add in the mustard, bouillon, and Worcestershire. Continue to cook, stirring constantly, until sauce thickens. Once it has thickened, remove from heat and stir in the wine and Parmesan cheese. Stir until cheese is melted and sauce is smooth. Set sauce aside and keep warm until meatballs are done.


Prepare the meatballs - In a mixing bowl, combine chicken, salt & pepper, egg, and panko. Mix well and form into 12 balls.


Cut the ham and Swiss cheese slices into 4 pieces each. Make little stacks of the ham and cheese to go inside the meatballs. In a bowl, combine the panko and Parmesan. In another bowl, combine the beaten eggs and Tbsp of milk. 


Flatten a meatball slightly in the palm of your hand. Place one stack of the ham and cheese in the meatball and pinch the meat up around it. Re-roll to shape into a meatball again.
Dip the meatball into the eggs and then roll in the breadcrumb/Parmesan mixture to evenly coat. 
repeat until all meatballs are formed and ready to be cooked. 


Heat the canola oil to 350 degrees in a large skillet. Place the meatballs into the hot oil.


Gently turn each meatball to cook all sides until meatballs are cooked through. Watch closely so you don't burn the meatballs. When meatballs are almost done - make sure your sauce is still heated. 
When done, remove the meatballs from the oil and place on paper towels to drain off any excess oil. Carefully move the oil off the heat and let it cool completely before discarding it (or saving it for another use). 


Serve hot over noodles or rice with the sauce. 
Love the bit of melty cheese peeking out!


Note - the sauce and meatballs can be made ahead of time. For the sauce - prepare as above to the point it is done and just being warmed. Remove from heat and place in covered, microwave safe container. Let cool and keep in fridge for up to 2 days. Simply reheat when ready to use. 
I have prepped the meatballs to the point where they are ready to go in the oil and then covered and refrigerated them for up to 6 hours - I'm sure they would be fine overnight -  (ie: made them at breakfast time and chilled until dinner time). Then let them sit at room temp for about half an hour before continuing to cook as above. 

Saturday, August 25, 2018

No Bake Penotti Monster Cookies


Quite a while ago we received a gift from Penotti Canada of two jars of their product. One jar we used to create our Crunchy Cookie Butter and Coconut Biscotti (Recipe HERE). The other jar we used to make these frightfully good no bake monster cookies. 
No bake cookies are soooooo great, aren't they? Super easy to whip up at the last minute. Throw some spooky candy eyeballs on and *voila*  a Halloween snack the kids will love. And adults. And ghouls. And vampires. Pretty much everyone....


No Bake Penotti Monster Cookies

Ingredients
2 cups sugar
1/4 cup butter
1/2 cup milk
1/4 cup baking cocoa powder
1 tsp vanilla
2 1/2 cups old fashioned oats
1 cup coconut
candy eyes

Directions
In a large saucepan mix sugar, butter, and milk. Bring to a full roiling boil (Full, rolling boil = bubbles can't be stirred down). 
Boil for one minute, stirring constantly. 
Remove from heat and stir in the Duo Penotti and vanilla until smooth.


 Stir in the oats and coconut.


Working fairly quickly, drop by spoonfuls onto parchment paper covered cookie sheet (you can also use plastic wrap). 


Press two eyes into each blob. Let cool completely. 


You can make them all different sizes if you like. They harden up enough to go in a lunchbox if you want to send some to school with the kidlets. 


You can also make these without the eyeballs of course! But.... cooooome ooooon


They're just so cute with the eyeballs. 
I mean.... terrifying.... they are so terrifying with the eyeballs. 
These are basically just a fun update to a classic "haystack" cookie. The Duo Penotti instead of peanut butter makes these extra tasty!

Friday, August 24, 2018

Blueberry Ice Cream


Blueberry ice cream is not one of my favorites, if we are being honest. I just find that blueberries are so mild that it doesn't impart a lot of flavor to the ice cream. I decided to try and up the blueberry flavor by adding in a swirl of reduced blueberries. 
It worked!
Not only does it add a textural element, it definitely boosts the blueberry-iness of it. Blueberry ice cream has now moved up the list of favorite flavors for me. The beautiful color helped push it into the top 10. If you are one of those people that only eats ice cream in the summer (weeeeeeird) then you still have lots of time to whip some up!


Blueberry Ice Cream

Ingredients
Swirl
1 cup fresh blueberries
1 Tbsp sugar

Ice Cream
2 cups fresh blueberries
1/4 cup sugar
1 Tbsp lemon juice
2 cups whipping cream, divided
1 cup half and half cream (or whole milk)
3/4 cup sugar
1/4 tsp salt
1/2 tsp vanilla
3 egg yolks
1 Tbsp blueberry vodka (optional)

Directions
Prepare swirl - on a small saucepan over medium-low heat, stir together blueberries and sugar.


 Keep stirring while blueberries come to a boil and start to breakdown and thicken - about 10 minutes (you want it to be jam-like). Remove from heat and let cool completely. 
Prepare ice cream - Place blueberries, sugar, and lemon juice in a medium pan. Cook and stir until mixture breaks down (much like the swirl, above). Remove from heat. Place a strainer over a bowl and strain the blueberry mixture through. Discard the bits left in the strainer. Set the bowl with the blueberry puree aside. 
In a medium saucepan over medium-low heat, stir together 1 cup of the whipping cream, the half and half, sugar, salt, and vanilla. Keep stirring constantly until mixture starts to steam. Remove from heat.
In a small bowl, whisk egg yolks. Very slowly whisk in a little of the hot cream mixture - about 1/4 cup at a time. (Do this slowly so you don't curdle the eggs). Stir the the yolk mixture back into the cream and place back on heat. Continue to stir until mixture thickens enough to coat the back of a spoon. When thickened remove from heat.
Place remaining 1 cup of cream in a bowl with a strainer on top. Pour the hot mixture through the strainer into the cream. Stir in the blueberry vodka, if using. 
Stir in the blueberry puree.
Chill mixture at least 4 hours.
When chilled: place in ice cream maker and process according to manufacturer's instructions.
When the ice cream is done processing, scrape half of it into a container. Place half of the swirl mixture on top and swirl with a butter knife. Scrape the remaining ice cream on top, then swirl on the last of the swirl mixture.


Freeze until firm. 


I use a bit of blueberry vodka to help prevent the ice cream from freezing too hard. It's not necessary though. You can use plain vodka or just leave it out. If your ice cream freezes really hard just be sure to take it out about 10 minutes before you want to serve it. 

Wednesday, August 22, 2018

Slow Cooker Beans With Bacon


Is it just me or is everyone here ready for fall?
Sue and I live in a small town in the interior of British Columbia and, once again, our summer has been fraught with smoke from forest fires. I get quite anxious now when summer rolls around because twice we have been placed on evacuation alert due to nearby forest fires. When we get near the end of August and September is nearing, I start to feel relief knowing that cooler weather is on its way. And with cooler weather comes comfort foods!
These slow cooker beans turned out pretty tasty, if I do say so myself, and require like zeeero cooking skills and/or energy. Served with a slice or two of garlic toast, it's the perfect warm-up meal. 
P.S. - It also works as a perfect summer meal because you don't need to turn on your oven and heat up the house!


Slow Cooker Beans With Bacon

Ingredients
1 lb navy beans (also called "small white beans")
1 lb bacon, diced
1 large onion, diced
1 green pepper, diced
4 cloves garlic, minced
2 cups water
1/4 cup strong brewed coffee
1/2 cup brown sugar
1 cup BBQ sauce
1/3 cup apple cider vinegar
1/4 cup prepared mustard
1/4 cup molasses
salt & pepper

Directions
Soak beans in water overnight. 
In a frying pan over medium high heat, cook bacon until it is starting to get crispy. Add in the onion, green pepper, and garlic. Cook until onions are wilted - about 5 minutes. 


Place in crock pot on high heat. Drain the beans and add them to the crock pot as well. Stir in 2 cups of water and 1/4 cup coffee. 


Cook, covered/on high, in the crock pot for 4 hours. 
Stir together the brown sugar, BBQ sauce, apple cider vinegar, mustard, molasses, and salt & pepper. 


Pour over the beans in the slow cooker and stir until well combined. 


Cover and continue to cook on high until beans are tender - another 2 or more hours. Liquid should start to thicken and darken. Cook until desired consistency is reached. (FYI - if the beans are getting too dry then stir in a little boiling water. It should be boiling so as not to lower the temperature of the beans.)


Serve hot.


Of course, garlic toast is a must....


Total time on high in the slow cooker is about 6 or so hours. It's going to depend on how your slow cooker cooks. Check every so often by giving them a stir. Don't check too often though because you don't want to lose the heat in the pot!
Also, the BBQ sauce is what lends a lot of flavor to the beans so be sure to use your favorite. You don't want to use something too sweet though, a smoky or bourbon type flavor is really nice!

Thursday, August 16, 2018

Slow Roast Leg of Lamb


Sue and I were having a discussion about trying something new the other day. We both decided on lamb because we couldn't remember the last time we had eaten it. I'm pretty sure it was way back in our childhood. Mom used to make lamb chops in mushroom sauce that I can vaguely remember. 
Lamb isn't usually available at our local grocery store - the joys of living in a teeny tiny town - but as luck would have it they happened to have in a few leg of lambs the day after we had our discussion. 
It had to be fate. 
Although fairly pricey, I knew I had to give it a try! 
Slow roasting the lamb makes it super tender and really infuses all those lovely flavors into the meat. I made this for a Greek dinner I prepared for the family, serving it with our Greek potatoes (recipe HERE), and a Greek salad using our Feta Cheese Dressing (Recipe HERE), some pita and tzatziki, and lastly, some Greek briam (I used the recipe from HERE). And lastly, some homemade Baklava for dessert (recipe HERE).


The lamb was really the cherry on top of this meal. 
Next thing I'd like to try is lamb burgers - I just need to get my hands on some ground lamb. 


Slow Roast Leg Of Lamb

Ingredients
1 leg of lamb, bone in, approx 6 lbs. 
1 head of garlic
1/2 cup extra virgin olive oil, divided
salt & pepper
2 tsp garlic powder
2 tsp paprika
2 medium onions, peeled and quartered
2 - 3 sprigs fresh rosemary
9 - 10 sprigs fresh thyme
2 tsp dried oregano
2 bay leaves
1 cup white wine
juice of 2 lemons
hot water


Directions
Peel the skins of all the garlic. Stick a small knife into the lamb and make a slit. Press in a sliver of garlic. Repeat with as many slivers of garlic as you can. 
Preheat your oven to 550 and place rack in the middle position. 
Place the leg of lamb in a roasting pan that just fits the leg. Drizzle with a little of the olive oil (about a tablespoon or so). Season with half of the salt and pepper, garlic powder, and paprika. Flip the leg over and repeat. 
Place the leg off lamb in the preheated oven and roast, uncovered for 15 minutes. Flip over and roast another 15 minutes. 
Remove lamb from the oven and reduce the heat to 350. 
Place the quartered onions around the lamb, adding any leftover garlic. Add the herbs (rosemary, thyme, oregano). Pour the wine in over the lamb then squeeze in the lemon juice. Pour in the remaining olive oil. 


Add in enough hot water to cover the lamb about 1/3 of the way up. Add in the bay leaves. 
Cover and place the lamb in the 350 oven for 2 hours. Baste the lamb once an hour, adding a bit more water if necessary. After 2 hours, flip the lamb over and continue to cook for another hour or so. (Use a meat thermometer to ensure meat is done)
Remove the lamb from the oven, baste with the pan liquids, and allow to rest for 15 minutes before slicing.


Sue was our carver and did a great job. We served the lamb with some of the pan liquid drizzled on top. It's too delicious to go to waste!


We strained the pan juices and saved it to add to homemade soup! So much flavor :)


Our first foray into the world of lamb went very well. We can't wait to make more dishes using lamb - it has such a different essence than beef, pork, or chicken. 
I'll be on the look out for ground lamb now. What's your favorite lamb recipe? Feel free to share in the comments below!

Tuesday, August 14, 2018

Cherry Pie Bars


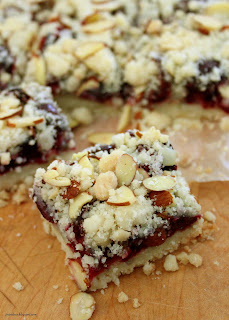
Sue and I posted a few years back about our Cherry Streusel Bars (Recipe HERE) that turned into a family favorite. The only thing about that recipe is that is uses canned cherry pie filling and I wanted to come up with something that used some of the fresh cherries we have piling up around our house.
These Cherry Pie Bars are pretty close to the streusel bars but different enough that they warrant their own post. 
The crumbly topping and shortbread base go so well with the sweet cherry filling that I am sure this will become a family favorite for your family as well!


Cherry Pie Bars

Ingredients
Filling
2 cups cherries, pitted and halved
1 Tbsp cornstarch
1 Tbsp lemon juice

Crust
1/2 cup butter, melted
1/2 cup sugar
1 1/2 cup flour
1/2 tsp baking soda
1/2 tsp baking powder
pinch salt

Topping
Reserved 3/4 cup crust mixture
1/3 cup sliced almonds
1 tsp sugar

Directions
Stir together cherries, cornstarch, and lemon juice. Set aside.
Preheat oven to 375. Line an 8 X 8 pan with parchment paper and set aside.
Stir together melted butter and sugar. Add in the flour, baking soda, baking powder, and salt. Stir with a fork until crumbly.  Scoop out 3/4 cup to use for the topping.
Press the crumbs firmly into the prepared pan. 
Spread the cherry mixture on top. 


Combine the reserved crust mixture and the almonds. Sprinkle over the cherries. Sprinkle with the 1 tsp of sugar.


Bake at 375 for 20 - 25 minutes, until golden brown on top.
Remove from heat and let sit on wire rack to cool. Be sure to let cool before cutting.


You can keep these in an airtight container on the counter for several days, or in the fridge. 
They also freeze pretty good. If you freeze them they lose a bit of their crispiness in the crust but they are still yummy. 


You don't have to line the pan with parchment paper, I just find it easier to cut this way. You can use the parchment paper to lift the bar out of the pan instead of trying to cut it in the pan. 
These squares are the perfect tea time treat. They add a lovely pop of color to any tray!

Sunday, August 12, 2018

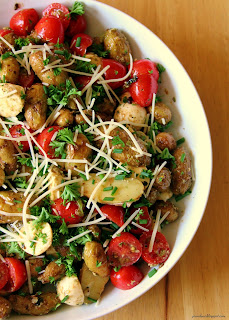
Roasted Pesto Potato Salad (No Mayo Potato Salad)


My mom and I got into a debate the other day. She said she had never heard of a potato salad not having mayonnaise as part of the dressing. I said there was lots of potato salads that didn't use mayo. 
Needless to say, Google became involved and oddly enough there is not a ton of no mayo potato salad recipes. It's okay though. There was enough that I could at least say they exist. 
I decided to create a no mayo potato salad so mom could try it. 
I love my mom, don't get me wrong, but her critique was "it needs mayo". *Sigh*
Anyhooooo, everyone else thought it was good so, whatever mom *insert eye roll here*
If you find it a little dry then feel feel to add another spoonful of pesto. You can serve this warm, if you like, but it is fabulous cold too. 
Have you tried a no mayo potato salad before? What are your thoughts?


Roasted Pesto Potato Salad (No Mayo Potato Salad)

Ingredients
Roast Potatoes
1 lb fingerling potatoes (or small new potatoes)
3 Tbsp oil
1 Tbsp garlic granules
2 Tbsp fresh parsley, chopped
1 tsp paprika
salt & pepper

Salad
1 1/2 cups grape tomatoes, halved (or cherry tomatoes)
1 200 gr container bocconcini (19 pieces), pieces cut in half
1 Tbsp prepared pesto
3 Tbsp fresh parsley, chopped
1 Tbsp fresh chives, chopped
2 Tbsp grated Parmesan

Directions
Preheat oven to 400 degrees. 
In a mixing bowl, toss the fingerling potatoes with the oil, garlic granules, parsley, paprika, and salt & pepper. Spread onto a cookie sheet and bake at 400 until potatoes are fork tender, about 30 - 35 minutes. I like to give them a stir half way to ensure one side doesn't burn,
When potatoes are cooked, remove from oven and let cool. (You can make the salad while the potatoes are still warm OR let them cool completely. I've made the potatoes the night before so I can make the salad the next day. Up to you.)
Prepare the salad - Place cooled potatoes in a bowl. Add in the halved tomatoes and the halved  bocconcini. Gently stir in the pesto until the pieces are evenly coated.


Sprinkle with the fresh parsley, fresh chives, and Parmesan.


Serve immediately or cover and refrigerate until ready to serve.


Leftovers are good for a day or two in the fridge. 
I found 1 Tbsp of pesto was enough but if you find it a bit dry then gently toss in another spoonful. It's a pretty forgiving recipe, you can change it up a bit and won't ruin it.  
I quite enjoyed my first no mayo potato salad. It's really colorful and flavorful and would be great at summer BBQs or family gatherings instead of the usual potato salad. 


Be sure to pop by Carole's Chatter for more fun foody links!