Monday, April 30, 2012

Lime and Coconut Cookies with White Chocolate Chunks


Ever buy a new food because it sounds really good and then you are horribly disappointed in the taste and then you are stuck with a whole bunch of food that you just don't want to finish?
Me too.
I bought a container of lime yogurt. Sounds like it would be good, right?
Hmmm....I wouldn't say it was NOT good...it just wasn't "good" good.
Every fruit smoothie I made with it just tasted like lime. It totally overpowered all the other fruit.
Needless to say I had to find a way to use it up. I figured some kind of tropical type cookie would be perfect to use up lime yogurt. I took the base from my go-to cookie and made some changes.
Turned out pretty tasty :)


Lime and Coconut Cookies with White Chocolate Chunks

Ingredients
3/4 cup brown sugar
1/2 cup butter
1/2 cup lime yogurt
1 tsp vanilla
1 3/4 cup flour
1/2 tsp baking soda
pinch salt
1 cup toasted coconut
1/2 cup chopped white chocolate (or white chocolate chips)

Directions
Preheat oven to 350. Line cookie sheet with parchment paper.
In a large bowl, cream butter and sugar until creamy. Beat in lime yogurt and vanilla.
In a medium bowl, stir together flour, baking soda, salt, coconut, and chocolate. 
Stir dry ingredients into wet ingredients until just combined and there is no flour showing in batter.
Place tablespoons full of dough about 2 inches apart on prepared cookie sheet.
Bake at 350 for 10 - 12 minutes, until lightly golden brown.
Remove from oven and let cool on cookie sheet for 5 minutes before moving to wire rack to cool completely.

If you want a more lime-y taste then you could grate some lime peel into the batter. I found I like the taste like this. It was coconutty with just a hint of lime and the white chocolate added a nice sweetness.

Sunday, April 29, 2012

5 Minute Low Carb Bun


Okay. Mark this day down on your calendar. I am doing a totally healthy blog today.
I know..I know... I have done healthy-eat-your-veggies blogs in the past but today's blog is different.
Why is it different?
It involves me going outside of my comfort zone with food and trying something new and scary (to me) and discovering (with a little tweaking) a recipe that is pretty darned fantastic.
A Low carb bun that is ready in under 5 minutes.
Okay...it maybe isn't your typical "bread" bun. But, if you are trying to eat healthier, especially less carbs, then this is surprisingly close to "real" bread.
At least, it is in my opinion.
And I have a few years of bread eating experience under my belt. Pun intended :)


5 Minute Low Carb Bun

Ingredients
2 tsp butter
1 egg
1 Tbsp water (scant)
1/2 Tbsp shredded Parmesan cheese
1 1/2 Tbsp almond meal
1 Tbsp flax meal
1/4 tsp baking powder
pinch salt
pinch garlic salt
pinch Stevia (or other sugar substitute such as Splenda)

Directions
In a standard cereal bowl, place butter. Microwave for 15 seconds (just to melt).
Add in egg and water, whisk with fork to combine.
Add remaining ingredients in order listed. Whisk well with fork or small metal whisk, until well combined.
Microwave, uncovered, for 1 1/2 minutes, until set. Cooking times will vary so start checking for doneness at about 1 minute 20 seconds. Batter should not have any wet looking spots.
Loosen edges with a butter knife and invert onto cutting board.

Inverted on cutting board. Don't be scared by the texture at this point. It changes when you toast it!

Let cool slightly and, using a sharp bread knife, carefully slice in half horizontally.
 Toast in a toaster oven or regular toaster until browned.

See, toasted it looks almost like "real" bread!

Continue to eat as you would a regular bread bun with your favorite sandwich toppings.

Are you ready for the good news?
If you follow the recipe above it is ONLY - 240 calories, 20 fat, 6 carbs, 11.5 protein. (Using Fitday )
Seriously....6 carbs! That's it!
A regular hamburger bun has between 18 - 35 carbs (depending on brand, size, etc...)

I had this for breakfast this morning:


A toasted 5 Minute Low Carb Bun with a scrambled egg, a little ketchup, and some turkey pepperoni.
Total calories - 340, fat - 26, carbs - 8, protein - 20!
Is that not one of the best breakfasts ever?
(Well, it is for me.....)
I felt like I was having an egg mcmuffin type sandwich for breakfast without the carbs. 
Don't get me wrong, I still have high fiber cereal or a fruit & yogurt smoothie for breakfast but now I have another healthy alternative. 
Healthy...and delicious!

UPDATE!! I made a super yummy portobello mushroom burger on this bun!


So the bun is 240 calories right? Add 130 calories for a slice of tomato, slice of cheese, and a portobello mushroom.... and you've got yourself a delicious burger for 370 calories.
Plus the fillers add 10 more protein (7 fat and 8 carbs too)!!
Holy H-E-double hockey sticks!!

Update number 2!! I made a regular burger with extra lean ground beef. I just wanted to share the photo to make you drool. You can use this bun for all of your sandwich/burger needs :)


FYI - DEFINITELY toast it!
I have never tried it un-toasted as the texture seems a little funky. By funky I mean chewy. By chewy I mean, not in a good way.
But, toasted, it is awesome :)


Saturday, April 28, 2012

Pecan Pie Cake


Yet another Pinterest find that has turned out to be capital A -mazing.
This cake was so super moist and flavorful and had such a wonderful texture with all those crunchy pecans. Plus, it looks fantabulous. The original recipe didn't call for any icing at all but we decided to create another layer of flavor. Three gorgeous layers of tastiness covered in a cinnamon infused whipped cream and custard icing. I think Sue and I will let the photos speak for themselves!
P.S. - If you want people to think you a super genius....make them this cake.


Pecan Pie Cake
Slightly adapted from Sweet Jeanette

Ingredients
Pecan Pie Filling
1/2 cup packed brown sugar
3/4 cup dark corn syrup
1/3 cup cornstarch
4 egg yolks
1 1/2 cups half-and-half
pinch salt
3 Tbsp butter
1 tsp vanilla

Pecan Pie Cake
3 cups pecans, finely chopped
1/2 cup butter, softened
1/2 cup shortening
2 cups sugar
5 eggs, separated
1 Tbsp vanilla
2 cups flour
1 tsp baking soda
1 cup buttermilk
3/4 cup dark corn syrup

Cinnamon Whipped Cream Custard Frosting
2 cups whipping cream (heavy cream)
1 Tbsp sugar
1/2 tsp cinnamon
1 cup of the Pecan Pie Filling

Directions
For Pecan Pie Filling: Whisk together the first 6 ingredients in a large, heavy saucepan until smooth. Bring to a boil over medium heat, whisking constantly, and boil for 1 minute, or until thickened. Remove from heat; whisk in butter and vanilla.


Place a sheet of wax paper (or plastic wrap) directly on surface of mixture to prevent a film from forming, and chill at least 4 hours. (When chilled - take out one cup of the filling to be used for the frosting)
For Pecan Pie Cake:  Preheat oven to 350. Sprinkle 2 cups pecans evenly into 3 generously buttered 9-inch round cake pans; shake to coat bottoms and sides of pans.
Beat butter and shortening at medium speed with an electric mixer until fluffy, and gradually add sugar, beating well. Add egg yolks, 1 at a time, beating just until blended after each addition. Stir in vanilla.
Combine flour and baking soda. Add to butter mixture alternating with the buttermilk, beginning and ending with flour mixture. Beat at low speed just until blended after each addition. Stir in remaining 1 cup pecans.
 
Before the egg whites
 
Beat egg whites at medium speed until stiff peaks form, and fold one third egg whites into batter. Fold in remaining egg whites. (Do NOT over mix).
 
Folding in the egg whites

Pour batter into prepared pans.

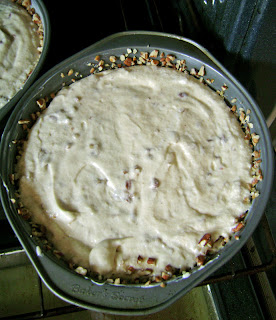
Ready to go in the oven

Bake at 350 for about 20-25 minutes.  Toothpick inserted near center should come out clean.
 
Ooooh nice and golden brown!

Cool in pans on wire racks for about 10 minutes, then invert onto the wire racks. Put some wax paper down under the wire racks.
Brush the tops and sides of layers with corn syrup, and cool completely. 
Cinnamon Whipped Cream Custard Frosting: Whip cream until soft peaks form. Gradually add sugar and cinnamon and beat until VERY stiff peaks form. (Just be careful you do not beat too much and turn your cream to butter) Gently stir in the 1 cup of Pecan Pie Filling until just combined.
To Assemble Cake: Place one cake, pecan side up, on serving tray.  
 

Spread half of pecan pie filling on one layer.


Place second cake, pecan side up, on top of filling.


Spread remaining pecan pie filling on top of second layer.


Top with 3rd cake, pecan side up.


Close up!!!


Frost with cinnamon whipped cream custard frosting.


Decorate as desired.


Make sure to cut yourself a big piece to enjoy!


Maybe you need one more peek at its deliciousness?


Yes, it is a little more effort than your average cake but, if you make it over a day or two, it doesn't seem as labor intensive. We made the pecan pie filling one day then the cakes the next. We assembled it and then it sat in the fridge overnight before we served it for a luncheon. The flavors really had time to mingle and it was delicious.
If you like pecans and pie and cake and everything delicious then this is definitely the cake for you!

Wednesday, April 25, 2012

Browned Butter Double Chocolate Toffee Cookies


So, I struggled to come up with a name for these bad boys.
I wanted something catchy that captured the true amazingness of the flavor and chewy texture. I hate naming recipes by listing off a whole bunch of the ingredients in the title. So, why then did I name it with the ingredients?
Well...
I'm having a creative name brain freeze.
Something like "Delicious Cookie" seems superfluous.
"Dream Cookie", while accurate, seems a bit boring.
"Most Amazing Cookies in the World", again, while accurate, might get me into some kind of legal trouble after I become rich and famous and people are looking to get at my fortune.
*Siiiigh*
What's a girl to do?
I definitely wanted people to know that there was browned butter in these. Browned butter is my new favorite thing-of-the-moment.  And then I just had to mention the double chocolate part. I mean chocolate X2 is a big selling point, right? Who doesn't want to eat cookies with cocoa and chocolate chips? And, lastly, it would be negligent of me to not mention the toffee bits. I mean......TOFFEE bits.... need I say more?


Browned Butter Double Chocolate Toffee Cookies

Ingredients
1 cup butter
1 cup brown sugar
1/2 cup sugar
1 egg
1 egg yolk
1/2 Tbsp vanilla
1 3/4 cup flour
1/2 tsp baking soda
1/4 cup baking cocoa powder
3/4 cup mini chocolate chip
3/4 cup Skor bits (or other hard, toffee bits)

Directions
Preheat oven to 350. Line a cookie tray with parchment paper.
Heat a saucepan over medium heat and add butter. Stir constantly with a heat proof spatula until brown bits appear on the bottom and butter turns a nice medium golden brown. Remove from heat and let cool completely. (You can place in refrigerator to speed process.)
Once cool, add to a large bowl and whisk together with sugars until smooth. Add in egg and egg yolk, whisking until combined, then stir in vanilla.
Separate the dough into 2 bowls. Try and get them as even as possible.
In one bowl - add 1 cup flour, 1/4 tsp of the baking soda, and the Skor bits. Mix to form stiff dough.
In 2nd bowl - add remaining 3/4 cup flour, remaining 1/4 tsp baking soda, 1/4 cup cocoa powder, and chocolate chips. Mix to form stiff dough.
Roll each dough into about 12 - 15 balls (about the size of a golf ball). Cut each ball in half. Take a half of each dough and place then together to form one mixed cookie. Place dough onto lined cookie sheet about 2 inches apart (they do spread) and bake approximately 10 - 12 minutes.


Cookies should be a little soft in the middle and golden on the edges. Remove from oven and let cool on cookie sheets for 5 minutes. Remove to wire rack to finish coooling.

Try not to eat them all.
I know you think I am kidding about that.
I'm not.
You may be tempted to start eating and just not stop.
Oooooh...I could call them The Downfall of My Trying to Lose Weight and Eat Healthy Cookies.
Yeah...that's probably the most accurate title.
True story.

Tuesday, April 24, 2012

Baked Indian Spiced Sweet Potato Patties


Need something different to serve with your next meal?
You have got to try these.
I saw the photo of these on Pinterest and new I had to try them. The color is just so fantastic. Let's face it, how often do we get to eat orange food?
The original recipe is from Soni's Food For Thought. I changed it a little bit to deal with what I had on hand, and the result was really good.
Really.
Really.
Really.
Good.


Indian Spiced Sweet Potato Patties

Ingredients
1 large sweet potato
1 medium potato
1/8 tsp ground ginger
3 cloves garlic, minced
1 tsp ground cumin
1 tsp ground coriander
2 Tbsp corn starch
salt & pepper

Directions
Preheat oven to 425. Line a cookie tray with parchment paper.
Wash the sweet potato and potato and scrub clean.
Prick both of them all over with a fork. Place on a microwave safe plate and microwave until fork tender. (For me that was about 10 minutes, turn them over, 6 minutes more)
Remove from microwave and let sit until cool enough to handle.


Peel them both and place the "meat" in a big bowl. Discard the skin.


Mash with a potato masher to break up.


Add in spices and cornstarch and mash until smooth and creamy with only small lumps remaining.
Take some of the mix between your hands and pat it into small patties (about 2 - 3 inches in diameter). Place the patties about 2 inches apart on the parchment paper.
Bake in 425 oven for about 12 minutes.
Carefully flip patties over and bake for another 12 minutes.
Turn broiler on. Broil about 5 minutes (until the side is nicely brown), and then gently flip patties over and broil another 5 minutes (until nice and brown).
Serve hot!
Ketchup on the side for dipping is tasty :)

Okay, the original recipe called for shallow frying in oil. I tried that but apparently am not very good at shallow frying.


This is my fried one. I had too much trouble with frying. They stuck in the pan, they fell apart, and - they got too crispy. They still tasted really, really good though.
I was happy with the way they turned out in the oven. They were still fairly crispy and they are healthier without the oil!
I will definitely make them in the oven again.

A couple of things about this recipe.
(1) Making the patties is kind of sticky. I rinsed my hands after about every 4 patties to keep from getting too sticky.
(2) If you want it to be spicier you can add some finely chopped jalapenos. (The original recipe called for them but I didn't have any.)
(3) It can be a little tricky to flip them over. Use a metal spatula and make sure you work with smooth strokes to flip them.
(4) Do keep an eye on them in the oven. At such a high temperature/broiling they can go from "nice and brown" to "burnt" in a matter of seconds.

This is a very simple, inexpensive recipe that really spices up a meal. I served it with leftover roast chicken and a green salad and it was wonderful.

Sunday, April 22, 2012

A Million Cupcakes


I was going through some photos and discovered that Sue and I have done a few cupcakes over the years. The ones we have chosen to post here today are the ones that we remembered to photograph. You will have to forgive us for the quality of some of the photos - they were probably taken with a camera phone while running out the door to deliver them. Most of these were for bake sales (For example: the cute Chinese Food cupcakes in this first photo) but some were for birthdays and family get togethers. We hope you enjoy them - we sure had fun making them :)


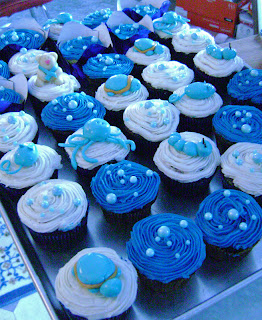
The hue is a little blue in these next 4 photos but that's okay - we made these for a little boy's baby shower. I think my favorite was this cute little octopus!


Hmmm...maybe my favorite little blue guy is this caterpillar with no legs.
(I guess that makes him a worm?)


Our mouse could use a little work but is still cute! All of these blue guys were created out of marshmallow fondant we tinted blue.


There they are, all together. We got the different sized blue balls from Golda's kitchen online.


It's too bad we didn't unwrap these polar bears to photograph. They were adorable. I love the baby bear!


These snowmen and presents were a breeze to whip up for a Christmas bake sale for our mom's church. The presents are just starbursts piped with icing. The snowmen are just iced and then dipped in coconut with some candy for facial features.


These white cupcakes were made for a friend from work when she got married. Instead of a cake she opted for a cupcake tree. I think it turned out beautifully. The flowers are just mini marshmallows.


Sue came up with this turkey idea a few years ago. (Before they were all over the internet, might I add! Remember, Sue is a super genius.) We made them for Thanksgiving dinner.


Close up of a turkey. How cute is he? We just warmed caramels in the microwave for a few seconds and then shaped them into turkeys. Easy but time consuming!


Could I have put these cupcakes in a more random order?
These were the cupcakes we made for a St. Patrick's Day fundraiser at our mom's church.
Another simple yet very striking topper.


St. Patrick's Day smiley faces. That is what happens after you make a million rainbows and a million flags :) Still pretty cute though!


Back to school! Sue wanted to make a little something for the teachers back in September.
Sue did a blog about these right HERE.


The teachers really appreciated the gesture. :)


The apples were a pain in the butt BUT were worth the end result.
So cute!


I love the pencil - made with Tootsie Roll candies warmed in the microwave and then shaped.


On to Halloween. We posted about these HERE. Sue and I do love Halloween treats!


Oooooh Spooky!
Close up the rat's face. Scary, no?


Our cute halloween monster cake balls.


One of the coolest cupcakes ever. Too bad it's also gross!
Cockroach cupcakes for Halloween. Nice.


Cutest ghosts ever. I had to stick a pumpkin on that guy's head.
I just had to.

Everyone loves these popcorn cupcakes. They really do look like popcorn, don't they?
They are topped with mini marshmallows that you cut and twist and then paint with a little yellow food coloring. Very cool.


More popcorn!


Another random cupcake. We just wanted to make these because they looked neat.
Pool ball cupcakes! Sorry about the photo quality!


These didn't turn out as pretty as I had hoped (my piping skills need some serious improvement!)
We blogged about them HERE if you want the recipe!
They were delicious :)


Random mini cupcakes for a bake sale. Marshmallow fondant and jelly beans.


Ooooh! A fancy one. This is a lime and coconut cupcake with a pineapple buttercream topped with a pineapple flower. We talked about this HERE if you want the recipe. Total tropical goodness.


Can you guess what these guys are? Yup.
Groundhog's day cupcakes.


Here are the "normal" groundhogs. We had to make some colorful ones as there are only so many brown m&m's in a package. :)


These were for our nephew Jordan's grad. We have made the cookie monsters many times before (everyone requests them as they are so cute) but this is the only photo we have of them.


This past Easter we made these adorable bunny bums. You can check them out HERE, along with our other Easter goodies.


A whole garden full of bunnies!

Burger cupcakes and cookie fries. Everyone will think you are awesome (which, of course, you are!) if you bring these to the next BBQ.
Check out our full blog about them HERE.


Close up of the hamburger-y goodness :)


Sue and I made these for a friend to take to another friend's Winnie the Pooh themed baby shower. All that is missing is the "Hunny" printed on the side.


Close up of Pooh sticking out of the honey pot. He's made of starbursts!


We've also had many requests for these little fellows. Who doesn't love bees?
Well, at least edible bees on cupcakes....


Bee mine?


Another bake sale cupcake platter. These koalas, chickens, and pigs are cake pops sitting on top of cupcakes. I cannot even begin to tell you how many people commented on them!
Adorable :)


Bees and flowers. I think the flowers were some of the first cupcakes we ever made. They are so easy and so beautiful.


I have no idea where we get such random ideas for bake sales. I made these guys out of colored Tootsie rolls.


As you can see we had an underwater theme going on here. Crabs, octopi, starfish and baby starfish, pearls, and - because we ran out of blue - butterflies.


Close up of the starfish and babies! I love teeny tiny things :)


Sue made this garden of cupcakes for our dad last year. Again, sorry for the photo quality. They were very, very cool.


Yes, you guessed it, random bake sale cupcakes again. TV dinner cupcakes!!
I love the peas and carrots out of skittles and starbursts.


Lemon meringue pie cupcakes and S'more cupcakes. So addicting!
Check HERE or HERE for either recipe.


Sue and I and a whole bunch of ladies, got together to make a whole lot of cupcakes for a Valentine's fundraiser at the high school.
They were a big hit!


Close up of some of the Valentine's cupcakes. Our caramel bears.


These were Easter cupcakes from last year. Yes, we put spaghetti cupcakes in the basket with Easter eggs, chickens, and pigs.


Close up of the spaghetti. Another one of those cupcakes that looks more complicated than it is. Super easy and super cool!

There you have it. 
A rather random collection of some cute, gross, tasty, and fun cupcakes.
Sue and I will definitely try harder to remember to take more photos of our cupcake creations. And, not with a dilapidated cell phone.
Please feel free to comment or ask us any questions you may have about any of the above creations.
 
Stop by A Rosie Sweet Home to check out some cool links!