Sunday, July 16, 2023

Easy Gluten Free Flatbread


Flatbread is a favorite around our house because it’s easy to whip up with minimal ingredients, it’s inexpensive, and it’s delicious with any toppings! I had a friend ask me to make some gluten free flatbread for her so I took a couple recipes from online and tweaked them and mixed and matched them to come up with this one. FYI - I use either Bob’s Redmill or Cup4Cup brand gluten free flour blends, I’m not sure how others would work.
From start to finish, it took me under half an hour to make these. 
You get a total of 8 approximately 8” flatbreads. 


Easy Gluten Free Flatbread

Ingredients
1 1/2 cups plain, 0 fat Greek yogurt
8 tsp olive oil
2 tsp baking powder
1 tsp salt
2 cups Gluten Free Flour Blend (I use Cup4Cup)

Olive oil
Extra gluten free flour
Optional: parsley 

Directions
Whisk together Greek yogurt and olive oil. In a separate bowl, stir together flour, baking powder, and salt. 


Stir the wet ingredients into the dry ingredients until stiff, but not too sticky dough forms. If too dry, add water a spoonful at a time. If too sticky, add more flour a spoonful at a time. 
Divide dough into 8 pieces.


Roll each piece out on a floured work surface to approximately 1/4 inch thick. 


Heat cast iron pan over medium low heat. (A non-stick pan will work but cast iron is better if you have the option). Brush pan with a little olive oil and fry one flatbread at a time. Each side takes about 2 minutes. You may need to adjust the heat - too hot and it will burn, too cool and you won’t get the color and crispness. 


When done, remove from pan, brush with a little more olive oil, and sprinkle with a little parsley. This is optional - you can leave it plain if you like. 


Repeat with remaining flatbreads, brushing the pan in between each one with a little oil.


Serve immediately. 


I love these with tzatziki or hummus. They are just the thing to serve with a curry too. 


They will last, covered, on the counter for a day or two or you can freeze them for a month or so. Just pop them in the oven to reheat.


Sliced into triangles they make the perfect potluck dish or appie. 


These have a lovely, slightly chewy, slightly crispy texture. If you eat them plain they have that hint of gluten free flour taste to them but it’s not at all noticeable when served with a dip. 
I used a garlic olive oil which is great for adding extra flavor. You could even add some minced garlic to the dough if you want it more savory. 


Sunday, July 9, 2023

Keto Yorkshire Puddings


I don’t know about you but when we have a big roast beef or ham dinner, including Yorkshire puddings is a must! Following a low carb/keto eating plan meant we didn’t have them too often and that just made me sad. 
I found several versions of a low carb yorkie and knew I had to give it a try. After a few trials I came up with this version. It is so close to “the real thing”. The only thing I found different was that the keto version is a little heavier and, if not baked long enough, can seem “eggie”. 
The trick? 
Bake them longer than you think you should: until the tops are very deep brown and almost look like they are starting to get burned. This way they are way more airy and taste amazing! 


Keto Yorkshire Puddings

Ingredients
3/4 cup whipping cream
4 eggs
2/3 cup almond flour
2 Tbsp arrowroot flour
1/4 tsp xanthan gum
1 Tbsp water
1/2 tsp salt

1/2 cup oil

Directions
Whisk whipping cream and eggs together until very well mixed and frothy. 
Whisk in almond flour, arrowroot flour, xanthan gum, water, and salt. 


Let batter sit and rest for at least 30 minutes, up to overnight, in the fridge. *Don't skip this step*
When ready to cook: preheat oven to 450 degrees. Place 1 1/2 tsp of oil in each cup of a muffin tin. (Makes 12). Heat oil in the preheated oven for about 10 minutes - until oil is sizzling. 
Quickly fill each cup approximately half full of batter and place back in oven.


Cook 15 - 25 minutes WITHOUT opening the door to check on them! This is important. Opening the door may lead them to deflate. 


The above photo is when I took them out the first time. They were golden brown and appeared done.


Technically they were done and they tasted great, if not a little “eggie”, BUT the next time I made them I left them in the oven until they looked like the photo below…


Notice they are very dark brown on top. This is how you should cook them! 


Remove from oven and let cool in pan for a few minutes. Serve immediately or let sit on wire rack to cool completely before freezing. 


To reheat from frozen simply place on a cookie sheet in the oven at 350 until they warm up. I usually take one out and pop it in the toaster oven. 
They are definitely better when they are just made but still taste delicious being preheated. They are more crispy when fresh, a little more chewy when reheated. 
Nutritional counts per serving (recipe makes 12 servings): 148 calories, 14 fat, 2.6 carbs, 0.7 fiber, 3.7 protein. That’s 2 net carbs per pudding! 


Wednesday, July 5, 2023

Coconut Banana Cream Pie For Two


I tell you, sometimes you just need some banana coconut cream pie. Like *NEED*. 
I came up with this recipe after a craving hit me one afternoon. I didn’t want to make a whole pie (because I would eat a whole pie). I just wanted enough for mom and I to share for dessert. You could probably get 3 or 4 smaller servings out of this but…. We did 2. #ILovePie 
I think it was about 15-20 minutes to whip this up….plus about 2 hours of cooling time. You probably have all the ingredients in your kitchen right now, nothing fancy schmancy required! 


Coconut Banana Cream Pie For Two 

Ingredients
Crust
2/3 cup graham cracker crumbs
2 Tbsp brown sugar
2 Tbsp butter, melted

Filling
3 Tbsp sugar
1  1/2 Tbsp  cornstarch
Pinch salt
1 cup heavy cream (or half and half will work)
1 egg yolk
1 tsp vanilla
1/2 tsp coconut extract
1/2 Tbsp butter
1/2 cup toasted coconut
1/2 banana, sliced

Topping
1/2 cup whipping cream
1/2 tsp vanilla
1-2 Tbsp sugar

Directions
Preheat oven (or toaster oven) to 350. 
Prepare crust - mix graham crumbs, brown sugar, and butter. Press into bottom and up the sides of 2 - 5 inch containers. Bake at 350 for about 8-10 minutes, until lightly browned. Remove from oven and set on counter while you prepare filling.
Prepare filling - Stir together sugar, cornstarch, and salt in a small pan. Slowly whisk in heavy cream until we’ll mixed. Set over medium heat and cook, stirring constantly, until steaming. 
In a small bowl, whisk egg yolk. Slowly, about 1 Tbsp at a time, whisk in the steaming cream mixture to temper the eggs. Don’t mix it in too quickly or you will scramble the egg!
When all mixed, place back in pan, over medium heat and cook, stirring constantly, about 1-2 minutes, until thickened. Remove from heat and stir in vanilla, coconut extract, and butter. Stir until combined. Stir in the toasted coconut. 
Place sliced banana pieces into the two graham cracker crusts. Pour the cream filling evenly into the two pans. Set in fridge and cool completely. 


Prepare topping - whip cream with vanilla and sugar to stiff peaks. Spread half of cream on each cooled pie. 


Chill until ready to eat. Optional but you can sprinkle with a little more coconut and a slice of banana to fancy it up a bit. 


When I say that this hit the spot…. I mean…*jazz hands*…it hit the spot! 


Leave out the banana if you want a classic coconut cream pie. Add more bananas and leave the coconut out if you want a banana cream pie. Personally I like both in there. 
I count this as “for two” but the servings are very generous. You could make it in mini cupcake tins and probably get around 6? maybe… let us know if you give it a try. 
I’m cool with eating a big ol’ piece of pie so I’m still counting it as 2. 


Monday, July 3, 2023

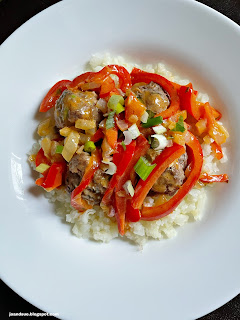
Keto Thai Meatballs with Cauliflower Rice


A lot of the meals I have been posting lately have the word “keto” in them. You don’t have to be following a low carb or keto eating plan to make them. They are delicious, healthy, hearty, beautiful, and also happen to be keto friendly. You can substitute cauliflower rice with regular rice or even something like quinoa if you prefer. 
The nutritional counts per serving (recipe makes 8) are: 247 calories, 14 fat, 7.5 carbs, 3 fiber, 26 protein. That’s 4.5 net carbs per serving. Counts would obviously change if you use white rice or quinoa. 
Recipe is easy to halve if you have a smaller crowd to feed or aren’t meal prepping. 


Keto Thai Meatballs with Cauliflower Rice

Ingredients 
Meatballs
2 lb ground beef
4 cloves garlic, minced
1 tsp red curry paste
1/4 cup green onions, diced
1/4 cup fresh basil, chopped
1 Tbsp Swerve sugar substitute 
1 Tbsp olive oil

Sauce
1 Tbsp butter
1/2 medium onion, sliced 
1 large red pepper, slivered
1 can coconut milk (~2 cups)
1 Tbsp red curry paste
1 Tbsp lime juice 
1 tsp fish sauce
1/4 fresh basil, chopped 

4 cups cauliflower rice

Directions
Combine meatball ingredients (ground beef through olive oil) and form into meatballs. I do 4 per serving, so 32 meatballs about 2 Tbsp in size. 


Cook using your favorite method - either in the oven or in a frying pan. I usually do 375 for about 15-20 minutes. Set aside when done.
Prepare sauce - sauté onion in butter until softened. Add in pepper and cook 2 more minutes. Add in coconut milk, curry paste, lime juice, fish sauce, and basil. Simmer to thicken, about 5-10 minutes.  
Add in meatballs and cook another 5 minutes. 
Heat up the cauliflower rice and put 1/2 cup serving on each plate or bowl. 


FYI - If you are not trying to make it look pretty, you can also just mix the cauliflower rice directly into the sauce. 


Top with 4 meatballs and 1/8 of the sauce and peppers. 


Serve immediately or let cool and place leftover in fridge. They will last several days, covered, in the fridge. 


For meal prepping I place them bowls with lids so they are stackable. 


My mom prefers quinoa for hers so I thought I would share a pic of that too. The meatballs and sauce are tasty on a variety of different things. Rice, zoodles, quinoa, couscous, etc. 
From start to finish in under an hour.
 If you don’t need 8 servings simply cut the recipe in half! 
If you aren’t counting carbs then throw in another pepper for more veggies.