Tuesday, December 31, 2013

Loaded Tatchos


So...
Let me just start by apologizing. 
I'm sorry but I'm not even sorry.
These. Are. Amazeballs.
Yeah, that's right, I said amazeballs. That's a thing.
Know what else is a thing?
Using tater tots to make nachos. 
Whyyyyyyyyyyy did no one tell me this? Oh my gosh. 
I decided to usher out 2013 with a calorie filled extravaganza as tomorrow, being the new year, will mean new resolutions, more veggie eating, lose weight, get in shape, blah blah blah. 
AGAIN. 
I know, I know...don't even get me started on resolutions. 
Yes, I make them. Yes, I do the whole new-year-new-start thing. I'm one of those people. 
Go ahead and judge me...I'll be over here eating my tatchos.


Loaded Tatchos

Ingredients
Base
1 bag tater tots

Toppings
1/2 lb lean ground beef
1/2 medium onion, diced
1 Tbsp taco seasoning
green pepper, diced 
tomato, diced
green onion, diced

Cheese Sauce
250 gr box of Velveeta cheese
1/4 cup 1% milk

Spicy Cream Cheese Sauce
4 oz Philadelphia cream cheese
1/2 cup sour cream
2 Tbsp jalapeno jelly 

Directions
Preheat oven to 450. Line a cookie sheet with parchment paper. Set aside. 
Spread tater tots evenly on prepared cookie sheet.


Bake at 450 for 10 minutes. After 10 minutes, give the cookie sheet a good shake to flip over the tater tots. Return the tater tots to the oven for another 10 - 15 minutes, until crispy.
While tater tots are cooking - place a medium sized skillet over medium heat. Cook the ground beef and onion together until the beef is no longer pink. Drain off the excess fat.
Sprinkle with taco seasoning and stir well. Keep warm.
Make the spicy cream cheese sauce - in a small, microwave safe bowl, heat the cream cheese for about 15 - 20 seconds to soften. Whisk in the sour cream until smooth. Add in the jalapeno jelly.


Whisk until smooth. Set aside until ready to assemble your tatchos.


Make the cheese sauce - in a small, microwave safe bowl, heat the Velveeta for about 30 seconds to start it melting. Add the milk, a little at a time, whisking well between additions, until smooth. You may have to heat in microwave for an additional 20 seconds or so to be able to whisk it smooth. If it solidifies too much just heat it for 10 - 15 seconds to get it melty again.


Assemble your tatchos - Place a good handful of tater tots on a plate. Top with a generous spoonful of the cooked beef.


Then drizzle with a generous amount of cheese sauce.


Top with a good amount of your favorite toppings (green pepper, tomato, green onion). 


But wait...there's more! 
Add another layer of tater tots, beef, and cheese sauce. Top with a big scoop of the spicy cream sauce.


Then, for good measure, add on some more toppings (green pepper, tomato, green onions). 


Revel in the gloriousness that is now on your plate.


I can't tell you how many serving sizes this makes. Let's just go with it probably makes way more servings than what we had. I mean, if it's wrong to eat 1/3 of a bag of tater tots covered in beef and cheese sauce and cream cheese and toppings then I don't want to be right. 
Until 2014, that is. In 2014 I will be way more judge-y because I will be on a resolution high and therefore will be able to shake my finger at the people who want to indulge in such ridiculousness. 
*tsk tsk* people *tsk tsk*

Be sure to visit - Kitchen Fun With My 3 Sons

Monday, December 30, 2013

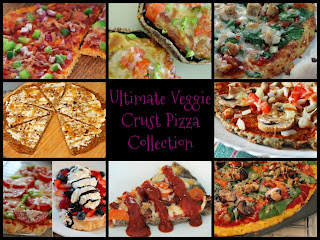
Ultimate Veggie Crust Pizza Collection


So...you may have heard of the cauliflower crust pizza. It was everywhere for a while there. 
But.. did you know that you can make pizza crusts out of pretty much ANY vegetable?
It's true. 
Sue and I have experimented with many different veggies and we decided to put them together in one collection so you could find your favorite without having to look too far. 
Of course we still have some experimenting to do... there are still some veggies we haven't gotten to... but for now, we hope you enjoy our recipes and photos. Click the links above the photos to get to the recipes!
(FYI - nutritional counts have been worked out using either Myfitnesspal or Fitday. They are as accurate as I could get but please do not take them as gospel.)


(One entire 8 inch pizza) Nutritional count: 502 calories, 18 carbs, 42 protein, 31 fat.
For just the crust of an 8 inch pizza it is 380 calories.
Gluten free.
This was our first veggie crust pizza and it certainly got us hooked. It is a little bit floppy but gets easier to pick up as it cools. If you can't wait then break out the forks and dig in!


(1/2 of an entire 11 inch pizza) Nutritional count: 585 calories, 63 carbs, 17 fat, 51 protein.
For just the crust of 1/2 an 11 inch pizza it is 418 calories.
Gluten free. Huge fiber count.
This crust was a bit fragile but, again, as it cools it gets easier to hold in your hand. Very filling.


(One entire 8 inch pizza) Nutritional count: 380 calories, 32 carbs, 25 fat, 14 protein. 
For just the crust of an 8 inch pizza it is 150 calories.
Gluten free.
This pizza is earthy and hearty and definitely recognizable as beets by its bright color. Like several of the other crusts, this one also makes a great wrap as well as a crust!


The above Beet Wraps were made with the Beet Crust Pizza and worked like a charm. (Click HERE to see how we did it.)


(One entire 8 inch pizza) Nutritional count: 394calories, 26 carbs, 21 fat, 27 protein. 
For just the crust of an 8 inch pizza it is 237 calories. 
Gluten free.
This crust is quite sturdy. It was really easy to pick up and eat like a "normal" pizza. 


(One entire 8 inch pizza) Nutritional count: 320 calories, 36 carbs, 12 fat, 16 protein.
For just the crust of an 8 inch pizza it is 227 calories. 
Gluten free.
Another really sturdy crust. I thought this was like having a pizza on top of a giant hash brown patty. 
So tasty!


(1/2 of an entire 12 inch pizza) Nutritional count: 300 calories, 9 carbs, 18 fat, 25 protein.
For just the crust of 1/2 a 12 inch pizza it is 200 calories.
Gluten free.
This crust is very floppy - like a tortilla. It would work very well as a wrap as the beet pizza crust did. It is, however, another very tasty crust! FYI - apparently kale can be subbed for spinach in this recipe and works just as well. 


(1/2 of an entire 12 inch pizza) Nutritional count: 424 calories, 24 carbs, 20 fat, 32 protein.
For just the crust of 1/2 a 12 inch pizza it is 376 calories.
Gluten free.
This one is probably my favorite as far as flavor and texture go BUT it is the hardest to pick up in your hands. When it is cold it is okay but otherwise you will most likely need a fork! 


(2 portobello caps) Nutritional count: 170 calories, 18 carbs, 5 fat, 14 protein.
Gluten free.
So, these pizzas aren't even really crust pizzas. The crust is a portobello mushroom cap. This is a brilliant idea as it works just as well as a made crust and tastes amazing!! So easy and so fast. 


(1/2 of an entire 11 inch pizza) Nutritional count: 381 calories, 41 carbs, 11 fat, 12 protein.
For just the crust of 1/2 of an 11 inch pizza it is 211 calories.
We had to include a dessert pizza in with all our savory pizzas. This one uses shredded fruit as a base instead of veggies. A little floppy, again - like a tortilla, but still easy to pick up. 


(1/4 of an entire 11 inch pizza) Nutritional count: 410 calories, 6 carbs, 26 fat, 39 protein.
Okay. So, not exactly a veggie crust. 
In fact, the exact opposite of a veggie crust.
BUT, I wanted to include this on our list as it is a great alternative if you are looking for a low carb, high protein pizza option. It slices and serves just like a regular pizza does and is surprisingly stable as a crust. 
Plus it's amazingly tasty.

So there is our veggie crust pizza list so far. When we have enough to do another list we will be sure to link this one to it. Keep checking back for more unusual crusts and other recipes!!
Please let us know if you have a favorite veggie you would like to see made into a crust. 

Be sure to visit these great blogs for tons of great links! -- The Chicken Chick, My Turn For UsCarole's Chatter
 

Sunday, December 29, 2013

5 Minute Bisquick Fruit Crisp


I'm all about fast & easy when it comes to food.
If you have read our blog you know that we have many single serving, 5 minute cakes and cookies and such. This is similar to a few of the fruit cobbler/crisp/grunts/etc that we have done but still different enough to warrant its own post. 
If you want to check out some of our others you can click on our - Peach & Cherry Cobbler, Blueberry Oat Crumble,  Strawberry Grunt, 5 Minute Apple Crisp, and Breakfast Quinoa - all of which are single servings. 
(We do, of course, have full sized crisps and crumbles as well. You can find those by typing what you are looking for in the search bar at the top of the page!)


5 Minute Bisquick Fruit Crisp

Ingredients
1/4 cup Bisquick
2 Tbsp quinoa flakes
1 Tbsp brown sugar
1/4 tsp cinnamon
1 Tbsp butter
2 cups frozen fruit

Directions
In a small bowl, mix together Bisquick, quinoa flakes, brown sugar, and cinnamon. Using a fork, crumble in the butter until mixture resembles coarse crumbs.


Divide the fruit between 2 microwave safe bowls (or large coffee mugs).


Divide the crumble topping between the 2 bowls, sprinkle evenly on top.


Microwave for 2 minutes.
Poke a fork in to see how cooked the fruit is and go from there. (Mine needed another 2 minutes to get nice and bubbly and for the fruit to be soft. - for a total of 4 minutes.)


Top with ice cream or whipped cream, if desired.


Serve hot. (Be careful as it is VERY hot when it comes out of the microwave!)


According to Myfitnesspal, each serving is:
218 calories, 36 carbs, 8 fat, and 3 protein. (This makes 2 servings). 
Not too shabby. A little high in carbs, maybe, but low calorie for such a big amount in my opinion. 
This is soooooo tasty. The fact that it only takes 5 minutes from start to finish is both a good and bad thing. 

Saturday, December 28, 2013

Bacon Wrapped Stuffing


I decided I had better sneak in here and post the recipe for our bacon wrapped stuffing before Jo takes over again and we switch to super healthy recipes.
Believe it or not this only one of two photos of the finished product that we have. 
In case you were not aware, bacon wrapped stuffing is the equivalent of candy to children on Halloween. I had to fight people off while I was plating these around the turducken. 
I believe I got about 24 to 30 of the stuffing packages out of the recipe and maybe 14 or 15 made it to the plate. 
Jo almost completely missed out on having one as she was too busy taking photos of all the food. Thankfully she was able to snap this pic before the vultures  family descended and ate them all. 


Bacon Wrapped Stuffing

Ingredients
1 onion, cut in thirds
3 cloves garlic
1/4 cup parsley
450 gr sausage meat
1 apple, cored, finely diced
2 stalks celery, finely diced
1/2 cup pecans, chopped
1 tsp curry
salt & pepper
1 egg
3 Tbsp lemon juice
1 lb of bacon, cut in half horizontally

Directions
Preheat oven to 350. Lightly spray a jelly roll pan (or cookie sheets with sides) with cooking spray. Set aside.
In the bowl of a food processor, pulse the thick sliced bread, to make crumbs. Dump into a large bowl.
In the food processor, pulse the onion, garlic, and parsley until finely chopped. Dump into the bowl with the bread crumbs.
Add in the sausage meat, apple, celery, pecans, curry, salt & pepper, egg, and lemon juice. 


Stir and squish everything together with your hands until very well combined.


Pinch golf ball sized pieces off and roll into finger shapes. 
Wrap each one with half a piece of bacon.


Lay out on the prepared jelly roll pan. (They can be close but try to avoid them touching.)
Bake at 350 for 15 minutes. 
Remove from the oven and drain off as much of the grease from the pan as you can. Flip the stuffing "fingers" over and return to the oven for another 15 minutes.
Serve hot.


So. Darn. Good.
Seriously. 
People will be fighting over who gets the last one. 
FYI - the bacon does not get crispy. It is just the right amount of chewy, crispy. 
With the apple and pecan and the sausage the texture of this stuffing is fantastic. And the little bit of curry adds a nice bit of spice.
Try this recipe or our Sausage and Stuffing Balls if you want to change up your usual stuffing.
 
Be sure to visit Carole's Chatter for tons of tasty links.
 

Friday, December 27, 2013

Potato Quinoa Pizza Crust


It's been a while since we came up with a new veggie pizza crust. We've made so many different ones that we are running out of vegetables to try and make into pizzas!! (You can find our others by typing "pizza" into the search bar at the top of the page!)
Not to worry though... there are still a few veggies we have yet to try.
This one, for example, is made out of potato. It is a little higher in carbs than some of our other veggie crusts but it is still healthy and lower in calories and fat than "regular pizza". Plus, this is gluten free....in case that is a thing for you...


Potato Quinoa Pizza Crust

Ingredients
Crust
3 medium potatoes
1/4 cup onion, finely diced
1/3 cup quinoa flakes
2 eggs
2 Tbsp mozzarella cheese, shredded
1 tsp dried chives
1/2 tsp garlic powder
salt & pepper

Toppings
1/4 cup pizza sauce
2 mushrooms
2 slices onion, diced
2 thin slices tomato. diced
1/4 cup mozzarella, shredded
2 Tbsp Parmesan cheese, shredded

Directions
Preheat oven to 400. Line a large cookie sheet with parchment paper, set aside.
Shred the 3 potatoes (I left the peels on) into a colander. Place the colander over the sink and press as much water out of the potatoes as you can. You should end up with 2 cups of tightly packed, shredded potatoes.
Put the potatoes into a mixing bowl. Add in the chopped onion, quinoa flakes, eggs, mozza cheese, chives, garlic powder, and salt & pepper.


Mix until very well combined.
When well mixed - dived mixture in half. Press each half into an 8 inch circle on the prepared cookie sheet.


Bake at 400 for 10 minutes. Carefully flip the crusts over.


Bake another 5 - 10 minutes or so...until the crusts start to brown nicely. 
Remove from oven and top with pizza sauce and toppings.


Place back in 400 oven for 5 - 10 minutes, until cheese starts to melt.
Turn oven to broil and cook pizzas until toppings start to brown up. (Keep a close eye on them under the broiler!!)


Let cool on cookie sheet for a minute or two before using parchment paper to slide them off. 
Slice and serve hot.


The good news?
According to Myfitnesspal, for one of the 8 inch pizzas it is - 
320 calories, 36 carbs, 12 fat, 16 protein. 
That's for a WHOLE 8 INCH PIZZA!! 
For the crust only it is - 227 calories, 31 carbs, 5.5 fat, 11 protein.
The other good news?
This is really easy to pick up and eat. It is quite stable. I waited until it had cooled about 5 - 8 minutes and I had absolutely no trouble picking it up. 
This is kind of like eating a pizza on top of a giant hash brown patty. The only thing I would change for next time I make this would be to add more cheese on top. I barely had any mozza left so only put about 3 Tbsp per pizza (1 Tbsp in the crust and 2 Tbsp on top). It will change the nutritional value of the pizza but it is only 320 calories for a whole fricken-fracken pizza so another 50 calories for more cheese isn't going to be a deal breaker. 
(Oh, yeah, in case you can't find quinoa flakes you should be able to sub in oats.)
 
Be sure to stop by Carole's Chatter for tons of great links!