Sunday, June 30, 2013

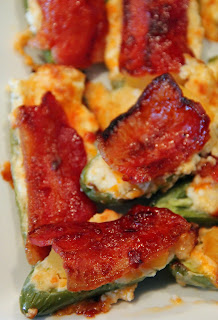
Pineapple Jalapeno Poppers


I've decided to take over the blog for the next day or two. It was my daughter, Kenzie's, birthday yesterday and I recruited Jo to help me make a big dinner spread for the party.
This particular jalapeno popper recipe is a combination of several I found on the internet. I took a few different ideas and threw them together and the result was amazing!
The kids certainly loved how spicy they were. 


Pineapple Jalapeno Poppers

Ingredients
12 jalapenos, cut in half lengthwise & seeded
1 (8 oz) brick cream cheese, softened
1 cup Tex Mex cheese, shredded
1 tsp garlic powder
1 tsp onion powder
1 pkg bacon
1 small can pineapple tidbits, drained
1/4 cup BBQ sauce

Directions
Preheat oven to 350, line cookie sheet with parchment paper, set aside.
Line up the sliced and seeded jalapenos on the prepared cookie sheet.


In a medium bowl, stir together the cream cheese, shredded cheese, and garlic & onion powder until well mixed. Spoon into each half of the jalapenos.


Place 2 pineapple tidbits on top of each jalapeno half.


Cut each slice of bacon into thirds. Place a third of bacon on top of the pineapple. 


Using a basting brush, brush some of the BBQ sauce on each piece of bacon.


Bake at 350 for 25 minutes. Turn oven to broil and continue to cook until bacon is crisp, about 5 minutes or so - keep an eye on it!
Remove from oven and serve warm.


Don't worry about the bits that bubble out during cooking...those are the "samples". Just be careful you don't burn yourself whilst testing them.


If you enjoy spicy then these are fantastic. Jo is a bit of a wimp so she was too scared to try one. She did sample some of the filling that bubbled out and she liked that.
My hubby, who is anti-spice, actually enjoyed a few of these. Of course, he just ate the filling out of the pepper and left the pepper shell. Oh well....for him that is pretty brave. 
I loved these, and, even better, my daughter and her friends thought they were great. 
If you need an appetizer to bring to a BBQ this summer - keep this one in mind. 

Be sure to visit Ms. enPlace and Jam Hands and Feeding Big and The Velvet Moon Baker and Easy Life and Carole's Chatter for some fantastic links!

Saturday, June 29, 2013

Nanaimo Bar Cupcakes & Whoopie Pies


Nanaimo Bars are a Canadian favorite. If you have never had one then you really are missing out. 
Nothing will ever beat a homemade Nanaimo Bar....the store bought ones just aren't the same. 
If you want to try one here is our recipe -- Nanaimo Bar.  
Today I decided to try a Nanaimo Bar Cupcake just to be different.
It turned out really Nanaimo Bar-y tasting. And, because it was cake and not the usual Nanaimo bar bottom, it was soft and squishy and VERY addicting. 
The Nanaimo Bar Whoopie Pies are the exact same recipe as the cupcakes, they are simply baked in a Whoopie Pie pan instead of a cupcake pan. 
I simply used our delicious Vanderwolf's Family Secret Chocolate Cake recipe and changed it up a bit. 


Nanaimo Bar Cupcakes (& Whoopie Pies)

Ingredients
Cake
1/2 cup baking cocoa
1 cup flour
1 cup graham cracker crumbs
1 cup coconut
1/2 cup pecans, finely chopped
2 tsp baking soda
pinch of salt
2 cups sugar
1 cup sour milk or cream
2 eggs
2 tsps vanilla
1/2 cup oil
1 cup boiling water 

Frosting
1 cup butter, softened
6 Tbsp milk
1/4 cup vanilla custard powder (We always use Bird’s Eye Custard Powder)
4 cups icing sugar

Chocolate Topping
2/3 cup chocolate chips
2 Tbsp butter

Directions
To make cake: Preheat oven to 350. Line cupcake pans with paper liners. 
Mix together first 8 ingredients. Make a hollow in center of bowl and add remaining 5 ingredients into center.
Whisk all together until well blended. 
Pour into prepared cupcake liners. 
Bake 20 mins or until toothpick inserted in center comes out clean. (Depending on pan size this varies greatly. Keep an eye on it!)  Remove from oven to cool 5 minutes on wire rack before removing the cupcakes from the pan.
Let cool completely. 
To make frosting: Beat together butter, milk, and custard powder. Slowly beat in icing sugar, about 1/2 cup at a time, until smooth.
Let chill for at least 30 minutes.
To make chocolate topping: When ready to assemble cupcakes - In a microwave safe bowl, place the chocolate and butter. Heat in the microwave in 20 second increments - stirring well in between - until melted and smooth. DO NOT over cook.
Assemble your Nanaimo Bar Cupcake: Place cupcakes on serving platter. Spread or pipe the chilled frosting on top of each cupcake. 
Place back in fridge for 15 minutes to chill again.
Using a piping bag (or Ziplock bag with the corner snipped off) drizzle the chocolate over each cupcake. You can also use a knife and spread a thin layer on top if you prefer.


If you used a muffin top pan or whoopie pie pan instead of a cupcake pan here are those instructions:
Assemble your Nanaimo Bar Whoopie Pie: Take one half of the whoopie pie, spread generously with the chilled frosting, sandwich with the other half of the whoopie pie. 
Generously drizzle the chocolate topping on the top of the whoopie pie. Sprinkle with finely chopped pecans.


I love this spin on the Nanaimo Bar. It is a little less sweet than the original. Don't get me wrong...it's still uber sweet...but it is just that much less sweet.
Note -- If you can't find Vanilla Custard Powder you can replace it with an equal amount of instant vanilla pudding powder. Understand that this completely changes the taste of the recipe BUT it is still very, very tasty!

Be sure to visit Carole's Chatter  for some great links!

Wednesday, June 26, 2013

Miso Veggies With Bacon


Have you ever tried cooking with Miso paste?
Until today I have only ever had Miso in pre-made, store bought, packaged soup. I really enjoyed the flavor and always wondered what in the heck Miso was. 
I had it in my head that it was a powder of some sort. 
Nope.
It's a paste.
Last weekend I spotted Miso on the shelves at our local grocery store and knew I had to try a dish with it. I came up with this mixture of bacon and corn and other veggies and served it over brown rice. 
Turns out, I really like Miso and so did the whole fam-damily.
I can't wait to experiment some more with this very flavorful and interesting ingredient.
Any recommendations?


Miso Veggies With Bacon

Ingredients
1 tsp butter
1/2 cup carrot, shredded
2 mushrooms, diced
1/4 small, purple onion, diced
1 can corn, undrained
2 Tbsp dried chives
1 tsp dried garlic
4 pieces bacon, cooked and crumbled
1 Tbsp Miso
3 - 4 Tbsp water (or chicken broth)
2 cups brown rice, cooked

Directions
In a large skillet, melt butter over medium heat. Stir in carrots, mushrooms, and onion. 


Cook and stir until vegetables soften. Stir in corn (and liquid in the can), chives, garlic, and cooked bacon. 
Cook and stir for about 3-4 minutes. 
Add in the Miso and the water (or chicken broth). Start with a tablespoon of liquid at a time until Miso "melts" and mixture is heated through. You want a bit of liquid as your sauce but do not want it to be "soupy".
Serve over rice (or brown rice). 


Definitely glad I picked up the Miso at the grocery store. (In the refrigerated section) 
One of the pluses of Miso is that it apparently lasts for several months in the fridge. 
If I had to describe its flavor I would compare it to soy sauce, both of them being similarly salty, otherwise it is a very distinct yet subtle addition to a dish. 
 
Don't forget to visit The Mandatory Mooch and My Turn (for us) and Blissful And Domestic for tons of fabulous links.

Monday, June 24, 2013

Peach & Cherry Cobbler For One


Let me start off by saying this isn't a traditional cobbler. It is kind of a combination of a cobbler, grunt, slump, and clafouti. 
It is...however... very tasty. And, all things considered, not that unhealthy. 
Myfitnesspal tells me it is 250 calories, 31 carbs, 10 fat, and 5 protein. I thought that was pretty good considering how decadent it tastes. 
I had this for breakfast but I'm thinking it would make a fabulous dessert too. 
I made a Strawberry Grunt a while back that is very similar but still different enough to warrant it's own separate blog. I like the whole fruit and topping cooked on the stove top thing. 


Peach & Cherry Cobbler For One

Ingredients
Fruit
1 peach, pitted, peeled, diced
4 cherries, pitted & quartered
1/4 tsp flax
2 Tbsp water

Topping #1
1 Tbsp flour
1 Tbsp oats
1/4 tsp baking powder
pinch baking soda
1 tsp granulated brown Sugar Twin
1/2 Tbsp coconut oil
1 tbsp milk

Topping #2
2 Tbsp Krema Maple Syrup Greek Yogurt

Directions
In a small saucepan over medium heat, stir together peach, cherries, flax, and water. Bring to a boil. Reduce heat to medium/low and simmer for 5 minutes.
In a small bowl, stir together flour, oats, baking powder, baking soda, and Sugar Twin. Using a fork, smash in the coconut oil until well combined. Stir in milk until just combined. 
Using a spoon, drop batter evenly over fruit. 


Turn down heat to low and cover pan. 
Let cook for approx 8 - 10 minutes. Batter should appear fairly dry. (Check at 8 minutes - If fruit appears to be burning but top is not done simply add a tsp or two of water and put lid back on.)


Scoop onto serving dish.


Top with Greek yogurt.


The nutritional info includes the Greek yogurt. 
If you haven't tried the Krema Maple Syrup Greek yogurt...you really should...it's amazing! You can use any Greek yogurt to top this if you can't find the Maple Syrup flavor. 
Oh, yes, if you don't have Sugar Twin Granulated Brown you can just use brown sugar or regular sugar. (This will, of course, affect the nutritional info.)
When it is so hot and stuffy out I love recipes that don't involve turning on the oven. 
I also love recipes that are this delicious for only 250 calories. :)

Sunday, June 23, 2013

Jalapeno Carrot Curry


Who says carrots have to be boring?
No more plain old boiled carrots for this girl. You can always make Carrot Fries or Carrot Crust Pizza for something a bit different OR...you can try this spicy little concoction I whipped up for lunch today. 
You can adjust the heat to your own personal tastes...myself, I'm a not a spicy kinda gal so mine was fairly mild. 
Plus...it looks really pretty so...you know...that makes it taste even better. 


Jalapeno Carrot Curry

Ingredients
1/2 jalapeno, seeded & finely diced
1 slice onion, finely diced
1/4 tsp mustard seed
1 tsp curry powder
pinch sea salt
2 large carrots, shredded
1/2 Tbsp unsweetened coconut

Directions
Spray a nonstick or cast iron pan with cooking spray. Over medium heat, cook and stir diced jalapeno, onion, mustard seed, curry, and salt until onion is translucent.


Add in shredded carrots. Cook, stirring ever so often, until carrot is cooked through - about 10 minutes. 
Stir in half of the coconut. 
Scoop onto serving dish and sprinkle with remaining coconut.  


Serve hot. 
This makes enough for one (if eaten as a meal) but can very easily be doubled or tripled. 
According to Myfitnesspal for the entire recipe it is:
96 calories, 17 carbs, 2 fat, 1 protein.
I just wanted to add that you really should add the 1/2 Tbsp of coconut to this dish. It adds a whole other level of flavor that really compliments the spiciness. 
 
Be sure to visit Feeding Big and Love Bakes Good Cakes and Memories By The Mile and Hun...What's For Dinner?  and Chef In Training and Carole's Chatter for some fabulous links!

Saturday, June 22, 2013

Strawberry Crumble Cake


Okay...so this isn't necessarily a Canada Day recipe but I'm including it in our Canada Day recipe week because it is a little bit red & white. 
This cake/crumble is perfect for tea time or dessert...or breakfast (It has fruit so therefore it can be eaten for breakfast.) 
You can make it in a tart pan or regular 9 X 9 baking dish. I made it in my 8 inch tart pan, which I knew would be too tiny, so I also used my mini tart pan for the extra batter and toppings.


Strawberry Crumble Cake

Ingredients
Cake
1/4 cup butter, softened
1/4 cup cream cheese, softened
3/4 cup brown sugar
2 eggs
1 tsp vanilla
1/2 cup Greek yogurt, strawberry flavor
1/4 cup oil
1 1/2 cup flour
1 tsp baking soda
1 1/2 tsp baking powder

Strawberry Layer
1 1/2 cups chopped strawberries

Crumble
1/2 cup oats
1/3 cup flour
1/3 cup brown sugar
1/4 cup butter, chilled

Directions
Preheat oven to 350. Spray a 9 or 10 inch tart pan with cooking spray, set aside.
Prepare cake - In a medium bowl beat butter, cream cheese, and brown sugar until light and fluffy. Beat in eggs, vanilla, Greek yogurt, and oil until well combined.
In another bowl, whisk together flour, baking soda, and baking powder. 
Stir the dry ingredients into the wet ingredients until just combined. Spread evenly into prepared pan. Batter will be thick. 


Sprinkle with the chopped strawberries.


Prepare the crumble - stir together oats, flour, and brown sugar. Using 2 knives or your fingers, crumble in the butter until mixture resembles coarse crumbs.
Sprinkle on top of the strawberries.


Bake at 350 until toothpick stuck in center comes out clean, about 20 - 30 minutes, and top is golden brown.


Let cool on wire racks. 
You can then remove from the pan by pushing up the removable bottom. If you do not have a tart pan with removable bottom then just line your baking pan with parchment paper before baking so you can remove the cake by lifting it out. (Of course, you can always serve it directly out of the pan if you want to.)


Oooooh...look at that cake-y, crumbl-y, strawberry-y goodness. 
While it would look pretty nice on your Canada Day table, it would also look good on your everyday table. 
You should probably be making this right now. 
People will think you are even cooler than are. 
Which is pretty cool....

Be sure to visit The Chicken Chick and Ms. enPlace for some great links!

Friday, June 21, 2013

Canadian Red, White & Bacon Skewers (And a Watermelon Beaver)


This is probably the most simple Canada Day appetizer you will ever make.
You can have this made in no time at all and it certainly makes a big impact on the table. 
Plus...it has bacon.
Win...win...baby!
Sue and I decided to also share our watermelon carving of a beaver. It is surprising simple to do. You can find a how-to video for step-by-step instructions here - Canadian Living
If you want something healthy and REALLY cool to impress your kids, you should totally make this beaver.


Anyway...here is the recipe for our super easy, super Canadian looking appetizers. 


Canadian Red, White & Bacon Skewers

Ingredients
cherry tomatoes
mini bocconcini
bacon, cooked & cut into 1 inch pieces

Directions
Thread a tiny skewer, or long toothpick, with a tomato, piece of bacon, bocconcini, bacon, tomato.
On the next skewer, thread a bocconcini, bacon, tomato, bacon and end with bocconcini. 
Alternate the different skewers on a serving platter.
Refrigerate until ready to serve.

*Boom*
Done.
Just like that.
How about another photo of the watermelon beaver?


There he is on his cookie sheet while we were still working on him. We set him on a nice, white platter to show him off better. (As in the photo at the top)
The only tool you will really need to make him is a melon baller. Once you have that, you are good to go.
Sue and I have one more treat to share that would work well for Canada Day to wrap up our Canada Day recipes week.  Be sure to check back soon!

Looking for some cool links? Check out Kitchen Fun With My 3 Sons and Or So She Says.

Thursday, June 20, 2013

Sweet and Spicy Burger With Sweet Potato Pulled Pork Poutine


Sue and I are continuing our Canada Day recipes today. Thus far we have only done sweet treats - Nanaimo Bar Rice Krispies, Maple Syrup Butter Tarts, and Baked Maple Bacon Donuts
We are switching things up today by including 2 savory recipes perfect for celebrating Canada Day.
A sweet and spicy burger and some crazy good poutine.
Be sure to check back again as we have one more fun and super easy Canada Day recipe post to go.
We tried to include all-things Canadian in these recipes that can, of course, be substituted with non-Canadian versions of the same. Ie: Canadian Beef and Canadian Pork and Canadian beer and Canadian cheese curds can easily be subbed with the same ingredients from your country of choice. 


Sweet Potato Pulled Pork Poutine

Ingredients
Pulled Pork
1 head garlic, peeled & broken into cloves
1 tsp onion powder
1 tsp garlic powder
1 tsp paprika
1 tsp dried garlic
1 tsp dried parsley
1/4 tsp cayenne pepper
1/4 tsp cumin
1/4 tsp curry powder
5 lb pork roast
1 bottle Canadian beer
1/2 cup BBQ sauce

Fries
3 large sweet potatoes, peeled 
3 Tbsp oil
salt & pepper
1 tsp onion powder
1 tsp garlic powder

Gravy
2 Tbsp drippings from roast
1/4 tsp garlic powder
2 Tbsp flour
2 cups beef broth
1 Tbsp Worcestershire sauce
salt & pepper

Toppings
1 bag cheese curds

Directions
Prepare the Pulled Pork - Using a small knife, cut several small slits all over the roast. Take the garlic cloves and stick them randomly into the slits. 
Combine spices in a small bowl. Take the spices and rub all over the roast. Massage the spices into the meat to ensure good flavor. 
Place roast in slow cooker and pour beer over the roast.


Cook on low in slow cooker until roast is cooked - depending on your slow cooker this will take between 4 - 6 hours. (Internal temperature should be 170 - 180)
When it is done, remove from slow cooker and let sit for 15 minutes. Using 2 forks, shred roast into thin bits. Place shredded pork back into the slow cooker with the juices. Stir in the BBQ sauce. Turn on low while you prepare your fries and gravy.
Prepare the fries - Preheat oven to 400. Line a large cookie sheet with parchment paper, set aside. Slice the peeled sweet potatoes into your favorite French fry shape. Soak the potatoes in cold water for 15 minutes. Rinse and pat dry.


Take your fries and drizzle them with the oil. Sprinkle with the salt & pepper and onion & garlic powder. Toss to evenly coat. 
Spread out on prepared cookie sheet so fries are not overlapping. 
Bake at 400 for 15 minutes. Remove from heat and flip over. Return to oven until fries are tender - another 15 minutes or so.


Prepare the gravy - While your fries are cooking, stir the roast drippings in a medium saucepan. Add the garlic powder and the flour until you have a paste like substance. Slowly stir in the beef broth, a little at a time until you have a very thick gravy. Add more stock until it is just runny enough but not completely liquid. 
Let simmer 5 minutes. Stir in Worcestershire and salt & pepper.
Assemble the poutine - Place a good amount of fries on a serving platter. Top with a generous amount of  the pulled pork. Sprinkle liberally with the cheese curds.
Finally, top with a ridiculous amount of gravy. (There is no way this is going to be healthy for you so you might as well indulge!) FYI - You can make this easier by using frozen fries and packaged gravy. 


And, of course, the burger would not be complete without some Canadian Beer Candied Bacon:


Canadian Beer Candied Bacon

Ingredients
1 lb thick cut bacon
1 cup brown sugar
1/2 cup Canadian beer

Directions
Preheat oven to 400. Line a cookie sheet with tinfoil. Place a cooling rack on top of the tinfoil. Lay out the bacon on the cooling rack so it is not overlapping. 
In a small bowl, whisk together brown sugar and beer. Using a pastry brush or basting brush, baste the bacon with some of the beer syrup.
Bake at 400 for 10 minutes. 
Remove from oven and baste again. Flip bacon over and baste again. Return to oven and bake another 10 minutes. Repeat this 2 to 4 more times, until bacon is crispy. 
Remove from oven, remove from the sticky cooling rack to a clean cooling rack sprayed with cooking spray or else it will stick.

Now for the Sweet and Spicy Burger:


Sweet & Spicy Burger

Ingredients
1 lb lean ground beef
1/2 cup onions, finely diced
1/4 cup Panko crumbs
1 egg
salt & pepper
1 jalapeno pepper, finely diced
1 Tbsp prepared mustard
2 Tbsp BBQ sauce

4 hamburger buns

Toppings
Canadian Beer Candied bacon (recipe above)
tomatoes, sliced
onion, sliced
Monterey Jalapeno Jack cheese, sliced

Directions
Combine the 8 ingredients listed above for the burgers in a bowl. Mix well with your hands until well combined. Make into 4 even sized patties.
Preheat your grill for about 5 - 6 minutes on high heat. 
Place the patties on the grill and turn heat down to low. Cover and cook about 10 minutes, until burgers are nicely browned on the bottom. Flip burgers over and cook for another 10 minutes, until burgers are cooked through.
(These can also be cooked in the oven - simply preheat oven to 450. Line a cookie sheet with parchment paper. Place the patties on the prepared cookie sheet. Bake at 450 for about 10 minutes, flip over, continue baking until burgers are done - about another 10 - 15 minutes. (It is best to use a meat thermometer to determine when beef is cooked)
Place on bun and top with the jalapeno cheese, Canadian candied bacon, and other toppings. 

Together these combine to make the best meal EVER for Canada Day!


I'm still drooling from having this the other day. 
It's happening again for Canada Day...and then, after that, again and again and again.....

Be sure to visit My Turn (for us)  and Carole's Chatter for some great links!