Wednesday, September 21, 2016

Individual Pear Pies and Honey Roasted Pear Ice Cream


I'm going to be honest with you. Pears are not my favorite fruit. Something about the texture is just a little weird. Like... you're expecting it to be the same as an apple but its just not. 
I can get past that though when you make pears into a deliciously smooth ice cream OR if you cover them with a flaky crust and cinnamon OR if you do both at the same time to create the ultimate magical pear combo dessert. 
Yeah.
You should probably just do that ALL the time. 
I mean... how adorable does a pear look covered in crust for an individual pie? (Totally adorable is the correct answer. Just sayin')


Individual Pear Pies

Ingredients
Pie crust
(Here is our recipe for "never fail" pie crust - Jo and Sue's Pie Crust or you can use your favorite recipe or even *gasp* store bought)

Filling
Pears
lemon juice
cinnamon

Directions
Prepare pie crust as per directions and set aside to chill while you prepare filling.
Preheat oven to 375. Line a cookie sheet with parchment paper or silicone baking sheet, set aside.
Prep pears by peeling and cutting in half and placing in a bowl. Sprinkle liberally with lemon juice to prevent browning. 


Using a knife or melon baller, Gently scoop out a circle where the seeds are. 


Sprinkle the pear with cinnamon and place face down on prepared cookie sheet. Sprinkle with more cinnamon, if desired.


Roll out pie dough to about 1/4 inch thickness. Cut out a circle of dough large enough to cover a pear half. Gently press the dough over the pear half, molding it to its shape, folding any extra dough under the edges of the pear.
Repeat until all pears are covered. 
Cut one or two slits in the pear for steam to escape. If desired, cut leftover pie dough into leaf shapes and place under the top of the pear, lightly pressing it to attach.


Bake at 375 for 5 minutes, reduce heat to 350 and bake until pears are tender and crust is browned - about 30 - 40 minutes.


Let cool on tray for about 10 minutes before either serving or removing to wire rack to cool completely. (If you place in a wire rack to cool - be careful when you go to remove the pies as they may stick a little to the wire. Just use a spatula to loosen and then lift. If the leaves become detached - simply lay them back in place when you go to serve.) 


Of course.... you could just eat the pie and call it a day. 


But.... why not put this dessert completely over the top and whip up the honey roasted pear ice cream? Trust me... no one will be upset with you for doing so. 


Honey Roasted Pear Ice Cream

Ingredients
4 medium sized pears
2 Tbsp lemon juice
1/4 cup honey
1/4 tsp cinnamon
2 cups whipping cream
1 cup half and half cream
1/2 cup brown sugar
2 eggs
2 tsp vanilla
pinch sea salt

Directions
Preheat oven to 425. Line a cookie sheet (with sides!) with tin foil and spray with cooking spray. Set aside.
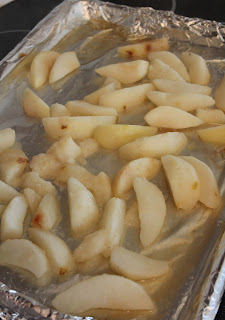
Peel the pears and cut into about 1/2 inch slices. Place in a bowl and toss with the lemon juice. 
Spread the pears on the prepared cookie sheet and drizzle with the honey. 


Bake about 15 minutes, stirring once or twice, until pears are tender.  (Do NOT skip roasting the pears. It brings out the mild flavor of the pears and makes the ice cream outstanding!) Place pears and pan juices into a blender (or food processor). Add in the cinnamon and process until smooth. 
Add to the blender the whipping cream, half and half cream, brown sugar, eggs, vanilla, and salt. 
Process until smooth - about 1 to 2 minutes. 
Pour mixture in to a bowl and chill completely - at least 2 to 3 hours. 


When chilled, pour into ice cream canister and process according to manufacturers directions.


Keep frozen until ready to serve.


Now. What you reeeeaallllly want to do is pair the ice cream with the pies.


Seeeeeeeeee?


So. Much. Better. 
You may have noticed I didn't put measurements for the pies. This is because you can do as many or as few pies as needed. I believe I got 8 pies from 1/3 of our Pie crust recipe (HERE
Fancy enough for company, easy enough for everyday. 


Be sure to pop by Carole's Chatter for more fun links!

Saturday, September 17, 2016

Old Fashioned Date Filled Oatmeal Cookies


This recipe has special meaning to me. It is the last recipe I got from our Aunt before she unexpectedly passed away. It is a recipe that our mom and our aunt's grandma used to make for them growing up. It does have "old fashioned" written all over it. 
Almost a date square in cookie form, if you will. 
The hint of orange is subtle but really elevates these simple cookies to another level.
When I make these now I always think of our aunt. I hope you give them a try and let us know what you think.


Old Fashioned Date Filled Oatmeal Cookies 

Ingredients
Date Filling
1 lb chopped dates
1 cup cold water
4 Tbsp brown sugar
4 Tbsp orange juice
2 tsp lemon juice
grated rind of 1/2 an orange

Cookies
1 cup butter, room temp
1 cup brown sugar
2 cups rolled oats (not quick oats)
2 cups flour
1 tsp baking soda
pinch salt
1/4 cup boiling water
1 tsp vanilla

Directions
Prepare date filling - In a medium saucepan, combine dates, cold water, brown sugar, orange juice, lemon juice, and orange rind. 


Cook over medium heat, stirring often, until thick and smooth. Remove from heat and let cool while you make cookies.
Prepare cookies - Line a cookie sheet with parchment paper. Set aside. 
Preheat oven to 375.
In a large mixing bowl, beat butter and sugar until smooth, scraping sides of bowl as needed. Stir in rolled oats. Next, stir in flour, baking soda, and salt. 
Add in the boiling water and vanilla and stir until well combined. Dough will be crumbly but stick together when you press it in your hand. 


Scoop onto prepared cookie sheet and press with a fork (or the palm of your hand) to flatten slightly.


Bake at 375 until lightly golden brown, about 10 - 15 minutes. Remove from heat and let cool on cookie sheet for about 5 - 8 minutes before removing to wire rack to cool completely. 


When cool you can sandwich the cookies together with the cooled date filling.
Flip over half of the cookies so the bottom is facing up.
Scoop a generous amount of date filling onto the flipped cookies.


Top with another cookie - bottom of that cookie facing down to touch the filling. Gently squish them together. 


Continue until all the cookie are used up.


You can make them as small or as big as you like, just keep in mind that with that lovely date center they are very rich and filling.
I believe I used my medium cookie scoop and got approx 23 or 24 cookies - which means 11 or 12 fairly large sandwich cookies. 


These freeze well too, FYI.
Also, if you want even more orange flavor simply grate the rind of a whole orange instead of just half. 
Our mom loves these as she says they remind her of her grandmother (plus they taste fantastic). 
I love them because they remind my of our aunt (plus they taste fantastic). 

Sunday, September 4, 2016

Lavender Lemon Shortbread Cookies


When it comes to cookies I like to consider myself somewhat of an expert. Not because of any schooling I've had or research I've done. No... basically I'm a cookie expert because I've eaten a lot of cookies in my time. 
A LOT
Like.... cookie monster has nothing on me. Not even lying. 
Anyway... to be a true cookie expert I decided that I'd have to step outside my cookie comfort zone and try something new. Since I've never tried anything baked with lavender (I was afraid it would taste like perfume...), that's the direction I decided to take. 
Our local U-pick farm (Old Airport Gardens in Lillooet) had some beautiful bundles of lavender so I knew I had to give it a try. 


Shortbread cookies are always a favorite around our house so I knew I would be safe using that as a base. I added some lemon just in case the lavender was too perfume-y so there would be a balance of flavors. 
If you are looking for a cookie to take you outside your safe place with baking then I definitely recommend giving these a try. They are different, light, and look so darned pretty. 


Lavender Lemon Shortbread Cookies

Ingredients
Cookies
2 cup butter, room temp
1 cup icing sugar
4 cups flour
1/4 tsp salt
zest of 1 large lemon
2 Tbsp lavender

Glaze
juice of 1/2 a lemon (about 1/4 cup)
1 cup icing sugar

Directions
Preheat oven to 325. Line a cookie sheet with parchment paper, set aside.
In a large mixing bowl, beat butter until fluffy, scraping sides of bowl as needed. Beat in icing sugar, flour, and salt until crumbly. Beat in lemon zest.


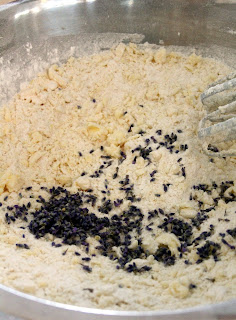
Collect 2 Tbsp of lavender.


Add it to the dough.


Beat until dough starts to come together. Use your hands to press together. Dough should stick together but may be a bit crumbly. You can add a few spoonfuls of milk if it won't stick together.


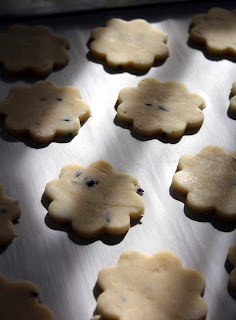
Divide dough in half. Roll out half of the dough to about 1/4 inch thickness. Cut out with cookie cutters.


Place on prepared cookie sheet. They can be fairly close together as they don't spread.


Bake at 325 for 10 minutes. Rotate pan in the oven. Bake for another 10 minutes, or until bottoms of cookies are a light golden brown and edges are just starting to brown slightly. Tops of cookies will look dry.


Let cool on pan for 5 minutes before removing to wire rack to cool completely. Continue with remainder of dough. (Note - it helps to have 2 cookie sheets so you can continue cutting out dough and not having to wait until the one sheet cools.) 
Prepare lemon glaze - in a small bowl, whisk together lemon juice and icing sugar until mixture resembles glue. Using a pastry or basting brush, brush the glaze over the tops of the warm cookies.


If desired, sprinkle a teeny bit more lavender on each cookie while the glaze is still wet. (FYI - it dries quite quickly. I brushed about 5 cookies with glaze then sprinkled them with more lavender, then 5 more cookies, more lavender, etc...)
This recipes makes quite a large batch - about 7 dozen - but can easily be halved!


Aren't they super de duper pretty?
I was always under the impression that lavender would taste like perfume. 
Not so much.
Okay... maybe a teeeeeeeeny tiny bit. I don't think I'm going to run out and starting drinking lavender tea or anything BUT these cookies have a great layering of flavors. There is the buttery richness of the shortbread, the refreshing tang of the lemon, and then a subtle hint of the lavender to round things out. 
Overall a fabulous way to try something new!