Monday, April 29, 2013

Japanese Pork And Mushroom Gyoza With Beet and Carrot Slaw


Looks pretty tasty, right?
That was my dinner last night. An odd combo? Maybe. Delicious? Definitely. I was really happy with how well the 3 dishes went together.
I made Pork and Mushroom Gyoza with an easy veggie fried rice and oh-so-pretty Beet and Carrot Slaw with a Poppy Seed Vinaigrette.
The slaw was soooooo unbelievably easy to make. I am definitely bringing this to the next BBQ I am invited to. The colors are amazing. The Gyoza (pronounced - "gyooh-zah") were a little more fussy to make but were certainly worth the little bit of effort they required. The dipping sauce I made to accompany it really put it over the top.
I ever-so-slightly adapted the Goyza recipe from an article in The Province Newspaper, from Chef Bill Jones' new cookbook. (I cut the recipe out and didn't happen to keep the piece with the name of the cookbook. Sorry about that.)
I am sharing the Gyoza recipe, the dipping sauce, the slaw, and the dressing. Let's get right to it!


Japanese Pork and Mushroom Goyza with Dipping Sauce
(Slightly adapted from Chef Bill Jones, The Province Newspaper)

Ingredients
Dipping Sauce
1/4 cup rice vinegar
1 Tbsp soy sauce
1/4 tsp ginger
2 tsp Thai Sweet Chili Sauce

Gyoza Dough
1 cup flour
1/2 tsp salt
1/4 to 1/2 cup boiling water

Gyoza Filling
1/2 lb ground pork
1/2 cup mushrooms, diced fine
1/4 cup cabbage, shredded
2 Tbsp onion, diced fine
1/2 tsp salt
1 tbsp cornstarch
1 tsp sesame oil + a little more sesame oil for frying

few Tbsp extra oil for frying

Directions
Prepare sauce: whisk together rice vinegar, soy sauce, ginger, and chili sauce. Chill until ready to use.
Prepare dough: In a food processor, pulse together flour and salt briefly. Slowly add the water through the feed tube until dough comes together in a ball. (The original recipe stated 1/4 cup boiling water but I used closer to 1/2 cup.)
Remove the dough from the processor, cover in plastic wrap, and let rest for at least one hour - up to 3.


While dough is resting, prepare filling: In a large bowl, combine pork, mushroom, cabbage, onion, cornstarch, and 1 tsp sesame oil until well combined. Place in a large sauce pan drizzled with a little sesame oil,  over medium high heat.


Cook until pork is no longer pink.


Set in fridge to cool.
When dough has rested and filling is cool, assemble your goyza.
Cut dough into 24 equal pieces. The pieces should be about the size of a small walnut.


Lay a piece on a floured work surface and roll out to a very thin circle. Place 1 Tbsp of filling into center of circle.


Dip your fingers into a bowl of water and wet the edges of the circle. Fold circle in half and seal the edges by pinching together. Be sure to keep any filling out of the edges or it won't seal firmly. Make 3 or 4 small folds along the edge to make a pleated finish.


Repeat until all 24 pieces of dough have been used. (I place mine on a cookie sheet lined with plastic wrap and cover with a tea towel to prevent them from drying out.)
In a large, non-stick frying pan, heat about 1 - 2 Tbsp of oil over medium high heat. Add the gyoza to the pan and cook for 1 minute.


Add 1 cup of water and cover frying pan with a lid. (Careful, this will spatter a bit as you add the water!)
Cook, covered for 7 - 8 minutes, until moisture evaporates.
Remove lid and continue cooking until bottoms are browned, about 2 more minutes.


In the photo above I flipped one over so you can see how nice and crispy the bottoms should be.
Remove from heat and serve with dipping sauce. (You may need to give the dipping sauce another quick whisk before serving it.)

And now for the Beet and Carrot Slaw:


Beet and Carrot Slaw with Poppy Seed Vinaigrette

Ingredients
Slaw
4 large carrots, grated
1/4 of a medium cabbage, grated
1 large beet, grated
1/2 small onion, diced fine

Poppy Seed Vinaigrette
1/3 cup sugar
2 Tbsp sesame seeds
1 Tbsp poppy seeds
1/4 tsp paprika
1/2 tsp Worcestershire sauce
2 Tbsp onion, diced fine
1/2 cup olive oil
1/4 cup white vinegar

Directions
Combine grated carrot, cabbage, beet, and onion in a medium sized bowl.


Prepare dressing: Whisk together all dressing ingredients until combined.
Drizzle dressing over salad and toss to combine. Start with a few spoonfuls and go from there until you reach your desired taste. Store remaining dressing in the fridge.


A couple of notes:
1. The original recipe stated the pork mixture did NOT need to be cooked first. You can fill the wrappers raw and it will cook in the pan while it steams. I am really nervous with pork and felt better cooking it before filling the wrappers.
2. After I grated my beet I drained the excess moisture out of it by using a cheesecloth. I didn't want the beet juice muddy-ing up the color of the salad.
3. The veggies in the slaw are all raw! There is no need to cook anything first.
4. The veggie fried rice in the photo doesn't really have a recipe. I just fried up some veggies I had on hand, added the cooked, leftover rice I had, added a few Tbsp of soy sauce, and heated through.

Looking for other tasty and fun links? Check out Carole's Chatter!

Sunday, April 28, 2013

Chocolate Cake Caramel Macchiato Cheesecake With Salted Caramel Buttercream (Guest Post at Hungry Little Girl)


Sue and I are happy to be guests over at Hungry Little Girl today.
If you haven't checked out Hungry Little Girl, you really need to. Jutta has some amazing recipes!
We shared our Chocolate Cake Caramel Macchiato Cheesecake With Salted Caramel Buttercream as she asked us to come up with an extreme decadent dessert.
I think this fits the bill.
If you want to get the recipe and see some more drool inducing photos, as well as step by step instructions....then head over to Hungry Little Girl right now!
Go..
Hurry...
For now...we will tease you with one little photo....the last tempting bite of this decadent dessert.
**ATTENTION EVERYONE!!!**
Apparently the above links to Hungry Little Girl no longer work. Please go HERE for the recipe. We reposted it on our blog to ensure everyone has access to it!


Little bit of chocolate cake, little bit of caramel cheesecake, and little bit of salted caramel buttercream.
You know you are just dying to find out what that last bite would be like, right?
head over to Hungry Little Girl and leave us a comment.
See you there!
**Once Again -- ATTENTION EVERYONE!!!**
Apparently the above links to Hungry Little Girl no longer work. Please go HERE for the recipe. We reposted it on our blog to ensure everyone has access to it!

And...be sure to visit Ms. enPlace and Jam Hands and The Velvet Moon Baker and Love Bakes Good Cakes for some great links!

Saturday, April 27, 2013

Beet Crust Pizza

 
Yup, it's that time again.
Time for a new veggie crust pizza!
This one is made from shredded beets. I spiced it up with some garlic and jalapeno to counteract the natural sweetness of the beets.
I loved the combination of flavors. Sue described it as "earthy" and "spicy".
The texture is stable enough to pick up in your hand (once it has cooled a bit) but definitely much easier to eat with a fork.
If you are looking for a spicy pizza alternative that also happens to be Capital H-ealthy...look no further!
 
 
See...you can pick it up but it is a little bendy!
It is definitely colorful!
 
Beet Crust Pizza
 
Ingredients
Crust
2 large beets, peeled
3 cloves garlic, minced
1/4 cup pickled jalapeno slices, drained & finely diced
1/4 cup skim mozza cheese, shredded
1 egg
 
Toppings
Sauce
1 avocado, pitted and peeled
2 Tbsp lemon juice
2 cloves garlic, minced
1/2 tsp cumin
1 tsp oil
 
1/4 cup torn baby spinach
1 small onion
3 large button mushrooms, sliced
2 Tbsp Parmesan cheese, shredded
 
Directions
Preheat oven to 425. Line a cookie sheet with parchment paper. Set aside.
Take peeled beets and process in food processor until finely shredded.
 
 
Take shredded beets and, using cheesecloth (or clean piece of material), squeeze as much moisture out of the beets as you can. (You should have approx 1 1/2 cups of beets)
Place beets in a bowl. Add in minced garlic and jalapeno, mozza cheese, and egg.
 
 
Stir to combine well. Use your hands if necessary.
Pat out into to 2 - 8 inch circles on the prepared cookie sheet.
 
 
Bake in preheated oven for 15 minutes.
While crust is baking, prepare avocado sauce.
In a small bowl, take avocado and mash with a fork. Add in lemon juice, garlic, cumin, and oil. Mash together with fork until fairly smooth.
 
 
Remove beet crust from oven. It should be fairly dry looking. If not, cook another 5 minutes.
 
 
Top each of the pizzas with half of the avocado sauce, spreading to within 1/2 inch of the border.
Top with your favorite toppings. (I used spinach, onion, and mushrooms) Top each pizza with 1 Tbsp Parmesan cheese.
 
 
Place back in 425 oven for another 5 - 8 minutes. Turn on broil and broil 2 - 3 minutes, until cheese browns up a bit.
Remove from heat.
 
 
Slide off of cookie sheet onto a cooling rack using the parchment paper. You can then carefully slide the pizza off the parchment paper directly on to the cooling rack.
Let sit for a few minutes, until cool enough to pick up OR use a knife and fork to eat.
 
 
According to Myfitnesspal for 1 of the 8 inch pizzas:
Calories - 380. Carbs - 32. Fat - 25. Protein - 14
That is for toppings and everything!
For JUST THE CRUST of 1 of the 8 inch pizzas:
Calories - 150. Carbs - 16.5. Fat - 5.5. Protein - 8.5
 
Eating one of the pizzas is very filling. Perfect for lunch.
Have I mentioned how incredibly healthy these are? I mean...beets, avocado, garlic, mushrooms, spinach... Hello vitamins, protein, fiber, and all that good stuff!
You can, of course, use regular pizza sauce on top of this instead of the avocado sauce. I really liked the texture and taste (and all the health benefits) that the avocado added.
 
Want some ideas for other veggie crusts?
 
Pop over to The Chicken Chick and Carole's Chatterfor some great links!

Friday, April 26, 2013

Meyer Lemon Ice Cream

 
Sue and I went to Costco the other day and ended up coming home with a crate of Meyer Lemons.
There was a lot of lemons.
We split them in half and each ended up with 7 lemons. What the heck do you do with 7 lemons?
Well, if you are Sue you make a Lemon Poppy Seed Cake (check back later for her recipe) and if you are me, you make ice cream.
Delicious.
Creamy.
Lemony.
Ice cream
This is the most refreshing dessert EVER. Better than Sue's cake but don't tell her I said that.
I still have some more lemons to use up so be prepared for a litany of lemon recipes in the coming days.
 
 
Meyer Lemon Ice Cream
 
Ingredients
2 cups whipping cream
1 cup sugar
juice of 3 lemons (approx 1/2 cup)
zest of 3 lemons (approx 3 Tbsp)
1 Tbsp Limoncello
1/8 tsp salt
 
Directions
In a large bowl, whisk all ingredients together. Continue to whisk every 5 minutes or so until sugar is dissolved.
Chill for about an hour.
Pour into the canister of your ice cream maker. Process according to manufacturer's instructions.
When machine is finished - scoop into air tight container and store in freezer.
 
I decided to go with a non-custard base ice cream this time to keep things simple.
I imagine making this in the heat of the summer when you don't want to go near the stove.
This takes so little time to put together and almost no effort, yet yields an amazingly decadent, refreshing dessert.
Note - The Limoncello is optional. I like to add a touch of alcohol to keep the ice cream from freezing too hard. You could use vodka or just leave it out altogether.
The Meyer lemon is a very sweet, orange tasting lemon. I recommend the Meyer lemons but, if you can't get a hold of Meyer's, by all means use whichever lemons you have on hand.
 
Be sure to visit Six Sister's Stuff and The Rustic Pig and Hungry Little Girl for tons of tasty links!

Thursday, April 25, 2013

Salted Chocolate and Caramel Shortbread Bar For Two

 
I was about ready to kill someone for chocolate today.
You've had those days, right?
Like...if someone looks at you the wrong way you are ready to go into full on attack mode.
I can't be the only one.
Well, regardless, in case you need an emergency chocolaty, caramel-y, salty, shortbread-y treat but don't want to make a whole pan because you know you would sit there and eat the whole thing, I have created this scrumptious little tidbit.
Big enough for 2...maybe even 3 (if you are feeling generous)...or just big enough to calm the killer inside of you on THOSE days.
It's best we don't look up the calories or nutritional info on this one. Just enjoy and know that the calories are worth keeping you out of jail.
 
 
Salted Chocolate and Caramel Shortbread Bar For Two
 
Ingredients
Crust
2 Tbsp flour
1/8 tsp baking powder
pinch salt
1/2 Tbsp sugar
1 Tbsp butter
 
Caramel Filling
1 Tbsp butter
1 Tbsp sugar
1/2 tsp light corn syrup
1/4 tsp vanilla
1/4 cup sweetened condensed milk
 
Chocolate Topping
2 Tbsp chocolate chips
1/4 tsp light corn syrup
1/2 Tbsp butter
 
Pinch coarse sea salt
 
Directions
Preheat toaster oven to 350 (or regular oven). Line a 3 X 6 oven safe dish with parchment paper. Spray with cooking spray. Set aside.
Crust: In a small bowl, combine flour, baking powder, salt, and sugar with a fork. Using the fork, add in the butter until mixture resembles coarse crumbs. Dump into prepared dish.
 
 
Press down firmly in prepared dish.
 
 
Bake until just starting to brown. About 5 - 8 minutes. Remove from heat.
 
 
Prepare Caramel Filling: In a small saucepan over medium heat, combine butter, sugar, corn syrup, vanilla, and sweetened condensed milk.
 
 
Stir constantly and bring to a boil. Reduce heat and simmer, stirring constantly, until mixture starts to turn amber in color. Remove from heat.
 
 
Carefully spread over crust in dish.
 
 
Chill for a few minutes to let firm up before adding the topping.
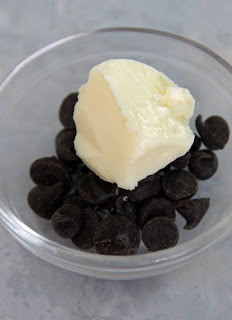
Prepare topping: In a small, microwave safe bowl, combine chocolate chips, corn syrup, and butter.
 
 
Heat about 20 seconds in microwave. Remove and stir until smooth. (If chocolate is not completely melted then return to microwave for a few more seconds and stir again.)
 
 
Spread over caramel layer.
 
 
Chill for a few minutes to let the chocolate set up a bit, 5 - 10 mins.
Sprinkle with a little coarse sea salt.
 
 
Chill until ready to serve.
 
 
One thing you don't want to do is overcook your caramel layer. If it gets too dark it will get hard and will be quite hard to eat as a bar. You want to cook it just until it starts to turn amber in color. Remove it from the heat and immediately spread it on the crust.
I let it sit in the pan for a few minutes and it kept cooking and got a bit dark. It still tasted fantastic but was VERY hard. The second time I cooked it a bit less and took it out of the pan right away and it was perfect.
 
Be sure to visit My Turn For Us for some great links!

Wednesday, April 24, 2013

One Pot Spaghetti

 
Sue here today!
I have been dying to share this easy peasy recipe for spaghetti but Jo just would not stop with the recipes. I decided to hijack the blog while I had a chance.
I found this over at Fantastical Sharing Of Recipes and thought it looked interesting.
Turns out, it is amazing! I've made it half a dozen times in the past month. I probably won't go back to making spaghetti the "old way" again.
I mean...everything in ONE pot!
Less dishes = happy Sue.
 
 
One Pot Spaghetti
(Slightly adapted from Fantastical Sharing Of Recipes)
 
Ingredients
1 lb turkey, ground
1 onion, finely diced
2 medium carrots, peeled & diced
3 cloves garlic, minced
1 (10 oz) can chicken broth
1 (26 oz.) can spaghetti sauce
1/2 cup water
8 oz spaghetti, broken into pieces
1/4 cup Parmesan, shredded
salt & pepper
shredded aged cheddar cheese (optional)
 
Directions
In a large pot, brown the turkey with onion and carrots, add garlic in last minute or so; drain if needed.
Add broth, spaghetti sauce, and water. Bring to a boil.
 
 
Add spaghetti and reduce heat.
 
 
Cook, covered, for 15 - 20 minutes, until spaghetti is cooked al dente. Stir occasionally and add more water, if needed. Stir in Parmesan.
Serve hot. Sprinkle with salt & pepper and shredded aged cheddar cheese, if desired (or more Parmesan).
 
 
Seeeeeeeee....how easy is that?
And, you only dirty ONE pot.
This is quickly becoming my go-to dinner when we are short on time. Served with some garlic toast and a salad, I can have a complete meal in under half an hour.
The world needs more dishes like this. Thank you to Fantastical Sharing Of Recipes for posting this one!
 
You should be sure to visit The Mandatory Mooch and Adorned From Above and The Busy Bees and Kitchen Fun With My 3 Sons for some great links!

Tuesday, April 23, 2013

Cinnamon Bun Rice Krispie Rolls

 
I've had Rice Krispie treats on my mind.
Ever since I made the Carrot Cake Rice Krispies with Cream Cheese Frosting I've been wondering what else I could do with them. I decided to try a rolled Rice Krispie to see how it would work.
When you think of baked goods that are rolled, what comes to mind?
If you said cinnamon buns then, congratulations, you and I are on the same wavelength and you are awesome.
Did you know you can buy cinnamon bun marshmallows?
Well..... if you live in the US. We poor Canadians don't have that option. At least, not anywhere near Lillooet.
That being said.... I still figured out a way to come up with cinnamon bun flavor. You know...by using cinnamon. And, I just happened to have some cream cheese frosting leftover from the aforementioned Carrot Cake Rice Krispies so *tah dah* Cinnamon Bun Rice Krispie treats are happening.
Right.
Now.
 
 
Cinnamon Bun Rice Krispie Rolls
with Cream Cheese Frosting
 
Ingredients
1 bag mini marshmallows (about 6 cups)
1/4 cup butter
1 tsp vanilla
1 tsp cinnamon
6 cups Rice Krispies
 
Filling
3/4 cup brown sugar
1/2 cup butter, softened
1 1/2 tsp cinnamon
3/4 cup pecans, toasted & chopped
2 Tbsp flour
 
Frosting
1/2 of an 8 oz brick of cream cheese, softened (so - 4 oz)
1 tsp vanilla
2 cups icing sugar
 
Directions
Line a 12 X 15 cookie sheet with parchment paper. Spray well with cooking spray. Set aside.
Melt marshmallows, butter, vanilla, and cinnamon over low heat.
 
 
Stir until melted and smooth. Remove from heat. Stir in Rice Krispies.
Scoop Rice Krispie mixture onto prepared pan. Using well greased hands (with butter or cooking spray), press out evenly into pan.
 
 
Let cool to room temp.
Prepare filling: Stir together the brown sugar, butter, cinnamon, pecans, and flour until well combined.
 
 
Carefully spread the filling onto the Rice Krispies, leaving a one inch border around the outside.
 
 
Roll up, jelly roll style,while Rice Krispies are still flexible.
 
 
Press firmly as you roll.
 
 
Place in fridge for 15 - 20 minutes. You want it to be fairly firm before you try and slice it. When it feels firm, cut into about 1/2 inch slices using a serrated blade and sawing motion.
 
 
You should get approximately 24 slices, give or take.
Prepare frosting: Beat together cream cheese, vanilla, and icing sugar until smooth.
Place in piping bag or plastic bag with corner snipped off.
Pipe a swirl onto each slice.
 
 
Did I mention these are sweet?
Because they are.
In case you couldn't pick that up from the recipe.
And deliciously cinnamon-y.
Oh...and cream cheesy...
You should make them.
 
Be sure to visit Hungry Little Girl and Love Bakes Good Cakes and Memories By The Mile and Chef In Training for some fantastic, fun links!