Saturday, January 28, 2017

Fudgy Chocolate Cake (Gluten Free)


This chocolate cake is super-de-duper fudgy and also ridiculously chocolaty, 2 things I am totally on board with. Mom and dad were not huge fans of it. They thought the texture was a little weird. 
One of the hazards of gluten free baking. I find people either love it or hate it. Not taste, mind you, just the texture. This time I was okay with the texture. I like fudgy. 
Anyway, this is super easy to whip up - all you need is a blender or food processor and about 10 minutes. *Boom* done. Throw it in the oven and call it a day. 
Can't argue with easy. 
Also can't argue with chocolate. 
Well.... you could... but you'd be wrong. 


Fudgy Chocolate Cake (Gluten Free)
(Slightly adapted from Women's World Magazine)

Ingredients
1 can (15 oz) black beans, rinsed and drained
1/3 cup pumpkin puree (NOT pie filling)
1/3 cup unsweetened applesauce
1/2 cup baking cocoa
1/2 cup egg whites (about 4)
1/4 cup Truvia (or similar)
1 1/2 tsp baking powder
1 tsp vanilla
pinch salt
2 Tbsp mini chocolate chips

Topping 
1 Tbsp mini chocolate chips

Directions
Preheat oven to 350. Lightly spray a 9 inch pan with cooking spray, line with parchment paper, then lightly spray again. Set aside. 
In a blender or food processor, puree black beans for about 2 minutes, scraping down sides often. Add in the pumpkin puree and applesauce and process until smooth, again scraping down sides as necessary. Add in the cocoa, egg whites, Truvia, baking powder, vanilla, salt, and 2 Tbsp of mini chocolate chips. Process until smooth. 
Pour into prepared pan and spread out evenly. 


Bake at 350 for about 30 - 40 minutes, until cake appears dry with some cracks and toothpick inserted near center comes out clean.


Remove from oven to a wire rack. Sprinkle with the 1 Tbsp of remaining mini chocolate chips.


Let sit for a minute for the chips to melt, then spread out on top of the cake. The chocolate will be very thin and will not cover the cake. 


Let cool completely before cutting.


According to the original recipe in Women's World magazine the nutritional counts are:
Cake makes 8 servings. Per serving: 100 calories, 6 protein, 22 carbs, 5 fiber. 


Chocolate fudgy deliciousness for only 100 calories. Nice. 
Whether you are gluten free or not, this is a great treat if you are trying to eat a bit healthier. 
 
 
Be sure to visit Carole's Chatter for tons of fun foody links!

Monday, January 23, 2017

Asian Inspired Turkey and Mushroom Pasta with Seaweed


Apparently seaweed is one of the new food trends this year. 
I like dried seaweed - aka nori - in sushi but have never been a huge fan of it on its own. I bought some of the little snack packs of dried seaweed and they have remained in my cupboard, untouched. I figured if it's going to be a new trend then maybe I should break them out and give them a try in some cooking. 
I am a big fan of NuPasta - which is a pasta made from konjac flour. 


A whole package of it only has 25 calories. 
Hello new favorite dinner item. 
I made an Asian inspired sauce that goes perfectly with the pasta and the addition of seaweed. According to MyFitnessPal a serving (recipe makes 3 servings) is only: 397 calories, 22 fat, 37 carbs, 7 fiber, and 35 protein. Trust me when I say, you will have trouble finishing a whole serving! It is very filling.


Asian Inspired Turkey and Mushroom Pasta with Seaweed

Ingredients
1 tsp sesame oil
5 button mushrooms, sliced
1/2 medium onion, sliced

1 lb ground turkey
2 cloves garlic, minced
1 slice onion, finely diced
1/2 tsp fresh ginger, grated
1 Tbsp soy sauce
2 Tbsp Yakisoba Sauce
1 tsp Chinese cooking wine

Sauce
4 Tbsp soy sauce
4 Tbsp Chinese cooking wine
4 tsp sweet chili sauce
4 tsp rice vinegar
1 tsp sugar

3 packages of NuPasta, rinsed and drained
(you can use any pasta BUT the nutritional counts will be very different)

Topping
6 Tbsp dried seaweed, crumbled

Directions
In a medium frying pan, heat sesame oil, mushrooms, and onions over medium low heat. 


Cook and stir every so often until onions start to caramelize - about 15 to 20 minutes.


While onions are caramelizing, cook turkey with garlic, onion, and ginger in a large frying pan until turkey is no longer pink. Stir in the soy sauce, Yakisoba sauce, and cooking wine. Set aside and keep warm.
In a medium saucepan over medium heat, stir together the soy sauce, cooking wine, sweet chili sauce, rice vinegar, and sugar. Stir and heat until steaming and sugar is dissolved. Toss the NuPasta in the sauce and heat through.


When onions are done and turkey is cooked, toss the two together in one pan.


Divide pasta between 3 serving plates. Divide turkey onion mixture amongst the plates, on top of the pasta. Drizzle each with a little of the leftover sauce in the pan. 


Top each plate with 2 Tbsp of crumbled seaweed and serve immediately.


I've added this to my dinner rotation because it is just ridiculous. I can't believe it is only 397 calories for the amount you get to eat. NuPasta is definitely helping me stick to my New Year's resolutions. 
And the flavors and textures are really intriguing and very addicting. 
I use low sodium soy sauce but regular would work too - you an always adjust the amount if you find it too salty. 


Stop by Carole's Chatter for tons of great links!

Monday, January 16, 2017

Sushi "Cake"


When you have a friend that doesn't like sweets but you like to make birthday cakes for them, it can start to get a little tricky what to make. 
I've made her smorgastartas (Link HERE) and potato tarts (Link HERE) and, oddly enough, she loves apple pie so I have made her several apple pies. BUT, I wanted to do something different this year that was also super-de-duper cool. I knew she was a fan of sushi so I went looking on Pinterest for some ideas. FYI - never go to Pinterest to "just look around". You will look up 14 hours later wondering what day it is. #addicting
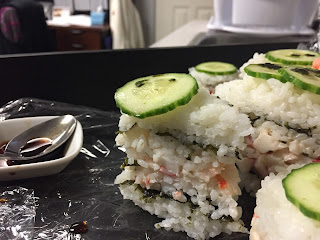
Anyway, I combined a few recipes and ideas together and came up with this pretty sushi tray. It was a big hit!


Sushi "Cake"

Ingredients
1/2 cup rice wine vinegar
1 Tbsp coarse salt
2 Tbsp sugar
3 cups sushi rice, uncooked
2 Tbsp mayo
1 tsp dried chives
2 tsp wasabi paste 
1 tsp lemon juice
salt & pepper
3/4 to 1 cup crab meat, diced
3/4 to 1 cup prawns, diced
nori sheets

Decoration
prawns
cucumbers
crumbled nori

Optional
serve with soy sauce, wasabi, pickled ginger

Directions
In a small bowl, whisk together vinegar, coarse salt, and sugar. Set aside.
Cook the 3 cups of rice according to the package directions. Remove from heat when cooked and transfer rice to a large bowl. Stirring constantly, slowly add the vinegar mixture until fully incorporated.


Let cool completely, stirring occasionally - you can place in fridge to speed process. 
In a medium bowl, whisk together mayo, chives, wasabi paste, lemon juice, and salt & pepper.


Let stand while you prepare the crab and prawns.


Mix the wasabi mixture and and the meat together.


Cut out the nori sheets into circles the size of the pan you will be using. We used a mini-cheesecake pan because the bottoms push up so you can remove the sushi stack once it is complete. 


Assemble your stacks/cake: 
Step 1: Place 1 Tbsp of rice into the bottom of each mini cheesecake pan. Press down firmly.
Step 2:  Place a nori circle on top.
Step 3: Place 1/2 Tbsp of rice on top of the nori. Press down firmly. 
Step 4: Place 1 scant Tbsp of crab/prawn filling down. Press down firmly.
Step 5: Place 1/2 Tbsp rice on top of filling. Press down firmly.
Step 6: Place a nori circle on top of the rice.
Step 7: Top with 1 Tbsp of rice. Press down firmly. 
(See photo below for steps 1 through 6)


Chill stacks/cake for 10 minutes before "unmolding". 
Now, you can push these out and repeat with remaining rice OR you can use a small springform pan and make a larger "cake". Simply repeat the steps as you did for the smaller ones but in the springform pan. (I used a 6 inch springform and had a bit of rice leftover. If you used an 8 inch pan after doing the 12 smaller ones your cake would be much thinner but would still work. Alternatively, you could NOT make any small stacks and simply make 1 large 8 inch cake.)
After everything has been firmly packed in, simply unhook the latch on the springform pan and release the cake.


Decorate as desired.


You can also have fun decorating the small stacks as well.


We topped half with chopped prawns and some nori.


And half with a thin slice of cucumber. 


I made this the day before and it sat, covered, in the fridge overnight. It was still wonderful. Same day would be optimal but next day works just as good! OH - except the nori and cucumber decorations on top. They could easily just be put on right before serving. The cucumbers looked a touch wilted and the nori went a bit soggy on top. It didn't ruin it by any means, just next time I would wait to put it on!
You could also sprinkle on some toasted sesame seeds. 


Angel (whose birthday we were celebrating) was kind enough to send me a photo of the cut cake. It just looks so cute! As you can see, it stays together very well, just be sure too press down firmly when you are preparing the stacks/cake so everything is compressed tightly. 
And, just an FYI - once the rice is mixed with the vinegar mixture and cooled it is VERY sticky. It helps to have a bowl of water to dip your fingers in before trying to scoop the rice into the pans.  

Saturday, January 14, 2017

Mashed Cauliflower


I've been in the cauliflower rice fan base for quite some time. What I had never tried, oddly enough, is mashed cauliflower. To see it in the photo above you would never know it wasn't mashed potatoes. 
Honest.
If you eat it on its own then it does have a cauliflower-ish taste BUT if you put a few spoonfuls of gravy on then *boom* exactly like mashed potatoes but nowhere near the calories or carbs. I'm watching my calories and this completely satisfied the craving I was having for a big ol' plate of mashed potatoes and gravy. 
You can fancy them up with butter or cream cheese - I didn't because of the calories it added - but I found I really did not need to add them. 


Mashed Cauliflower

Ingredients
1 med head cauliflower
3 cloves garlic, halved
1 Tbsp Parmesan, grated
1/4 cup red onions, fried

Directions
Break apart the cauliflower into florets. Place in the top of a steamer (or double boiler) with the 3 cloves or garlic. 


Cook until fork tender. 
Remove from heat and place cauliflower and garlic into a blender (or food processor). Add in the Parmesan and fried onions. 


Pulse until smooth - leave it a little lumpy if that is how you prefer your mashed potatoes normally. 


Place on serving plate...


Top as desired.


With some  gravy OR 


Some gravy and chicken meatballs!
I added the red onions (fried) because I found that the little colored bits in the mashed cauliflower resembled potato skins and lent to the whole illusion of having mashed potatoes. 
I counted this recipe as 2 servings - about 1 cup each - and, according to Myfitnesspal the nutritional counts are: 94 calories, 1 fat, 18 carbs, 7 fiber, 7 protein per serving. 
How awesome is that? And the gravy hardly adds any calories either - the gravy I use is 3 Tbsp for 40 calories. I had one serving for dinner then reheated the second serving in the microwave for lunch the next day. *perfection*
 
Be sure to stop by Carole's Chatter for more tasty links!

Sunday, January 8, 2017

Soft Chocolate Cookies (Small Batch)


I tend to go nuts when it comes to cookies. Not necessarily baking them but definitely eating them. Fresh out of the oven when they are still warm.... I mean.... don't even get me started. *Drool*
SO... due to my lack of self control I have started using small-batch recipes more often. That way, if I go crazy, the harm is still limited. 
This recipe makes 4 good sized cookies. That's it! Perfect for those of us who continually succumb to the magic of cookies. 


Chocolate Cookies (Small Batch)

Ingredients
1/4 cup butter, melted
1/4 cup dark brown sugar (light will also work)
2 Tbsp sugar
1 egg yolk
1/2 tsp vanilla
1/2 cup flour
1 Tbsp + 1 tsp baking cocoa
1/4 tsp baking soda
pinch salt

Toppings (Optional)
4 pecan halves
4 chocolate pieces
pinch coarse sea salt

Directions
Preheat oven (or toaster oven) to 350. Line a baking tray with parchment paper, set aside.
In a small mixing bowl, whisk together melted butter, sugar, egg yolk, and vanilla. 
In a separate bowl, whisk together flour, cocoa, baking soda, and salt. 


Pour the dry ingredients into the wet ingredients and whisk to combine. Using a large cookie scoop (or spoon), drop the dough onto the prepared baking tray about 2 or more inches apart.


Bake at 350 until bottoms are lightly browned and tops appear dry.


Remove from heat and, if using the optional toppings, press a piece of chocolate and pecan half into the cookie while still hot. Sprinkle with a pinch of sea salt. Remove to wire rack to cool completely. 


You can, of course, eat them warm. And don't feel too bad if you eat all four. After all, there is only four.... it could have been much worse.....

Tuesday, January 3, 2017

Rajma Masala


Rajma Masala is a popular Indian dish consisting of red kidney beans in a thick curry. It resembles chili but with (in my opinion) much more flavor! 
I've taken several recipes from online and mish-mashed them together to suit what I had on hand. So... no.... this is not a traditional rajma masala but is pretty close. 
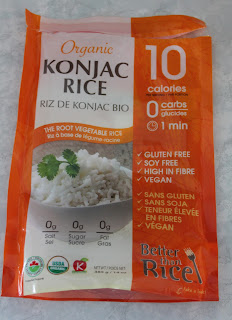
I served it with konjac rice - which is actually not rice at all but certainly has the look and feel of rice. (Lillooet peeps: you can pick some up at KC Health) If you are watching your diet (Hello! It's New Year's resolution time!) then konjac rice (and pasta) makes a wonderful substitute. I mean half the bag - which is about 3/4 cup - is only 15 calories. Whaat whaat!


For a serving of the Rajma Masala (1/3rd of the recipe) with 1/2 a pack of the konjac rice  it is: 
246 calories, 44 carbs, 2 fat, 17 protein, 15 fiber.
(For JUST the rajma masala - 231 calories, 40 carbs, 2 fat, 16 protein, 10 fibre)
How amazing is that? 


Rajma Masala

Ingredients
1 can (540 ml) red kidney beans, rinsed and drained
1 cup red onion, diced
1 tsp ginger, minced
5 cloves garlic, minced
2 Tbsp chopped green chilies 
1 cup roma tomatoes, diced
1/2 Tbsp cumin seeds
1/2 tsp garam masala
pinch cayenne
salt and pepper
pinch coriander
1/2 tsp mustard seeds
1/2 tsp tumeric
1 bay leaf
4 cups water
1/3 cup Greek yogurt

Garnish (optional)
fresh or dried coriander

Directions
Place all of the ingredients - except for water and yogurt - into a large pot. 


Gently stir in 4 cups of water. 


Bring to a boil over high heat. 
Reduce heat, cover and simmer for 2 hours - stirring 2 or 3 times to ensure nothing is sticking to the bottom of the pot.
After 2 hours, remove about half of the mixture to a blender or food processor and process until smooth. Return this to the pot. Simmer, uncovered, for a further hour - until thickened, stirring every few minutes to ensure it doesn't burn. 


When it reaches your desired thickness remove from heat and let sit for 10 minutes. After 10 minutes stir in the yogurt. Stir in well. Serve hot with rice. Garnish with coriander, if desired. 


From what I've read online, rajma masala is usually prepared in a pressure cooker or for 8 or more hours in a crock pot to ensure a creamy, tender dish. I've cut the time considerably by blending half the dish at the 2 hour mark. Again, this version is not a traditional rajma masala. 
If you prefer a spicier meal then throw in more green chilies or more cayenne pepper. As it is, it is fairly mild - which is how I like it!! :)
FYI - this is gluten free and vegetarian. You can make it vegan by swapping out the yogurt for coconut milk.