Thursday, May 30, 2019

Rhubarb Fritters


We all know apple fritters are pretty much magic. (Check out our Apple Fritter recipe HERE!) 
But did you know rhubarb fritters are even better? 
It's true.
I mean... unless you don't like rhubarb, in which case you're going to disagree *sigh*.
Rhubarb fritters are tangy and crunchy AND sweet and squishy. They are all the things. 
All. Of. Them.
Yeast dough always takes a bit of time to prepare but the end results are so worth it!
Deep fried dough and fruit (although technically rhubarb is a veggie) is on the top of the Best Treats In The World list, or at least it should be. 
Did you know rhubarb was a vegetable? It's true. See.... these must be healthy then... *cough cough*


Rhubarb Fritters

Ingredients
Dough
4 - 5 cups flour (separated)
1/4 tsp baking soda
1 tsp salt
pinch nutmeg
1 cup warm buttermilk
1/4 cup melted butter
2 eggs
1/2 cup sugar
1 Tbsp yeast

Rhubarb Filling
3 cups finely diced rhubarb
1/2 cup sugar
3 Tbsp lemon juice
pinch salt

Oil for deep frying (about 1 liter)

Glaze
Liquid from rhubarb filling (above)
2 cups icing sugar
a bit more lemon juice (if needed)

Directions
Prepare dough - Whisk together 2 cups flour, baking soda, salt, and nutmeg. Set aside.
In the bowl of a stand mixer add: buttermilk, butter, eggs, sugar, and yeast. Whisk on low for 1 minute. Add in the dry ingredients and whisk another minute. Switch to dough hook - add enough flour (up to about 1 1/2 cups) to form a dough that is not sticky. 
Knead dough for 5 minutes. Place in an oiled bowl, cover, place somewhere warm to rise for 1 to 1 1/2 hours. 
While dough is rising, prepare rhubarb - place finely diced rhubarb, sugar, lemon juice, and salt in a bowl and let sit for at least an hour to release the juices. 
After dough has doubled in size - Roll out to about a 1/2 inch thick rectangle. 
Drain the rhubarb (RESERVE THE LIQUID FOR THE GLAZE). 
Spread the rhubarb on half of the dough.


Fold the dough to cover the rhubarb and roll with a rolling pin to flatten. 


Cut dough into 20 pieces. Try to get them as equal as possible. 


Take each piece, give it a good twist, and then flatten it in your hands. Things will get a little messy at this point. Place each twisted and flattened piece on a piece of parchment paper on a cookie sheet. (NOTE - I like to cut the parchment paper into individual pieces so it is easier to move the fritters for deep frying. They can get a bit sticky!)


Cover with a clean tea towel, place somewhere warm, and let rise another hour. 
During the last 15 minutes of rise time, heat your oil to 350. Place a wire rack or some paper towel down so you are ready once you start deep frying. 
You should also prepare your glaze at this point as well. Whisk together the reserved liquid and the icing sugar. Add in a little more lemon juice if needed to get to a "glue-like" consistency. 
When your oil is at 350, (use a thermometer for most accurate results. If your oil gets too hot your fritters will burn on the outside and be raw on the inside. Too cool and your fritters absorb too much oil) carefully lower 3 or 4 fritters into the oil at a time. Fry for about 1 minute on each side - until golden brown.


Remove from heat and place on wire rack or paper towel to drain excess oil. Repeat with remaining fritters. 
While fritters are still warm, dip each one into the glaze, then turn over and let excess glaze run off. 


Enjoy warm or room temp. Or, if you're one of those people, even chilled. 


They are soooo fluffy with that hint of chewiness on the outside. Check out the insides...


The rhubarb isn't cooked beforehand so it stays fairly crunchy. It's a nice surprise to get that bit of texture in there with all that fluffiness.
This recipe should make you about 20 palm-of-your-hand sized fritters. Be prepared to have to make even more. Once people taste these they'll be back for more.

Tuesday, May 28, 2019

Macarons (Peanut Butter Cup and Lemon)


My foray into the world of macarons was very stressful. Macarons (not to be confused with macaroons, totally different cookie) are notoriously tricky to make. You can go from beautiful to what-even-is-that simply by stirring too many times. 
*sigh*
They are not impossible but they are one of the most difficult and unpredictable things I have ever made. I'm sharing my chocolate macarons and lemon macarons here because I seem to have the most success with them. 
I've also tried cinnamon bun macarons and bailey's and coffee macarons.


Above is the cinnamon bun macarons. Filled with cream cheese, yum! (You can see that the "feet" did not properly form on these ones)


My first attempt was the Bailey's and coffee. Tasted great but did not look very macaron-y. The "feet" did not really form at all and they were very pointy. 


If you've never made macarons but want to try I would definitely recommend searching how-to videos on Pinterest and Youtube. Watching the videos and getting a good visual on what they are supposed to look like is important. 
Also, my directions are going to be just basic directions. If you are looking for more in depth instruction, be sure to do some Googling! 
Are they worth it though? Yes. The texture and flavor are super-de-duper amazing and like nothing else you can make. Be prepared to make more than one batch. 


Peanut Butter Cup Macarons

Ingredients
Cookie
2 cup icing sugar
1 cup almond flour
1/2 cup baking cocoa powder
4 egg whites
1/2 cup sugar (granulated)

Filling
1/2 cup peanut butter
6 Tbsp icing sugar
1 Tbsp coconut oil
1 Tbsp milk (or almond milk)

Directions
Preheat oven to 325. Line a large baking sheet with parchment paper, set aside.
In a food processor (or blender), combine icing sugar, almond flour, and cocoa powder. Process until very fine. Sift into a large bowl. 
In a stand mixer, beat egg whites using the whisk on medium speed until light and frothy. Reduce speed to low and slowly add in sugar. Increase speed to high and beat until stiff peaks form. Be patient, it will take a few minutes. 
Add the dry ingredients to the egg whites and gently fold in using a spatula. Once ingredients are combined, fold for just another few turns of the wrist. **Be careful, this is where things can go wrong. Under mix and you will have pointy shells, over mix and you will have a soupy mess.**
Transfer to a piping bag and carefully pipe mixture onto prepared baking sheet about an inch apart. 
Tap the sheet on the counter several times to remove any air from the cookies. Let sit for 30 minutes, until tops are glossy and smooth to touch. (They should be dry!)
IMPORTANT - do not skip tapping the the sheets on the counter or letting them sit out. 
Bake at 325 until just set, about 10 - 12 minutes. 


Cool completely before filling.
Prepare peanut butter filling - beat together the filling ingredients until smooth. Pipe a small amount onto the flat surface of one of the macarons, lightly press the flat surface of another macaron on top. Note - they are quite fragile so be sure to do this carefully!


The lemon macarons are very similar. 


Lemon Macarons

Ingredients
1 cup almond flour
3/4 cup icing sugar
2 egg whites
1/4 tsp cream of tartar
1/4 cup sugar
1 tsp lemon zest
1 tsp lemon extract
yellow food gel coloring

Filling
1/4 cup butter
1 cup icing sugar
2 tsp cream (or milk)
1 Tbsp lemon juice
1/2 tsp lemon extract

Directions
Line a large cookie sheet with parchment paper (or silpat), set aside.
Preheat oven to 300.
Sift together the almond flour and icing sugar, twice. Set aside.
In a stand mixer, beat egg whites using the whisk on medium speed until light and frothy. Add in the cream of tartar. Reduce speed to low and slowly add in sugar. Increase speed to high and beat until stiff peaks form. Add in the lemon zest, extract, and food coloring. 
Add the dry ingredients to the egg whites and gently fold in using a spatula. Once ingredients are combined, fold for just another few turns of the wrist. **Be careful, this is where things can go wrong. Under mix and you will have pointy shells, over mix and you will have a soupy mess.**
Transfer to a piping bag and carefully pipe mixture onto prepared baking sheet about an inch apart. 
Tap the sheet on the counter several times to remove any air from the cookies. Let sit for 30 minutes, until tops are glossy and smooth to touch. (They should be dry!) (FYI - If it is humid this can take as long as an hour.)
IMPORTANT - do not skip tapping the the sheets on the counter or letting them sit out. 


 Bake at 300 for 18 - 20 minutes. 
Transfer to wire rack and cool at least 15 minutes before removing. 
Prepare filling - beat together the filling ingredients until smooth. Pipe a small amount onto the flat surface of one of the macarons, lightly press the flat surface of another macaron on top. Note - they are quite fragile so be sure to do this carefully! 


Macarons are best eaten the next day. They can be stored in an airtight container in the fridge for about 5 days. They also freeze very well. 
If you read through both the above recipes you can see that they are a bit different. In ingredients and in method. I'm not sure which is my favorite way but they both seem to work pretty good. Sifting can be a pain in the butt and is probably what takes the longest to make these. 


From top to bottom: bailey's and coffee, peanut butter cup, lemon, and cinnamon bun. 


One of the nice things about macarons is that your flavor combos are limitless. 
I'm going to try again with some new flavors. 
Practice, practice, practice. 


I ended up sharing my trials with the local hospital and medical clinic. Sue and I wanted to thank the nurses and doctors and administrators for all the hard work they do. 
Need an idea for something a little different for a bake sale? Macarons sell like crazy. 
Because they taste even better the next day, they are great for gifting to people too!

Sunday, May 26, 2019

Keto Scalloped Daikon (Scalloped Fauxtatoes)


I don't really eat a lot of daikon radishes. In fact, I've probably only ever eaten them a handful of times. But then I discovered that you can use daikon radishes in place of potatoes in a lot of dishes to make them more keto friendly so have been eating them a lot more often. I mean, look at the photos here. Totally looks like scalloped potatoes. Except for a very slight texture difference you would never know they weren't potatoes in this dish. 
According to MyFitnessPal one serving (recipe makes 4) is: 427 calories, 34 fat, 12 carbs, 4 fiber, 7 sugar, and 18 protein. That's about 8 net carbs. 
Dishes like this one definitely make following a keto eating plan easier. 


Keto Scalloped Daikon (Scalloped Faux-tatoes)

Ingredients
1 lb daikon radish, thinly sliced
2 cups chicken broth
2 cups water
2 Tbsp butter
2 Tbsp almond flour
3/4 cup whipping cream (heavy cream)
1 1/2 cups cheddar cheese, shredded
salt & pepper
4 pieces cooked and crumbled bacon
dash of paprika

Directions
Preheat oven to 375. 
Boil the sliced radish slices in the 2 cups of broth and 2 cups of water for 8 - 10 minutes, until fork tender. Drain and set aside.


In a saucepan, melt butter and whisk in almond flour. Slowly add in cream, lower heat, and simmer for 5 minutes. Remove from heat and stir in half the cheese until smooth and melted. Season with salt and pepper. 
In an 8 X 8 pan: Spread a generous spoonful of the cheese sauce over the bottom of the pan.


 Layer half of the radish slices, half of the remaining cheese, and half of the cheese sauce. 
Top with remaining radish slices, cheese sauce, and bacon. 
Sprinkle with the last of the cheese and paprika. 


Bake at 375 for 20 - 30 minutes, until bubbly. Remove from heat and let sit for 3 - 4 minutes before serving.


One serving is a quarter of the pan. 


I had mine with a few slices of ham and it was soooo good. 
If you didn't tell anyone it wasn't potatoes, they'd never know. It does have a little texture difference but, seriously, you'll fool the pickiest of eaters. 
Following a keto / low carb diet? You'll want to give this a try. 
Like foods that trick your brain? You'll want to give this a try. 
Enjoy delicious vegetable dishes? Definitely give this a try! 

Wednesday, May 22, 2019

Hokkaido Milk Buns


I've made a lot of bread in my baking lifetime. A TON. But never have I made a bun that was this amazing. 
High praise, right?
It's totally worthy. 
These are the fluffiest, tastiest, softest, squishiest buns in the history of the world. Probably. I mean... I haven't eaten every bun ever... but I've eaten a LOT of bread so I'm kind of an expert so I'm making the call. 
It's made with a process called tangzhong - which basically means water-roux. It takes a few more minutes but I will be making all my bread using this method from now on. 
It's magic. For real though. 
I'm a total newbie to this so I would suggest doing your own research on Pinterest and Google, watch a few videos so you get the gist of it, and then give it a go. It's not at all hard! 
My next project is to make cinnamon buns with this recipe. #soexcited
(FYI - I've not credited any particular site for this recipe as it is everywhere and has been around forever. I am not the inventor of this recipe but I am sharing my version of it!) 
Also: I should add that you need to use bread flour and not all purpose for this recipe. It won't work nearly as well with all purpose! 


Hokkaido Milk Buns

Ingredients
Tangzhong
6 Tbsp water
6 Tbsp milk
4 Tbsp bread flour

Dough
5 cups bread flour
4 Tbsp dry milk powder
1/2 cup sugar
2 tsp salt
2 Tbsp instant yeast (Rapid Rise)
1 cup warm milk
2 eggs
1/2 cup melted butter

Egg Wash
1 egg
1 Tbsp heavy cream

Honey Butter
1/4 cup honey
1/2 cup butter, soft
generous pinch cinnamon

Directions
Make the tangzhong - combine water, milk, and bread flour in a pan over medium - low heat, whisking until smooth. Cook and stir constantly until lines are left when you drag the spoon through the pan, about 3 - 5 minutes. (A roux that is fairly loose)
Transfer to a bowl, cover with plastic wrap directly on surface, and put in fridge while you prepare the dough.


Prepare dough - In the bowl of a stand mixer: whisk bread flour, milk powder, sugar, salt, and yeast. In a separate bowl - whisk together warm milk, eggs, melted butter, and the cooled tangzhong (it's okay if it's still a little warm). 
Pour the wet ingredients into the dry ingredients and turn stand mixer on low for 2 minutes (using dough hook). Increase to medium and knead for 10 - 20 minutes, until dough is shiny and no longer sticky. It will be a bit tacky, but not sticky. (NOTE - I ended up adding a few spoonfuls of warm water because I found my dough was really dry. Make sure you give it about 5 minutes before adding any additional ingredients because it takes a while to come together. Don't be tempted to add more flour until almost done kneading and only if your dough is still really sticky.)
NOTE - it will take at least 10 minutes up to 20 minutes. Seriously. Let the machine do the work. 
Lightly oil a bowl and place the dough in it.


Cover and place in a warm spot to rise for about an hour to an hour and a half. 
Prepare 2 - 10 X 10 (or you can use 9 X 9, you will have to adjust your cooking time) pans by greasing the bottoms with butter. Set aside. 


Once the dough has doubled, place it on a work surface. (You shouldn't need to put flour down, the dough shouldn't be too sticky.)
Roll to a 9 X 18 rectangle. Cut into 18 roughly equal sized pieces. Roll the pieces into smooth balls and place 9 balls in each of the prepared pans.


Cover and let rise in a warm place for another hour. During the last 15 minutes of rise time, preheat the oven to 350. The buns are ready when they have doubled in size. 


Prepare the egg wash by whisking together the egg and heavy cream. Using a basting or pastry brush, gently brush the egg wash on the tops of the buns. 


Bake at 350 until golden brown, about 20 - 25 minutes. (If you use a thermometer to check your bread, it should read 190)


Let cool for about 10 minutes before trying to remove them from the pan. You can flip them out but I should warn you - they are so soft and squishy that flipping them does squish the tops a little. I found cutting them out, one at a time, saved the smoothness. Of course, flipping them only does a little cosmetic damage and does not really do anything to them. 


I served them with a little honey butter. Optional, but a fabulous idea. 
To prepare the honey butter all you have to do is whip together the honey, butter, and pinch of cinnamon until fluffy. 


Guys... the pictures do not do it justice. They are so squishy. Not to mention the amazing flavor that the dry milk powder adds. I could eat all of them. Right now. Somebody stop me. 
Anyhoo... I'm not sure how I missed out on the tangzhong method for so long but now that I know about it.... everything is getting tangzhong-ed. 
I cannot wait to try cinnamon rolls with this recipe. 
I almost forgot! The buns are super shiny at the end because when they came out of the oven I brushed them with a little melted butter. This is optional but will make your buns nice and glossy and will also help to soften up the top crust even more. 

Tuesday, May 21, 2019

Roast Boneless Leg Of Lamb


We normally don't get to eat lamb around our house. It's usually too expensive and our local grocery store doesn't often carry it. This Easter they had a pretty good sale on leg of lamb so I decided to give it a try. 
I love the simplicity of this recipe. It has an enormous amount of flavor without overwhelming the taste of the lamb. It only takes about 5 minutes to prep and then you pop it in the oven for just over an hour. That's it. Easy peasy, no muss-no fuss, yet you end up with a dish you could serve even the most discerning of guests. 
I would suggest you do your own bit of research on the exact way to cook lamb. I am no expert by any means, and the information I found varied widely. Cook at 425, cook at 350, cook 15 minutes per lb, cook 30 minutes per lb. What the heck?! 
You can try it as I have done here, of course, but it never hurts to be fully informed! 
I cooked our lamb to between 135 - 140 degrees (medium) and it was perfect IMO.
Definitely invest in a meat thermometer. It makes things so much easier (and accurate!). 


Roast Boneless Leg Of Lamb

Ingredients
5 cloves garlic, minced
2 Tbsp lemon juice, freshly squeezed
3 Tbsp dried rosemary (or fresh)
1 Tbsp prepared mustard
2 tsp olive oil
1 tsp salt
1/4 tsp pepper

5 - 6 lb boneless leg of lamb

Directions
Preheat oven to 375. 
Mix together garlic, lemon juice, rosemary, mustard, oil, and salt & pepper. Rub all over the lamb. Place in roasting dish.


Roast, uncovered, at 375 for 70 - 90 minutes. Temperature of lamb should be between 135 - 140 for medium. When up to temperature, remove from heat and let rest for 10 minutes.


Place on cutting board...


Admire how beautiful it looks....


Slice and serve. 


That color though.... 


How easy was that?
You could do up some mashed potatoes and gravy or rice to go along. We opted for some steamed veggies and raw veggies for a more colorful plate. 
I'm hoping lamb goes on sale again soon. I'm hooked. 

Saturday, May 18, 2019

Big Batch Strawberry Shortcake Donuts


Want to know what's a good idea? 
Making a glazed donut the base for strawberry shortcake. It's a genius idea, in fact. 
Strawberry shortcake is one of my favorite desserts... I generally like it on a biscuit base but won't say no if it's served on angel food cake or a vanilla cake. I have been making A LOT of donuts lately and I had a light bulb moment where I thought, "how amazing would these glazed donuts be with strawberries and whipped cream?" 
Of course the internet was there to let me know that I was not the first person to think of this. I just want to know; if so many people have already had this idea, why weren't they telling me about it? 
*geeeeez*
Anyway, this is my version of a strawberry shortcake doughnut and I'm in love. The airy texture of the donut works sooooo well for shortcake. Imagine peach shortcake or blueberry shortcake or even pineapple shortcake. 
So. Many. Possibilities. 


Big Batch Strawberry Shortcake Donuts

Ingredients
8 cups heavy cream (2 liters) (Whipping cream)
4 tsp vanilla
5 large containers of strawberries

Glaze
2 cups icing sugar
1 tsp vanilla
1/4 cup milk

Directions
Prepare donuts - Prepare dough according to recipe. Let rise for an hour. Roll out to about 1/4 to 1/2 inch thick. Cut out with cookie or biscuit cutters, then cut out the centers with a smaller cookie or biscuit cutter. Place on a cookie sheet lined with parchment paper. (NOTE - to make things easier I always cut the parchment paper into individual pieces. This makes it much easier to place the donuts in the oil for cooking). Cover and let rise again. 


Heat your oil in a large pot to 350 (use a thermometer for best results). 
Cook donuts 3 or 4 at a time in oil, about one minute per side, until golden brown. Remove from oil with a slotted spoon and place on wire cooling rack OR directly on paper towel to drain off excess oil. 


Prepare the glaze - whisk together icing sugar, vanilla, and milk until the texture of thin glue. (You made need to add more icing sugar or more milk to get to the right consistency.) Dip each donut into the glaze. Let cool completely so glaze hardens a bit and is not so sticky. Cut the donuts in half horizontally with a serrated knife. (NOTE - be careful not to squish the donuts or hold the tops so the glaze gets rubbed off!)


Whip the cream with the vanilla to stiff peaks. (NOTE - to make things easier I beat 2 cups of cream with 1 tsp of vanilla at a time.)
Hull and slice your strawberries. 


Prepare shortcake - Place the bottom of a donut on a serving plate. Top with a generous scoop of whipped cream. (I used a large cookie scoop full. About 1/4 cup)


Top with a scoop of strawberries. (I used 1/3 cup measuring cup as a scoop for this.)


Top with another scoop of whipped cream. (Again, I used a large cookie scoop {about 1/4 cup} for this). Then place the top of the donut on top. Squish it down gently and then place a slice of strawberry on top. 


Serve immediately or chill, covered, until ready to serve. (You don't want to make them up too far ahead of time as they may get soggy. You can make up the separate components ahead of time and then just assemble the shortcake when ready to serve.) 
One recipe should yield between 25 - 30 donuts which makes this a fabulous recipe for a fundraiser or family reunion. I made them for a mother's day get together...


I just put them in disposable soup containers that had lids, which worked great. I made 2 batches and ended up with 60 shortcakes. (FYI - to get 60 I used 4 liters of whipped cream and 10 containers of strawberries.) 
Of course, you could use bought donuts to make this wonderful dessert but our Kilkenny Glazed Donuts are so fluffy and tasty that making them is totally worth the extra effort. The only thing we changed from the original recipe is the glaze. We didn't use the original beer glaze, instead went with a simple vanilla glaze so the flavor of the strawberries can shine through. 


You could also half the recipe if you only wanted to make 12 - 15 donuts. It's pretty forgiving. 
Strawberry shortcake on donuts is the new food trend. I'm making it happen. 
Who's with me? 

UPDATE: 
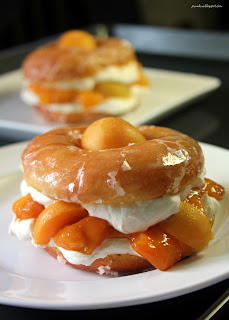
Guuuuuys! Just wanted you to know that this is amazing with apricots as well! 


I just cooked a few down on the stove top for about 5 minutes, let that cool down a bit, and then threw in a a bunch more that I chopped up so there was bigger pieces as well. 


Imagine all the possibilities for this! #ImExcited