Saturday, April 30, 2016

People Sliders


Why am I posting a spooooky Halloween-ish recipe in the spring, you may ask. 
Well, truth is I completely forgot about this adorable little monster until going through my old photos. 
Once I saw him again I knew I had to post the recipe before I forgot about it again!!
I mean... you can eat people sliders all year long. You don't have to wait for Halloween. These would be perfect for a monster party.
Plus... they are vegetarian so you aren't even eating any meat. (Pssst - it's beets. For real.)
No people were harmed in the making of these burgers, I promise.


People Sliders (or Monster Burgers)

Ingredients
Ingredients for our Easy Bread Dough
1 cup shredded jalapeno jack cheese (optional)

Ingredients for our Beet And Quinoa Burgers

sesame seeds
poppy seeds
white cheese
mustard
slivered almonds
blue food coloring or edible ink

Directions
Make slider buns - Prepare dough as per link HERE, (remembering to add the 1 cup of shredded jalapeno jack cheese, if desired.) up to the point where you let the dough rest for 15 minutes. 
After dough has rested, roll into slider sized buns, just a little larger than a golf ball. Place several inches apart on a cookie sheet lined with parchment paper. Sprinkle with sesame seeds and poppy seeds. Cover and place in a warm place to rise for about an hour. 


Preheat oven to 375. 
After dough has risen, bake at 375 until tops are brown and dough is cooked through, about 20 - 30 minutes - keep an eye on it.


Let cool. (Note - sliders can be made ahead of time and frozen until needed.)
Prepare people patties as per recipe HERE. Instead of forming into "regular" hamburger patty shapes, simply use a gingerbread man cookie cutter as a form to make your people patties. 
Try to use a cookie cutter a little smaller than your slider buns so the people fit in the mouths of the monsters. 


These can also be  made up a little ahead of time and kept, covered, in the fridge for a day. 
When ready to cook, simply preheat your oven to 400. 
Place people patties on a parchment paper lined cookie tray, and bake for 10 minutes. Very carefully flip the patties over and continue to bake at 400 for another 10 - 15 minutes.
Remove from oven and serve hot on slider buns. 


Decorate the buns with cheese cut into circles for eyes. The pupils are blue food coloring but you could easily use edible food pens. 


You can use slivered almonds for teeth, if you like. And a little mustard for "x"s for eyes. 


You can cut a slice of cheese to look like teeth.


Or stick a couple of thin cheese triangles on for fangs, using a teeny bit of mustard as the "glue". 
I made the slider buns from scratch as, living in the small town of Lillooet, we don't have access to store bought ones. If you have them available to you then by all means you can pick up a pack of tiny slider buns and save yourself the work of homemade bread (although, it does make them tastier, IMO). 

Tuesday, April 26, 2016

Basbousa


I've been looking for Egyptian and Middle Eastern sweets recently to make for new doctors at my work place. I figured I had better practice a few times before making it for them to make sure I could prepare the recipes properly. 
Turns out this was a fabulous idea. 
Practice makes perfect, am I right?
Practice also means eating a lot of delicious treats because, well, quality control obviously. 
Basbousa is my new favorite and NOT just because it's really fun to say. The semolina flour makes for a wonderfully different texture. Plus... it's really easy and quick to whip up which makes me love it even more.


Basbousa
(Ever so slightly adapted from SBS Food) 

Ingredients
2 1/2 cups coarse semolina
1 cup finely shredded coconut
1 cup caster sugar
1/2 cup AP flour
1 tsp baking powder
pinch salt
1 cup Greek yogurt
1 cup butter, melted
1 tsp vanilla
blanched almonds

Syrup
1 1/2 cups sugar
1 cup water
1 tsp lemon juice
1/4 tsp almond extract

Directions
Preheat oven to 375. Line a 9 X 13 pan (or large round tart pan) with parchment paper, set aside.
In a mixing bowl, stir together semolina, coconut, caster sugar, flour, baking powder, and salt. 
In a smaller bowl, whisk together yogurt, butter, and vanilla.


Stir the wet ingredients into the dry ingredients until well mixed - if it is too dry and crumbly then stir in a bit of milk to bring it together - it should be quite stiff (almost like a cookie dough rather than a cake batter). 


Press it into the prepared 9 X 13 pan (or tart pan). Score squares or diamonds into the dough, pressing very firmly. Top each square (or diamond) with a blanched almond, pressing in firmly.


Bake at 375 for approx 35 - 40 minutes, until top is golden brown. 
Before removing from oven, prepare syrup. 
Prepare syrup - In a medium saucepan over medium high heat, stir together the sugar and water until sugar is dissolved. Stop stirring and let come to a boil. Simmer for 5 minutes.
Remove from heat, stir in the lemon juice and almond extract. 
Remove cake from oven and place on wire rack. Gently cut along the scored lines while the cake is still in the pan. (DO NOT remove the cake from the pan at this point!)


Slowly drizzle or spoon the hot syrup over the hot cake. It may seem like a lot of syrup but the cake will soak it all up.


Let cool completely. (I find letting it come to room temp then covering it and placing it in the fridge overnight is the best but a couple of hours of soaking in the syrup will also work.)


Once it has sat you can simply run a knife along the score lines again and serve.


A couple of notes - the original version calls for 1 tsp of rosewater in the syrup. Living in a small town I don't have access to this so I subbed in the small amount of almond extract after researching what some good subs would be. Next trip to the city I am picking up some rosewater to try this with. I imagine it would taste that much more authentic!
Also - the caster sugar that is called for in the cake is different than regular white sugar. You can buy it (if you don't live in Lillooet because, why would that be available in Lillooet? *sigh*) OR you can make it yourself VERY VERY VERY easily. Simply place 1 cup of regular white sugar into a blender and pulse until it is fine - 30 seconds of pulsing should about do it. *Voila* substitute caster sugar. It really does make a difference in the cake. 


Be sure to pop by Carole's Chatter for more fun and tasty links! 

Sunday, April 24, 2016

Easy Parchment Fillets


Boy, life sure gets a little crazy sometimes!
It's been almost 2 weeks since our last blog post! We usually never go that long between posts but, as I said, life can be a little crazy sometimes. This is one of those meals that is perfect for when you just can't seem to find any time but still want something delicious, nutritious, and filling. 
The entire meals is ready in about 30 minutes.
*Win*


Easy Parchment Fillets

Ingredients
2 tsp oil
1 small carrot, thinly sliced
1 red pepper, thinly sliced
3 button mushrooms, sliced
salt and pepper
1 tsp soy sauce
3 Basa fillets (or your favorite fish)

Sauce
4 Tbsp whipping cream
1/2 tsp dill
1 Tbsp lemon juice
1 Tbsp white wine

Directions
Preheat oven to 400. 
In a medium frying pan, heat the olive oil and add carrot, pepper, and mushrooms. Saute for 2 - 3 minutes, adding salt and pepper and soy sauce. Remove from heat when veggies are almost completely cooked. Set aside.


In a small bowl, whisk together cream, dill, lemon juice, and wine. 
Divide the vegetables evenly among 3 parchment envelopes (I used Culinary Parchment Cooking Bags) 


Place a fish fillet on top of the veggies in each bag. Top with 1/3 of the sauce.


Close the parchment bags (by folding 2 or 3 times) and place on a cookie sheet. 
Bake at 400 for 10 - 15 minutes, until fish is cooked through. 
Cut bag open to remove the fish and veggies.


If you want to prepare the green beans and potatoes, as in the above meal, then just prep them before you start the fish. I cleaned them, cut them, and got the water boiling on the stove and then started the fish. By the time the fish was done the veggies were also done. 
Potatoes take about 15 - 20 minutes to boil, green beans about 10 minutes - so start the potatoes first. If they are done before the fish, simply drain and cover the pot and keep it on the stove top to keep warm. If the fish is done before the veggies - simply shut off the stove and keep the fish warm until the veggies are cooked. 


Easy, healthy, delicious. 
You can also reserve some of the sauce to drizzle on top of the fish before serving for an extra boost of flavor. 
 
Be sure to stop by Carole's Chatter for tons of tasty links!

Saturday, April 9, 2016

Cinnamon Bun Ice Cream Sandwiches


I have the easiest and most delicious treat for you to make. 
Like.... sooooooooooooo easy. 
Like..... 2 ingredients easy.
Like....... why-haven't-I-been-making-this-all-my-life easy. 
Treats for dad on Father's Day just got a heck of a lot easier!! (You'll definitely be "the favorite"!) 
Cinnamon Bun Ice Cream Sammies (Sammiches?). I'm not even going to call this a "recipe" because it's not really. It's two amazing things squished together to become another amazing thing. 
We're having a yard clean up to help our mom and dad so I whipped these up for treats for our volunteers. It probably took me about an hour from start to finish. Not too shabby at all!


Cinnamon Bun Ice Cream Sandwiches

Ingredients
1 container Vanilla Bean Ice Cream 
(about 4 - 6 cups, depending on how much you put on)

Directions
Preheat oven to 350. Line a cookie sheet with parchment paper or silpat baking mat. 
Remove Grands rolls and place on cookie tray. 


Bake for approx 20 - 25 minutes, until golden brown.


Let cool completely. (Can be placed in freezer to speed up process)
When cool, cut the cinnamon buns in half horizontally.


Remove the ice cream from the freezer and let soften. This takes about 10 minutes or so. 
Scoop a generous amount of ice cream in to the bottom half of the cinnamon bun and spread to edges. 


Continue with all the buns. You should have 10 buns in total. 
Top with the top half of the bun and press down firmly.


You can either serve them now (totally my favorite way!) ....


Or return them to the freezer until ready to eat.


If you are freezing them for later you can wrap each one individually in plastic wrap and they will keep longer. When you want to eat them just let them sit for a few minutes to soften up and you are good to go!
Easy peasy, am I right? 


Looking for tons more fun and tasty links? Pop over to Carole's Chatter! We're sharing at her linky party. 

PB2 and Chocolate Skinny Shake


I had been reading about PB2 online for quite a while but never was able to find it. One of the benefits of living in a small town. Anyway, on a recent trip to the city I stumbled across some PB2 and decided to buy it.
For a peanut butter addict like myself PB2 is a fantabulous alternative. They basically take peanut butter and suck the oil out of it so it is powdered. Peanut butter flavor with way less calories and fat.What's not to love?
I am soooo happy I decided to try it. I love it in shakes and oatmeal. 
The recipe I am sharing here is a peanut butter and chocolate explosion that comes in at about 300 calories. (According to Myfitnesspal - Calories, 301, Carbs 40, Fat 6, Protein 25, Fiber 7) That's for the whole recipe, it is a single serving!


PB2 and Chocolate Skinny Shake

Ingredients
1/2 cup 0 fat Greek yogurt, plain
1 pkg Stevia 
3 Tbsp PB2
1 tsp baking cocoa
2 Tbsp quick oats
1/2 banana, sliced
1/2 tsp mini chocolate chips
1/3 cup 1% milk
1/2 tsp mini chocolate chips

Directions
Mix together the Greek yogurt, Stevia, PB2, cocoa, quick oats, 1/2 a banana, and the first 1/2 tsp of mini chocolate chips.


Freeze until firm - I usually make it up at night so it is good for my breakfast in the morning.
When frozen, place in blender or food processor. Add in 1/3 cup milk and process until smooth. You may need to add in a bit more milk (or you can use water) to get it to your desired consistency. 
Pour into serving glass and top with remaining mini chips. (You can also use a Tbsp of Fat Free Cool Whip to make it look fancy schmancy without adding very many more calories.)


I like mine really thick so it feels like a real chocolate peanut butter milkshake so I can eat it with a spoon but you can definitely thin it out if you want it to be more "smoothie" like. 


300 calorie, protein filled breakfast that feels like you are having dessert! 
I often have it for dinner if I can't decide what to have. I make up several in advance in Ziplock baggies so they are frozen when I want them. 

Saturday, April 2, 2016

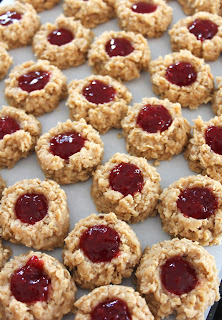
No Bake PB&J Cookies


I admit it. 
I love to eat cookies but they can be such a pain in the patootie to make. I mean there is all that waiting between cooking and switching cookie sheets and scooping and it just seems to go on forever. 
Is it worth the effort? 
Well... d'uh. Of course. I mean. COOKIES. 
But with these no bake cookies you can have all the deliciousness of cookies without the stupid waiting to cook time. 
Boil it, stir it, scoop it, fill it. Done. AND they look pretty. Not like lumps of yuck like some no bake cookies. 


No Bake PB&J Cookies

Ingredients
3 cups sugar
3/4 cup milk
3/4 cup butter
1 tsp vanilla
1 1/2 cups peanut butter
4 1/2 cups quick oats

Filling
approx 1 cup of your favorite jam (I used strawberry)

Directions
Line a cookie sheet with parchment paper, set aside. 
In a large saucepan, place sugar, milk, and butter. Cook and stir over medium heat until mixture comes to a full rolling boil that can't be stirred down. Boil for one minute. 
Remove from heat and add in vanilla and peanut butter.


Stir until smooth. 
Stir in the oats and mix well.


Using a medium cookie scoop (or large spoon), scoop cookie dough onto prepared cookie sheet (they can be fairly close together as they won't spread at all). When all the dough has been scooped - use a the back of a teaspoon or something small and round (like the tip of your baby finger), and press an indent into each mound. **NOTE** - you will need to scoop and indent the cookies before the cookie dough cools off so will need to work fairly quickly. 


Let set for about 10 - 15 minutes. 
Fill each indent with 1/4 to 1/2 tsp of jam.


Let cool completely. Cookies can be placed in fridge to chill for 15 - 20 minutes to speed this up. 


I believe I got 5 dozen or so cookies out of one batch using a medium cookie scoop. You can store the cookies in a covered container for several days. If you decide to store them in the fridge just remember to let them come back to room temp before serving or they will be crumbly. I found at room temp was just fine.