Tuesday, January 31, 2012

French Onion Soup


I give Sue props for coming up with and creating some amazingly delicious dishes. She is a super-de-duper cook/baker/kitchen wizard.
What she is not as good at is photographing her creations.
*sigh*
Her photos of her French Onion Soup just do not do it justice.
It makes me sad.
*siiiiiiiiiiiiiiiigh*
Oh well, until she invites me down for dinner when she is serving these amazing things, we will have to suffer with her room-for-improvement photography skills.


French Onion Soup

Ingredients
1/4 cup butter
3 medium white onions, sliced
3 14 oz cans beef broth
1/2 tsp salt
1/4 tsp garlic powder
3 Tbsp grated Parmesan cheese
 6 - 8 slices French bread (baguette)
1 bag of Kraft Italiano cheese blend (About 3 - 4 cups)

Directions
Saute onion in melted butter in a large soup pot or saucepan for 30 - 40 minutes, or until onions begin to brown.

Before the cooking begins
After the cooking is done! Quite a difference :)

Add beef broth, salt, and garlic powder to onions. Bring mixture to boil, then reduce heat and simmer, uncovered, for 1 hour. Add the first amount of Parmesan cheese in the last 10 minutes of cooking the soup.
When the soup is done, preheat oven to 350.
Cut French bread into cubes and spread out on cookie sheet. Toast for about 10 minutes, just until they start to brown.

French bread cubed and ready to be spread on the cookie sheet for toasting.

When bread is done, remove from oven and set oven to broil.
Assemble each bowl of soup by spooning about 1 cup of soup into an oven-safe bowl. Sprinkle toasted French bread cubes evenly on top of soup.
Top with a generous 1/2 cup of the Italiano cheese blend.

Yup, that's a lot of cheese!

Place the bowl on a baking sheet and broil for 5 - 6 minutes, until the cheese begins to brown.
Serve hot.

Just a quick note - if you don't buy the Kraft Italiano cheese blend you will want to use:
6 slices Swiss cheese
6 slices mozzarella cheese
 6 Tbsp grated Parmesan cheese
When you get to the cheese part of the directions - layer a slice of Swiss, then mozza, then sprinkle with 1 Tbsp of the Parmesan.


It is one of the best French Onion Soup recipes you will ever taste.
Ever.
Seriously.
Props to Sue. She has mad cooking skillz.
Word.
Now..we just have to work on those picture taking skillz......

Stop by Carol's Chatter for links to tons more onion recipes!

Sunday, January 29, 2012

Healthy Banana Ice Cream


Are you ready? I'm about to blow your mind.
This ice cream.....
The creamy, rich, decadent looking ice cream in the photo above....
Only 1 ingredient.
Yes.
That's what I said.
One.
Ingredient.
Is your mind blown? Are you wondering  - how can that even be possible?
Let me tell you, I was a skeptic. I didn't believe one ingredient could transform into this magical, amazing treat.
In case you didn't guess the ingredient from the title - it's bananas.
Yes.
All you need is bananas.


Healthy Banana Ice Cream

Ingredients
4 medium, ripe-but-not-too-ripe bananas

Directions
Slice bananas into fairly small chunks. Freeze overnight.

Oooooooh, frosty!

Take frozen bananas and place in food processor.

Sorry, it's a little fuzzy...I was excited to get started!

Process until bananas start to look like mashed potatoes.

Okay, still a little lumpy, but we're getting there....

Keep processing until completely smooth. You may have to stop quite often and use a spatula to scrape down the sides and stir the bananas. Don't give up! I was thinking mine wasn't going to work because I was getting impatient and the bananas didn't seem to be getting smooth.... just keep processing and stirring - it will work!

Taaa-daaaah!    *Cue angel's singing*

That's it. That's all you have to do.
Well, except eat it.
Can you believe it's that easy?

My mind was blown when I first saw this on Get Off Your Butt And Bake. I thought - there is no way frozen bananas will be as creamy and rich as ice cream made with cream and sugar and all that good stuff.
I was wrong.
Everyone that tried it thought it was ice cream in the traditional sense. They couldn't guess that it was just bananas.
Oh yeah, want to know how many calories are in a serving of this? (It makes 4 servings by the way)
Google calories in a medium banana.
Yeah, that's right - only 105 calories.

I had some peanut butter cookies laying around so I made Peanut Butter Banana Ice Cream Sandwiches. 
Yeah. I went there. 

Oh yes, I almost forgot.


Adding in some cocoa...


Makes it Banana Chocolate Ice cream!
You can also add in a heaping spoonful of peanut butter if you like, OR some hot fudge sauce. You can get all fancy schmancy and make Peanut Butter Banana Ice Cream, Fudgy Chocolate Banana Ice Cream...if you like!
I didn't......yet....but will definitely be trying this again!

Update: I made Strawberry Banana Ice Cream - my favorite yet!


All I did was throw in a generous handful of frozen straberries at the same time as the frozen bananas. Then, to create the swirl, I used a Tbsp or 2 of Strawberry Jam.....just for an extra hint of strawberry. 

Saturday, January 28, 2012

Slow Cooker Italian Beef Sandwiches


I hate to admit it too often because then she gloats about it forever...but....
Sue is super genius.
*sigh*
I said it now, it's too late to take it back.
Yes, Sue is pretty darn awesome at creating delicious...nay....SUPER delicious dinners.
This dish is one of our nephew, Jordan's, favorites. Sue has to invite him for dinner whenever she makes it.
It is so amazing that I bet you will add it to your family favorites after you try it.
Go ahead.
 I dare you to try this and not love it.
Just promise me you won't tell Sue how extraordinary this is....she'll never let me forget it.


Slow Cooker Italian Beef Sandwiches

Ingredients
3 lb beef roast
3 cups water
1 tsp of each - salt, pepper, oregano, onion powder, and garlic powder
2 pkgs Italian dry salad dressing mix
1 bay leaf
2 cups button mushrooms, sliced
1/2 medium onion, sliced
6 crusty buns
4 - 5 Tbsp garlic butter
1 cup Kraft Italiano cheese blend

Directions
Mix together water, seasonings, dry salad mix, and bay leaf. Heat in microwave for 1 - 2 minutes, just to warm up. Pour over roast and marinate overnight.
Put in slow cooker on low for 6 - 8 hours, until roast is cooked.
Slice roast thinly, or shred with 2 forks if you prefer. Place back in slow cooker in the juices for about another hour.
In a frying pan, fry mushrooms and onions in 1 Tbsp of the garlic butter.
Slice buns in half and butter with garlic butter. (Here is how we make our garlic butter.) Place on a cookie sheet, buttered side up. Stick under the broiler for 1 - 2 minutes. Just long enough to melt the butter and slightly crisp the bread.

Cheese is pretty sparse on these ones as Sue almost ran out of cheese! Feel free to put more on as you like!

Sprinkle with cheese.
Place the beef on top of the cheese. Top with the onions and mushrooms.


Enjoy!

Served with salad, french fries, and broiled cocktail weiners.

Depending on the size of your roast, how much you pile on your sandwiches, how big the buns are, etc... you may have some leftover beef. Simply heat it up in the microwave the next day and you can enjoy another yummy sandwich.

Trust me when I say, this is a really, really, really, REALLY tasty sandwich.
I would never admit it to Sue but, I could never come close to making something as mouthwatering as this bad boy.
Don't tell her I said that.

Be sure to stop by Carole's Chatter for tons of great links!


Friday, January 27, 2012

Sex In A Pan


It was the name that got your attention, right? 
"Sex, in a pan? What the heck is that?" you ask.
I've actually  heard this dessert called a few different names.....
Robert Redford Dessert
Better Than Anything Dessert
Chocolate Dream Dessert
etc...etc...
In our house it only goes by one name...the TRUE name of this dessert....
Sex In A Pan.
I know...I know...not exactly a kid-friendly dessert title.
I first tasted this many, many moons ago and since then have made it a million times. Well, maybe not quite a million but pretty close I'm sure. It is one of those desserts that is great for any occasion. And, if you truly can't bring yourself to call it "Sex In A Pan" when people are asking you "What is this deliciousness called?", then you call it whatever you like.
Heaven On A Plate might be a good back up name.


Sex In A Pan

Ingredients
1 cup finely chopped pecans
1 cup flour
1/2 cup butter
1 cup icing sugar
8 oz cream cheese
large tub of Cool Whip
2 cups milk
1 6 oz pkg instant chocolate pudding
1 6 oz pkg instant vanilla pudding

Directions
Preheat oven to 350. Lightly spray a 9 X 13 pan with cooking spray.
In medium bowl, mix together flour, pecans, and butter to form coarse crumbs. Press firmly in to the 9 X 13 pan. Bake in 350 oven for 10 - 15 minutes, until just showing brown.
Remove from oven and let cool for 15 minutes or more. (I usually place mine in the freezer while I do the next step)
In the same bowl you used for the crust, beat together icing sugar and cream cheese until smooth. Fold in 1/2 the tub of Cool Whip until well combined.
Spread carefully over the pecan crust. Place in fridge to continue cooling while you proceed with the next step.
Using the same bowl again, dump in both pudding powders and whisk with 2 cups of milk until smooth. Spread over cream cheese layer.
Take the remaining 1/2 tub of Cool Whip and spread over pudding layer.
Sprinkle with a few extra chopped pecans or chocolate slivers. Chill until ready to serve.


I try not to make this too often anymore as I think I could get a spoon and just sit and eat the entire pan. If you are so inclined, you can use reduced fat cream cheese and Cool Whip and the no sugar pudding, and skim milk and it won't really change the taste or texture TOO much. It's still delicious.

Oh! I get this question all the time...
"Do I use 2 cups of milk PLUS the milk that the pudding box calls for, or is it just 2 cups of milk, period?"
You only use 2 cups of milk. That's it. The puddings blend together and are quite thick. That's what you want to happen. You don't want it to be "pudding-y".

You can also make this with different pudding flavors if you want to, as long as you use 2 - 6 oz boxes of instant pudding. You could try butterscotch, only chocolate, only vanilla, banana, etc..
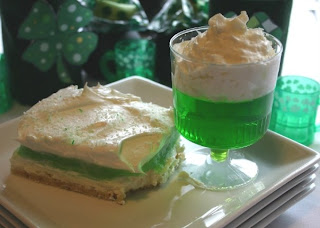
I have made it with pistachio pudding for St. Patrick's Day and it was really tasty.

See...it's pretty and St. Patrick's Day-y

Just remember...it's called Sex In A Pan.
I love telling people the name of this dessert. It has started some really interesting and sometimes hilarious conversations.

Wednesday, January 25, 2012

Carrot Fries


If you are like me, you saw "carrot fries" and got all excited thinking - Oh, my goodness! Carrots that are as good as fries? Really? Yaaaaaaaaaaay! - and then you did a happy dance.
I hate to be the one to burst your bubble.
They aren't really "fries" in the crispy, greasy, fat laddened sense.
Sorry.
*sigh*
BUT...they are still delicious in their own right.
They are tasty, far less calories, and much healthier.
Now...wait.....I know what you are thinking - Mmmm boy, healthy carrot snacks. Yum.
First of all, don't be like that.
Carrots don't judge you so don't judge our poor carrot friends.
Second, these are really good.
I wouldn't lie about that.
They are basically a roasted carrot without the roast drippings sogging them up. Plus, you can change the seasoning to suit your taste.

Carrot Fries

Ingredients
3 medium carrots
1/4 tsp sea salt
sprinkle pepper
sprinkle garlic salt
1/2 Tbsp olive oil

Directions
Preheat oven to 425. Line a cookie tray with parchment paper.
Peel and slice carrots into sticks. Place in a medium bowl, sprinkle with spices and drizzle with oil.


Toss to evenly coat. Spread out on cookie sheet so carrot sticks are not touching.
Bake at 425 for approximately 20 - 25 minutes, until the carrots are starting to brown. Stir halfway through cooking time.
Remove from oven and serve hot.


So, I KNOW they aren't fries, okay? Let's move past that.
But, they do kinda look like fries...if that counts....
They are super-de-duper tasty and, if you are like me and trying to eat more vegetables, this is a great side dish. From what I can figure, using Fitday, I got to eat the whole recipe and it was only (about) 150 calories. Not too shabby :)

Monday, January 23, 2012

Parmesan Roasted Chickpeas


Sue here :) I figured I better give Jo a break as she has been doing so many of the blogs lately.
I found this recipe on Happy Healthy Mama and decided to give it a try.
I have been looking for healthy snacks for my daughter, Kenzie. She is trying to eat healthy, which is great, but she also wants to try and eat more vegetarian meals - not my forte, and she is extremely picky.
She can't have meat and cheese in her lunch because the cheese gets "sweaty".
She doesn't like sandwiches.
**sigh**
The list of stuff she doesn't like goes on forever. The list of stuff she does like? Not as long.
This recipe turned out to be really interesting. In a good way! It's great as a snack and stays nice and crispy in a container in the lunch box.

Parmesan Roasted Chickpeas

Ingredients
2 15 oz cans chickpeas, drained & rinsed
2 Tbsp olive oil
juice from 1/2 a lemon (about 1 1/2 Tbsp)
1 Tbsp died oregano
1 tsp dried rosemary, crushed
1/2 tsp garlic powder
1/2 tsp sea salt
1/4 tsp ground pepper
1/2 cup grated Parmesan cheese

Directions
Rinse and drain chickpeas, spread out on a towel to dry for about 20 minutes.
Preheat oven to 400.
Mix together all ingredients, except chickpeas, until well combined.


Add chickpeas and stir gently. You will probably loosen a few skins; pick them out and throw them away as they will burn.
Spread out on a cookie sheet, no overlapping, and roast for about 50 - 60 minutes.


Keep a close eye on them as you near the 50 minute mark as they start to burn quickly. Make sure to gently stir a few times during baking.

I found I liked them better warm - the flavor seemed to be a little stronger. They do crisp up somewhat as they cool off so don't worry if they aren't as crispy as you'd like straight out of the oven.

So, this recipe was a success! Kenzie now has another lunch snack that she will eat. Thank goodness. I figure if I can feed her at least until she turns 16 then she can get her driver's license and figure out how to forage for her own healthy food.
Who I am kidding...I'll be trying to find healthy snacks for my picky eater until I win the lottery and can pay my chef to do that for me. 


Sunday, January 22, 2012

Our First Giveaway Winner

Just a quick blog today to announce our first ever giveaway winner.
Sue and I would like to thank all of those who entered. All in all we are very pleased with the response. We definitely gained a few more followers and for that we are grateful. We hope you continue to read us and Twitter about us and Pin us and Facebook us and all of those fun things.

For now though...the winner is....
*trumpets blaring*

The Self Taught Cook

Unfortunately The Self Taught Cook did not respond within 48 hours so we had to choose a new winner. The new winner is......

Susan Powell

We will be getting a hold of The Self-Taught Cook Susan to let her know she won a copy of Hershey's Classic Recipes cookbook, a copy of frame>by>frame baking: a visual step-by-step cookbook, and a jar of Oh! So Garlic seasoning. She will have 48 hours to respond otherwise we will be drawing another winner.

Please continue to check back with us as we plan on having many more giveaways in the future. Our goal was 1 per month but whether that happens or not remains to be seen. I am pretty sure we will be hosting a giveaway near the middle/end of February as we have a FANTASTIC Irish cookbook to giveaway in time for St. Patrick's Day.

Thanks again to those who support Sue and I and our blog. We enjoy posting about the dishes we create and sharing stories and recipes with you.
:)

Saturday, January 21, 2012

Apple Pie In An Apple


Here is one of those creative recipes that seems so simple yet never, in a million years, would I have thought of.
Seriously.
Apple pie IN an apple.
The person who thought of this is clearly a genius. A super genius even.
I first saw the photo on Pinterest and it lead me to Testado, Provado e Aprovado! 
I'm beginning to love, love, love Pinterest for all these great ideas. Plus, it's making Sue and I look like we are super geniuses.


Apple Pie In An Apple

Ingredients
1 recipe Pie Crust
apples
lemon juice
cinnamon
brown sugar
flour

Directions
Preheat your oven to 400 degrees. Line a cookie tray with parchment paper.
Okay, the first thing you might notice is that I have not included measurements with the ingredients. That is because this recipe can be whatever size you want it to be. You can make 1 apple if you want, or you can make 2 dozen apples.
Cut the apples roughly in half, leaving a little more on the bottom half than the top. Using a melon baller, carefully scoop out the bottom half of the apple, being careful not to leave the outside edge too thin. (If it is too thin the skin can burst during cooking leading to deflated apples - of course they still taste delicious they just don't look as pretty) Place the scooped out apple bits into a bowl and sprinkle with a bit of lemon juice to prevent browning.


Sprinkle empty apple shell with cinnamon.  Take the apple tops, peel and core them, and cut the apple into the bowl with the other apple bits.
Drain the apple pieces to get rid of excess liquid.
Toss apple pieces with cinnamon, brown sugar, and a little flour. (I made 4 apples and used about 1 tsp cinnamon, 1 Tbsp brown sugar, and 1 tsp flour. Depending on your tastes you can use more or less cinnamon and brown sugar. Don't use too much flour.)


Fill the apple shells with the apple pieces. Mound them up a little so they rise above the edge of the apple as they will cook down.
Roll out your pie dough on a lightly floured surface. Using a cookie cutter or drinking glass, cut a circle of dough that is a little larger than the top of the apple so it will cover the top and hang over the sides a little. Place on top of the apple and cut a slit to vent it. 
Place on cookie tray and bake in 400 oven for 5 minutes. Reduce heat to 350 and continue cooking until pastry is brown and apples are tender.
Remove from oven and let cool 5 minutes on cookie tray placed on wire rack.
Serve warm with ice cream or whipped cream OR remove to wire rack and let cool completely.


I drizzled them with a little maple syrup and served them warm. So tasty!
If you only make a few apples then you will not need the entire recipe of pie dough listed above. No problem - just wrap the remaining dough in plastic wrap and freeze it. When you need more dough simply let it come back up to room temp and you are good to go!

I made this twice and the second time I used Granny Smith apples. I can't remember which kind I used initially but they were not tart at all. The Granny Smith's tasted much better but they did seem to have weaker skins. By this I mean the skins split and the apples collapsed more than they did the first time I made it. This was not a big deal though - they were delicious and still looked pretty darn cute.

Apple Pie In An Apple - all the deliciousness of apple pie with way less calories. Plus, it's cuter. :)

Only 1 more day to enter our first giveaway!
Don't forget - you can enter our first blog giveaway until January 22nd. (Only 1 more day!) Winner will be announced on January 22nd! Go HERE for more details.
You might win 2 fabulous cookbooks and a bottle of Oh!So Garlic seasoning!
Draw is now over. Thank you for your support!

Friday, January 20, 2012

Blood Orange Ice Cream


I know there are people out there who don't like ice cream.
I mean, I get it if you are lactose intolerant.
But...just NOT liking it is a little odd. What's not to like?
Surprise, surprise - Sue isn't a huge fan of ice cream. But then, she's weird so......
Anyways...
I am loving my dad's ice cream machine. It makes making ice cream a breeze.
I still dream of making Salted Caramel Ice Cream - just mentioning the name starts me drooling. Unfortunately I have given up on my attempts to make that for now. See here for my tale of woe.
Instead, I decided to make blood orange ice cream.
There is not a lot of recipes out there for orange ice cream - orange sorbet, yes, ice cream, no. As for BLOOD ORANGE ice cream, I couldn't find any.
I decided to see what I could come up with on my own. I was pretty happy with the result.


Blood Orange Ice Cream

Ingredients
6 blood oranges
 1/3 cup orange juice
1 avocado, peeled & seeded
2 cups whipping cream
1 cup half & half
1/2 cup white sugar
1 Tbsp lemon juice
1 tsp vanilla

Directions
In a food processor or blender, puree blood oranges, orange juice, and avocado until very smooth. You should end up with about 2 1/2 to 3 cups of puree.
In a stand mixer, on low speed, combine whipping cream and half & half. Add in sugar and mix until sugar is dissolved. With mixer running on low, add in lemon juice, vanilla, and blood orange puree. Mix until well combined and smooth.
At this point you will want to strain some or all of the pulp out of the mixture by pouring it through a strainer into another bowl. I strained approximately 3/4 of the mixture and left the pulp in 1/4 of it to add some texture.  
Chill the mixture in a covered container until it is chilled.
Pour into your ice cream maker and process according to manufacturer's instructions. Store in freezer.
If it becomes too hard in the freezer, simply let it sit out for 15 minutes or so before serving to soften.

My samplers said it tasted like an Orange Julius and/or a creamsicle. It has a lovely blood orange flavor and the color is really pretty. I was hoping it would be a darker pinky-orange but was happy with the light pink it ended up. I suppose you could add food coloring if you wanted to.
The avocado is a strange ingredient, I admit,  but it certainly does help to create the smooth texture of the ice cream. And, don't worry, you can't tell it is in there at all as far as flavor or color goes. It's a good way to sneak some extra nutrients into a delicious treat.

Be sure to pop over to Carole's Chatter for tons more orange recipe links. 

Wednesday, January 18, 2012

Smorgastarta (Sandwich Cake)


Looks like a cake, doesn't it?
It's got layers, like a cake.
It's frosted, like a cake.
It's decorated, like a cake.
BUT....it's not a cake. It's a sandwich!
A smorgastarta is, according to Wikipedia, a Scandinavian dish.
Those Scandinavians are a pretty clever bunch.  I saw one on Pinterest and had to make it. I mean...it's a CAKE SANDWICH.
Sweet.
The only thing that is difficult about it is deciding what ingredients to put in the layers.


Smorgastarta

Ingredients
1 recipe Bread Dough

Filling Ingredients I used:
Top layer
2 cans devilled ham
2 medium pickles, finely chopped
1/4 cup onion, finely chopped
mustard
mayo

Bottom layer
approx 1 1/2 cups cooked, ground turkey
10 slices of bacon, chopped
4 large slices jalapeno jack cheese
pesto
mayo

"Frosting"
2 8 oz packs cream cheese, softened
1 Tbsp Oh! So Garlic
(You could just use garlic flavored cream cheese)
1/3 cup sour cream

Decorations
carrots
cucumber peel
cherry tomatoes
cheddar cheese

Directions

Prepare your bread dough according to instructions. Divide into 3 equal parts and press into lightly greased 8 inch baking pan. (See photo below)


Let proof and then bake according to directions in recipe. When they are done, remove from pans to wire racks to cool. (See photo below)


When they are cool, carefully cut off outside crusts and top crusts. This will make the bread easier to cut through when you serve it. I even removed the bottom crust of the middle layer and top layer of bread to make it easier to slice through. This is not a necessary step but I do recommend it - if you have to cut through several layers of crust you may end up smooshing your sandwich when you go to serve it.

Place the bottom layer on your serving tray.
Spread with mayo and pesto.
Spoon on your turkey and bacon. Lay cheese on top, being careful not to have any cheese overhanging the edge. Just break any cheese off that sticks out so your "frosting" will be smooth.
Top with middle layer of bread.
Spread with mustard and mayo.
Spoon on your devilled ham, pickles, and onion. (To make things easier - pre-mix these ingredients together in a little bowl)
Top with top layer of bread.
In a medium bowl, beat cream cheese, Oh!So Garlic, and sour cream until smooth and creamy. Spread on sides of sandwich and then on top of the top layer of bread.
Decorate with whatever vegetables you would like. (I used a tiny, round cookie cutter to cut circles out of carrots, cucumbers, and cheese)   


The possibilities with this dish are endless. I think next time I will do a layer of tuna salad and a layer of egg salad, I love that combination.  
I would have added a lot more veggies - ie: tomatoes, cucumbers, etc... - but I was making this for a co-worker's birthday and I wasn't sure what she did or didn't like.
If you Google "smorgastarta" there are some really fancy schmancy ones decorated with shrimp and egg slices and all sorts of things. Some of the flavor combinations are a little questionable to me but, hey, to each their own.
At first I thought the bread might be too thick but, as it turns out, with all that cream cheese on the outside it comes in handy to have that thick bread in the middle to eat it with.

Don't forget - you can enter our first blog giveaway until January 22nd. Winner will be announced on January 22nd! Go HERE for more details.
You might win 2 fabulous cookbooks and a bottle of Oh!So Garlic seasoning!
Giveaway is now over. Thank you for your support.

Tuesday, January 17, 2012

Coffee Cake


Want to hear my story behind this cake?
It's pretty amusing, I promise.
Okay.... I am on theNew Year's resolution bandwagon to eat healthier. (Holy, 2 weeks in and still going strong! A new record for me.) I decided to go buy some low fat Greek yogurt to have instead of regular yogurt as, apparently, Greek yogurt is "in" right now and supposed to be very rich and creamy.
Anyways...I wanted plain so I could Magic Bullet it with fruit to make smoothies.
I went up and down the aisle in the grocery store and finally found the Greek yogurt,
Hmmm.... it's all flavored....no plain....
Wait....there is a plain one. There is no colors on the label to indicate a fruit flavor... I'm good to go.
I get home and excitedly try out my first smoothie. A scoop of yogurt and some fruit and I am on my way.
Yup, sure is thick. I guess people were right about it.
Then I go to get more to make my lunch for the next day and I see a weird looking colored line in the yogurt. Like someone used a dirty spoon to steal some and left trace evidence.
Nope...no one in the house touched it.
I stick my spoon in to see if it's mold and there is more of this weird looking stuff under the yogurt.
What the heck is this?
Oooooooooooooh...it's STRAWBERRY Greek yogurt. You know, fruit on the bottom...
Yes...apparently STRAWBERRY Greek yogurt was on the label, I just can't read. 
Okay, that's no problem. I like strawberry yogurt. I'll eat it.
On my next trip to the grocery store I was determined to get PLAIN Greek yogurt.
Down to the where the Greek yogurt was... okay....plain...plain...plain...there has to be plain...
Yay! Plain Greek yogurt...is it low fat?
Yes.....there is the low fat label.
Okay, let's give this one a try.
Now I am really excited to try my new smoothie with plain Greek yogurt.
Yup...nothing on the bottom of this one. Good to go...
Hmmm...boy this sure is tangy.
Really tangy.
Is greek yogurt really THAT strong? Where's the carton? I have to read the label.
Oooooooooooh....it's not plain, low fat Greek yogurt.
It's plain, low fat GOAT yogurt.
Apparently I can't read. Again.
I guess that is why there is a little cartoon goat on the carton. 
FYI - goat yogurt is really, really, REALLY strong. Even the low fat version.
Like - BAZAAM! Here's your yogurt...
BUT, on the up side - it is high in protein and makes for an incredibly moist coffee cake.


Coffee Cake

Ingredients
1 cup butter, room temp
1 cup white sugar
3 eggs
3 cups flour
1 Tbsp baking powder
1 tsp baking soda
pinch salt
1 tsp maple flavoring (You can use vanilla if you prefer)
1/2 cup water
1 cup yogurt (or sour cream)
1 cup chopped pecans (or whichever nuts you prefer)
1/2 cup brown sugar
2 tsp cinnamon

Directions
Preheat oven to 350. Spray a 9 inch bundt pan or a 9 X 13 pan with cooking spray. Set aside.
In a large bowl, cream together butter and sugar until fluffy. Beat in eggs, 1 at a time, until combined.
In a medium bowl, whisk together flour, baking powder, baking soda, and salt. Stir into creamed mixture.
Stir the maple flavoring into the 1/2 cup of water. Mix this and the yogurt into the batter until just combined. Do not over mix.
In a small bowl, combine pecans, brown sugar, and cinnamon.
Spread half the batter into the prepared pan. Sprinkle with half of the nut mixture.
Top with remaining batter. Sprinkle with remaining nut mixture.
Bake for approximately 50 minutes or until toothpick inserted near center comes out clean. Depending on what size pan you use you will have to watch your cooking time.
Remove from oven and let cool for about 10 minutes before inverting onto wire rack to cool completely. If you bake it in a 9 X 13 dish you may want to serve it right from the pan, in which case you do not need to remove it from the pan.


I was going to be all clever and call this "Goat Yogurt Coffee Cake", like I used the goat yogurt on purpose,  but I didn't. I think if people read "goat yogurt" they would be scared away and I wouldn't want that. This cake is worth making - with or without goat yogurt - so I hope you give it a try.

Oh, and in case you were wondering. I have given up my search for plain, low fat Greek yogurt for now. I don't know what I would bring home next but I'm a little afraid...I mean...GOAT yogurt...really?

Don't forget - you can enter our first blog giveaway until January 22nd. Winner will be announced on January 22nd! Go HERE for more details.
You might win 2 fabulous cookbooks and a bottle of Oh!So Garlic seasoning!
Giveaway is now over. Thank you for your support!

Monday, January 16, 2012

Curried Chicken Quinoa


I am a recent convert to quinoa so I don't have a huge repertoire of recipes to fall back on.
I found this one in a newspaper clipping that someone had cut out for future reference and placed in the "to make" recipe box. I'm guessing it had to have been from a fairly old paper as it was all curly and a crinkly.
Whatever the case....it turned out delicious.
Another plus?
It is a one dish meal.
Aaaaaaaand...
From start to finish was under an hour. Whoot! Whoot!
Just think....if you started this right now - you could be enjoying it in less than an hour.
Quick...go...now....


Curried Chicken Quinoa

Ingredients
about 1 1/2 lb boneless, skinless chicken thighs, cut into bite sized pieces
1 small onion, chopped
2 garlic cloves, minced
1 15 oz can petite diced tomatoes
1 Tbsp curry powder
1/2 Tbsp chili powder
1 Tbsp Oh! So Garlic (optional)
1 cups chicken broth
1 cup quinoa

Directions
Spray a large Dutch oven (or heavy bottom pot) with cooking spray. Add the chicken, onion, and garlic. Saute for about 10 minutes, until chicken is almost completely cooked.
Add the tomatoes, undrained, curry powder, and chili powder (and Oh! So Garlic if using). Stir until combined and let cook for about 5 minutes.
Stir in the chicken broth and bring to a boil. Stir in the quinoa, bring to rolling boil and then reduce heat to medium low, cover and cook for 20 minutes.
Turn heat to low and keep warm until ready to serve.

Option 1 - you can add 2 cups of peas during the last minutes, if you desire.
Option 2 - you can serve on a bed of spinach leaves, if you desire.

A delicious dinner in under an hour. What's not to like?
Nutritional info (using myfitnesspal) - 329 calories, 5 fat, 37 carbs, 33 protein (That is for 1/4 of the recipe)

Just a reminder - joandsue.blogspot.com is hosting our first blog giveaway. There are lots of ways to get entries for a chance to win 2 fantastic cookbooks (Hershey's Classic Recipes and frame>by>frame baking: a visual step-by-step cookbook) AND a jar of Oh!So Garlic to try for yourself.
Approximate $40 value!
Winner will be announced on January 22nd.
Giveaway is now over. Thank you for your support :)


Sunday, January 15, 2012

joandsue.blogspot.com's First Giveaway

No photos today! No recipes either....
Today's blog is about our first giveaway here at joandsue.blogspot.com.
In a perfect world we would like to host a giveaway a month but we will see how our first giveaway goes before making any promises.
Sue and I have sponsored this giveaway ourselves. We will be looking for sponsors for some of our future giveaways and contests but, for now, we are putting up the prize ourselves.
We have decided to give away a couple of cookbooks and a bottle of Oh! So Garlic seasoning.
Cookbook 1: Hershey's Classic Recipes
Cookbook 2: frame>by>frame baking: a visual step-by-step cookbook

The rules on how to enter:
1. This giveaway is open to everyone.
2. There will be one winner chosen by random drawing.
'3. The winner's name will be posted on our blog on January 22nd, 2012 and they will have 48 hours in which to respond. If the winner does not respond, a new winner will be chosen.
Ways to get entries:
1. Become a follower of the blog.
2. "Like" joandsue.blogspot.com on Facebook. (And, while it won't gain you anymore entries, we would love it if you posted this contest on your wall)
3. Follow @joandsue on Twitter and tweet this contest.
4. Blog about this giveaway and leave a link to your post on our blog giveaway post in a comment.
5. Get 1 additional entry for each one of our blogs that you pin on Pinterest. (Leave a comment on this giveaway blog to let us know what you pinned.)
6. Get 1 additional entry for each comment you leave on any one of our blog posts. (Of course we encourage you to actually read the blogs you comment on and not just comment for an entry.)
 
There you have it. There are tons of ways to get a lot of entries.
 
The Oh! So Garlic is an amazing seasoning that I have used often in our blogs. As for the 2 cookbooks - Hershey's Classic Recipes & frame>by>frame baking: a visual step-by-step cookbook - they are full of really great and delicious looking recipes.
If I had to estimate the value of the prize, I would say approximately $40.00.
 
This is our first giveaway and hopefully everything goes smoothly. Please let us know if you have any questions or concerns about the giveaway.

Saturday, January 14, 2012

Orange Date Muffins


This recipe is one that Sue brought home from high school home ec. class. So....what I am saying is that it is from a few years ago.
Don't try and guess how many years ago.
In fact, let's never do that.
It is an unusual recipe in that you use the entire orange, peel and all. It is unique in its flavor and texture as well. Quite different from a "regular" muffin.  I recommend you give it a try.


Orange Date Muffins

Ingredients
1 whole orange, quartered, seeded
1/2 cup orange juice
1/2 cup pitted dates
1 egg
1/2 cup butter
1 1/2 cup flour
1 tsp baking powder
1/2 tsp baking soda
1/2 cup brown sugar
pinch salt

Directions
Preheat oven to 400. Spray muffin tin with cooking spray or use cupcake liners. (Makes 12)
Place orange in blender or food processor and blend until finely chopped. Add orange juice, pitted dates, egg, and butter. Blend until fine.
In a bowl, combine flour, baking powder, baking soda, brown sugar, and salt.
Mix wet ingredients into dry ingredients until just blended. DO NOT overmix.
Divide evenly amongst 12 prepared tins.

Ready to go in the oven!

Bake at 400 for 15 minutes, or until toothpick inserted near center comes out clean.
Remove from oven and let cool in pan for 5 minutes. Remove from pan and let cool on wire rack.

These are great when still warm, cut in half, with a little bit of butter spread in the middle. They also are great to throw into the kid's lunch boxes for school.

Sue and I are excited to be hosting our first blog giveaway! We will be posting about it tomorrow to let you know how you can enter and what you can win.
Be sure to check back!!