Saturday, February 29, 2020

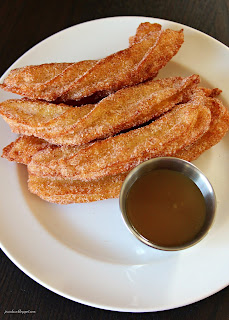
Churros with Caramel Sauce


I just recently discovered how easy and delicious cream puffs are to make (I will be sharing my method for those soon!) and imagine how surprised I was to learn that the choux pastry you use to make cream puffs ALSO MAKES CHURROS. Whaaaaat!!!
For real. All you do differently is shape them differently and cook them differently. *Boom* Two completely different amazeball desserts from one dough. 
I know, I know... I'm late to the game here... people have been doing this for a million years. But I am now officially jumping on the choux pastry train and never jumping off. 


Churros with Caramel Sauce

Ingredients
Caramel Sauce
1 cup butter
1 cup whipping cream
1 cup brown sugar
1 tsp vanilla

Churros
1/2 cup water
1/2 cup milk
1/2 cup butter
1 tsp sugar
1 cup flour
4 eggs

Oil for deep frying (about 1 liter) 

1/3 cup sugar
1 ts cinnamon

Directions
Prepare caramel sauce - combine butter, cream, and brown sugar in a medium saucepan over medium heat. Bring to a boil and, stirring constantly, boil for 8 minutes. Remove from heat and set aside. (Don't worry if it still looks really thin - it will thicken as it cools!) 
Prepare choux pastry - In a deep pot, preheat oil to 350. While oil is preheating, prepare the churro dough. 
In a medium saucepan over medium heat, bring the water, milk, butter, and sugar to a boil while stirring often. Remove from heat and stir in flour all at once. Place back on the burner but shut off the heat. Stir flour mixture for 2 minutes until film forms on bottom of the pan. 
Remove from heat and let sit for 5 minutes stirring a few times. Beat in the eggs, one at a time, beating well between additions. 
Scoop the pastry dough into a piping bag. Line a cookie tray with paper towel and set aside. Have a pair of scissors ready beside where you are frying. 
Prepare the cinnamon sugar by stirring together the sugar and cinnamon in a bowl. Set aside. 


When dough has reached 350 - pipe a strip of the dough into the oil and use the scissors to snip it off. Pipe 3 more into the pot - as many as will fit without crowding the pot. 


Fry about 1 1/2 to 2 minutes and then flip over and fry another 1 1/2 to 2 minutes on the other side. They should be a deep golden brown color when you flip them. 
Using a slotted spoon, remove the cooked churros and place them on the paper towel (or on a wire rack above some paper towel). Continue to fry the rest of the dough. 


When they have cooled a few minutes, roll the cooked churros in the cinnamon sugar. 


Serve warm or room temp with the warm (or room temp) caramel sauce.


These are best the day they are made but I have been doing a little experimenting and have discovered that these can be frozen and reheated in the microwave and are almost as good as fresh. Just zap the frozen churros and caramel sauce for about 30 - 40 seconds and you should be good to go. (I did 6 churros and 3 Tbsp of caramel sauce on a plate/teeny bowl and this time seemed to work. You may have to experiment a little. Too long and they go a little soggy BUT let them cool and they crisp up again, too little and they are still cold - obvs - but are good to eat.) 

Thursday, February 27, 2020

Mock Apple Pie


I have wanted to make this pie FOREVER. I don't know why I waited so long to try it. It's magic you guys. Complete and utter magic. I love it when you make a food that tastes like another food and you can trick people. This pie, for example, looks and tastes like an apple pie. For real. You'd never know it wasn't apple pie except for a slight texture difference. The thing is... there are NO apples in it. At all. None. Nada. Zero. Crazy right? (Check out our What Do You Mean It's Not Apple Apple Crisp HERE for another magic recipe!) 
Obviously we didn't create this recipe but we are excited to share it with you. Have you tried it yet? A few friends grew up with it and love this version. I was worried about the pie not being deep enough because I used a larger pie plate so I layered some extra crackers in the filling. If you don't do this then you will not get those layers you see in there and it will completely look like apple pie. If you layer in extra crackers then it kind-of ruins the effect *lesson learned* but does not affect the taste!


Mock Apple Pie

Ingredients
Pie crust for a double pie (Our recipe HERE)
2 cups water
1 cup sugar
2 tsp cream of tartar
30 Ritz crackers 
1 Tbsp lemon juice
1 tsp cinnamon

For Decorating
1 egg, beaten
1 - 2 tsp sugar

Directions
Preheat oven to 400. 
Place one pie crust into an 8 inch pie plate sprinkle with a pinch of cinnamon. Set aside. 


If you want to add a layer of crackers then you can do it now... totally optional though and this will affect the look of the pie!!!


In a medium saucepan over medium heat, bring water, sugar, and cream of tartar to a boil. Add in the Ritz crackers and simmer, stirring every so often, for 5 minutes. 


Remove from heat, stir in the lemon juice. Pour into the crust. Sprinkle with the 1 tsp of cinnamon. (If you want to add extra crackers then you can pour in half the filling, layer crackers, pour in the rest of the filling. Again, totally optional.)


Place the remaining pie crust on top of the pie and seal the edges together with a fork or by pinching together with your fingers. Brush the top of the crust with the beaten egg and sprinkle lightly with the sugar. 


Bake at 400 for 15 minutes. Turn down the heat to 350 and continue to cook another 20 minutes or so - until the crust is golden brown. 


Remove from heat and let cool. 


Slice that baby up and enjoy.


Just to reiterate - I put in extra cracker layers that is why you can see them in there. If you do not add extra crackers then it will look more like apple pie. 


Throw on some ice cream and see if anyone notices it's a magic pie. 


Heck... throw on some caramel sauce on top of the ice cream and *boom* impress EVERYONE in the room. Okay... die hard apple pie fans might figure out something is up... but it'll be a conversation starter for sure. Next time I make it I won't add the extra cracker layers and I'll post a pic of how much more apple pie-y it looks! 
Have you got a magic recipe that tastes like one thing but is actually another? We'd love to hear about it! 

Wednesday, February 26, 2020

Bourbon Chocolate Chip Cookies


Maybe you're looking for a cookie for the adults in the room? Maybe something for dad for father's day or mom for mother's day? Maybe something to bring to the poker game? Ladies night? The big game? I think you see where I'm going with this.... not for kidlets....definitely for adults. 
I find most alcohol cookies only have a pinch of alcohol that didn't really impart much flavor to the cookie... these bad boys though.... you taste the bourbon. I also browned the butter and added toffee bits because obviously these are the most over the top ridiculously delicious chocolate chip cookies on the planet. These have to be tasted to truly understand how amazing they are!


Bourbon Chocolate Chip Cookies

Ingredients
3 1/2 cups flour
pinch salt
1 1/2 tsp baking powder
1 1/4 tsp baking soda
1 cup butter, browned and cooled
1 1/2 cups brown sugar
3/4 cup sugar
2 tsp vanilla
1/4 cup bourbon
2 eggs
2 cups chocolate chips (divided)
1 cup toffee bits

Optional
coarse sea salt for sprinkling

Directions
**Before starting make sure your butter is browned and cooled**
In a medium bowl, whisk together flour, salt, baking powder, and baking soda. Set aside.
In a large bowl, cream the browned butter and sugars until creamy, scraping sides of bowl as needed. Add in the vanilla, bourbon, and eggs and beat well. Beat together the dry ingredients and wet ingredients - if it gets too thick then finish by stirring with a wooden spoon. Stir in 1 1/2 cups chocolate chips and the toffee bits. Scoop dough into balls and press slightly between the palms of your hands. Press a few more chocolate chips into the top of each cookie. 
Place on a cookie sheet or tray. Repeat until all the dough has been formed into slightly flattened balls. Cover with plastic wrap and chill for at least 2 hours (can be frozen in Ziploc bags at this stage, if desired). Note - I used a large cookie scoop (a scant 1/4 cup) and got about 15 - 17 cookies. Photo below shows a double batch. 


After dough has chilled, preheat oven to 350. Line a cookie sheet with parchment paper and place cookies about 2 inches apart on the cookie sheet. 


Place in preheated oven and bake until edges are lightly browned and top looks "dry" - about 11 - 13 minutes. It's okay if the center looks a little under done - you want the cookie to be soft, not crunchy.. Rotate the cookie sheet half way through baking. 


When you remove the cookies quickly sprinkle with a pinch of coarse sea salt. This is optional but I love a little salt with my chocolate chip cookies! Let sit on the cookie sheets for about 5 - 8 minutes to cool off before removing to wire rack to cool completely. 


Try them warm out of the oven if you want a real treat, FYI. Just don't eat them all... trust me, you'll be tempted.


Serve with your favorite bourbon or coffee or milk or, you know, on their own is fabulous too. 
These smell SO GOOD when they are baking! Very bourbon-y and chocolaty. I found the bourbon flavor was much stronger once the cookies have cooled completely. Its far more subtle when they are warm. 
You don't have to brown the butter, of course, you can use "regular" butter but the cookies won't be as rich and caramel-y. I recommend browning 100%. 


Browned butter, toffee bits, chocolate chips, bourbon all make for the best adult chocolate chip cookie ever. 
NOTE - pressing the extra chocolate chip cookies onto the top of the cookies before baking ensures the cookies look nicer. It's an optional step but I always do it so the cookies look a little more chocolate chippy. 
NOTE - if you froze the cookie dough before baking: when you are ready to cook them all you have to do is take them out of the freezer and place them on a cookie sheet while the oven preheats. You may have to add 1 minute or 2 to the cooking time, just keep an eye on them. 

Monday, February 17, 2020

Keto Nanaimo Bars


You guuuuuuuys! 
These Nanaimo Bars are going to change your life! Okay.... maybe not... but they might. You don't want to not try them and take the chance you're missing out. 
They taste like "normal" Nanaimo bars, they look like "normal" Nanaimo bars, and the texture is totally like "normal" Nanaimo bars. You'd never know they were keto/gluten free/diabetic friendly. 
I even had some taste testers say they preferred these over "normal" Nanaimo bars because they weren't quite as overwhelmingly sweet. 
I wanted to keep some of the Bird's Eye pudding powder in the recipe because that is what makes a Nanaimo bar a Nanaimo bar. It adds the most carbs to the recipe but also adds the authentic flavor and color. Per bar (recipe makes 24) the nutritional counts are: 191 calories, 17.5 fat, 5.9 carbs, 3.2 fiber, 2.7 protein. That's 2.7 net carbs per slice.
Doing keto you often can feel like you are missing out. Not with these bars. These keep well in the freezer so you can just pop one out whenever you need a keto friendly sweet treat!


Keto Nanaimo Bars

Ingredients
Bottom Layer
1/2 cup butter
1/4 cup Swerve brown sugar 
1 egg
5 Tbsp unsweetened baking cocoa
1/4 cup chopped walnuts
1 cup almond flour
1 cup unsweetened coconut, toasted

Middle Layer
3/4 cup butter, room temp
2 Tbsp Bird's Eye custard powder
1 cup Swerve icing sugar
4 Tbsp whipping cream

Top Layer
3 Tbsp butter
6 oz (scant 1 cup) sugar free milk (or dark) chocolate chips
2 Tbsp Swerve icing sugar

Directions
Prepare bottom layer - In a heat safe bowl, stir together butter, brown sugar Swerve, and egg. Place over a pan of simmering water over medium heat (or in a double boiler). Stir until well mixed. Stir in the cocoa powder. Stir until thickened. 
Remove from heat and stir in walnuts, almond flour, and coconut until well mixed. Press into a 10 X 10 pan lined with tinfoil. Set aside. 


Prepare middle layer - beat together butter, custard powder, and Swerve icing sugar. Beat in the whip cream until smooth. Drop by the spoonful over the crust.


Use the back of a spoon to spread the layer evenly. Note - it helps to dip the spoon in water and shake it off, then spread to prevent sticking. You can also use your fingertips dipped in water to help spread it out. 


Chill the two layers for at least half an hour before doing the last step - or pop in the freezer for 20 minutes. It is very important you do not skip chilling it!! Spreading the chocolate layer on top will be almost impossible if the bottom layers are not chilled. 
Prepare the last layer - Melt butter and chocolate chips in a microwave safe bowl in 20 second increments, stirring well in between, until smooth. Stir in the Swerve icing sugar. 
Working fairly quickly, drop the chocolate in spoonfuls over the yellow layer and then spread it with the back of a spoon. This can be a little tricky because the chocolate starts to melt the middle layer, making it difficult to spread. Don't worry if your chocolate isn't completely even - just do the best you can. 


Chill until set. 
Use the tinfoil to remove the bar from the pan - this will make it much easier to cut. 
Cut into 24 pieces. You can keep these in the fridge or on the counter. I tend to leave them in the fridge in a lidded container and take them out about half hour before serving them. 


Only 2.7 carbs per slice!!


Look me in the eye and tell me that doesn't look EXACTLY like a "normal" Nanaimo bar. 


I love one of these with my keto coffee for those days I'm craving sugar. Totally satisfies the need for sweets. 


Texture is a big thing for me when it comes to replicating recipes to a keto friendly format. The texture of these, IMO, is spot on. A healthified, gluten free, keto friendly, diabetic friendly treat that I guarantee everyone will enjoy. 


FYI - you can also make these in mini muffin tins - I got 30. Just spoon about a tablespoon of the base into each muffin tin and press it down, then a Tbsp of the filling, spread it out, and then about 1 tsp of the chocolate topping, and spread it over the filling. 

Thursday, February 13, 2020

Keto Mocha Brownie Cheesecake


Maybe it's just me, but I find a LOT of keto friendly desserts just terrible. I mean.... they have that weird sugar-substitute aftertaste that seems chemically to me. Ooooor.... the texture is off because you've subbed out ingredients with low carb ingredients (ie: flour for almond or cocout flour). 
This cheesecake though.... none of the above. 
It's as cheesecake-y as cheesecake can be. Even the brownie bottom is very brownie-y. I was very excited that it turned out so tasty after only 2 tries at tweaking my recipe. It makes 4 servings but can be doubled easily. FYI - you can freeze pieces of this very well for a later date so you are not tempted to eat it all at once! Although, for only 3.3 net carbs per serving, you'd have nothing to feel bad about if you did! 


Keto Mocha Brownie Cheesecake

Ingredients
Brownie Base
3 Tbsp butter, melted
3 Tbsp baking cocoa powder
3 Tbsp almond flour
3 Tbsp powdered Swerve
1 tsp instant coffee granules
1 egg
1/4 tsp vanilla
2 Tbsp walnuts

Cheesecake
8 oz cream cheese, room temp
3 Tbsp powdered Swerve
2 Tbsp sour cream
1/4 tsp vanilla
1 egg

Directions
Preheat oven to 325. Spray the sides and bottom of a 7 inch spring-form pan with cooking spray, set aside. 
Prepare brownie base - stir together the melted butter, cocoa, almond flour. Stir in Swerve, coffee granules, egg, vanilla, and walnuts. 


Spread into the prepared 7 inch spring-form pan. Place in preheated 325 oven while you prepare the cheesecake layer. Bake for 8 minutes.
Prepare cheesecake layer - Beat cream cheese until smooth, scraping sides of bowl as needed. Beat in Swerve, sour cream, vanilla, and egg until smooth. Gently spread evenly over the brownie layer.


Place back in oven, reduce heat to 300, and bake 30 minutes more (until cheesecake is set). Turn off the oven and crack open the door a little. Leave cheesecake in the oven another 30  minutes to cool gradually. This will help prevent it from cracking.


When cheesecake has cooled completely, run a knife around the edge of the pan and remove the sides of the pan. 


Chill at least 3 hours before serving, up to overnight. 


Cut into 4 pieces. 


Serve as is or add your own favorite toppings. 


I went with a little whipped cream and a strawberry to keep the carb count pretty much at 3.3 net per piece.


I love the simplicity of this recipe and that, other than the Swerve and almond flour, the ingredients are all "regular" baking ingredients. I was able to find the powdered Swerve online and am so happy I did! It definitely makes a difference what sugar substitute you use. I don't find the powdered Swerve nearly as chemical tasting as some of the others out there. The texture is bang on too. Just like icing sugar. 
Do you have a favorite keto dessert that you swear by? We'd love to hear about it! Drop us a comment below so we can check it out! :) 

Sunday, February 9, 2020

Orange Cranberry Pie


I initially made this pie for Christmas because the color and flavors seemed Christmas-y to me. Thing is, once we tried it, we fell in love with the flavor! It's tangy and refreshing and rich-yet-light, making it perfect for so many things. The color also works for Valentine's Day or Canada Day - if you're thinking about holiday desserts. Orange and cranberry may seem to be Christmas flavors but I'm thinking they also scream Springtime. 
You can make this pie the night before you plan to serve it, or the day of, you just want to let it sit for at least 4 hours or so to let it set completely. It will last for a couple of days in the fridge before your crust will start to be a little soggy. I topped it with fresh cranberries and orange slices but you may want to warn your guests NOT to eat the cranberries. Raw, fresh cranberries, while totally safe, are very bitter/sour. You could sugar them, if you wanted to, but I always just tell people not to eat them unless they want to give their taste buds a shock! 


Orange Cranberry Pie

Ingredients
1 baked, 9 inch pie shell

Filling
2 3/4 cup fresh cranberries
1 cup sugar
1/4 cup water

3 eggs
2 egg yolks
2 tsp grated orange rind
1/2 cup fresh orange juice
pinch salt
1/2 cup sugar
1/2 cup butter

Whipped cream
1 cup whipping cream (heavy cream)
2 Tbsp instant vanilla pudding powder

Optional Decorations
orange slices
fresh cranberries

Directions 
Prepare filling - In a medium saucepan over medium heat, cook, stirring often, the cranberries, sugar and water. Boil about 10 - 15 minutes, until moisture is gone and cranberries have broken down. 


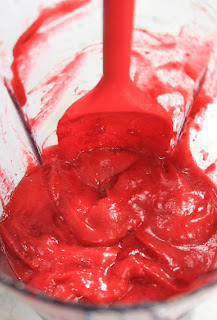
Remove from heat and let cool 10 minutes. Puree until smooth, about 3 - 4 minutes. 


Add the puree to a double boiler. Add in the eggs, egg yolks, orange rind and juice, salt, and sugar. Cook in a double boiler (or in a bowl over gently simmering water - see pic below), stirring often, until thickened, about 10 minutes.


Strain the thickened curd through a strainer into a bowl. Beat the warm curd, adding a little of the butter at a time. Beat until lighter in color, about 5 minutes.
Pour into the baked pie shell. 


Let cool completely. 
Prepare the whipped cream - whip the cream with the vanilla pudding powder until stiff peaks form. Pipe onto the top of the pie as desired. (Can also just be spread on top.)


Top with oranges slices and cranberries to decorate, if desired. 


Chill until ready to serve - at least 4 hours. 


The lighting is Sue's house is a little odd so the color does not appear as bright in these photos as it really is! 


The texture is a little like a lemon meringue..... but thicker and not quite as smooth. 


A refreshing option after a heavy meal. 
If you don't have a double boiler then you can use a bowl over a pot - as I did in the photo up above. It works just as well - just make sure you use precautions when lifting the bowl out; it will get fairly warm over the simmering water. 
Also, the vanilla pudding powder in the whipping cream helps to stabilize it. If you want to leave it out and just use plain, sweetened whipping cream, that will work too.