Friday, May 31, 2013

Easy Cheesy Tater Tot Casserole


I don't know about you, but I like easy. The less work I have to do, the better. 
Take this casserole for example. 
You take a few basic ingredients, stir them together, throw them in the oven, and you're done. 
*poof*
Just like that. 
You can make this up the night before, keep it covered in the fridge, and simply bake it when you are ready to eat it. Perfect for when company is over, taking to potlucks, or for holiday breakfasts (Christmas morning just got easier!)
You can also play with the ingredients and add your favorites to customize it. 
And, have I mentioned how amazing this tastes?
Yeah.
It tastes amazing. 
Like, when-no-one-is-looking-you-might-just-lick-the-dish amazing. 


Easy Cheesy Tater Tot Casserole

Ingredients
1 bag (1kg/2lb) frozen tater tots
1/2 lb Italian sausage meat, browned
1 can (10 oz) cream of cheddar cheese soup
1 can (10 oz) cream of cheddar and broccoli soup
1 cup sour cream
1/2 a medium onion, diced
1/2 a red pepper, diced
1/2 cup + 1/2 cup aged cheddar, shredded
1 can French's fried onions

Directions
Spray a 9 X 13 baking pan with cooking spray, set aside.
In a large bowl, gently stir together the frozen tater tots, cooked sausage meat, soups, sour cream, onion, red pepper, and 1/2 cup of the cheddar cheese. Stir until well combined.
Spread evenly into prepared dish.


Top with remaining 1/2 cup cheddar cheese and the can of French's fried onions.


Cover and refrigerate until ready to use - up to overnight.
When ready to bake - preheat oven to 350. (I like to let the casserole sit at room temp while the oven preheats.)
Bake at 350 until casserole is bubbly and heated through, about 45 - 55 minutes.


Soooo good. So cheesy. So ridiculously easy.
You can see from the recipe how easy this would be to customize. Ie: You could use 2 cans of pretty much any cream-of soup. You could add more veggies if you wanted. You could probably use hash browns if you couldn't find tater tots - but tater tots are my favorite! You could use your favorite cheeses.
However you make it, you have to admit, it does NOT get much easier than this.
FYI - You can cook it right away if you want to. You don't have to refrigerate it after your make it if you want to eat it right away. 

Don't forget to visit Jam Hands and The Velvet Moon Baker and The Chicken Chick and Carole's Chatter for some fantastic links!

Thursday, May 30, 2013

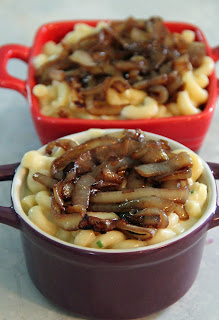
French Onion Soup Mac & Cheese For 2


Just when you thought macaroni and cheese couldn't get any better, along comes mac & cheese combined with delicious caramelized onions.
Can you say "decadent"?
I saw this recipe over at Savory Simple and was about ready to lick my computer monitor staring at the photos. I made a few changes and down sized the recipe to only make 2 servings. If you want to have a look at the original recipe then pop over to Savory Simple.
Do yourself a favor and DO NOT look up the nutritional values. Trust me when I say this is one of those times you just want to enjoy, indulge, and not think about calories.
We all need a wonderful treat like this every once in a while.


French Onion Soup Mac & Cheese For 2
(Adapted from Savory Simple)

Ingredients
Caramelized Onions
1 large onion, sliced thin
2 tsp butter
1 tsp olive oil
generous sprinkle sea salt
1 Tbsp red wine

Pasta
1 cup macaroni

Cheese Sauce
1/2 Tbsp butter
1/2 Tbsp flour
3/4 cup milk
2 cloves garlic, minced
3/4 cup Gruyere cheese, shredded
1/4 cup Mozzarella cheese, shredded
1/4 cup aged cheddar cheese, shredded
1 tsp dried chives

Topping
2 tsp Panko bread crumbs

Directions
Preheat oven to 350. Spray 2, single serving, oven safe dishes with cooking spray. Set aside.
Prepare onions: In a medium frying pan over medium-low heat, add onions, butter, olive oil, and sea salt.


Cook, stirring occasionally, for about 15 minutes. Add in red wine to deglaze pan and continue to cook the onions until they are golden brown - about another 10 minutes.


Remove from heat and set aside.
Prepare pasta: Cook pasta according to package directions. When done, drain and set aside.
Prepare cheese sauce: In a medium saucepan over medium heat, whisk together butter and flour until a smooth paste forms. Slowly pour in milk, a little at a time, whisking the entire time. Bring sauce just to a boil and remove from heat.
Stir in garlic, cheeses, and chives. Keep stirring until cheese has melted and sauce is smooth.
Assemble the dish: Stir cooked pasta into the cheese sauce. Spoon the pasta evenly into the 2 prepared dishes.


Top each dish with 1/2 of the caramelized onions.


Sprinkle each with 1 tsp of the Panko bread crumbs.


Bake at 350 until bubbly and top has browned, about 20 minutes.


*cue angels singing*
Now THAT is how you do mac & cheese, my friends.
For realz.

Head over to Blissful and Domestic and Kitchen Fun With My 3 Sons and My Turn (for us)  and Carole's Chatter for some fantastic links!

Tuesday, May 28, 2013

Indian Spice Shredded Chicken Wrap With Avocado Curry Sauce


I like leftovers. 
Especially leftovers that aren't really leftovers because you have turned them into a completely new dish. 
Them's my favorite.
I made an Indian inspired dinner and had some roast chicken and veggie curry leftover so I decided to see what I could turn it into instead of just reheating it.
I had an avocado getting too ripe so I decided to throw that into the mix and *voila* This tasty tasty chicken wrap magically happened. 

Indian Spiced Shredded Chicken Wrap with Avocado Curry Sauce

Ingredients
Sauce
1 avocado, pitted and peeled
1 Tbsp lime juice
1 clove garlic, minced
1/4 tsp cumin
1/2 tsp curry powder
2 Tbsp Greek yogurt

Wrap
4 large, whole grain tortillas
shredded lettuce
tomato slices
red onions slices
leftover Indian Spiced Roasted Chicken, shredded

Directions
In a blender or food processor, process the avocado, lime juice, garlic, cumin, curry, and yogurt until smooth. Use immediately or chill in an airtight container until ready to use.


Assemble wrap: place 1 tortilla wrap on serving plate. Spread 1/4 of the avocado sauce on the middle of the wrap, going to about an inch from the bottom of the wrap.


Layer your fillers - lettuce, tomato, onion, and shredded chicken on top of the avocado sauce - again leaving an inch space at the bottom.


Fold over one side of the wrap, then fold up the bottom of the wrap, then fold over the remaining side of the wrap. Keep closed by sticking a toothpick through the side of the wrap. Repeat with remaining 3 wraps.


But wait...it looks so lonely there on the plate by itself, doesn't it?
Why not cook up a pot of rice and have some leftover Vegetable Curry with your spicy wrap?
Okay...maybe you want to make this without going through all the trouble of making the Indian Spiced Roast Chicken. Fair enough. You can cheat and use a store bought rotisserie chicken. 


There you go!
That looks more like a complete dinner. 
Taking one dinner and getting two different meals. Nice. Nothing to complain about there.

Be sure to visit Hungry Little Girl and Adorned From Above and The Mandatory Mooch  and Carole's Chatter for some fantastic links!

Sunday, May 26, 2013

Indian Inspired Dinner Menu


I saw a recipe on Pinterest for an Indian Spiced Roast Chicken from Simply Delicious and was motivated to make an Indian inspired dinner.
I made the Indian Spiced Roast Chicken, a vegetable curry, and our cucumber salad and served it with some naan bread.
I don't know why I don't cook with these spices more often. I mean, curry, cumin, turmeric, garam masala, coriander...hello!...all delicious, all readily available (even in Lillooet!), all fairly inexpensive.
I hope you are not intimidated by the number of ingredients in these recipes. It seems like a lot. I was initially thinking that it would take me forever to make this dinner as there were so many ingredients.
Not true.
It came together very quickly and was incredibly easy.
Oh. Yeah. Can I just add that I have never made a roast chicken before.
Weird, right?
I have made a million different recipes but have never attempted to roast a chicken.
This was the perfect recipe for my first attempt. It was moist, juicy, succulent, and the flavor was amazing. The fact that I had to have my hand inside a raw chicken (eeeeeeeewwwwww) was not lost on me...BUT...I am prepared to do it again because this recipe is now my new favorite.
I am sharing the Indian Spiced Roast Chicken recipe and the Vegetable Curry recipe with you today. You can click HERE to find our Cucumber Salad recipe.


Indian Spiced Roast Chicken
(Slightly adapted from Simply Delicious)

Ingredients
Spice Paste
1/4 tsp cayenne pepper
pinch salt
1/2 tsp garam masala
1/4 tsp curry powder
pinch coriander
1 tsp cumin seeds
2 cloves garlic
1 tsp oil
1/4 medium tomato
1 Tbsp ground almond

Marinade
1 recipe spice paste (above)
2 Tbsp garam masala
1 tsp salt
juice of 2 limes
1 tsp sugar
1 cup plain Greek yogurt

Chicken
1 roasting chicken (5 to 10 lbs)

Directions
Preheat oven to 300. Spray a roasting pan with cooking spray. Set aside.
Spice Paste: In a frying pan, add the spices from the "spice paste" list. Toast them until they are fragrant, about 1 - 2 minutes. Remove from heat and add to blender (or food processor).
To the spices, add the garlic, oil, tomato, and ground almonds. Process until a smooth paste is created.


Combine the spice paste with the marinade ingredients (garam masala, salt, lime juice, sugar, yogurt). Whisk together until combined.
Rinse and pat the chicken dry.
Rub the marinade all over the chicken. Gently lift the skin up and spread the marinade under the skin as well. Spread any remaining marinade into the cavity of the chicken.


Place chicken into prepared roasting pan. Tent foil over the chicken to cover.
Place in 300 oven and bake for one hour, covered. After an hour, turn oven up to 350. Uncover and bake until chicken is done. This could take between anywhere from an hour to 2 hours, depending on the size of your chicken. (Internal temperature should be 185, juices should run clear) If the skin is getting too dark, cover with foil again until it is done.


Remove from heat and let sit, covered, for 10 minutes.
Carve and serve hot.


*Drool*
I thought I did pretty good for my first roast chicken. Sue carved it up for me - she may need to work on her carving skills a little....


Vegetable Curry

Ingredients
First in Pot
1 tsp mustard seeds
1/4 cup butter (or ghee)
4 cloves garlic
1 medium onion
2 Tbsp curry powder
1 tsp cumin
1/4 tsp turmeric

Second in Pot
2 large carrots
1 medium parsnip
1 can (420 g) coconut milk

Third in Pot
2 stalks celery
1/2 head broccoli
1/4 head cauliflower
1 large potato
2 cups mushrooms
1 large tomato
1 - 2 cups water

Last in Pot
1/2 cup peas
1 can chickpeas, rinsed and drained
2 Tbsp red wine vinegar

Directions
Prep all your veggies by cutting them into 1 - 2 inch pieces. (It makes things easier if you have them in 3 piles according to the list above - IE: one pile is first in pot, one pile is second in pot, and one pile is third in pot.)
In a large saucepan, heat mustard seeds until they start to pop. Add butter, garlic, onion, curry powder, cumin, and turmeric. Cook and stir until onion softens.
Add in "second in pot" ingredients - carrots, parsnip, and coconut milk. Let cook for about 8 - 10 minutes, until carrots and parsnips start to soften.
Add in "third in pot" ingredients - celery, broccoli, cauliflower, potato, mushrooms, tomato, and water. (Water should be about halfway up the sides of the veggies. The veggies will cook way down!)
Simmer, stirring every few minutes, for about 10 minutes.
Finally, add in the "last in pot" ingredients. Peas, chickpeas, and vinegar. Simmer another 5 - 10 minutes, until heated through.
**I use mild curry. You may want to adjust the amount of spices depending on how hot your curry is and your personal preferences**


There is the Cucumber Salad. We make ours with sour cream but you can use yogurt/Greek yogurt as a sub.


Two types of Naan bread - whole wheat and garlic.  I haven't taken the plunge yet and made my own Naan. These were store bought. :)
They worked great to soak up the sauce from the veggies. You could also serve the veggies on basmati or jasmin rice.


My favorite was definitely the chicken.
The veggie curry was good but not as exciting as the roast chicken.  Feel free to sub your favorite vegetables - it is a pretty easy going recipe.
Want to know what's even better about this dinner?
Leftovers the following day are even tastier.
That is.....if you have any leftovers!
UPDATE: Ooh oooh oooh! Check this out - what to do with any leftovers - Indian Spiced Shredded Chicken Wrap with Avocado Curry Sauce and Veggie Curry on Rice. The wraps are totally my new favorite thing in the whole universe. 

Friday, May 24, 2013

May Day Circus Float

 
My friend, Kerry, and I decided to do another float for Lillooet's annual May Day Parade.
A couple of years ago we did Candyland Float and had so much fun we decided to participate again.
It is a lot of work but, I have to say, seeing the looks on all the kids' faces is worth the effort.
I thought I would share a few photos from our float this year.
The above photo is helper Taylor (in purple), then nephew Nick (clown), Me (popcorn lady), niece Kenzie (in purple), Kerry (clown), and Kerry's hubby, Marcel (lion tamer). We are standing at the back of our float.
 
I made a large, paper mache giraffe for the front of the float. We named him Gerome. The following photos are of him in his various stages of prep.
 
 
Here is Gerome's wood and chicken wire skeleton. Pretty sad looking so far....

 
Here is Gerome's head, some crumpled up newspapers and a cereal box. Again...not very giraffe-y yet....

 
This is the first layer of paper mache going on. Looks pretty much like a llama at this point, yes?
 
 
Just attached Gerome's finished head. The added height definitely makes him look more giraffe-y, less llama-y.
 
 
*tah-dah*
Gerome all painted and ready for his debut.
I had to share this baby giraffe I made too. Kenzie really, really wanted to keep Gerome but I had already promised my nephew, Jord, he could have him. I made Kenzie a baby giraffe so she wouldn't feel left out.
 
 
A few paper towel rolls, a cereal box, and a balloon and we have a baby giraffe skeleton.

 
A couple of layers of paper mache and some bright yellow paint and she is starting to look pretty cute.

 
Some sparkly black felt and some googly eyes and Tyra (Kenzie named her) comes to life.
 
 
She turned out so cute.

 
For an extra touch I added a little purple bow to her tail.
And, for a last paper mache project for the float I made some weights for our strong man.
 
 
There is the first step of the weights. Some cereal boxes and paper towel rolls taped together and paper mached.
 
 
There is our strong man with his finished weights.
Kerry made a lion cage for the float out of one of her kid's wagons and some rolls of cellophane wrap.
 
 
We used some red and white dollar store table clothes to make our circus tent.
It looked so adorable.  We added a large, stuffed monkey, some balloons, a stuffed giraffe hanging from a hoola hoop and many more little animals plus we had some helper animals to throw out candy...
 
 
A lion, monkey, giraffe, 2 tight rope walkers, another clown....
Adorable factor of about a million right there.
 
 
There is Gerome heading up the float with Me, Nick, and Kenz. Nick handed out balloons to kids, I handed out caramel popcorn, Kenz & Taylor handed out cotton candy and rice krispie treats.
Another friend, Amanda, made us about 30 balloon animals to hand out to kids too.
Our friends are fantastic. :)
Sue didn't join on us this year but she did manage to share some love with Gerome.
 
 
And, one more of our float climbing a hill to pass by the hospital and old folk's home.
 
 
We got our exercise walking the parade route, for sure.
We had saved some cute little happy face balloons to hand out at the old folk's home and hospital.
 
 
There's Kenz and Nick handing out the balloons. (You can see one of the balloons at the side of the photo.) They were a big hit.
Kerry and I had so much fun coming up with all the circus themed ideas. Our lovely helpers were amazing! I think they had fun too.
Can't wait to see what we do next time!
I will leave you with a shot of our Candyland float from the previous parade.
 
 
We do tend to favor the bright and colorful, don't we?
 
Be sure to stop by The Chicken Chick and Ms. en Place for some exciting links!