Saturday, November 28, 2015

Ham and Cheese Rolls


Looking for an easy yet super delicious idea for holiday breakfasts?
Something you can prepare ahead of time and just pop in the oven to warm in the morning?
Something that even the pickiest eaters will fall in love with?
Well.... look no further. 
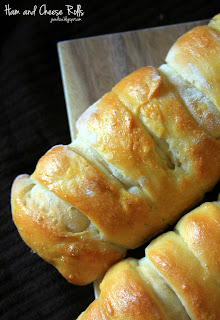
These soft and fluffy rolls are stuffed with ham and cheese and, with only a little extra time, look like you slaved all day over them.
We used deli honey baked ham and then jalapeno Havarti cheese but you can use your favorite meat and cheese to fill them. Make them up far in advance and freeze them, then all you have to do is pop them in the oven to reheat in the morning. Of course, these also work for brunch, lunch, or as a dinner accompaniment.  
We used our go-to bread recipe but feel free to use store bought or your favorite soft yeast dough. 


Ham and Cheese Rolls

Ingredients
5 - 5 1/2 cups flour
3 Tbsp sugar
2 envelopes Rapid Rise Yeast
1/2 tsp salt
1/4 tsp baking soda
1 cup buttermilk
1 cup water
1/3 cup butter, cut into pieces

Filling
24 slices of cheese (we used jalapeno Havarti)
24 slices of ham (we used deli honey ham)

one egg, beaten - for egg wash

Directions
Line a large cookie sheet with parchment paper, set aside.
In a large bowl combine 3 cups flour, sugar, undissolved yeast, salt, and baking soda.
In a medium saucepan, heat buttermilk, water, and butter until very warm (120 - 130); butter does not need to melt completely. Mixture will appear curdled.
Stir into the flour mixture. Stir in enough remaining flour to make soft dough.
Knead on lightly floured surface until smooth and elastic 2 - 5 mins). Cover and let rest on floured surface approx 15 mins.
After dough has rested:
 1. divide dough into 12 equal parts.
2. Roll one piece into a rectangle.
3. cut strips evenly, roughly 1/3rd of the way up the rectangle. Lay 2 slices of cheese and 2 slices of ham along the middle, uncut 1/3 dough.
4. Fold top 1/3rd of dough over the filling and pinch to seal.
5. Wrap the strips of dough around the filled section.
(See step by step photos below)


Repeat with remaining 11 pieces of dough. Place each roll onto prepared cookie sheet.
Cover with a clean tea towel and set somewhere warm to rise for an hour.
After an hour - preheat oven to 375.
Take beaten egg and, using a pastry or basting brush, brush tops of buns with the egg. 
Bake at 375 until tops of bread are golden brown, about 15 - 20 minutes.
Remove to cooling rack to cool for at least 10 minutes.


Best served warm but, of course, they are still delicious at room temp - or even just out of the fridge.


Pretty, right?
You can also freeze them once they have cooled down to room temp, covered in an air tight container. When ready to serve, simply pop them into the oven until warmed through.


Just enough to cheese to make these melty and delicious but not too gooey.


Cut in half (above) there is 24 pieces - which is perfect for Christmas morning when you might have a house full of company. You can do all the not-really-hard work days, or even weeks, in advance.


I would recommend storing any uneaten pieces covered in the fridge. 
You can always pop them in the microwave for a few seconds too. 
 
Be sure to visit these fun sites for more great links! - Carole's Chatter, Kitchen Fun With My 3 Sons, My Turn (for us),  Wondermom Wannabe
 

Sunday, November 22, 2015

Pumpkin Chocolate Butterscotch Chip Muffins


'Tis the season for all things pumpkin, is it not?
These simple, yet moist and delicious, muffins are perfect for fall - or any time, really. These can be whipped up in about 30 minutes from start to finish so are perfect for breakfast or brunch. They also freeze very well so the kids can take one out after school and pop it in the microwave for a snack. 
Quick breads are one of my favorite things to bake. 
Not only because they are "quick" but because they are so versatile and easy to tailor to suit your favorite flavors.


Pumpkin Chocolate Butterscotch Chip Muffins

Ingredients
3 cups flour
2 tsp cinnamon
pinch salt
1 tsp baking soda
1/3 cup chocolate chips
1/3 cup butterscotch chips
1/3 cup walnuts, chopped
4 eggs
2 cups sugar
1 1/2 cup pumpkin puree (not pumpkin pie filling)
1/2 cup Greek yogurt (plain or vanilla)
1 cup oil

Directions
Preheat oven to 350. Line 20 - 24 muffin tins with paper liners, set aside.
In a large mixing bowl, whisk together flour, cinnamon, salt, and baking soda. Add in the chocolate and butterscotch chips and walnuts.
In a separate bowl, whisk together egg and sugar until smooth. Whisk in the pumpkin puree and Greek yogurt. Vigorously whisk in the oil until well combined. 


Stir the dry ingredients in to the wet ingredients until just mixed - it's okay if a few small streaks of flour show. Evenly scoop into the prepared muffin tins.
Bake at 350 until muffins are lightly browned and a toothpick inserted near center comes out clean, about 15 - 20 minutes. Remove from oven and let sit in muffin trays for 5 minutes before removing to wire rack to cool completely.


Serve warm or at room temp. 
See... easy peasy.
You can easily change the 1 cup of add ins - I used 1/3 cup of each chocolate chips, butterscotch chips, and walnuts - to any that you like. For example dried cranberries, raisins, pecans, skor bits, caramel bits, dark chocolate chunks, etc. Really, really like chocolate - put in just a cup of chocolate chips and don't worry about anything else. Totally up to you!!! 

Sunday, November 15, 2015

Cherry Limeade Cupcakes


Alright, here's the thing.
We cheated... again....
It's just that it worked soooo well with our Triple Butterscotch Cupcakes for Thanksgiving (recipe HERE) that we thought we should do it again. 
Don't judge.
Who doesn't want delicious cherry and lime cupcakes that also happen to be super de duper easy peasy? No one. That's who. 
Once you make these and see how crazy good they turn out... you'll be cheating too. 
For realz.


Cherry Limeade Cupcakes

Ingredients
Cake
1 box white cake mix
1 box vanilla pudding mix
2 limes juiced + enough water to make 1 cup
zest of 1 lime
1/3 cup oil
3 eggs

Simple Syrup
2 Tbsp fresh lime juice
2 Tbsp sugar

Cherry Buttercream
1 1/4 cup butter, room temp
4 - 5 cups cups icing sugar
6 - 8 Tbsp maraschino cherry juice
few drops red food coloring

Decorations
12 maraschino cherries with stems

Directions
Prepare cake - preheat oven to 350. Line 24 muffin tins with paper liners. Set aside.
In a mixing bowl, beat together cake mix, pudding mix, lime juice and water, oil, and eggs until well combined. Scoop evenly into the prepared muffin tins.
Bake at 350 until tops are golden brown and toothpick inserted near center comes out clean, about 20 - 25 minutes. Remove from oven and let sit for 5 minutes. 


Then remove from muffin tin to cool completely on wire cooling rack. 
Prepare simple syrup - Stir together lime juice and sugar until sugar is dissolved. 
Brush the simple sugar on the tops of the cupcakes using a basting or pastry brush. Let sit for a few minutes to air dry a bit. 
Prepare buttercream - Beat butter until smooth, scraping sides as needed. Gradually beat in icing sugar and cherry juice and food coloring until you reach spreading consistency. 


Pipe or frost the buttercream on top of each cupcake. Place a maraschino cherry on top of each cupcake.


Chill until ready to serve.


FYI - It might seem like a pain in the patootie but the simple syrup brushed on top of the cupcakes adds even more flavor so is totally worth doing. 
They looked so pretty on a platter with our Triple Butterscotch Cupcakes....


Two alternatives for those of you looking for a non-chocolate dessert cupcake. 
Plus... these are also perfect for an office potluck/party. Everyone in my office loved them! 
 
Check out Carole's Chatter for tons of great links to more recipes!

Wednesday, November 11, 2015

Slow Cooked Short Ribs


When I started making this recipe I wasn't going to photograph it for the blog. I thought - there is no way I can take a picture where short ribs will look appealing. I thought - I'm going to make them look not delicious and won't do them justice. I mean...it's a hunk of beef in gravy. How can I make that look pretty? 
But then, being a food blogger for several years now, I thought.... well.... justincase I better take some shots. 
*Whew*
Good thing I did.
I think they turned out pretty darned appealing and tasty looking. Which is good because this is one of the most delicious dinners I have ever made. 
Not even lying. 
It is sooooooooo simple but is fancy enough to serve to guests you want to impress (in-laws, I'm looking in your direction...) 
Can you call beef short ribs "pretty"? 
Yes.
Yes, you can.


Slow Cooked Beef Short Ribs

Ingredients
2 Tbsp sesame oil
2 to 3 lbs beef short ribs (bone in)
2 stalks celery, finely chopped
2 whole shallots (or 1 large onion), finely chopped
3 cloves garlic, minced
2 Tbsp tomato paste
1 tsp curry powder
1 1/2 cup red wine
2 cup beef broth
1/4 cup soy sauce
2 Tbsp flour
2 bay leaves
1/2 tsp pepper

Directions
Preheat oven to 250. 
In a large frying pan, heat oil over medium heat. Cook short ribs for 2 minutes on each side. Remove ribs and place in bottom of a dutch oven (*these can also be placed in a slow cooker!)
In the frying pan, cook the celery, shallots, and garlic until onion softens - about 3 - 4 minutes. 
Stir in the tomato paste and curry powder and cook for 1 minute. 
Add in red wine, beef broth, and soy sauce. 
Stir in flour and bring sauce to a boil. 


Pour the sauce over the short ribs. 


You may need to a little more liquid as you want it to almost cover the ribs. 
Cook at 250 until meat is very tender and falling off the bones - about 5 hours. **I flipped the meat in the sauce at the 2 hour and 4 hour mark to ensure even cooking.**


Keep warm in oven while you prepare your side dishes - I went with garlic mashed potatoes and peas & carrots. Serve hot.


It is ridiculously tender....
And can we talk about the gravy for a second?
Maaaaaaaaaaaaaaaaaan... that is some amazing gravy. Don't waste it. Use every drop. Seriously. 


I'm glad I decided to take some pics. I was very happy with how pretty everything looked. Maybe I was influenced by how crazy good the short ribs tasted!
Note - You can also place everything into a slow cooker instead of a Dutch oven and cook on low for about 9 - 11 hours (it really helps to know your slow cooker!!)
Slow is the way to go!


Be sure to click HERE to visit Carole's Chatter for more fun foody links! 

Tuesday, November 10, 2015

Triple Butterscotch Cupcakes


These pretty little things were part of our Thanksgiving dessert options.
Can I let you in on a little secret?
We totally cheated with these.
Totally.
But no one knew. *insert evil laughter here*
We don't often cheat with by starting with a box mix but sometimes it just saves some time. (Especially when we went a little bonkers with our Thanksgiving desserts and made a billion things - check them out HERE.)
Don't want to use a box mix - make your favorite from scratch cake instead. We won't judge. 


Triple Butterscotch Cupcakes

Ingredients
Cake
1 box yellow cake mix
1 box butterscotch instant pudding mix
1 cup buttermilk
1/3 cup oil
3 eggs

Filling
4 Tbsp butter
1 cup dark brown sugar
1/2 cup heavy cream
1/2 tsp salt
5 Tbsp Butterscotch Ripple liqueur 

Frosting
4 cups whipping cream
2 boxes butterscotch instant pudding mix

Decorations (optional)
mini chocolate pieces

Directions
Cake - Preheat oven to 350. Line 24 muffin trays with paper liners. Set aside.
In a mixing bowl, whisk together cake mix and pudding mix. Whisk in the buttermilk, oil, and eggs until well combined. Scoop evenly into the prepared tins.
Bake at 350 until cupcakes are golden brown and toothpick inserted near center comes out clean, about 20 - 25 minutes.


Remove from pan to wire rack to cool completely.
Prepare filling - In a medium saucepan over medium heat, melt together butter and dark brown sugar. Cook, stirring constantly, until liquidy. Pour in cream and salt. Bring mixture to a boil. Stir boiling mixture for 4 minutes.
Remove from heat and stir in Butterscotch Ripple liqueur. Let cool to room temp. 
Prepare frosting - Pour the whipping cream into a large mixing bowl. Sprinkle in the butterscotch pudding mix. Beat until stiff - 1 to 2 minutes. 
Assemble cupcakes:
Cut a cone shape wedge of cake out of the center of each cupcake (see photo below). Keep the top circle part of the cone but discard the rest (or, you know, eat it....)


Fill the hole in the cupcake with a generous spoonful of the butterscotch filling.


Place the little circle back on top of the cupcake.


Pipe (or spread with a knife) a generous amount of frosting on top.


If desired, top with a mini chocolate bar piece.


Alternatively, you could also drizzle a bit of the leftover butterscotch filling over the top. 
Chill until ready to serve. 
A few notes - Don't have Butterscotch Ripple Liqueur?? Use any similar flavor - I have made it with Pumpkin Spice Whiskey and Salted Caramel Liqueur and it is also delicious.
The amount of frosting is a lot. If you are not going to be piping tasty swirly piles on top and simply spreading with a knife - then you probably only have to make half the frosting. (But, seriously, the frosting is amazing... pile it on!)
Everyone loved the little surprise of gooey butterscotch in the center. I mean... what's not to love??


Saturday, November 7, 2015

Crab Puffs with Garlic Aioli


I made these for an appetizer at Thanksgiving not really knowing what to expect. The original recipe was one I had clipped out of a magazine years ago and put in our mom's recipe tin under the cupboard and then forgotten about. 
After re-discovering it just before Thanksgiving I decided to give it a go. 
Turns out this was a fantabulous idea. 
These are addicting. They are baked, not fried so are a tad healthier. (Don't get me wrong - I'm not saying they are healthy. Just... heathier.
The crispy crust on the bottom is excellent with the savory cheesecake-esque filling on top. 
Plus they are actually super easy to make. I think they took 10 minutes to put together and then throw in the oven. 
In case you need another reason to make them... you can serve them hot, fresh out of the oven, but they are also just as tasty at room temp which makes them a perfect appie for entertaining when your guests will be milling around snacking for a while.
And definitely make the garlic aioli. It takes them over the top. So. Much. Garlic. It's amazing!


Crab Puffs With Garlic Aioli

Ingredients
Garlic Aioli
1/2 cup mayo
1 Tbsp dried chives
1 tsp prepared coarse mustard
1 clove (large) garlic, minced
salt & pepper

Crust
1/3 cup Parmesan cheese, grated
1 1/4 cup Panko type bread crumbs (I used Glutino Gluten Free Breadcrumbs Original)
1/4 cup butter, melted
salt & pepper

Filling
2 (8oz) pkgs cream cheese, room temp
1/3 cup Parmesan cheese, grated
3 Tbsp mayo
2 tsp prepared coarse mustard
1 tsp Worcestershire 
1 egg yolk
6 oz crab meat (cooked)
1 Tbsp dried parsley

Directions
Preheat oven to 350. Lightly spray a 24 tin, mini muffin pan with cooking spray. Set aside.
Prepare the Garlic Aioli - Whisk together mayo, chives, mustard, garlic, and salt & pepper. 


Place in fridge to chill until ready to use. (This can be made up to a day or two ahead so the flavors have time to blend.)
Prepare the puffs - In a mixing bowl, stir together the crust ingredients (Parmesan cheese, Panko, butter, salt & pepper) until well combined. Press about 1 Tbsp of this mixture firmly into each of the mini muffin tins so it is well packed and is up the sides slightly to form a "cup". 


In another mixing bowl, stir together the cream cheese, Parmesan cheese, mayo, mustard, Worcestershire, and egg yolk. When well mixed together, fold in crab meat and dried parsley. 


Scoop approx 1 Tbsp of the filling into the crumb crusts.


Bake at 350 until well browned and cooked through, about 20 - 25 minutes. When done, remove from heat and let cool at least 5 - 8 minutes in tin before attempting to remove.


They need to firm up a little or they will fall apart when you take them out. 


Run a knife carefully around each puff to loosen from pan. Remove to serving tray.


Serve hot or at room temp with the chilled garlic aioli.


Try not to eat them all before sharing with your guests. 


A few notes - **With my mini muffin pan size I ended up getting a total of 30 puffs. 
**Make the aioli ahead of time so the flavors can blend. You want it to be garlicky. That is what makes it so good. I used a LARGE clove of garlic but you could use 2 smaller ones to the same end.
**I bought Glutino Gluten Free Original Breadcrumbs (link HERE) as my niece is currently gluten free and they worked just as well as Panko would. You just want to use a crumb similar to Panko in consistency. 
**If you can't get fresh cooked crab meat then it will work just as well with canned/packaged. 

We're sharing over at Carol's Chatter. Be sure to pop by and say hi!