Monday, August 19, 2019

Jarlsberg Lamb Burger (with KETO alternative)


You may have seen our last post (click HERE) where we shared Sue's entry into "The Jarlsberg Burger Recipe Contest" (link HERE). Well, now it's my turn to share my entry. Granted Sue's Jarlsberg Spicy Chicken Bacon Burger will be pretty hard to beat. 
I decided to go with lamb as I figured it would go really well with the nuttiness of the Jarlsberg. I also decided to add some deep fried daikon, use a grainy, seedy bun, and turn the Jarlsberg into a cheese sauce because #textures that's why. 
Yup. It's got a lot going on. It's the perfect burger for those times you want something a little fancier than the usual. Also.... it's keto friendly believe it or not. Be sure to read through to the end of this post for how to make it keto and to get the nutritional counts!


Jarlsberg Lamb Burger (with KETO alternative)

Ingredients
Lamb Patties
1 lb ground lamb
1 tsp dried rosemary
1 clove garlic, minced
salt & pepper
4 lettuce leaves
4 whole grain buns

Cheese Sauce
1 1/4 cup heavy cream
2 oz cream cheese
2 Tbsp butter
8 oz shredded Jarlsberg
1/8 tsp black pepper

Deep Fried Daikon
half a daikon radish, peeled and sliced thin
1 egg
1/2 cup crushed pork rinds
oil for deep frying

Directions
Prepare the lamb patties - mix the ground lamb, rosemary, garlic, and salt & pepper together well. Form into 4 equal sized patties. Cover and place in fridge until ready to cook.
Prepare the cheese sauce - in a medium saucepan over medium heat, whisk the cream, cream cheese, and butter until smooth. Add in the shredded Jarlsberg and pepper. 


 Stir until melted and smooth. Set aside and keep warm until needed. (NOTE - can be made ahead and refrigerated until needed: simply microwave to reheat.)
Prepare the Daikon - Whisk the egg in a small bowl. Place the crushed pork rind crumbs in another bowl. Dip each slice of the Daikon radish into the egg and then coat in the pork rinds. Set aside on a plate until all are done. 


Heat your oil in a medium sized pot to 350 degrees (use a thermometer for best results). Fry the Daikon slices a few at a time until golden - about 1 minute on each side. Remove from oil with a slotted spoon and place on paper towel to drain. 


Repeat until all the slices are cooked. 
Just before you are ready to assemble your burger you will want to cook up your lamb burger patties. Use your favorite method: oven, BBQ, or stove top (I pan fry mine).


Assemble the Jarlsberg Lamb Burger: Place the bottom of the bun on your plate. Top with a lettuce leaf, a lamb patty, and a generous scoop of the Jarlsberg cheese sauce. 


Then add a slice of the crispy fried Daikon...


Top with the other half of the bun and you are good to go! I don't add anything to my top bun but feel free to add a little butter or mayo.... nothing too strong through, you want to experience all the flavors in the burger! 
NOTE - I prepped my Daikon to be fried and then set it aside. As soon as the oil was heated for frying the Daikon,  I also put the burgers on to cook. Doing it this way they were both done about the same time. You don't want to make the Daikon ahead of time as they will lose their crispiness and do not reheat well. 


BUT WAIT.... how do you make it KETO, you wonder?
So easy....


Did you see what I did there? Maybe you need a closer view.


Yep. Simply wrap it in some lettuce instead of a bun and *voila*...


A delicious KETO Jarlsberg Lamb Burger. 
According to MyFitnessPal the nutritional counts are (for no bun served on half a cup of lettuce): 727 calories, 33 protein, 3 carbs, 0 fiber, 65 fat, and 0 sugar. Nice - 3 net carbs. 
So, what do you think? Would you choose my tasty lamb burger or Sue's crispy chicken burger?
Two wildly different burger experiences that are both sure to make your taste buds explode. 

Wednesday, August 14, 2019

Jarlsberg Spicy Chicken Bacon Burger


Thank goodness for Jarlsberg cheese. They quite often run recipe contests and I am so happy they do. It inspires Sue and I to think outside the box for ways to use their delicious cheese. This year they ran "The Jarlsberg Burger Recipe Contest" (Link HERE) and Sue and I both came up with our own creations. I'm sharing Sue's today - everyone went completely crazy for hers. I'll share mine next time - it wasn't quite the hit hers was but it's still pretty fancy schmancy (if I do say so myself!). (UPDATE: CLICK HERE TO SEE MINE)
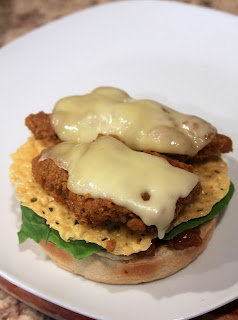
Sue used Jarlsberg cheese twice in her recipe and.... I will give her credit.... she knocked it out of the park with this one: soft brioche bun, a layer of spicy apple chutney, lettuce, a Jarlsberg cheese crisp, crunchy fried chicken, more Jarlsberg cheese (melty this time), crispy bacon, and a bit more spicy apple chutney. 
Drooling yet? 
This is one burger you are going to want to try.... more than once...


Jarlsberg Chicken Burger

Ingredients
Spicy Apple Chutney
3 medium onions
2 Tbsp oil
3 medium apples, peeled and cored
1 cup sugar
1/3 cup + 2 tablespoons apple cider vinegar
1 Tbsp fresh lemon juice
1 1/2 tsp curry powder
1/2 tsp salt
pinch cinnamon
1 tsp mustard
2 - 3 Tbsp Sriracha (or to taste)


Crisps
Jarslberg Cheese, shredded

Fried boneless chicken pieces, cooked
lettuce
Jarlsberg cheese, sliced
bacon, cooked
brioche buns

Directions
Prepare the chutney - Caramelize the onions in the oil. Deglaze the pan with 2 tablespoons of the cider vinegar and pour the onions and the deglazing liquid into a large pot.
Add the apples, and sugar, and the rest of the cider vinegar. Bring them to a rolling boil over high heat. Lower the heat and simmer the mixture, uncovered for 20 minutes, stirring every few minutes.
Add the lemon juice, curry powder, salt, cinnamon, mustard, and Sriracha. Raise the heat slightly and continue cooking and stirring at a high simmer for another 5 minutes.
Let the mixture cool before putting in an airtight container. The mixture should be kept refrigerated and is best eaten cold. Will last for a couple of weeks refrigerated.
Prepare the Jarlsberg crisps - Preheat oven to 350. Line a cookie sheet with parchment paper (NOT foil!). Place little mounds (about 2 - 3 Tbsp) of shredded Jarlsberg several inches apart on the parchment paper. they will spread so don't place them to close together. Cook in preheated 350 oven until golden brown. Remove from heat and allow to cool before removing. Set aside. (Can be made ahead and stored in fridge until needed.)
Just before assembling your burger - place fried chicken pieces into a hot oven and top with slices of Jarlsberg cheese. Heat until cheese is melted. 
Assemble burger: Place the bottom of your brioche bun on a serving plate. Top with a generous amount of the spicy apple chutney.


Top with a a piece of lettuce and a Jarlsberg cheese crisp.


Top with the fried chicken and melty cheese.


Now add the crispy, cooked bacon.
Spread a little more of the spicy apple chutney onto the inside of the top bun...


Admire your handiwork...


And then jump right in there.


So good!
The Jarlsberg cheese adds a wonderful nuttiness to the flavor... and the spicy apple chutney pairs so well with the chicken and bacon. All those flavors! All those textures! 
A burger lovers dream come true. For real though.
We haven't heard you won the contest yet but will be sure to update when we do. Sue definitely deserves to be in the running with this recipe. 


Don't tell Sue but I think she may have beat me out in the creativity dept. When I post my recipe I will add a link (update: LINK HERE) so you can click over and check out mine. I went a completely different way. 
Her addition of a Jarlsberg crisp AND the melted Jarlsberg was genius.... not to mention the spicy apple chutney. Maybe a bit of a pain to get everything ready but you can make most of it up ahead of time and TOTALLY worth the effort. 
NOTE - when adding the Sriracha use as much as you like. Less if you are a bit of a wimp (like me), more if you want to bring the heat. 

Saturday, August 10, 2019

Key Lime Pie


Okay. Two questions: 1) Who out there knew that key lime pie was super easy to make? 
and 2) Why didn't you tell me?
Seriously. 
It's like 5 ingredients and takes 2 seconds to make. It's probably a good thing I didn't know about this early. I would've eaten a lot more key lime pie. 
Sue happened to give me a bag of key limes to use up so I decided to read up on key lime pies. Good thing I did! This is going in the regular pie rotation for sure. I'm going to try it with regular limes too - just because I can't get key limes in the town where I live (yay small town living!). I'm thinking it will work well with lemons too - just to switch up my regular lemon meringue pie a little. Let us know in the comments below if you've made it with regular limes or lemons - we'd love to hear how it went. 


Key Lime Pie

Ingredients
2 cans sweetened condensed milk
1 cup key lime juice
zest of a "regular" lime
4 egg yolks

dough for 9 inch pie crust

decoration
whipped cream
lime zest

Directions
Preheat oven to 350. Roll the pie dough out and place in 9 inch pan. Par-bake for about 10 - 12 minutes (until ever so slightly browning on the edges). Remove from heat and set aside while you make filling. 


Whisk together condensed milk, key lime juice, lime zest, and egg yolks. Pour evenly into par-baked crust. Bake at 350 until pie is set - about 20 or so minutes. (Can vary depending on oven - mine took almost 40 minutes to "set". Start checking at 20 minutes. (I put my pie on a cookie sheet but this is not necessary. This can add to the cooking time as well, FYI.)


Remove pie from oven and let cool completely. 


Decorate with shipped cream and a little lime zest, if desired. Maybe a little slice of lime too, to fancy things up....


Chill until ready to serve. 


One of the prettier pies out there, no?


So creamy and light. Perfect for summer! 


Sooooooo easy!
The only tricky part for me was the baking. Most recipes I looked up said 15 - 20  minutes. I found mine took about double that before it looked set up in the middle. I was afraid I had overcooked it but it seemed to be okay. It was still nice and smooth and creamy and sliced really well. 
If you try this recipe please let me know how your cooking time was. I'm curious if it is just my oven or if most people have to cook it for the longer time. :)

Thursday, August 1, 2019

Blackberry Pie


I've never made a blackberry pie. I've made a Blackberry Meringue Pie (Link HERE) which was amazingly different and delicious, but not a good, old fashioned, blackberry pie. 
My niece, Sue's daughter, Kenzie brought up a whooooole bunch of blackberries so I knew this was my opportunity to make one. Also... I have a lot of blackberries.... anyone have any fabulous blackberry recipes they'd be willing to share? :)
This pie, like most pies, is a bit time consuming because you have to make a crust and a filling and then bake it. You can use a store bought crust if you want to cheat a little. I use our Never Fail Pie Crust (link HERE) because it's super-de-duper flaky and *jazz hands*. In the end, this pie is totally worth any time it's going to take you. Seriously. So good. 


Old Fashioned Blackberry Pie

Ingredients
Crust for double pie crust (Our Recipe HERE) 

Filling
6 cups blackberries
1/2 cup sugar
1/4 cup cornstarch
zest of one lemon
1 tsp vanilla

For Brushing on Crust
1 egg
1 Tbsp milk (or cream)

Directions
Preheat oven to 400.
Prepare crust as per instructions. You need enough crust for a double 9 inch pie. Roll out the bottom crust and place in pie pan. Set aside.
In a large mixing bowl, gently stir together the blackberries, sugar, cornstarch, lemon zest, and vanilla until well combined. Spoon into bottom crust. 


Roll out the other crust and place on top. Pinch around the edges to seal, cutting off any extra dough.
In a small bowl, whisk together the egg and milk. Using a pastry or basting brush, brush the egg mixture over the top crust. Cut a few slits in the top to allow steam to escape. 
NOTE - place on a cookie sheet or pizza pan as pie will boil over a little and you don't want that in your oven! 


Place in preheated 400 degree oven. Bake at 400 for 10 minutes. Turn heat down to 350 and continue to bake until pie is golden and filling is bubbly - about 40 - 50 minutes. 


Let cool on a wire rack to room temperature. 


If you try and slice it while warm it will ooze out. It will still taste fabulous but will not stay together very well. Let it cool and then chill it for a few hours for best results. In the photos here I cut it at room temp, without chilling it. It stayed together but still was a bit oozy. 


Of course, vanilla ice cream is a must...


Close up? Let's do it.


*cue angels singing*
Berry-licious. 


I think pies always look so pretty. Something about that flaky, golden crust just seems so artsy. 
Art you can eat.... I'm on board that train.