Friday, November 26, 2021

Sugar Cookie Hot Chocolate Cups


The cuteness factor of these cookies is off the charts, am I right? 
And, believe it or not, they aren't that complicated to make. The kids will have a blast helping you out with these ones! You can use your favorite sugar cookie recipe for this or even store bought sugar cookie dough. We used Sue's Sugar Cookie recipe AKA Dinosaur Footprint Cookies (HERE)
I think I got 18 cookies from the recipe, but I'm not 100% on that. I had helpers in the kitchen that may have sampled as we went along....


Sugar Cookie Hot Chocolate Cups

Ingredients
1/4 cup white chocolate chips, melted
small, hard pretzels
1/2 cup chocolate chips, melted
1/2 cup super mini marshmallows


Directions
Preheat oven to 350. Lightly spray a mini muffin tin with cooking spray, set aside. 
Prepare sugar cookie dough as per instructions. Pinch off golf ball sized amounts of dough and roll into a ball. Place into prepared muffin tin. Use your thumb to gently press in the center of each ball. 
Bake at 350 until edges are light, golden brown, about 8 - 10 minutes. 


Remove from heat and gently press down center of cookie with the bottom of a shot glass or something similar. This indent will hold the chocolate. 
Remove cookies from tray to a wire rack and let cool completely. 


Prepare the handles of the cups by carefully cutting the round bits from the pretzels. Be sure to have extra pretzels as you will lose some to cracking!


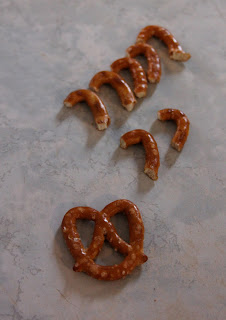
Dip the ends of the round piece of the pretzel into the melted white chocolate and press to the side of the cookie cup. Hold it for a few seconds to make sure it adheres. Continue with the rest of the cups and pretzels bits. 


Take a small spoon and carefully fill each indent on the top of the cookies with about a tsp or so of melted chocolate. Don't fill the indent all the way to the top! Just enough to cover the bottom of the indent. 


Now all you have to do is sprinkle in a few of the super teeny marshmallows!


How cute are they?


Yes, they are a bit fussy to make but so worth it when you see them on display. Make a dozen and throw them in with your Christmas cookie tray. I bet they will be the most commented on by your guests. 
FYI - if you have trouble with the handles sticking; try propping the cookies on their side and then the pretzel can stand on top until it is dry. That way you don't have to hold it until it dries!

Monday, November 15, 2021

Keto Tomato Soup


We are well into comfort food weather here in BC. 
And what better comfort food is there than soup? We have an amazing Tomato Soup recipe (HERE), but it is a bit time consuming and it's not keto friendly. It really is THE BEST though so if you want a delicious, from scratch, tomato soup you can can for the winter.... make that one!
This keto friendly tomato soup recipe only takes about 10 - 15 minutes from start to finish. Not even lying. Plus it's delicious. Try both, see which one you like better!


Keto Tomato Soup

Ingredients
24 oz jar of Rao's marinara sauce
1 cup chicken broth
1/2 cup whipping cream
2 Tbsp tomato paste
2 Tbsp Swerve granulated 
salt & pepper

Directions
Stir ingredients together in a pot over medium hot. Bring to a boil, reduce heat, simmer 5 minutes. 
Boom. 
Done. 


The nutritional counts for one serving (recipe makes 4) are: 220 calories, 19 fat, 8 carbs, 2 fiber, and 3 protein. So 6 net carbs! 
FYI - you can thin it a bit with more chicken broth if you feel you need to. It's very thick and luxurious (which is a weird word to use to describe soup but I can't think of another one right now). 


I like to serve them with a big scoop of Twin Peaks Nacho Cheese Protein Puffs. 
But I also love it with a delicious grilled cheese on Carbonaut bread to keep things keto friendly!


Either way, it's low carb, keto friendly, delicious, comfort food. 
You will never be able to convince me that tomato soup and grilled cheese isn't the greatest food pairing in the history of comfort food. 
Yes, I will fight you over this. 


Saturday, November 13, 2021

Pretzel Donuts


The hybrid you didn't know you needed. 
Chewy and fluffy, salty and sweet. 
Yes, you need to try them. Yes, they are delicious. Yes, they are delightfully weird. 
Okay, bit of a spoiler alert though: you will either love these or hate these. There's really no in between here. Your brain will be confused by how you are eating a pretzel BUT it's a donut... or you are eating a donut BUT it's a pretzel. 
Weird. Weird is the word we heard the most from our taste testers. I'd say we had an 80/20 split for love it/didn't love it. To be fair.... the "didn't love it" group had the end of the batch and may have developed a bit of a metallicy aftertaste from the baking soda. 
Cooking note - if your baking soda water is turning brown near the end, your pretzels will taste more baking soda-y. You can always have a small pot of new baking soda water waiting to do the last ones and you can avoid this. 
If you are looking for a crazy new recipe to wow your family/friends.... this is the one. Try it!


Pretzel Donuts

Ingredients
Pretzel Donuts
3 cups warm water
2 Tbsp sugar
2 tsp salt
4 1/2 tsp yeast
7 - 9 cups flour
1/2 cup butter, melted

10 cups water
1/2 cup baking soda

1 egg, beaten
1 Tbsp water
coarse sea salt

Oil for deep frying, about 2 liters

Glaze
2 cups icing sugar
1 tsp vanilla 
1/4 cup milk

Directions
Dough - Combine warm water, sugar, salt, and yeast. Let sit about 5 minutes to activate yeast. 
Add in 7 cups of flour and the melted butter. Add in more flour, if needed, until soft but not sticky dough comes together. Turn on to floured surface and knead about 2 minutes. 


Place in an oiled bowl and cover with tea towel. Let rise somewhere warm until doubled, about an hour. 


Punch dough down and place on lightly floured work surface. Divide into 12 equal pieces. (These will make quite large pretzels. If you want smaller then I would make about 16.)
Roll each piece into a 24 inch rope. 
Then form the rope into a pretzel shape.


Place each pretzel onto a piece of parchment paper and then onto a cookie sheet. Don't forget the parchment paper or the dough will stick to the cookie sheet and not turn out. You can use a single, large piece of parchment BUT it is far easier to lift them off the cookie sheet if the parchment is cut into individual squares. 


When all pretzels are shaped, bring the 10 cups of water to boil in a large pot with the baking soda. The baking soda will foam up so be sure to use a large pot! 
Also start heating the oil for deep frying to 350 degrees (over medium heat). I start the oil when the water reaches a boil so it will be almost ready when I am done boiling the pretzels. 


Carefully place a pretzel in the boiling water for 30 - 40 seconds. Flip the pretzel over and boil on the other side for 30 - 40 more seconds. 


Remove and place back on the parchment paper. 
Repeat until all pretzels have been boiled. Whisk the egg and water together. Using a pastry or pasting brush, brush the egg mixture over each pretzel to coat and then sprinkle with a pinch of sea salt. 
When the oil has reached 350, carefully place a pretzel in the pot. Fry for one minutes, flip over, and then fry for one more minute - until golden brown. 
Remove from oil with a slotted spoon or tongs and place on paper towel to drain an excess oil. 


Repeat with remaining pretzels. Use a thermometer to make sure the oil stays at approximately 350. (Lower and the pretzel will be oily, higher and the insides will be doughy.) 
Prepare Glaze - in a shallow bowl, whisk together the icing sugar, vanilla, and milk.
Dip each pretzel into the glaze and then let any excess drip off. 


That is a thing of beauty!
Chewy outside crust and fluffy inside!


Yes, it is a fairly labor intensive recipe. Not going to lie, it takes about 4 hours from start to finish. 
I absolutely loved these though so I thought it was worth the effort. 


You could easily make these maple bacon flavored by adding maple extract to the glaze instead of vanilla, and sprinkle with bacon bits after glazing. 


That salty and sweet combination gets me every time. 
I guarantee your brain will be in a happy state of confusion eating these. 
Is it a donut? Is it a pretzel? It's both! 

Wednesday, November 10, 2021

Old Fashioned Cream Puffs


Choux pastry has been around for a very long time. We don't pretend to be experts in the choux field but we do have fun with it. 
Obviously we didn't come up with this recipe but we did want to share our experience with it and some of the things you can do with it. 
Check out our Triple Chocolate Eclairs (HERE), our Eclair Cupcakes (HERE), and our Churros with Caramel Sauce (HERE). Yup. All basically the same recipes, just the shape or cooking method changes!
Cream Puffs (also called profiteroles) have a reputation for being difficult to make and we can't disagree. Usually they turn out fine but every once in a while, for no apparent reason, they will collapse or not cook properly or be otherwise weird. If you've never made choux pastry before we would recommend watching a few videos on Pinterest or YouTube before starting just to get an idea. 
Cream puffs are so versatile and delicious! So worth the little bit of work it takes to make them.


Old Fashioned Cream Puffs

Ingredients
1/2 cup water
1/2 cup milk
1/2 cup butter
1 tsp sugar
1 cup flour
4 eggs

Directions
Preheat oven to 425. Line a cookie sheet with parchment paper, set aside. 
In a saucepan over medium heat, stir the water, milk, butter, and sugar. Bring to a boil.
Once boiling, add in the flour all at once. Stir and cook for about 1 1/2 to 2 minutes. Remove from heat and let sit, stirring every once in a while for 1 - 2 minutes. 
Using a wooden spoon or spatula (or beaters will also work), beat in the eggs one at a time until smooth. 


Scoop into a piping bag and pipe about 28 blobs onto the prepared cookie sheet. Dip your finger in a bit of water and gently pat down any peaks on the blobs. 
Bake at 425 for 10 minutes and then reduce heat to 325 and continue cooking 20 - 22 more minutes.
DO NOT OPEN THE OVEN DOOR!
Puffs should look golden brown and appear dry. 


Remove from oven and quickly pierce each puff with a sharp toothpick to release the steam inside. Let cool completely. Don't worry if they sink a tiny bit, they will puff again when you fill them with cream. 
When they are room temperature, gently cut the tops off each puff.  


Fill with your favorite filling. 
Traditionally it is either pastry cream or whipping cream or even ice cream. Savory fillings can also be used. 


You can make them tiny, which is normally how you think of cream puffs.... or, 


You can make them larger. Above is a large cream puff.... instead of the 28 - 30 I only piped about 12. The danger of making them bigger is your cooking time will change. If you don't cook them long enough they will collapse and be doughy inside!


Once you fill them you place the top back on and you can drizzle them with chocolate or caramel.


Or, you can dust them with icing sugar for a totally different look and taste!


I also like to put a little surprise inside with the cream. 
I made a raspberry whipped cream for these guys and put in a couple of fresh raspberries too. 


Have you made cream puffs/profiteroles before? Did you have any trouble?
Usually the only time I run into trouble is when I make them too big and don't cook them long enough. The fun part is you can use this same recipe and make eclairs and churros! Who knew? 
I have yet to make a savory filling but that is next on my list to try!

Thursday, November 4, 2021

Gingerdead Men Donuts


Sue got me a large gingerbread men cookie cutter which I was originally going to use at Christmas time until I saw some ridiculously cute Halloween cookies that someone made using a regular size gingerbread man cookie cutter. 
My cutter is 8 1/2 inches so I knew that it would make fabulous giant donuts. 
I used our Old Fashioned Jelly Donut recipe (HERE) to make these but feel free to use your favorite donut recipe. 
I went with zombies, ghosts, voodoo dolls, and vampires. Well, actually I only did a couple of vampires because, as you can see....


Instead of spooky looking vampires I thought they kind of looked like walrus men. Not that walrus men wouldn't be terrifying but... it wasn't the look I was going for!
The voodoo men were next.


These guys I filled with jelly so they looked bloodier. They are a little harder to fill than regular jelly donuts because you want to make it look like he's bleeding so you want the jelly closer to the surface of the donut. 


The gingerbread men wearing ghost costumes were pretty adorable. I piped on the icing instead of doing a glaze because I wanted the lines to be sharper so it looked more ghost-ish. 


The zombies ended up being my favorite!
I mean... it didn't matter if the donut had a flaw, you could turn it into part of his zombiness. This guy looked like he was missing a leg so I added a little red icing and *voila* zombie guy is missing a leg now. 


For the zombies I did a simple green glaze with icing sugar, a little vanilla, a little milk, and a little moss green food dye. Then I used a red gel icing and black gel icing (store bought) for blood and to pipe in the eyes and mouths. 


Except instead of cutting out circles, you cut out gingerbread men. 


Let them rise normally and then fry, as per original recipe. 


Make sure you use a pot big enough to give you room to flip these guys over. They are quite large! 


Yes, I will be making these again at Christmas and decorating like regular gingerbread men instead of gingerdead men. 


Which is your favorite?