Sunday, January 28, 2018

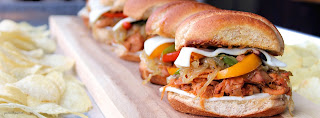
Vegan Philly Cheesesteak Sliders


Have you ever tried something new and just been blown away by it? I have to admit, when it comes to trying new food things it takes a lot to surprise me. 
When I first heard about jackfruit I was skeptical. I mean, using fruit as a meat substitute? I don't think so. Then jackfruit started showing up on all the "new food trends" lists and I knew that Sue and I had to give it a go. Unfortunately, living in Lillooet meant we didn't immediately have access to it. We were very patient however and eventually jackfruit made its way to town. 


We used this prepackaged, already shredded, original jackfruit from Upton's Naturals (website HERE) for our recipe but we'd love to be able to try it with an actual jackfruit one day!
Anyway, this surprised the heck out of me. 
Seeing it in the pan confused my brain. I mean... it looks like meat. Totally like meat. Look....


How is that fruit?
I don't know. It's so weird. 
But, as we often say, weird is good. In this case, weird is amazing! If you haven't given jackfruit a try then we encourage you to do so. This recipe is completely vegan but you don't have to be vegan to thoroughly enjoy it. Our parents didn't even know it wasn't meat. 
So. Much. Fun.


Vegan Philly Cheesesteak Sliders

Ingredients
Caramelized Onions
2 Tbsp oil
2 large onions, sliced
salt & pepper

Fried peppers
1 Tbsp oil
3 cloves garlic, minced
1 red pepper, sliced
1 green pepper, sliced
1 yellow pepper, sliced
1 medium portobello mushroom cap, sliced

Jackfruit
2 (7 oz/200 gr each) pkgs shredded, plain jackfruit
1 tsp garlic powder
1 tsp onion powder
1 tsp paprika
1/4 tsp cayenne pepper
2 tsp brown sugar
1/2 tsp liquid smoke
1 tsp soy sauce

Garlic Butter
1/3 cup vegan butter
3 cloves garlic, minced
1 tsp garlic powder

12 slider buns 
12 slices of vegan provolone (We used Daiya provolone see HERE)

Directions
In a medium frying pan over medium-low heat, place the 2 Tbsp oil, 2 large, sliced onions, and a dash of salt and pepper. Cook and stir until onions starts to sizzle. Immediately turn the heat to low. Continue to cook over low heat, stirring every couple of minutes, until onions are caramelized. This should take between 30 - 40 minutes. 
When the onions are done, remove them from the pan to a bowl and set aside. In the same pan, place the 1 Tbsp oil, garlic, peppers, and mushroom. Turn heat up to medium. 
At the same time, in a separate non-stick pan, place the jackfruit and spices, sugar, liquid smoke, and soy sauce. Cook and stir gently over medium-low heat until heated through. This should take about the same amount of time as the peppers to cook - about 8 minutes. 
When the peppers are done cooking, add the onions back to the pan with them. 
In a small bowl, combine your vegan butter, garlic, and garlic powder. Brush on both the top and bottom inside each bun. Place the buns, face up, on a cookie sheet. 
Place half a slice of Daiya provolone on the bottom half of each bun. 


Turn on the broiler in the oven. Place cookie sheet on the middle rack in oven until cheese just starts to melt, about 1 - 2 minutes. 
Remove from heat and top each bottom half with 1 spoonful of the jackfruit mixture.


Then top with the onion/pepper/mushroom mixture.


Lastly, top with another half of Daiya provolone.


Place back in oven under broiler (middle of oven) until cheese is melty - about 5 or so minutes. If the top of the buns start to get too toasty then just pull them off the cookie sheet and place them on the counter until cheese is melted. 


Place top bun on top of the provolone.


Serve immediately. 
Hard to believe it's vegan, am I right?


FYI - we purchased vegan slider buns, we didn't make them. 


They are a little bit of effort to put together but nothing terribly difficult. Totally worth it, IMO. 
These sliders are perfect for game night, ladies night, after school snacks, or lunch time! 
Use a gluten free soy sauce and buy gluten free buns and not only is this vegan, it's also gluten free. 
Sue and I aren't vegan but we do enjoy vegan and vegetarian dishes. We can't wait to experiment more with jackfruit. What are your experiences with jackfruit? Are you a fan?

Saturday, January 20, 2018

Refreshing Blueberry And Coconut Rice bars


This post was sponsored by USA Rice Canada. We were compensated monetarily but all opinions and experiences are our own. 

When the opportunity came up to create a recipe using rice Sue and I jumped at the chance. We love rice and eat it a lot. Like... a LOT lot. Why? Well, not only is it delicious and extremely versatile, its nutritious and low in calories (only 108 calories per half cup),  plus it's a source of B vitamins, phosphorus and zinc. Sue's favorite - brown rice - is also full of magnesium, selenium, manganese, and fiber (4 gr of fiber for 1 cup!). 
Not to mention, for those of us on a budget, it is very affordable. When I am meal prepping I make up a large batch and simply freeze the rice in single serving portions in bags. It freezes beautifully and is super handy - just pop it in the microwave and  *boom* good to go. 
I wanted to come up with a recipe that was different and fun. Obviously desserts or treats came to mind. I used sticky rice to create these tasty bars that are gluten free (rice is the original gluten-free grain), low sugar, and vegan! 
Healthy, refreshing, delicious, cheerful, and so purdy- What's not to love?!


Refreshing Blueberry And Coconut Rice Bars

Ingredients
3 cups uncooked sticky rice (sushi rice)
2 1/2 cups water
2 cups light coconut milk
3/4 cup coconut cream
1/3 cup maple syrup (or honey)
3 Tbsp lemon juice

Filling
2 cups blueberries
1 tsp cornstarch
1 Tbsp water

1/2 cup shredded, unsweetened coconut

Directions
Combine rice, water, and coconut milk in a large pot (or rice cooker). Bring to a boil, reduce heat, simmer for 20 minutes - until rice is done. 
Transfer cooked rice to a large bowl and add in coconut cream, maple syrup (or honey), and lemon juice.


Stir to combine. Set aside to cool.
While rice is cooling, prepare berries. In a medium saucepan over medium heat, place blueberries, cornstarch, and water. Cook and stir until berries have broken down and thickened, about 5 - 8 minutes. Mixture may still be a bit runny. 


Remove from heat and let cool. 
While everything is cooling, take the 1/2 cup of shredded coconut and pulse it in a blender or food processor until powdered (or very finely shredded)
When rice and berries are both cool continue with the bar. 
Sprinkle half of the powdered coconut into the bottom of a 9 X 13 pan lined with parchment paper.  


Top with half of the cooled rice mixture. Press the rice down firmly. 


Top with the cooled berries.


Then top with the remaining rice. Again, press the rice down firmly. 


Sprinkle with the remaining powdered coconut and press down lightly.


Chill, covered, for at least an hour, up to overnight. 
When the bar has chilled to firm up, use the parchment paper to remove the bar from the pan. Set on a cutting board and slice into squares.


Note - you can use your favorite berry in place of blueberries if you like. I also made this with raspberries and the color is lovely.


Store any leftovers in the fridge. 


Look at all that gooey goodness.


Basically the prettiest thing ever. 


You can go ahead and eat with your fingers! Warning - things may get a little messy. 


Or you can use a fork and be all prim and proper. 


However you decide to enjoy your treat, just remember there is no guilt attached! So much healthiness going on.... and tastiness. 


Be sure to pop over to USA Rice Canada (HERE) for more fabulous rice recipes and information on rice.   

Wednesday, January 17, 2018

Chicken Cheeseball


Sue and I made this last year for Easter (See our Easter 2017 roundup HERE) and I just realized I never shared the recipe and how-to. Better late than never I always say..... anyways, Easter is almost here again so no time like the present. 
Not only is this little chicken adorable (and perfect for a farm theme party too!) it's delicious and pretty darned easy to make. I think I might make her again this year because the kids absolutely loved it. Serve her with crackers, bread, or even veggies. 


Chicken Cheeseball

Ingredients
2 bricks (8 oz each) cream cheese, softened
1 cup shredded, aged cheddar
2 cans of canned ham (about 3/4 to 1 cup total)
1/3 cup finely diced onion
2 - 3 generous dashed of Worcestershire sauce

For decorating
2 cups shredded mozza cheese
1/4 to 1/2 a red pepper
4 large carrot round slices
edible google eyes

Directions
In a mixing bowl, mix together the cream cheese, cheddar, ham, onion, and Worcestershire sauce until well combined. Place mixture on a flat surface and shape into a pyramid shape. Place on a serving tray. Note - if mixture is too sticky to work with, simply place in fridge for 20 minutes to firm up a little. 


Once you have a nice pyramid shape, cover with the shredded mozza cheese and press gently to get it to stick. Place in fridge while you cut out 4 "tulip bulb" shapes for the wings and feet from the carrot - and a triangle beak, and the wattle from the red pepper. 
Place them on the chicken, pressing firmly to get them to adhere. Press on the eyes as well. 


Cover loosely with plastic wrap and chill until ready to serve. 


Such a cute table centerpiece, am I right?


She only takes about 15 minutes to make but everyone will think you spent a lot more time on her. The recipe is very simple but the flavor is very good. This is our go-to cheese ball recipe and wherever we take it we always get asked for the recipe! You could, of course, make it with your favorite cheese ball recipe/mix if it's just the chicken shape you are after. 


Be sure to check out Carol's Chatter for more fun foodie links! 

Friday, January 12, 2018

Apricot Cheesecake Bites


I made these in the summer when we were being inundated with apricots. Lillooet grows some of the most amazing apricots in the world. We even have an annual Apricot Festival to help celebrate them!
This recipe came about because I wanted something simple, elegant, and delicious that made enough for a crowd. This met all the criteria and then some. 
I used large apricots and got about 30 pieces. Smaller apricots would work just as well, you would just be dipping and filling for a while longer!
Fresh fruit, fluffy cheesecake filling, and decadent dark chocolate - yes, yes, and yes. 
Also, they are soooo pretty. So, there's that. 


Apricot Cheesecake Bites

Ingredients
15 large apricots, halved and pitted
3/4 cup dark chocolate chips

Filling
1 pkg (8 oz) cream cheese, softened
1/4 cup brown sugar
1 tsp vanilla
2 cups Cool Whip

Topping
2 Tbsp graham cracker crumbs

Directions
Place prepared apricots on a cookie tray lined with a Silpat or plastic wrap, pat dry with a paper towel. Set aside.


Place the dark chocolate chips in a microwave safe glass and melt in 20 second increments in the microwave, stirring in between, until smooth. 
Dip each apricot halfway into the melted chocolate, gently shake off excess, then place back on cookie sheet. Repeat until all the apricots are done. If the chocolate starts to harden up simply microwave for a few seconds again. 


Set aside to solidify while you make the cheesecake filling. You can pop them in the fridge for a few minutes to speed up the chocolate hardening. 
In a mixing bowl, beat the cream cheese until smooth, scraping sides of bowl as needed. Add in the brown sugar and vanilla and beat until well combined.
Stir in the Cool Whip. 


Place filling in a piping bag (or a large Ziplock bag). Pipe filling into each apricot half.


Sprinkle each with a pinch of graham cracker crumbs to finish.


The crumbs are optional but really add to the cheesecakeyness. 


The larger apricots are perfect 2 bite desserts to bring to a potluck. No cutlery needed!
Chill until ready to serve. 


In the above photo you can see I left a few without chocolate just to see how they looked. I think they look naked. Definitely go with the chocolate. It adds all the right things! Of course, if you have people that don't like chocolate then this is always an option. But, I don't really think those people exist. Do they?
Anyway, These may be a bit fidgety to make with all that dipping and piping but they are not at all difficult. If you have a helper it goes even faster. 
FYI - I think the sprinkle of graham crumbs looks like gold sparkles. Don't you think?

Sunday, January 7, 2018

Korean Pork Chops


Okay, I am in LOVE with the sauce on these pork chops. I'm thinking it's going to be my new sauce for everything. Not even lying. It would be fabulous on chicken, beef, pork, even tofu. 
It's hard to believe it only take 6 simple ingredients and 5 seconds to whip up. I served it with some Double Happiness noodles (Click HERE for what Double Happiness noodles are!) but it would go great with rice as well. 
Looking for a meal that can be ready in about half an hour or so? Look no further. 


Korean Pork Chops

Ingredients
Sauce
1/2 cup soy sauce
4 Tbsp honey
3 cloves garlic, minced
2 tsp sesame oil
2 tsp fresh grated ginger
2 Tbsp sweet chili sauce

4 - 6 pork chops 

For cooking
2 Tbsp oil

Directions
In a small bowl, whisk together sauce ingredients. Remove half the sauce for later. Place the pork chops into the sauce remaining in the bowl. Marinate the pork chops for 10 minutes. (NOTE - this can be done the night before and marinated over night.) 


Heat the oil in a skillet or frying pan over medium heat. Place the pork chops into the hot pan. Cook for approx 6 minutes then flip to the other side. Pour in the reserved marinade and continue to cook for another 6 or so minutes - until pork is done. 


Serve immediately. 


How easy is that?
A super simple meal that doesn't take a lot of effort or time. Perfect for those days when you just don't have any energy left but still want something delicious! 
Feel free to double the sauce too if you want to make sure you have lots to use as a sauce for your rice or noodles. 


We're sharing at Carol's Chatter! Click over and say hi!

Saturday, January 6, 2018

10 Salad As A Meal Ideas

Yes, I do New Year's resolutions. Most of my resolutions involve eating better or living in a healthier way. Sometimes I fail and sometimes I succeed. Such is life. 
One of the things that I find helpful in keeping my resolutions is planning out my meals. I've put together this list of 10 Salad As A Meal Ideas because they are some of my favorite recipes to make. They are generally pretty easy, quick, and - most importantly - very tasty.  It's not a secret that I am not a huge fan of salad BUT I am very fond of these recipes because they are more like a filling, hearty meal than a boring old green salad. 
Links to the recipes are included below each photograph!


Roasted veggies with a lovely garlic vinaigrette combine into one of my all time favorite salad recipes. It comes in at 360 calories per serving, which is fabulous for those counting their calories! (Nutritional counts can be found with the recipe at the original link) Find the recipe by clicking HERE! 


The dressing on this salad is amazing! I promise you will be wanting to make it for everything!
This salad comes in at 440 calories but is full of protein and fiber and is sooooo hearty and filling. Also, it's beautiful, so that counts too, am I right? 
The recipe and nutritional counts can be found by clicking HERE


At only 250 calories this salad is as close to perfection as a salad can get. With all those pretty colors how can you not fall in love? And don't even get me started on the flavors and textures! #addicting
Click HERE for the recipe and nutritional counts. 


Sweet and spicy are the big attraction here. Not to mention the huge serving for only 378 calories. Looking for something to heat up your taste buds? You'll want to give this delicious salad a try. 
Click HERE for full nutritional counts and the recipe! 


The first time I tried a wedge salad I was skeptical. I mean.... it's a big hunk of lettuce. Here's the thing though..... it's so much more than that. It's weird but when you top it with the dressing and prawns it transforms into a light and refreshing lunch for only 162 calories. Give it a try, you won't regret it!
Click HERE for the recipe and nutritional counts!


This one takes a little bit of planning but is totally worth it. All those flavors and colors and textures are simply amazing. It comes in at 417 calories and is very filling. Definite something different!
Find the recipe and nutritional counts HERE


I make this salad at least once a week (when I have asparagus available). The calorie count is fabulous (249 calories) and it is full of fiber and protein so it keeps you feeling full a bit longer. What's not to love about that?
Find the recipe and nutritional counts HERE


This is the only salad we didn't do a nutritional count on. That being said it is still a super healthy choice full of protein and lots of veggies. When we were catering this was one of our most popular lunch orders! Find the recipe HERE.  


Steak and cheese in a salad? Yes. ALL the yes. 
You'll satisfy even the biggest of eaters with this healthier take on a cheese steak sandwich. All of the tastiness much less of the calories and carbs! (435 calories)
Find the recipe and nutritional count HERE


Last, but not least is this bit of pasta and chicken art. 
For only 260 calories per serving you can have pasta and chicken and still eat healthy! 
Find the recipe and the nutritional counts HERE

All of the above salads have their own homemade dressing which I prefer over store bought. Don't get me wrong - I use store bought dressing quite often, but making your own can be so much more rewarding. 

Still looking for more salad as a meal ideas? Check out our previous round up:
18 more recipes with homemade dressings which include calorie counts and nutritional values.