Wednesday, June 24, 2020

Big Batch Rhubarb Raspberry Streusel Cake


Did you know that rhubarb and raspberry are an amazing combo? I thought they'd be too tart together but when you mix them in a cake and throw on some streusel they are juuuuuuuust right. 
I didn't add nuts to the topping but, believe me, they're a great addition as well. I developed this recipe to be a big batch because I needed a LOT of cake to gift to several families. This makes 4 - 8 inch pans, or 2 - 9 X 13 pans. You could probably stretch it out to 5 - 8 inch pans if you wanted it more like a square than a cake. I prefer the thickness of a cake myself. If you do try 5 then be sure to adjust the cooking time accordingly. 


Big Batch Rhubarb Raspberry Streusel Cake

Ingredients
Cake
1 cup butter, softened
3 3/4 cups sugar
4 tsp vanilla
4 eggs
8 cups flour
4 tsp baking powder
2 tsp baking soda
1 tsp salt
4 cups buttermilk
8 cups rhubarb, finely chopped
2 cups raspberries

Streusel
1 cup butter, melted
2 cups flour
2 cups brown sugar

Directions
Preheat oven to 350. 
In a large bowl, beat together the butter, sugar, and vanilla until creamy, scraping bowl as needed. Beat in eggs. In another bowl, stir together flour, baking powder and soda, and salt. In another bowl, measure out the buttermilk. Lastly, in a separate bowl, measure out the rhubarb and raspberries. 


Combine the dry ingredients into the wet ingredients alternating with the buttermilk until just combined. It's okay if a few streaks of flour remain. 
Stir in the rhubarb. Batter will be very thick. 


Spread the batter evenly among the 4 - 8 inch pans. Top each cake with 1/4 of the raspberries. (Note - you can also stir the raspberries into the cake batter with the rhubarb but they will get smushed. The cake will still taste delicious but will be streaked with color.) 


Prepare streusel - in a mixing bowl, stir together the melted butter, flour, and brown sugar. (If you'd like to add any nuts, do so now) Sprinkle the streusel evenly over the 4 cakes. 


Bake at 350 for 40 - 50 minutes. Depending on how your oven cooks, it may take a bit longer. The cakes are done when they are golden brown on top and toothpick inserted near center comes out clean. 
FYI - place a cookie sheet or oven liner at the bottom of the oven to catch any spills, these do bubble up and over a bit.


Remove from oven and let cool completely on wire racks. 


You can serve the cake warm or room temp. They are delicious either way. This is a very dense cake and is very moist so no frosting is required. Although, it does go fabulously with a scoop of ice cream or dollop of whipped cream!


The perfect tea time snack. It is a very large batch of cake so it's great for larger gatherings or potlucks. It also freezes very well so you can have cake whenever you like in the future too! Just cover the cooled cakes very well with plastic wrap and then a layer of tinfoil before placing in the freezer. 
Tangy and sweet, just the way I like it!

Tuesday, June 23, 2020

Brownie Ice Cream Sandwiches


Is there anything better than ice cream sandwiches? Seriously... 
I mean you take two delicious things and sandwich a third delicious thing in the middle.... basically heaven, am I right? 
These bad boys only take about an hour to whip up, if your using store bought ice cream, and are sure to be a big hit with friends and family! Use any flavor ice cream you like - I went with vanilla and chocolate, but I imagine salted caramel, maple walnut, mint chocolate chip or pretty much anything would be delicious as well. 


Brownie Ice Cream Sandwiches

Ingredients
Brownie Cookies
8 oz chocolate chips (about 1 1/3 cup)
1/2 cup butter
3 eggs
1 cup sugar
1/4 cup brown sugar
1 Tbsp vanilla
1/2 tsp baking powder
salt
3/4 cup flour
1/4 cup cocoa powder
1 cup walnuts, chopped

Filling
Ice Cream

Directions
Make cookies - In a microwave safe bowl (or on the stove top), melt the chocolate chips and butter, whisking until smooth. Set aside.
In a large bowl, beat eggs for 2 minutes. Beat in sugars, vanilla, baking powder, and salt. Beat in the melted chocolate until combined, scraping sides of bowl as needed. 
Add in flour, cocoa powder, and walnuts, stirring until just combined. Chill batter for 30 minutes. (Do not skip this step!) 


When batter is chilled, preheat oven to 350. Line a cookie tray with parchment paper. Using a large cookie scoop, scoop batter about 2 inches apart onto prepared cookie sheet. They will spread. 


Bake at 350 for 10 - 15 minutes, until tops are crackled. Don't over bake or cookies will be crispy not chewy. If you make the cookies smaller then your cooking time will vary. 


Cool completely on wire racks before filling with ice cream. 
Let ice cream soften on the counter for about 10 - 15 minutes before scooping onto the flat side of one cookie. Flatten gently with a spoon before topping with another cookie. You need to work fairly quickly as the ice cream will start to melt and get very messy!


Store in freezer. 


You can wrap them individually to make storage easier. 


FYI - these go great at bake sales if you have a cooler with ice to keep them in! 
I made some with brownie cookies, some with chocolate chip cookies, some with vanilla ice cream and some with chocolate ice cream and they all sold in about 5 seconds! 
These are, as the little one Sue babysits would say, deeeeeeeeelicious. 

Friday, June 12, 2020

Shredded Apple Tarts


This is a little twist on a classic apple pie. 
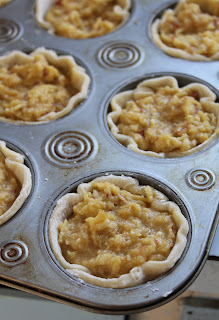
I want to start off by saying if you make something in a muffin tin which has a pie crust THEY ARE NOT CALLED MINI PIES. Okay? They are called tarts. I will fight you on this. I'd like to also mention that these tarts are a delicious alternative to regular apple pie. Same apple cinnamon-y taste but the texture is completely different - in a wonderful way. 
If you'd prefer a pie, this makes one 8 inch pie. Otherwise you should get 12 tarts. Delicious, apple-y tarts. (Not mini pies... just to make sure we're on the same page...) 


Shredded Apple Tarts

Crust
Or enough dough for an 8 inch pie

Filling
1 1/4 cup sugar
1/2 cup butter, softened
3 Tbsp flour
2 tsp vanilla
1 tsp cinnamon
pinch salt
2 eggs
3 medium apples, grated

Directions
Preheat oven to 350. Roll out pie crust and, using a cookie cutter or large glass, cut out 12 circles of dough a little larger than the size of the muffin tins (you may need to re roll scraps to get enough). Press the circles into the muffin tins. 
In a large bowl, beat together the sugar, butter, flour, vanilla, cinnamon, salt, and eggs until well combined, scraping sides of bowl as needed. Add in shredded apples and stir in. (Note - apples don't have to be peeled)


Scoop the apple filling into the pie dough in the muffin tins. Fill to the top. 


Bake at 350 until golden brown and set, about 30 - 40 minutes. (If you make a pie it will be about one hour)


Let cool in pans for about 10 minutes. Then run a knife around the edge of each tart and remove to wire rack to cool. 


You can serve them warm, if you prefer, or chilled. Up to you!


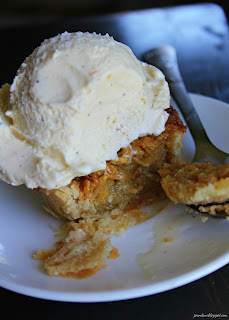
My favorite? Warm with a big ol' scoop of ice cream on top. 


Yum! 
If you want to change up the texture even more.... add in a 1/4 to 1/2 cup of chopped pecans/walnuts for a bit of crunch. Homemade pie crust is definitely the way to go with these BUT we totally get it if you want to save yourself that step and just buy it. 
Tip: Our Never Fail Pie Crust (HERE) can be made up ahead of time and frozen so there is always a few pie crusts in the freezer. 


Wednesday, June 10, 2020

Chicken Mole Fries


In the spring Sue and I were running a Chopped-style food competition on Facebook for our friends and family as something to do while self isolating. One week we had chocolate and peanut butter as our mystery ingredients. I knew a lot of entries would be sweet ones so I decided to go savory! 
There are not too many chocolate and peanut butter recipes that are savory. It took me a long time to come up with this recipe. I spent many hours scouring Pinterest and Instagram looking for inspiration. 
I think this has the right amount of spice with definite hints of both the peanut butter and chocolate. 
No... I didn't win the challenge that week. But I did get a delicious new recipe to make and that's never a loss. 


Chicken Mole Fries

Ingredients
Mole Sauce
2 Tbsp olive oil
1 medium onion, diced
4 garlic cloves, minced
1 chipotle pepper
2 tsp adobo sauce
398 ml (14.5 oz) can diced tomatoes with green chilies
4 Tbsp peanut butter
2 cups chicken broth
1 tsp salt
1/2 tsp pepper
2 tsp chili powder
pinch cinnamon
2 oz (~scant 1/3 cup)  sugar free dark chocolate

chicken thighs, cubed
salt & pepper

Frozen fries

Optional
Chives
lime wedges

Directions
Prepare mole sauce - In a large frying pan over medium heat, cook olive oil, onion, and garlic for about 5 minutes, stirring often. 
Add in chipotle pepper, adobo sauce, and tomatoes. Cook an additional 15 minutes.
Carefully transfer to a blender. Add in the peanut butter, chicken broth, salt & pepper, chili powder, and cinnamon. Blend until smooth. 
Pour back into the frying pan, place back over medium/low heat and simmer to reduce for about 15 minutes. Shut off heat and add in chocolate. Stir to melt. 


Mole sauce can be made up to a week ahead of time and kept, covered in fridge. 
Reheat when ready to use. If you are using it right away, simply keep warm while chicken and fries cook. 


Prepare chicken and fries - There are several ways to prepare the chicken thighs. Season the chicken thighs with salt and pepper first. Then you can BBQ it on the grill, you can fry it in a pan, or you can place it under the broiler. I skewered mine on skewers but you don't have to do this. (Be sure to soak the skewers if you use wooden ones). 
Cook the frozen fries as per package directions. (Of course you can always make your own if you prefer!) Make sure they get nice and crispy! 
Plate em up!
Place fries on a serving platter. Top with the cooked chicken. 


Top with a generous amount of hot mole sauce. 


Sprinkle on some chives to fancy it up and add a slice of lime on the side. 


Feel free to use lots of mole sauce. It's delicious. 


This recipe has just the right amount of spice. If you like things really spicy, add another chipotle pepper. I've never tried this so it might take away from the subtle hints of chocolate and peanut butter. Let me know if you try it! 


Looking for another way to jazz up your fries that isn't poutine? Give chicken mole fries a chance. Make up the sauce ahead of time and it's literally about 5 minutes worth of work when you are ready to eat. Impress your guests at your next BBQ with this spicy recipe. 
Note - I didn't put quantities for the chicken or fries because you can make as much or as little as you like. You get a lot of sauce, about 2 cups or so depending on how much you reduce it. 
You can also use chicken breast or shredded rotisserie chicken from the store. 

Tuesday, June 9, 2020

Butterhorns (Smitty's Bakery Recreation)


Sue and I have been making butterhorns for years and years. Our family recipe (which can be found HERE) is one we make every year at Christmas time. So, when my friend, Len, came to me with a recipe to try that was named "Butterhorns" but was a completely different recipe than ours, I knew I had to give it a try. 
Len grew up going to "Smitty's Bakery" and they made these giant treats that he loved. His sister had found the recipe on a Facebook sharing site and told him about it. Len asked if I would be willing to try and recreate the recipe to see if it was like what he remembered from his youth. How could I say no? Baking challenges are always exciting! 
I have to say.... these GINORMOUS butterhorns are completely different from our recipe but they are amazing! Soft and fluffy and don't even get me started on that magic frosting. It makes the whole treat what it is. You really, really, really need to try them!


Butterhorns (Smitty's Bakery Recreation)

Ingredients
Dough
1/4 cup hot tap water
2 1/4 tsp active dry yeast
3/4 cup scalded milk, cooled to warm
1/2 cup margarine, melted
1/4 cup shortening, melted
1/4 cup sugar
1 1/2 tsp salt
2 eggs, beaten
3 - 5 cups flour

Icing
2 Tbsp water
4 1/2 Tbsp sugar
1 egg
1 2/3 cup icing sugar
2/3 cup shortening, room temp
1 tsp vanilla

Topping 
 1 1/2 cups chopped walnuts

Directions
Prepare dough - mix hot water and yeast in a small bowl and let bloom for 5 minutes. 
In a separate bowl, stir together milk, margarine, shortening, sugar, salt, and eggs. Stir in the bloomed yeast. Gradually add in flour until solid dough forms. Place on floured work surface and knead 2 - 3 minutes. Place into an oiled bowl, cover with a tea towel, place somewhere warm to rise. 


After 1 to 1 1/2 hours dough should be doubled in size. 


Place dough on work surface and divide into 4 equal pieces. Roll each piece into a 12 inch rope (about 1 inch thick). 


Spiral each log into a circle. (So it looks like a snail shell.) Place on parchment paper lined cookie sheet.


Cover with a tea towel and let rise somewhere warm again for another hour. (Until doubled in size)


Preheat oven to 350. Bake butterhorns for 12 - 15 minutes, until light golden brown. 
Set on wire rack to cool. 


Prepare icing - Beat the egg and icing sugar until smooth, scraping sides of bowl as needed. Set aside. Measure out the shortening and vanilla and have it ready to go. 
Boil the water and the sugar in a small saucepan for exactly 2 minutes. Do not stir it. 
After 2 minutes, remove the boiling syrup from the heat and slowly drizzle it into the egg and icing sugar mixture while you are beating on low with beaters. Continue to beat until all the syrup has been added. Do not scrape the sides of the syrup pan - they will make your icing grainy. Beat in the shortening and vanilla until smooth. 
Spread frosting generously onto the buns and then sprinkle with the chopped walnuts. 


Let sit for a few minutes so icing can set a bit. Don't skimp on the frosting and walnuts!


You can spread the icing on the buns if they are a little bit warm, but it will melt off if the buns are too hot. 


These are ginormous, by the way. Like.... spread your hand out as wide as you can. From the top of your thumb to the top of your baby finger - that's how big these are. You could make them smaller but then they wouldn't be Smitty's Bakery Butterhorns.... Making them smaller will also change the texture when they bake. Bigger = fluffier so keep that in mind. 


Look how light and airy these are...


Slathering a little butter on there can't hurt either... our mother can't have a bun without butter. I find the icing and walnuts to be plenty but... if you want to add a little butter.... I won't judge! 


Have you ever seen anything so purdy?


Let us know if you give these a try! FYI - I am usually a "use butter in all the things" type of baker but don't do it in this recipe. You need to use margarine and shortening. Butter will noticeably change the taste. Not that it's a bad thing... it just means they won't be the authentic Smitty's recipe.  

Thursday, June 4, 2020

Strawberry Rhubarb Margarita


What to do with that rhubarb quickly piling up in the garden? So many choices. So many delicious choices. But... have you ever made a margarita with it? Now, if you want something refreshing and family friendly, try our Rhubarb Lemonade (recipe HERE)  If you want something refreshing and more adultish... try this recipe. 
Sweet strawberries and tart rhubarb make for the most original margarita you'll ever drink. Plus it's a gorgeous color so it makes a great Canada Day celebratory drink. 


Strawberry Rhubarb Margarita

Ingredients
6 large strawberries, crushed
1 cup fresh lime juice
1 cup rhubarb simple syrup
3/4 cup tequila
1/2 cup Grand Marnier
2 cups ice

Also needed
lime wedge, for rimming glass
salt, for rimming glass (or sugar)
strawberries, for decoration

Directions
Place the crushed strawberries into a pitcher. Add in the remaining ingredients. Stir in ice, mix well, and let sit for at least 10 minutes to chill. 
Run a lime wedge around the rim of your glasses and then dip each glass in salt (or sugar, if you prefer)


Pour the chilled margarita through a strainer into the prepared glasses. Recipe makes 4 glasses. Decorate with a strawberry or lime wedge. 


Best enjoyed on the patio on hot, sunny days.


But we won't judge you if you enjoy it even when it's raining or snowing.


To make a rhubarb simple syrup all you need is rhubarb, water, and sugar. Here is a link to a great example - Homemade Rhubarb Syrup by Tori Avey. You can prepare the rhubarb simple syrup way ahead of time as it lasts for weeks in the fridge.