Thursday, October 24, 2019

Giant Nutella Stuffed Mocha Chocolate Chip Cookies


These cookies are big. BIIIIG BIG. 
I'm not going to lie, they're also pretty sweet, *shocker* I know... but I'm always surprised when people comment that a cookie recipe is "really sweet". Okay.... but it's a cookie soooo... To be fair, I suppose some cookies are not sweet.. like.. healthy cookies... but these are NOT healthy cookies. NooooOoooOOooo they are not. At all. 
What they are though, is delicious and addicting and totally worth making for an every-once-in-a-while indulgence. I took my favorite chocolate chip cookie recipe and stuffed in some Nutella because, why not? and then made them super jumbo... again, because why not?
Sure... you can make these "normal" size, if you want to *sigh* but I totally recommend giant. When we are talking cookies... size matters. 


Giant Nutella Stuffed Mocha Chocolate Chip Cookies 

Ingredients
Cookies
2 1/4 cup flour
1 tsp baking soda
1 heaping tsp instant coffee granules
1/2 tsp salt
1 cup BECEL original margarine
1 cup brown sugar
1/4 cup sugar
2 eggs
1 tsp vanilla
1 1/2 cups mini chocolate chips

Filling
12 Tbsp Nutella

Topping
mini chocolate chips for sprinkling on top

Directions
Prepare cookies - Preheat oven to 375. Line 2 cookie sheets with parchment paper and set aside. 
Whisk together flour, baking soda, coffee granules, and salt. In another bowl, beat together BECEL brown sugar and sugar until creamy, scraping sides of bowl as needed. Beat in the eggs and vanilla. 
Beat the wet ingredients into the dry ingredients until just combined. Stir in the mini chocolate chips. 
Using a large cookie scoop, about 1/4 cup in size, scoop cookies onto one of the cookie sheets. They can be close together because you are not cooking them right now you are going to chill them. Chill for about 30 minutes. 


While dough is chilling, prepare the Nutella. 
On a small tray lined with parchment paper, scoop 12 heaping tablespoons of Nutella about 1 inch apart. Try to leave the Nutella fairly heaped up and not spread out. Place in freezer until your cookie dough is chilled. 
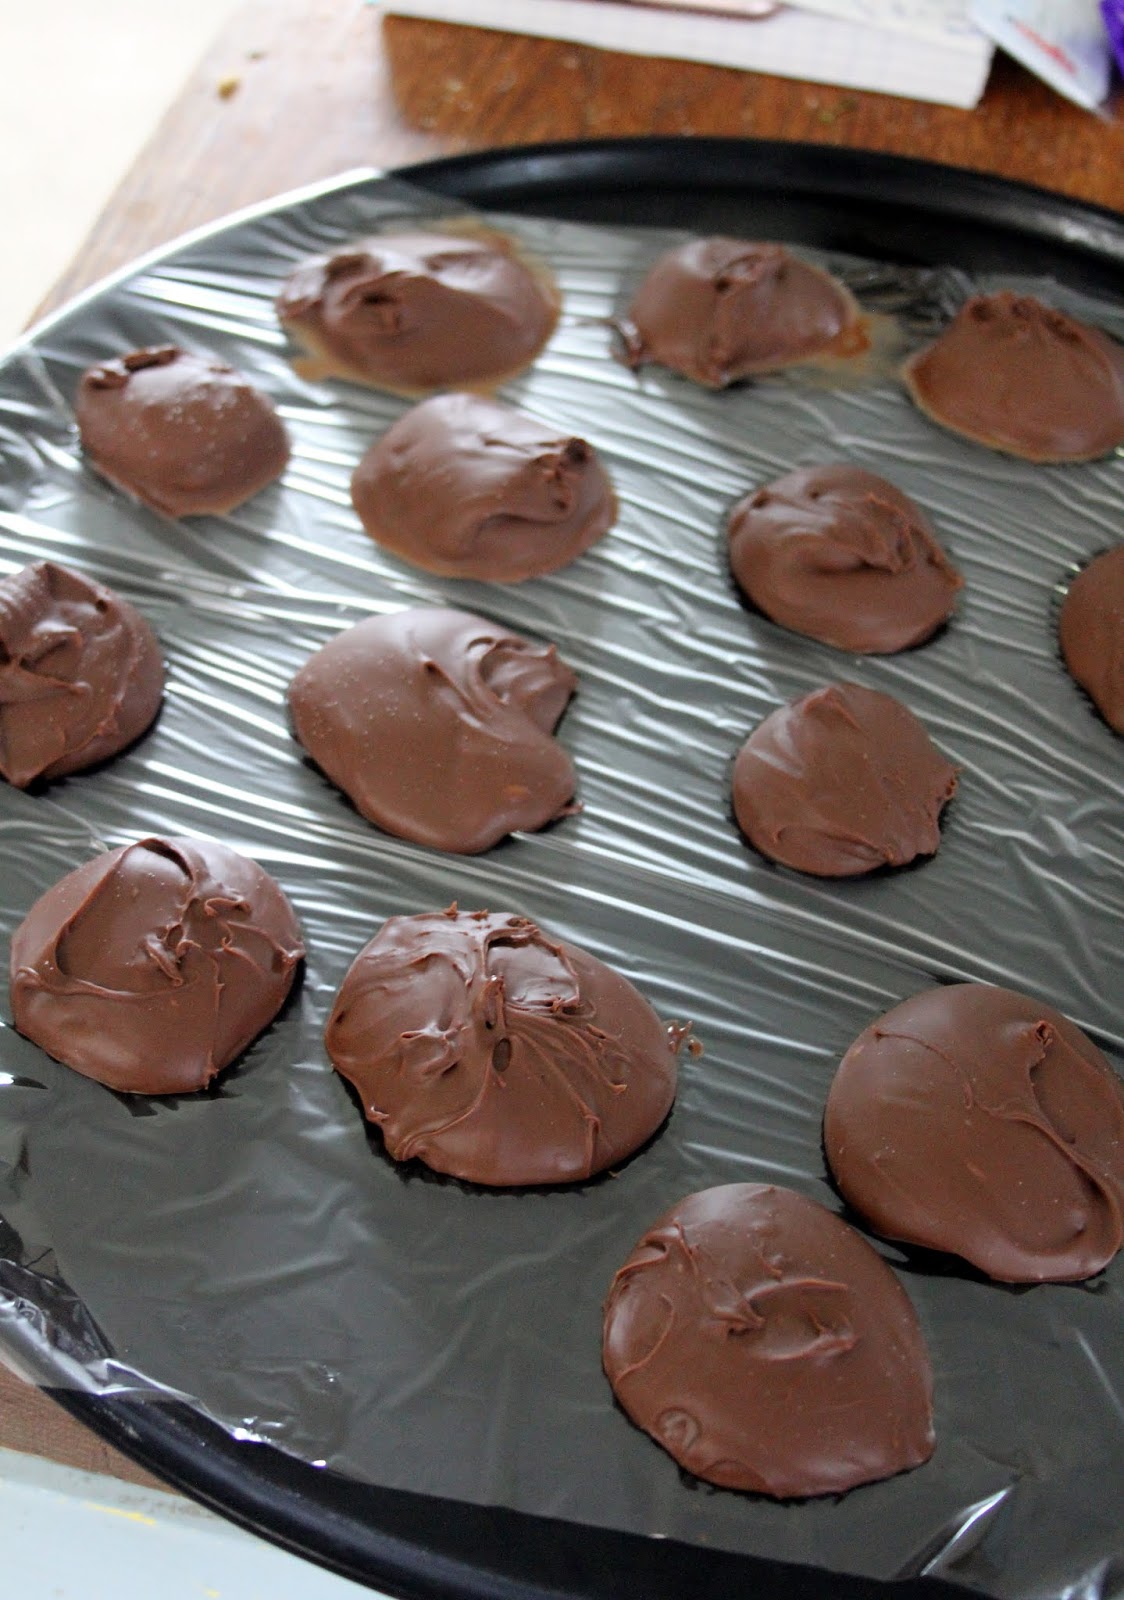

Take one of the chilled cookie balls and press one disc of frozen Nutella into the center of it. You need to work fairly quickly as the Nutella thaws fairly fast and gets hard to work with. 


Top with another chilled cookie dough ball and form into a round ball. Continue with the remaining dough and Nutella. Place at least 2 inches apart on prepared cookie sheets. You should get 12 jumbo cookies. 
Lightly press the cookies down with the palm of your hand and then sprinkle a few more mini chocolate chips on top of each cookie. 


Bake at 375 for about 11 - 18 minutes. Start checking at 11 minutes. The bottom and edges should be light golden brown and the center should look pale. Don't over bake or cookies will be crunchy instead of chewy!


Let cool on cookie tray for 10 minutes before removing to wire rack to cool completely. 


Recipe yields 12 ginormous mocha chocolate Nutella cookies. So good. 


In case you are in a hurry and DON'T chill these...


You'll be okay but they will spread out more and not be as high...


Also, instead of the Nutella being a blob in the center, it kind of spreads out throughout the cookie more...


Not that this is a bad thing. It's just different than if you let the cookie dough chill. 
Both ways result in a heavenly tasting cookie #justsayin
FYI - this is my new go-to chocolate chip cookie recipe. I ALWAYS use real butter when I bake but decided to try BECEL just to see what happened. Turns out everyone loved these more than my usual recipe. 
I'm as surprised as you are. 
But, for real though, try this one. It's a really good, soft but chewy, sweet but not coma inducing, chocolate chip cookie. Feel free to leave out the instant coffee granules if you don't like that hint of mocha-ness in there. 

Monday, October 14, 2019

Giant Spider Cheese Ball


Cheese balls are the best, aren't they?
Need something to bring to a potluck? Cheese ball. Want to make something festive? Cheese ball. Something for an appie, side, or dessert? Cheese ball. Looking for quick and easy? Cheese ball. 
We made this spooktacular chocolate peanut butter cheesecake-y spider as a treat for our Halloween party. It only takes a few minutes to put together and makes a pretty big impression on the table! If your chocolate piping skills are lacking (as mine are) then you can use black licorice for legs instead. Up to you! You can also stick edible googly eyes on him, if you like. I found he looked creepier without eyes. 


Giant Spider Cheese Ball

Ingredients
2 bricks (16 oz total) cream cheese, room temp
1/2 cup peanut butter
1/2 cup butter, room temp
2 tsp vanilla
2 cups icing sugar
6 Tbsp  baking cocoa
~1 cup mini chocolate chips 

chocolate for piping legs or black licorice 

Directions
Beat together the cream cheese, peanut butter, butter, and vanilla until smooth, scraping bowl as needed. Stir in the icing sugar and baking cocoa. 
Divide into 2 balls - one about 2/3rds and one about 1/3rd, for the body and head. Roll the balls in the mini chocolate chips and then wrap in plastic wrap. Place in bowls so the balls retain their round shape. Chill until firm. 


After chilling; unwrap the balls and roll in more mini chocolate chips to cover any spots that you may have missed. Place on a serving platter. 
Pipe 4 legs on either side of the body (or place black licorice). Cover and chill until ready to serve!


Looking to make something that will have everyone talking, but don't want to have to work too hard?
We feel ya. We're here for you. 


We served him with graham crackers, animal crackers, and strawberries! You could use any fruit you like! 

Thursday, September 26, 2019

Red Velvet Brain Cake


Halloween is getting closer! I know it's only the end of September but really.... I mean.... it's basically Halloween. Sue and I start planning our Halloween shenanigans in the summer as we are both a little holiday crazy so by the time we get to September we're anxious to get things started. 
#HalloweenRules
Anyway, I made this gruesome cake last year and decided it needs to be a staple at all our Halloween parties. It's just sooooo gross yet delicious. And really, how often do we get to say that about things?


Brain Cake 

Ingredients
Red Velvet Cake
3 cups cake flour
1 tsp baking soda
2 Tbsp baking cocoa
pinch salt
1/2 cup butter, softened
2 cups sugar
1 cup oil
3 eggs
1 Tbsp vanilla
1 Tbsp vinegar
2 - 3 Tbsp red food dye
1 cup buttermilk

Marshmallow Fondant
1 lb bag mini marshmallows (16 oz)
3 Tbsp water
1 tsp red food dye
2 lb icing sugar
(Butter, to grease your hands)

Also needed
1 jar Raspberry Jam
1/2 cup-ish Vanilla Frosting

Directions
Prepare the red velvet cake - preheat oven to 350. Using a "soccer ball sized", oven safe bowl, first spray with cooking spray and then place a couple of strip of parchment paper criss cross in the bowl (See photo below for clarification.) Set aside.
In a mixing bowl, whisk together cake flour, baking soda, cocoa, and salt. In a separate bowl, beat together butter and sugar until creamy, scraping sides of bowl as needed. Beat in the oil and then the eggs and vanilla, beating well in between each addition. Add in the vinegar and red food coloring. 
Alternately beat in the dry ingredients with the buttermilk into the wet ingredients. 
Pour into the prepared bowl. 
Place a small, shallow, "cereal bowl sized", oven safe bowl, into the middle of the cake batter and press down gently. This helps the cake to cook faster.  
Cook at 350 until toothpick inserted near the center of the cake comes out clean - about 20 - 30 minutes. Remove from oven and let cool about 20 minutes in the bowl on a wire rack. 


Gently remove the small bowl from the middle. Let cool completely. (Don't worry if you have a hole right through the cake. You will be covering the cake in fondant so you won't see it. 


Gently invert cake onto a serving tray and remove from the bowl. 


Using a serrated knife, trim the cake so it is more brain shaped. (NOTE - I used the trimmings to cover the hole on top and create a little more domed appearance.) 
Crumb coat the cake with a thin layer of vanilla frosting. Use a knife to carve a shallow line down the middle of the cake separating the two brain halves. 


Place cake in fridge while you make the marshmallow fondant. 
Prepare fondant - Place marshmallows and water in a microwave safe bowl. Heat approx 40 seconds and then stir. If marshmallows are not completely melted, heat another 20 seconds, stir, repeat if needed. Stir until smooth. Stir in the red food dye. 
Add in the icing sugar about 1/3 at a time. You may need a little bit more icing sugar if it is very sticky. 
Place some icing sugar on a flat work surface and scrape the fondant onto it. Cover your hands in a bit of butter to prevent sticking and then knead the fondant until it is not sticky and is fairly firm. You may need to add more icing sugar as you knead. 
Pull off tablespoon sized pieces of the fondant and roll them between your hands to form "worms" about 2 - 3 inches long. Start placing these on the cake in a wiggly, zig zag pattern so as to look like a brain. See the photo below to get a better idea of what we mean. Make sure to NOT cover up the line down the middle so the brain looks like it has 2 halves. 


Warm a bit of raspberry jam in the microwave for about 20 seconds. I use about 1/2 cup at a time. 
Use a pastry or basting brush, brush the melted jam over the fondant liberally. Be sure to cover all the fondant and the white bits of frosting peeking through. The gooier the better! 


Chill until ready to serve!
We also made poison pudding shots and they looked extra creepy sticking out of the cake!


You can fill the cake center, if you want to.... we actually placed the small bowl we baked in it back in there for more stability. You can see it peeking out in the photo below. 


So gruesome!


The most time consuming part of this cake is rolling all the little "worm" shapes to make the brain squiggles. 


Totally worth it though. You'll have people talking if you bring this to your next Halloween get together. 
A couple of notes: 
1.) The brain squiggles do not have to be uniform. In fact, it looks better if they are not. 
2.) If you are not filling the center of the cake then definitely put the bowl back in there for stability. It can start to collapse under the weight of the fondant. 
3.) The cake can be made ahead of time and frozen until needed. The fondant can be made a few days ahead of time and refrigerated until needed. Just remember to take it out and let it come back to room temperature before trying to work with it. 
4.) I use canned vanilla frosting to crumb coat the cake as you only need a little bit - but feel free to make your own if you prefer. 
5.) You can use any red jam you like to cover the cake but just be sure it doesn't contain seeds!

Wednesday, September 25, 2019

Jumbo Cinnamon Rolls with Salted Caramel Cream Cheese Frosting


I have been trying to come up with an amazing giant cinnamon roll recipe for a long time. Somehow they always just did not meet my expectations. They were missing that certainsomething that made them special. 
Well... I have good news. 
Great news, actually.
I have discovered the best tasting humongous cinnamon rolls ever. In the history of ever. 
I know... I know.... pretty bold claim. Thing is, it's accurate. 
They are super tasty without any frosting but when you add a smear of the salted caramel cream cheese icing... LOOK OUT... you'll be hooked. 
Make them, you'll see.
Oh, you'll see. 


Jumbo Cinnamon Rolls with Salted Caramel Cream Cheese Frosting

Ingredients
1/3 cup hot water
2 1/4 tsp instant yeast (not fast rising)
1/4 tsp sugar
1/2 cup sugar
1 cup warm milk
1/3 cup butter, melted
2 Tbsp oil
1 Tbsp vanilla
2 eggs
1 tsp salt
1 tsp baking powder
4+ cups flour

Filling
1/2 cup butter, melted
1+ cup brown sugar
1+ Tbsp cinnamon

Salted Caramel Cream Cheese Frosting
1 (8 oz) brick cream cheese, room temp
1/4 cup icing sugar
1 tsp sea salt


Directions
In a small bowl, whisk together the 1/3 cup hot water, yeast, and 1/4 tsp sugar. Set aside to allow the yeast too bloom. (It should take about 5 - 8 minutes)
While yeast is activating, whisk together the 1/2 cup sugar, warm milk, melted butter, oil, vanilla, and eggs. 
Whisk in the salt and baking powder and then whisk in the frothy yeast. Slowly stir in the flour until a firm but still a little bit sticky dough forms. Knead for 2 minutes, adding a spoonful or two of flour if dough is too sticky. Place the dough into a well oiled bowl, cover, and set somewhere warm to rise for an hour (until doubled in size). 
Once doubled, punch dough down and placed on lightly floured work surface. Roll dough to a 12 X 17 rectangle. Spread the melted butter over the surface of the dough and then sprinkle with the brown sugar and cinnamon (I put approx measurements but I always end up adding a bit more just to make things gooier!) Roll up, jelly roll style, with the short end closest to you. 
Slice into 6 rolls (2 inches across each). 
Line a 9 X 13 pan with parchment paper and place the buns equal distance apart in the pan. 
(Note - Please note in the photos below I have doubled the recipe to make 12 buns and placed them on a large cookie sheet instead of in two 9 X 13 pans.)


Place somewhere warm, cover with a clean tea towel, and let rise another hour (until doubled). 


Preheat the oven to 350. 
Cook the buns in a preheated 350 oven until deep golden brown and cooked through, approx 30 - 40 minutes, turning at the halfway point. 


Let cool about 20 minutes before trying to remove from the pan. If they look a little under cooked in the middle of the pan then leave them in the oven extra time - better a little too long than not enough!
(FYI - Photo below is of a single batch in a 9 X 13 pan.)


You can serve as is...


Or you can whip up the frosting and spread that on!
To prepare frosting - beat the cream cheese, icing sugar, caramel sauce, and salt until smooth. Spread on cooled buns. (If serving immediately then you can spread on warm buns but - wait until they are cool if you are not serving them until later as the frosting gets all melty.) 


FYI - These freeze very well. 
If you prefer regular cream cheese frosting simply beat the cream cheese with 1/2 cup icing sugar, 1 tsp of vanilla, and leave out the salt and caramel. Easy peasy. 
If you double the recipe (which is never a bad idea IMO) then roll the dough to 24 X 17 instead of 12 X 17, and cut into 12 instead of 6. 
Ginormous, cinnamony rolls that, I have to say, are my favorite cinnamon rolls I have ever made. Definitely keeping this recipe forever. 

Sunday, September 15, 2019

Sushi Donuts


I usually make deep fried donuts and not baked so haven't had much use for my donut pan. Sue found a photo on Pinterest of sushi donuts so we thought that would be a fun way to get some use out of the pan. Sushi donuts are the perfect appie to bring to your next family get together or party. (Also, they happen to be gluten free too!) They may be a little fussy to prepare but they can be made a day ahead so the clean up can be out of the way too. The topping possibilities are endless - if you can slice it super thin you can use it - and the filling ideas are pretty open too! 


Sushi Donuts

Ingredients
Sushi Rice
1/2 cup rice wine vinegar
scant 1 Tbsp coarse salt
2 Tbsp sugar
3 cups uncooked sushi rice
water (to cook according to package directions)

Filling
mashed avocado

Topping Ideas
toasted seaweed
toasted sesame seeds / black sesame seeds
cucumber
radish 
imitation crab
smoked salmon
avocado

Directions
In a small bowl, whisk together vinegar, salt, and sugar. Set aside. 
Cook the 3 cups of rice according to the package directions. Remove from heat when cooked and transfer rice to a large bowl. Stirring constantly, slowly add the vinegar mixture until fully incorporated. Let cool for at least 20 minutes. 
Line a donut pan with saran wrap and place a small bowl of water on your work space. Place a scoop of the rice into one of the donut pan holes and use your fingers to very firmly press the rice into the pan. (Dip your fingers into the bowl of water to prevent the rice from sticking to your fingers)


Repeat until the pan is full. 
Carefully spoon the mashed avocado into the pan on top of the rice. Be careful not to fill too full! You can put it in a Ziplock bag and snip the corner off to pipe it in for a less messy way to fill them. 


Place another scoop of rice on top and very firmly press it down on top of the avocado to fill the pan. Repeat with the entire pan. Chill the pan in the fridge for about half an hour - to make sure the rice is firmly chilled and will stick together. (Longer may be necessary.) 
When sushi donuts are chilled, gently flip them onto a serving tray and remove the plastic wrap. 


Top with your favorite toppings. The secret is to slice your topping very, very thin so they will mold to the shape of the donut. 


I believe we got 12 donuts from the amounts listed above but I'm not totally sure! Sorry about that. I am posting this quite a while after we actually made them so I can't remember. (Oops)


Have fun decorating with your favorite toppings. I found the toasted seaweed was the easiest to work with as it stuck really well to the rice and was easy to cut into shapes with scissors. 
You could do a wasabi or sriracha mayo for the filling if you want something a bit spicier, or some finally diced crab in mayo. Anything creamy would work.  


A great opportunity to let out your inner artist. 
Have fun with textures and colors and feel free to put on as much or as little topping as you like! Completely up to you! Serve with soy sauce/gluten free soy sauce, wasabi, ginger... all the usual sushi accompaniments. 
As mentioned above, you can make these a day ahead of time but be sure to keep them covered so the rice doesn't dry out. 

Saturday, September 14, 2019

Moist Jumbo Pumpkin Muffins


I may have gone a little crazy with the size of these muffins. Thing is... when you want a delicious, moist, crumbly pumpkin muffin you want a big one. I'm not wrong about that. 
This recipe is very basic and has very little in the way of bells and whistles. You probably have all of the ingredients in your pantry right now. (The only thing I had to pick up was a can of pumpkin but, as it's now cooler weather time, pumpkin becomes a staple at my house too.) 
I made these, perhaps a little too big - if that's even a thing... you could make 7 jumbo muffins if you don't fill your pans quite so full. You could make 12 regular sized muffins if you don't have the jumbo tins. 


Moist Jumbo Pumpkin Muffins

Ingredients
1 3/4 cup flour
1 cup sugar
1/2 cup dark brown sugar
1 tsp baking soda
pinch salt
2 tsp cinnamon
1/4 tsp cloves
1/4 tsp nutmeg
2 eggs
1/2 cup oil
1 tsp vanilla

Directions
Preheat oven to 375. Grease a 6 cup jumbo muffin tin with butter and set aside. 
In a medium bowl, whisk together the flour, sugars, baking soda, salt, and spices. In a bigger bowl, whisk together the eggs, pumpkin, oil, and vanilla. 
Mix the dry ingredients into the wet ingredients until just mixed. A few streaks of flour is okay - you don't want to over mix or your muffins won't be as fluffy. 
Scoop the batter evenly into the 6 cups.


As you can see... I filled mine very full... you could fill 7 cups instead of the 6 if you are worried about it being too full. (12 regular size)
Bake at 375 until a toothpick inserted near the center comes out clean and tops are a light golden color, about 25 - 35 minutes (Depending on your oven. I rotate my muffins in the oven at the ten minute mark and then start checking at 20 minutes. Tops should appear dry.)


Let cool for at least 15 minutes in the pan on a wire rack. Then carefully run a butter knife around the edge of the muffin and remove it from the pan. 


I like to cut mine in half for serving...


And, of course, a healthy dose of butter makes things even better...


These freeze very well so they work as a make-ahead, travels-well breakfast or snack. After school the kids can pop one in the microwave for a minute and have a delicious treat. 
You can, of course, add in chocolate chips or butterscotch chips, or nuts, or raisins but it is totally not necessary. Simplicity is the key for these bad boys. 
So moist. So tender. Basically the best muffin ever.