Showing posts with label cheesecake. Show all posts

Sunday, June 28, 2026

Chocolate Chip Cheesecake Bars


I've been wanting to post this recipe for a while now but I never seem to be able to get any photos of the finished product. It's usually eaten up before I get the chance! This is a fairly simple bar to put together, even though there are three layers to it. Totally worth the few dishes you will have to clean up, IMO. 
You can cheat a bit and use a roll of Pillsbury chocolate chip cookie dough for the top layer if you don't want to make your own. 


Chocolate Chip Cheesecake Bar

Ingredients
Bottom Layer
1 3/4 cup graham cracker crumbs
1/2 cup melted butter
1/4 cup brown sugar

Cheesecake Layer
2 - 8 oz pkgs cream cheese, softened
1/2 cup sugar
1/4 cup sour cream
1 egg
1 tsp vanilla

Cookie Dough Layer
1/2 cup butter, softened (can use margarine)
1/2 cup white sugar
1/2 cup brown sugar, packed
1 egg
2 tsp vanilla
1 1/2 cup flour
pinch salt
1 1/4 cup mini chocolate chips

Directions
Preheat oven to 350. Line a 9 X 13 pan with parchment paper, set aside. 
Bottom layer - Mix together graham crackers, butter, and brown sugar. Press evenly into the prepared pan. Bake at 350 for 5 - 8 minutes, until lightly browned. Remove from heat and set aside. 
Cheesecake layer - beat cream cheese until smooth, scraping bowl as needed. Beat in sugar, sour cream, egg, and vanilla. Spread over crumb layer in pan. 
Cookie dough layer - Beat butter and sugars until light and fluffy, about 3 - 4 minutes. Beat in egg and vanilla. Add in flour, salt, and chocolate chips. Beat until stiff dough forms. Evenly crumble the dough over the cheesecake layer. It's okay if a bit of the cheesecake shows through in places. 
Bake at 350 for about 12 minutes, rotate pan, then bake another 10 - 15 minutes, until top is lightly golden brown and bar appears set. Remove from heat and let cool to room temperature before attempting to cut. You can also let it chill in the fridge before cutting. 


This bar has so many flavors and textures that combine in the most amazing way. The buttery, caramelly crust, the smooth cream cheese middle, and the chocolatey cookie top are an unbeatable combo. 


Store them in the fridge after they have cooled. They also freeze very well if you want to make them ahead of time. They might look like a simple square but they are SO FLIPPIN' GOOD!!. 
After school snack or fancy dessert after dinner? 
This can be both, and so much more! 


Wednesday, December 27, 2023

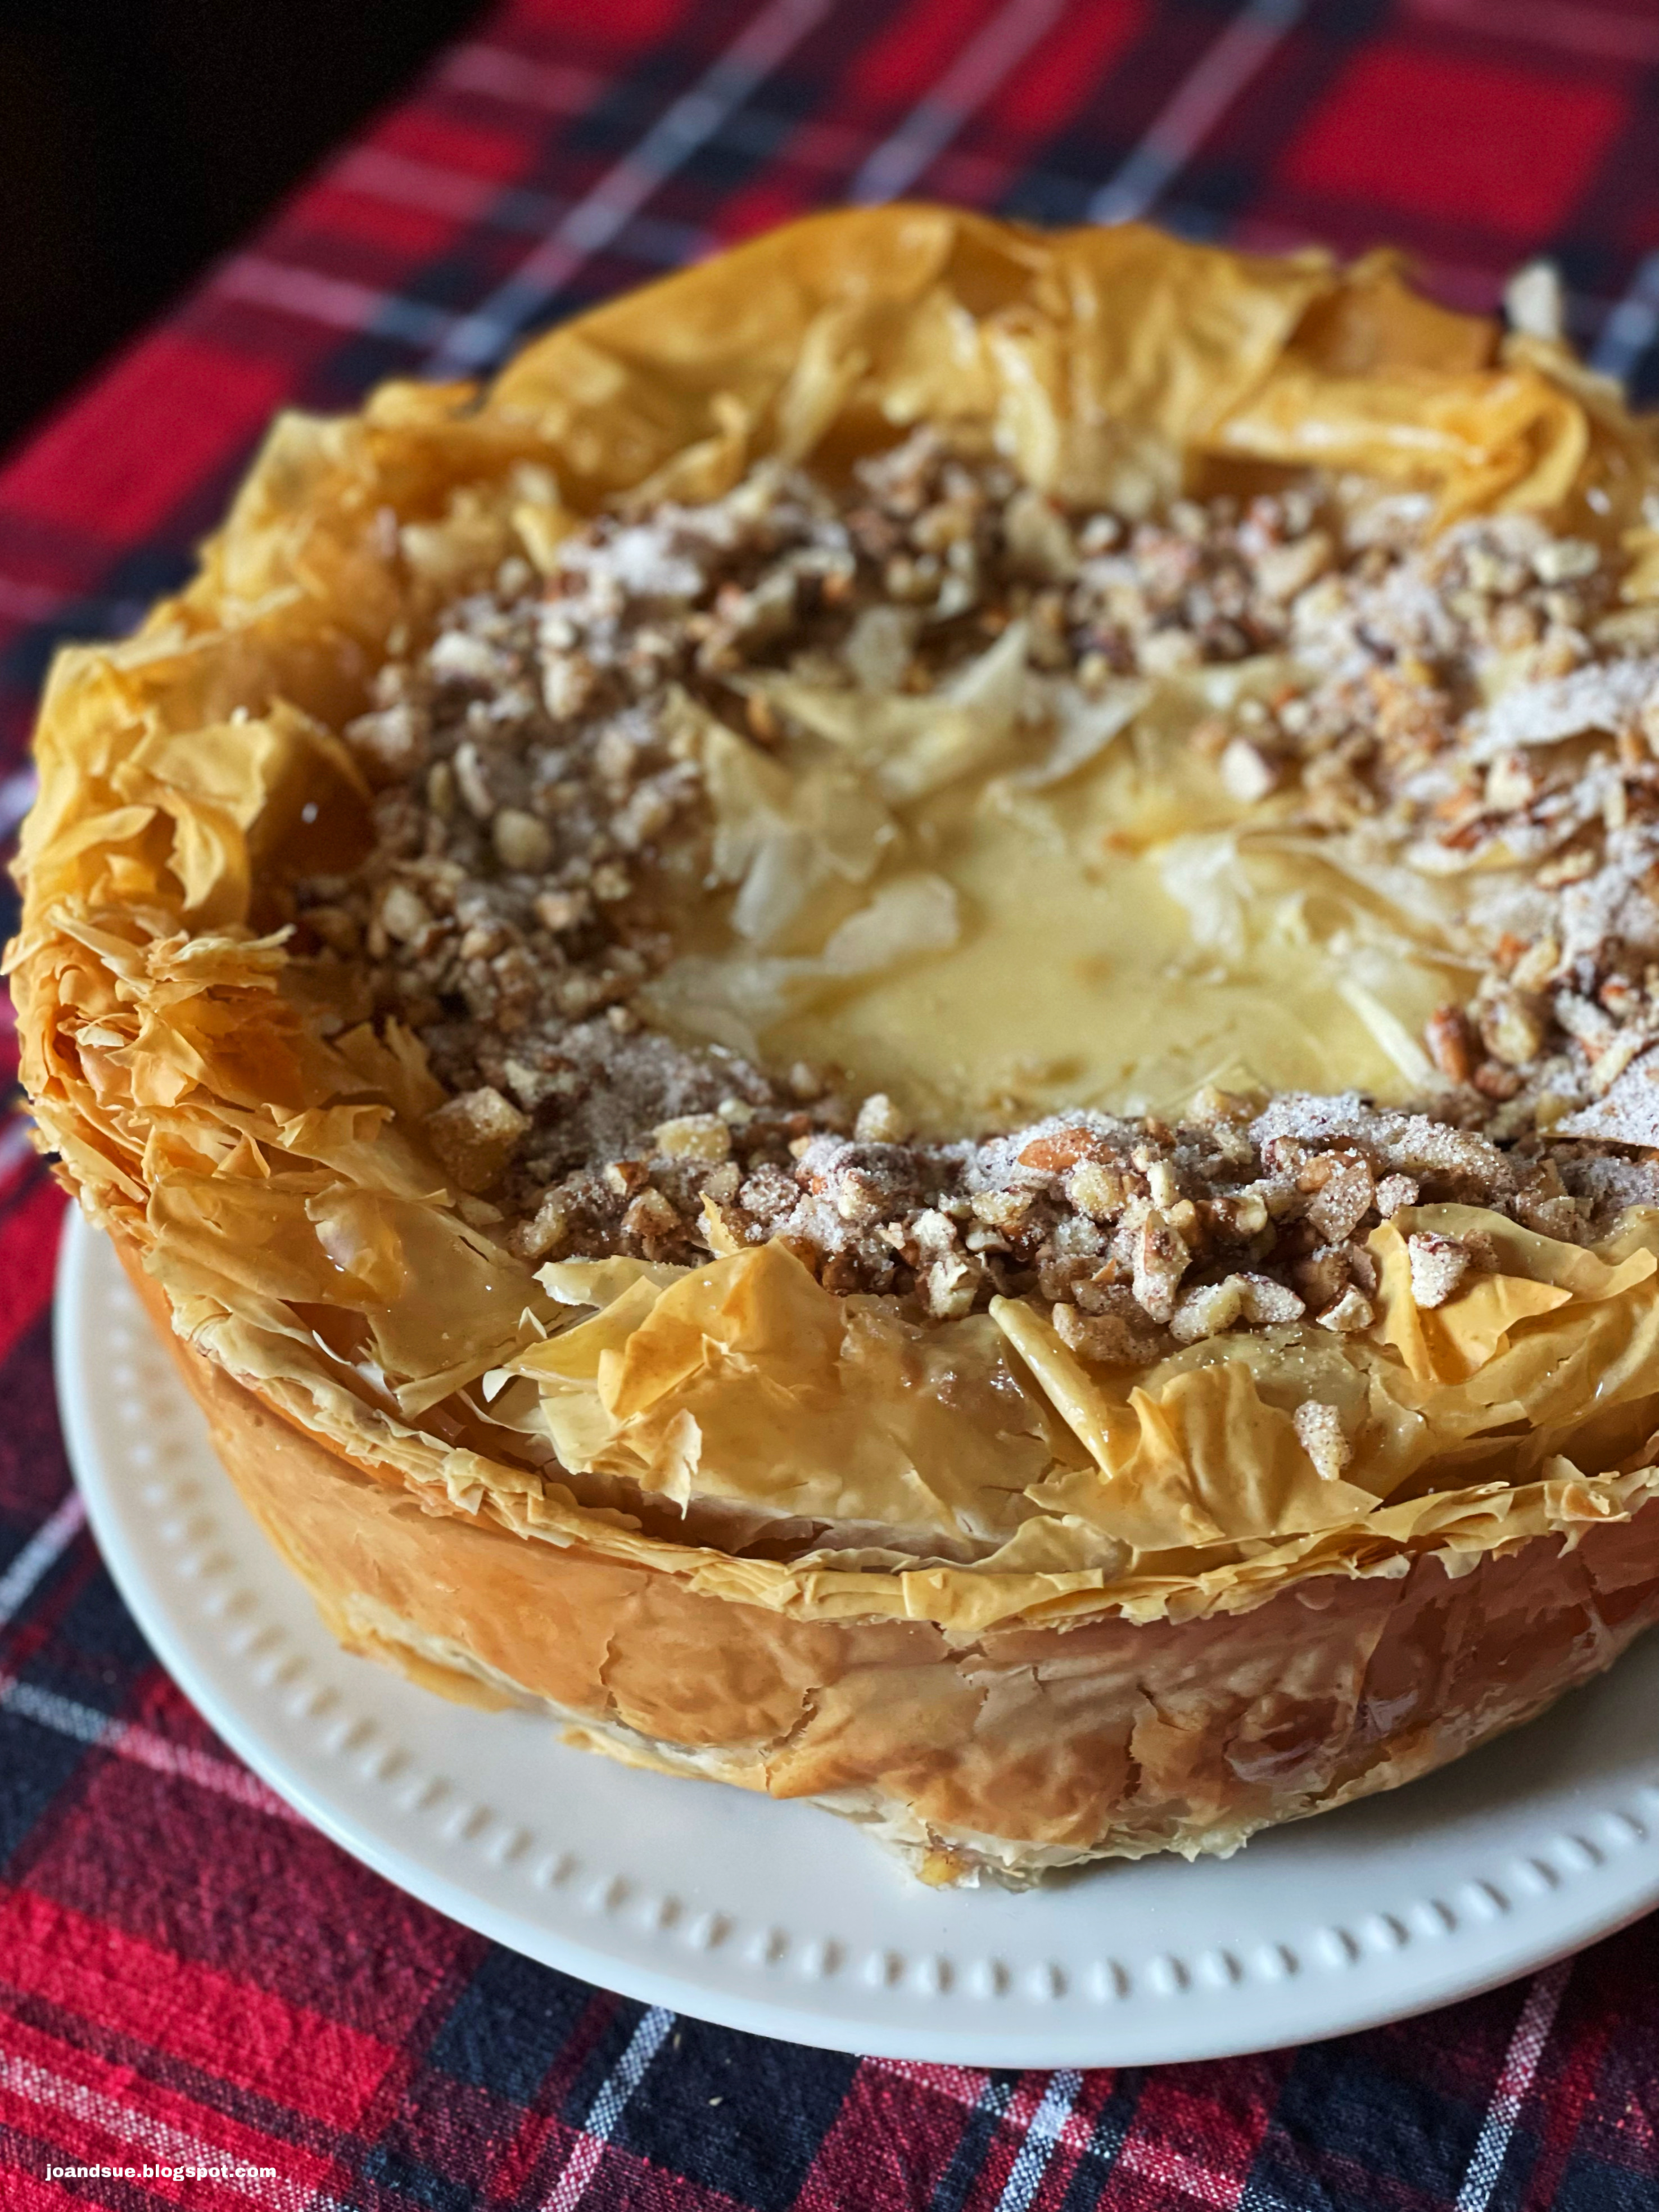
Baklava Cheesecake


This just might be the best cheesecake… nay, dessert… in the universe. 
Bold claim, I know, but it’s true. The combination of the crispy sweet baklava and the smooth and creamy cheesecake is *chef’s kiss*. 
My sister’s boyfriend said I could become a millionaire if I decided to sell it. I think he’s right. Once you have a taste you want more. The only thing that is a bit of a bummer is the fact that it takes a bit of time and effort to put it together. If you’ve ever made a baklava and a cheesecake then you know what I’m talking about. Totally worth it though. 
Do it.


Baklava Cheesecake

Ingredients
Baklava Base
20 phyllo sheets
1 cup butter, melted
1 cup finely chopped walnuts
1 cup finely chopped pecans
1/4 cup sugar
1 1/2 tsp cinnamon

Cheesecake Layer
3 bricks cream cheese (24 oz), softened
1 1/2 cups sugar
Pinch salt
3 tsp vanilla extract
3/4 cup sour cream
1 Tbsp lemon juice
3 eggs

Honey Syrup
1/2 cup sugar
1/4 cup water
1/4 cup honey

Directions
Preheat oven to 325. Line the bottom of a 10 inch springform pan with parchment paper.
Layer 1 phyllo sheet in the prepared pan. Gently press the sheet against the sides of the pan and over the top. Brush all over with a little melted butter. Continue layering a phyllo sheet and butter until you have used 10 phyllo sheets. 
Combine the chopped walnuts, pecans, sugar, and cinnamon in a small bowl. (Reserve 1/3 of a cup for decorating the top of the cheesecake later). Spread half of the mixture into the pan. 
Layer 5 more phyllo sheets and butter on top of the nuts.
Spread the remaining chopped nuts mixture in the pan. 
Layer in the last 5 phyllo sheets and butter. 
 Set aside and prepare the cheesecake.


Prepare cheesecake - Beat cream cheese until smooth, scraping down sides of bowl as needed. Beat in sugar, salt, and vanilla. Beat in sour cream and lemon juice. Lastly, beat in eggs until just combined. 
Pour into the pan and spread evenly. 


Gently fold the excess phyllo up and over the top, leaving the centre of the cheesecake open. It’s okay to trim off some phyllo if you don’t want it too thick on top. IMPORTANT NOTE - Set the cheesecake on a cookie sheet as it will drip and smoke up your oven otherwise! 


Bake at 325 for 60 - 70 minutes. FYI - I actually ended up baking mine for almost 2 hours before it was done. The centre should be almost completely set with just a slight jiggle to it if you gently shake the pan. The phyllo should be golden brown.
When the cheesecake is done, shut the heat off and let it sit while you prepare the honey syrup.
Prepare the syrup - Bring sugar, water, and honey to a boil over medium heat. Simmer for 5 - 6 minutes. 
Remove cheesecake from oven to a wire rack. Slowly drizzle the honey syrup over the phyllo pastry. Make sure to try and get it in all the cracks and crevices. Drizzle a little over the centre of the cheesecake as well. 


Let cool to room temperature before removing the sides of the pan. Don’t worry if a bit of the phyllo falls off as you do this, it’s normal. 
Chill the cheesecake in the fridge for at least 4 hours, up to overnight.


Before serving, sprinkle the reserved 1/3 cup of chopped nut mixture around the edge of the cheesecake. Slide a spatula under the chilled cheesecake to remove the bottom of the springform pan and transfer the cake to a serving plate. 


This makes a huge cheesecake so is perfect to bring to a family gathering or potluck. It also lasts for several days, covered, in the fridge. I had a piece 3 days after first making it and it was totally fine. The phyllo was a teeny tiny bit not as crunchy but it was not soggy or anything like that. 


Look at all those delicious layers!
So. So. So. Good.
I will definitely be making this again. 

Monday, March 27, 2023

Keto Cheesecake


When I create keto recipes my goal is to make them as close to “the real thing” as possible. 
This recipe was a huge success in that regards. Except for a bit of difference in the crust, you can’t tell it’s keto. The taste and texture are amazing. 
You can make it as a 10 inch cheesecake, 2 - 7 inch, or 24 to 30 muffin cup sized. The only thing you have to change is the cooking time. The bigger it is, the longer it takes! 


Keto Cheesecake

Ingredients
Crust
2 cups almond flour
1/3 cup melted butter
3 Tbsp brown sugar Swerve (or similar sugar replacement)
1 tsp vanilla

Cheesecake
5 - 8 oz pkg cream cheese, softened
1 cup powdered Swerve (or similar sugar replacement)
4 eggs
2 Tbsp sour cream (or Greek yogurt) 
 1 tsp vanilla

Directions
Preheat oven to 350. 
Combine crust ingredients and press firmly into pan. Bake at 350 for 10 minutes. Remove from heat and set aside while you prepare filling.
Beat cream cheese until smooth, scraping bowl as needed. Beat in Swerve and then eggs, one at a time. Beat in sour cream and vanilla. Pour over crust in pan. 


If you are using muffin trays, be sure to fill evenly so they bake evenly. Reduce heat to 325 and cook until done - approx 50 to 80 minutes. (Depending on size of pan) Top should look dry and filling shouldn’t jiggle when the pan is moved. 


Let cool completely before removing from larger, springform pans. If you make them in muffin tins lined with paper cups then you can remove them carefully and let them cool on wire racks. 


Let chill overnight (or at least several hours) before topping with your favorite toppings.


I went with a sugar free lemon curd, keto caramel sauce, and keto strawberry jam. Try blueberries or strawberries, or even just some whipped cream! 


According to MyFitnessPal, one serving (if you divide in 12) is: 
500 calories, 49 fat, 7.5 carbs, 2 fiber, 13 protein. 5.5 net carbs.
If you make 24 muffin sized it’s is: 
250 calories, 25 fat, 3.75 carbs, 1 fiber, 6.5 protein. 2.75 net carbs
FYI - These counts are for the crust and filling only, not the toppings. 
Everyone I have made this for has loved it! It is diabetic friendly, gluten free, low carb, keto friendly, and still super delicious! 


Monday, July 27, 2020

Pina Colada Cloud


Nothing beats a frosty pina colada when the summer heat gets crazy.
Even better? This Pina Colada Cloud dessert! It'll transport you to the tropics while you are staying at home in your own backyard. Make it in a 9 X 13 pan for a bigger group OR in 2 - 8 inch pans if you want to share it! 
Layers of graham crumbs, rum cheesecake, pineapple, banana, and coconut ensure this dessert will be your go-to for BBQs all summer long! 


Pina Colada Cloud 
(Slightly altered from Ramona Johnson, Valleyview Alta)

Ingredients
Crust Layer
2 cups graham cracker crumbs
1/2 cup melted butter

Rum Cheesecake Layer
1 1/2 cup whipping cream
1 - 8 oz brick cream cheese, softened
1/2 cup icing sugar
2 tsp rum extract

Banana Layer
3 medium bananas

Pineapple Layer
2 cans (398 ml each) crushed pineapple (do not drain)
1/4 cup water
1/2 cup brown sugar
1 tsp lemon juice
3 Tbsp cornstarch

Coconut Whipped Cream Layer
1 1/2 cup whipping cream
2 tsp coconut extract
1/3 cup toasted, shredded coconut

Directions
Prepare Crust Layer - combine graham crumbs and butter until well mixed. Press firmly into bottom of pan. Chill while preparing next layer. 
Prepare Rum Cheesecake Layer - beat 1 1/2 cups whipping cream until stiff peaks form. In a separate bowl, beat cream cheese, icing sugar, and rum extract. (NOTE - if you do not have rum extract you could use 2 Tbsp of rum) until smooth. Beat the cream cheese mixture into the whipped cream until just combined. Spread over the crumb base. 
Prepare Banana Layer - Slice bananas into a single layer on top of the cheesecake layer. Cover and chill while preparing the pineapple layer. 
Prepare Pineapple Layer - in a saucepan, combine pineapple, water, brown sugar, lemon juice, and cornstarch. Cook over medium low heat until thickened. Remove from heat and let cool completely - it speeds things up if you pop it in the freezer for about 15 - 20 minutes, stirring every 5 minutes. 
Spread the cooled pineapple mixture over the bananas.  


Prepare Coconut Whipped Cream Layer - beat 1 1/2 cups whipping cream with the coconut extract until stiff peaks form. Spread over the pineapple layer. Sprinkle evenly with the toasted coconut. 


Chill until ready to serve. At least 3 hours. 


If you like Pina Coladas then you will love this dessert. 


Layers of pineapple, banana, coconut, and rum.... what's not to love?


This is best the day it is made but will last in the fridge for a couple of days. I usually make it the morning I am planning to serve it so it has time to chill for several hours. I've made it the night before and it is fine too - the crust just gets a bit soggy the longer it sits. 

Thursday, February 13, 2020

Keto Mocha Brownie Cheesecake


Maybe it's just me, but I find a LOT of keto friendly desserts just terrible. I mean.... they have that weird sugar-substitute aftertaste that seems chemically to me. Ooooor.... the texture is off because you've subbed out ingredients with low carb ingredients (ie: flour for almond or cocout flour). 
This cheesecake though.... none of the above. 
It's as cheesecake-y as cheesecake can be. Even the brownie bottom is very brownie-y. I was very excited that it turned out so tasty after only 2 tries at tweaking my recipe. It makes 4 servings but can be doubled easily. FYI - you can freeze pieces of this very well for a later date so you are not tempted to eat it all at once! Although, for only 3.3 net carbs per serving, you'd have nothing to feel bad about if you did! 


Keto Mocha Brownie Cheesecake

Ingredients
Brownie Base
3 Tbsp butter, melted
3 Tbsp baking cocoa powder
3 Tbsp almond flour
3 Tbsp powdered Swerve
1 tsp instant coffee granules
1 egg
1/4 tsp vanilla
2 Tbsp walnuts

Cheesecake
8 oz cream cheese, room temp
3 Tbsp powdered Swerve
2 Tbsp sour cream
1/4 tsp vanilla
1 egg

Directions
Preheat oven to 325. Spray the sides and bottom of a 7 inch spring-form pan with cooking spray, set aside. 
Prepare brownie base - stir together the melted butter, cocoa, almond flour. Stir in Swerve, coffee granules, egg, vanilla, and walnuts. 


Spread into the prepared 7 inch spring-form pan. Place in preheated 325 oven while you prepare the cheesecake layer. Bake for 8 minutes.
Prepare cheesecake layer - Beat cream cheese until smooth, scraping sides of bowl as needed. Beat in Swerve, sour cream, vanilla, and egg until smooth. Gently spread evenly over the brownie layer.


Place back in oven, reduce heat to 300, and bake 30 minutes more (until cheesecake is set). Turn off the oven and crack open the door a little. Leave cheesecake in the oven another 30  minutes to cool gradually. This will help prevent it from cracking.


When cheesecake has cooled completely, run a knife around the edge of the pan and remove the sides of the pan. 


Chill at least 3 hours before serving, up to overnight. 


Cut into 4 pieces. 


Serve as is or add your own favorite toppings. 


I went with a little whipped cream and a strawberry to keep the carb count pretty much at 3.3 net per piece.


I love the simplicity of this recipe and that, other than the Swerve and almond flour, the ingredients are all "regular" baking ingredients. I was able to find the powdered Swerve online and am so happy I did! It definitely makes a difference what sugar substitute you use. I don't find the powdered Swerve nearly as chemical tasting as some of the others out there. The texture is bang on too. Just like icing sugar. 
Do you have a favorite keto dessert that you swear by? We'd love to hear about it! Drop us a comment below so we can check it out! :) 

Monday, October 14, 2019

Giant Spider Cheese Ball


Cheese balls are the best, aren't they?
Need something to bring to a potluck? Cheese ball. Want to make something festive? Cheese ball. Something for an appie, side, or dessert? Cheese ball. Looking for quick and easy? Cheese ball. 
We made this spooktacular chocolate peanut butter cheesecake-y spider as a treat for our Halloween party. It only takes a few minutes to put together and makes a pretty big impression on the table! If your chocolate piping skills are lacking (as mine are) then you can use black licorice for legs instead. Up to you! You can also stick edible googly eyes on him, if you like. I found he looked creepier without eyes. 


Giant Spider Cheese Ball

Ingredients
2 bricks (16 oz total) cream cheese, room temp
1/2 cup peanut butter
1/2 cup butter, room temp
2 tsp vanilla
2 cups icing sugar
6 Tbsp  baking cocoa
~1 cup mini chocolate chips 

chocolate for piping legs or black licorice 

Directions
Beat together the cream cheese, peanut butter, butter, and vanilla until smooth, scraping bowl as needed. Stir in the icing sugar and baking cocoa. 
Divide into 2 balls - one about 2/3rds and one about 1/3rd, for the body and head. Roll the balls in the mini chocolate chips and then wrap in plastic wrap. Place in bowls so the balls retain their round shape. Chill until firm. 


After chilling; unwrap the balls and roll in more mini chocolate chips to cover any spots that you may have missed. Place on a serving platter. 
Pipe 4 legs on either side of the body (or place black licorice). Cover and chill until ready to serve!


Looking to make something that will have everyone talking, but don't want to have to work too hard?
We feel ya. We're here for you. 


We served him with graham crackers, animal crackers, and strawberries! You could use any fruit you like! 

Wednesday, July 3, 2019

Rhubarb Cheesecake Squares


When rhubarb season arrives everyone knows it. Rhubarb shows up everywhere because it just keeps growing and growing and growing! Not that we're complaining. Rhubarb is an amazing ingredients in soooo many things. Throw it in with some strawberries or blueberries and the flavor of whatever you are making just gets better. 
These cheesecake squares can be whipped up in about an hour from start to finish and will make you all sorts of new friends. People cannot get enough of them! And by "people" I mean me. I may have eaten more than one..... quality control, you understand. 
But seriously, be prepared to make more than one pan of these!


Rhubarb Cheesecake Squares

Ingredients
Rhubarb Layer
5 cups chopped rhubarb
3/4 cup sugar
1 Tbsp water
3 tsp cornstarch

Cheesecake Layer
2 - 8 oz bricks of cream cheese (16 oz total), room temp
1/2 cup icing sugar
1 egg

Crust/Crumb Layers
1 cup butter
1 3/4 cup flour
1 cup oats
3/4 cup brown sugar
pinch salt
1/2 cup chopped walnuts

Directions
Preheat oven to 350. Line a 9 X 13 pan with parchment paper, set aside. 
Prepare rhubarb layer - cook rhubarb, sugar, and water. Simmer for 8 minutes over medium heat. Add in the cornstarch and cook 2 more minutes. Set aside to cool.
Prepare cheesecake layer - Beat together the cream cheese, icing sugar, and egg until smooth. Set aside. 
Prepare crust/crumb layer - Crumble together butter, flour, oats, brown sugar, and salt. Add half of this mixture to the prepared pan and press firmly. 
Add the walnuts to the remaining half and set aside. 
Assemble square: Scoop cheesecake mixture by the spoonful on top of the crust and spread with a spoon, being careful not to disturb the crust layer too much. 


Spread the rhubarb mixture on top of the cheesecake.


Lastly, crumble on the remaining crust/crumb mixture evenly over the top.


Lightly press down. 
Bake in 350 oven until topping is golden brown and cheesecake is set - about 30 minutes. 
Cool completely before slicing. Store in fridge. 


Love cheesecake but not the time involved to make it? Give this a try. All the tastiness of cheesecake but in a fraction of the time. Plus... rhubarb and crumbly bits.... you've got nothing to lose here. 
FYI - If you are a little shy of 5 cups of rhubarb you can make up the difference with strawberries! 

Tuesday, March 5, 2019

Cream Cheese Brownies


You can't go wrong with brownies. I mean... fudgey, chocolaty, ooey gooey brownies warm, with ice cream and caramel sauce....*droooool*. When they bury me it's going to be written on my tombstone: "The brownies finally got her."
I'm okay with that. 
This recipe is a bit of a cheat. We started with a mix and made some additions and ended up with a totally decadent dessert that will impress all your chocolate loving guests. If you are anti-cheat, then by all means you can use your favorite basic brownie recipe to start with!


Cream Cheese Brownies

Ingredients
1 box brownie mix (We used Betty Crocker Fudge Brownie) 
Ingredients on box to prepare brownie

Cream Cheese Swirl
4 oz cream cheese (1/2 a brick), room temp
1/2 cup sugar
1/4 cup sour cream
1 tsp vanilla

Extras
vanilla ice cream
caramel sauce

Directions
Preheat oven to 350. Line a 10 inch pan with parchment paper, set aside. (NOTE - can use a 9 inch pan but you will need to adjust cooking time.)
Prepare brownie as per box instructions and spread into the prepared 10 inch pan.


In a bowl, beat together the cream cheese, sugar, sour cream, and vanilla until smooth, scraping bowl as needed. Drop by spoonfuls over the brownie in the pan.


Swirl the cream cheese mixture through the brownie mixture with a butter knife. 


Bake at 350 until toothpick inserted near center comes out with only a few moist crumbs and top looks "dry"- about 30 - 35 minutes. The cream cheese part will be browned. 


Let cool on wire rack. Use the parchment paper to remove the brownie from the pan OR serve directly from the pan. 


You can serve warm or room temp.... or even chilled if that's your thing. There is no wrong way to serve a rich and creamy cheesecakey brownie.


Ice cream always makes things better, of course. But wait, there's more...


Caramel sauce on top is just the bomb. 
Are we still saying that? Are things still "the bomb"?
Regardless.... this is and always will be. 


Do you enjoy cheesecake and brownies and ice cream and caramel in one stupidly over the top dessert? I do. I really, really do.