Showing posts with label Valentine's Day. Show all posts

Sunday, May 24, 2020

Mom's Macaroni Salad (AKA: Best Macaroni Salad Ever)


I know you saw the title of this recipe and came here to see what makes it the best macaroni salad ever. 
You're skeptical, I get it. 
Thing is.... it's ridiculously simple and delicious and has absolutely nothing but the basics in it but it's magic and will have you hooked in 1 bite. Maybe 2 bites...
There are no measurements, you've got to make it like mom does... with your heart. 
Ha. Sappy. But accurate. 
Eyeball it. You got this. 


Mom's Macaroni Salad

Ingredients
elbow macaroni
green peas
radishes
pickles
green pepper
onion
aged cheddar cheese
mayo or miracle whip
salt & pepper 

Directions
Boil macaroni as per package directions until soft. (Mom likes hers a little more well done than al dente so do it up right!) At the end of cooking, throw in a handful of frozen green peas and let cook for a minute. Drain and let cool to room temp. 
Cut up a few radishes into slices. About 2 - 4, just enough to add some color to the pasta.
Cut up one or 2 pickles into tiny cubes. 
Cut up about 1/4 of a green pepper into tiny cubes.
Finely dice about 1/4 of an onion.
Cube up aged cheddar cheese into tiny cubes. (Do NOT shred it, that is not mom's way. Cube it.)


Give it a good stir. Can you see little bits of all the different color ingredients?
If yes, you're good to go. If no, add a bit more of whatever ingredient isn't showing up enough. When you think it looks good, stir in the mayo.
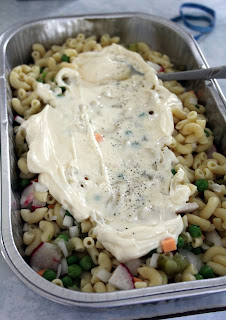

Make it good and creamy. Stir it well then let it sit for 5 minutes so the pasta can soak up some of the mayo. Creamy enough? Ok. Still seem dry? Add in more mayo a spoonful at a time. 


Chill until ready to eat. Definitely give it at least an hour or two in the fridge. Just before serving, season with salt and pepper!
Word of advice - if you want to make this ahead of time: mix in the ingredients but DO NOT mix in the mayo. Cover and chill until ready to serve. Mix in mayo about half an hour before serving and place back in fridge until ready to use.


One of the best things about this salad is you can make a little bit or a huge amount. 
For those of you insisting on measurements. *Sigh* I get it. I'll do my best to guesstimate here, but you really do have to go by how it looks. 
For about 4 cups cooked macaroni I'd say 1/3 cup peas, 3 radishes, 2 baby pickles, 1/4 of a green pepper, 1/3 cup onion, 1/2 cup cheese, and 1 cup mayo. Totally guesstimating here guys.... use your mom-senses to make sure it feels right. 
You should be able to see all the ingredients every time you give it a stir. And if you're unsure about the mayo, start low and add slow. You can't take it out after if you've added too much. 
Let us know if you give it a try! We're pretty sure you'll fall in love with it! 

Sunday, February 9, 2020

Orange Cranberry Pie


I initially made this pie for Christmas because the color and flavors seemed Christmas-y to me. Thing is, once we tried it, we fell in love with the flavor! It's tangy and refreshing and rich-yet-light, making it perfect for so many things. The color also works for Valentine's Day or Canada Day - if you're thinking about holiday desserts. Orange and cranberry may seem to be Christmas flavors but I'm thinking they also scream Springtime. 
You can make this pie the night before you plan to serve it, or the day of, you just want to let it sit for at least 4 hours or so to let it set completely. It will last for a couple of days in the fridge before your crust will start to be a little soggy. I topped it with fresh cranberries and orange slices but you may want to warn your guests NOT to eat the cranberries. Raw, fresh cranberries, while totally safe, are very bitter/sour. You could sugar them, if you wanted to, but I always just tell people not to eat them unless they want to give their taste buds a shock! 


Orange Cranberry Pie

Ingredients
1 baked, 9 inch pie shell

Filling
2 3/4 cup fresh cranberries
1 cup sugar
1/4 cup water

3 eggs
2 egg yolks
2 tsp grated orange rind
1/2 cup fresh orange juice
pinch salt
1/2 cup sugar
1/2 cup butter

Whipped cream
1 cup whipping cream (heavy cream)
2 Tbsp instant vanilla pudding powder

Optional Decorations
orange slices
fresh cranberries

Directions 
Prepare filling - In a medium saucepan over medium heat, cook, stirring often, the cranberries, sugar and water. Boil about 10 - 15 minutes, until moisture is gone and cranberries have broken down. 


Remove from heat and let cool 10 minutes. Puree until smooth, about 3 - 4 minutes. 


Add the puree to a double boiler. Add in the eggs, egg yolks, orange rind and juice, salt, and sugar. Cook in a double boiler (or in a bowl over gently simmering water - see pic below), stirring often, until thickened, about 10 minutes.


Strain the thickened curd through a strainer into a bowl. Beat the warm curd, adding a little of the butter at a time. Beat until lighter in color, about 5 minutes.
Pour into the baked pie shell. 


Let cool completely. 
Prepare the whipped cream - whip the cream with the vanilla pudding powder until stiff peaks form. Pipe onto the top of the pie as desired. (Can also just be spread on top.)


Top with oranges slices and cranberries to decorate, if desired. 


Chill until ready to serve - at least 4 hours. 


The lighting is Sue's house is a little odd so the color does not appear as bright in these photos as it really is! 


The texture is a little like a lemon meringue..... but thicker and not quite as smooth. 


A refreshing option after a heavy meal. 
If you don't have a double boiler then you can use a bowl over a pot - as I did in the photo up above. It works just as well - just make sure you use precautions when lifting the bowl out; it will get fairly warm over the simmering water. 
Also, the vanilla pudding powder in the whipping cream helps to stabilize it. If you want to leave it out and just use plain, sweetened whipping cream, that will work too. 

Monday, January 28, 2019

Classic Angel Food Cake


Angel food cake from a box mix just cannot compare to from scratch. It's an entirely different experience. Angel food cake from scratch is a bit of a pain in the butt to make, granted, but is so worth the effort. And what is the best way to top an angel food cake? Well, that would be with whipped cream and strawberries of course. I upped the strawberry factor by adding some crushed, freeze dried strawberries to the whipped cream and it was a good decision. I don't think you can ever have too much strawberry-ness. 
If you have 12 egg whites that you are wondering what to do with.... look no further. 
The folding of the egg whites is the trickiest part and can lead to disappointment if you collapse them OR if you don't fold the flour in enough. Just have patience, go slow, and you should be okay. 
Classic desserts like angel food cake are classics for a reason. They never go out of style. 


Classic Angel Food Cake

Ingredients
Cake
1 1/2 cups cake flour
1/4 tsp salt
12 egg whites
1 1/2 cups fine sugar
1 1/2 tsp cream of tartar
1/2 tsp vanilla
1/2 tsp almond extract

Whipped Cream
2 cups whipping cream
3 Tbsp sugar
1/4 cup powdered freeze dried strawberries

Serve with
Strawberries
extra whipped cream

Directions
(NOTE - If you do not have cake flour: measure out the 1 1/2 cups of all purpose flour, then scoop out 3 tablespoons and replace with 3 tablespoons of cornstarch.)
Preheat oven to 325. 
Whisk together the flour and salt. Set aside 
Set aside 3/4 cup of the sugar.
Place remaining 3/4 cup of sugar and the flour/salt mixture into a blender (or food processor). Process approx 1 minute to form fine powder. Set aside.
In a stand mixer: combine egg whites and cream of tartar. Beat on low for 1 minute. Increase to medium until stiff peaks just start to form. Slowly beat in the reserved 3/4 cup of sugar and the extracts. (This should take about 5 - 7 minutes)


Sift the flour mixture into the egg whites in 3 separate additions, folding in between additions. Do this gently so as not to deflate the whites!


Gently spread batter into an un-greased angel food cake pan. 


Bake at 325 for 40 - 45 minutes. Top should be light golden brown and cake tester inserted near center should come out clean. (Depending on how your oven cooks it may take up to an hour to bake.)


Remove from oven and immediately turn upside down to cool. You can set it on a wine bottle or prop it up on cans. Be sure to support the center so it does not slide out if your pan has a removable bottom.) Let cool completely. 


When cool, run a knife around the inside of the edge of the pan to loosen then invert onto a wire rack.


You can then run a knife around the bottom of the pan to remove the bottom piece. Invert onto serving platter. 


Prepare whipping cream: Beat the whipped cream with the sugar and freeze dried strawberries until stiff peaks form. 


Spread on sides and top of cake.


Decorate with strawberries and a pinch more freeze dried strawberry powder (optional).


Chill until ready to serve.


The texture of angel food cake is amazing. So fluffy but still cake-like. 


It looks so fancy schamncy.


You can always serve with a bit more whipped cream and strawberries, of course. 


Something for Valentine's Day perhaps? Mother's day? You'd definitely be the favorite if you made this for mom. 


Just remember, be patient when folding the egg whites. Be gentle. Don't over mix or you will deflate your whites and the cake won't work. It's a bit more challenging than a regular cake but you can do it!
Old fashioned recipes are the best! 


We're sharing over at Carole's Chatter. Be sure to stop by and say Hi!
Friday, December 28, 2018

Strawberry Cheesecake Bites


This Christmas I was able to get my hands on a tin of freeze dried strawberries from walmart.ca. Have you tried freeze dried fruit yet? The texture is weird but the flavor is amazing. 
Best of all? If you powder it, it makes for amazing desserts!
There is only 4 ingredients in these little bad boys and they only take about 15 minutes to whip up BUT they rival the most complicated of cookies or truffles. The color is perfect for the Christmas holidays but works for Valentine's Day or Canada Day as well. 
If you like strawberry cheesecake then you will love these little bites. 


Strawberry Cheesecake Bites

Ingredients
2 cups freeze dried strawberries
1 brick (8 oz) cream cheese, room temp
1/2 cup icing sugar
1 cup graham cracker crumbs

Directions
Take the 2 cups of freeze dried strawberries and pulse them in a blender or food processor until finely ground. You should have just shy of 1 cup of powder. 
In a mixing bowl, combine strawberry powder, cream cheese, and icing sugar.


Stir until well combined.
Using a small cookie scoop (about 1 tbsp) scoop out the bites and place them on a platter lined with plastic wrap. Dip the bottoms of the bites into the graham crumbs. (You can roll the bites in the crumbs but then you will lose most of the lovely pink color!) Chill until ready to serve.


Add them to a tray of cookies/balls for a pop of color - or serve them on their own!


You could also roll them in more powdered strawberries and skip the graham crumbs, if you prefer. 


These bites have all the creaminess of cheesecake in a teeny little bit sized treat. 
Try to eat just one! It can't be done. 


I am excited to try some more strawberry recipes with the freeze dried berries. They pack a huge flavor punch! These will last several days, covered, in the fridge but the graham crumbs will get a bit soggy. No one seemed to mind around here though! If you want to make them up early you could wait until just before serving to dip them in the crumbs. Up to you! 

Saturday, February 10, 2018

Valentine's Cake In A Can


Sue and I realized we haven't done anything really fun for Valentine's Day for a while and wanted to try and remedy that. I came across a post on Pinterest that showed a woman baking a birthday cake in a can and things kind of snowballed from there. 
I didn't want to bake the cake in the can as I wasn't sure how to tell if it was actually safe to do that. I decided to bake the cake separately and then place it in the can after. It worked like a charm. 
You could use any kind of cake and frosting you like - being this was for Valentine's I went with chocolate and more chocolate. 
This is a super fun way to make treats for someone special and is totally customizable. I used Word to print my labels but you could also just cut paper and have the kids draw their own art on each label for a perfect gift for Gramma and Grampa.  


Valentine's Cake In A Can

Ingredients (non-edible)
7 cans with a "pop top"
7 can labels
7 forks
hot glue gun with glue sticks
ribbon

Ingredients (edible)
2 cups chocolate frosting
2 cups sixlets (or sprinkles)

Directions
Using a can opener, remove the BOTTOMS of the cans. Pour the contents into a bowl to use for something else. (Make sure you use canned fruit cans. You don't want any lingering weird flavors in your cake from soup or something.) Wash and dry the cans. Be sure to hang on to the bottoms that you removed, you will need them after the cake is placed inside. 


Use a cookie cutter the same size as the opening in the can to cut out your cake.


Assemble the cakes: 1. divide the sixlets between the cans evenly.  


2. Pipe in icing to cover the candies.


3. Place one of the cake circles you cut out in the can and lightly press down. Top with a bit more icing.


4. Cut a second round of cake in half and press half down lightly on top of the frosting. Your cake should come as close to the rim of the can as possible. 


5. Place the bottom of the can on top and then carefully run a bead of hot glue around the outside to hold the lid in place. 
Don't worry if the glue looks messy. It is on the bottom and you won't see it. (NOTE - if you don't have a glue gun you can put an "X" with tape across the bottom of the can to hold the tin in place. Any tape on the sides of the can will be covered with the label.) Let glue cool and solidify before turning cans over. 


Place the labels on the can using a small bit of hot glue. You can also use tape if you don't have a glue gun. Tie a fork to each can using a bit of ribbon. 


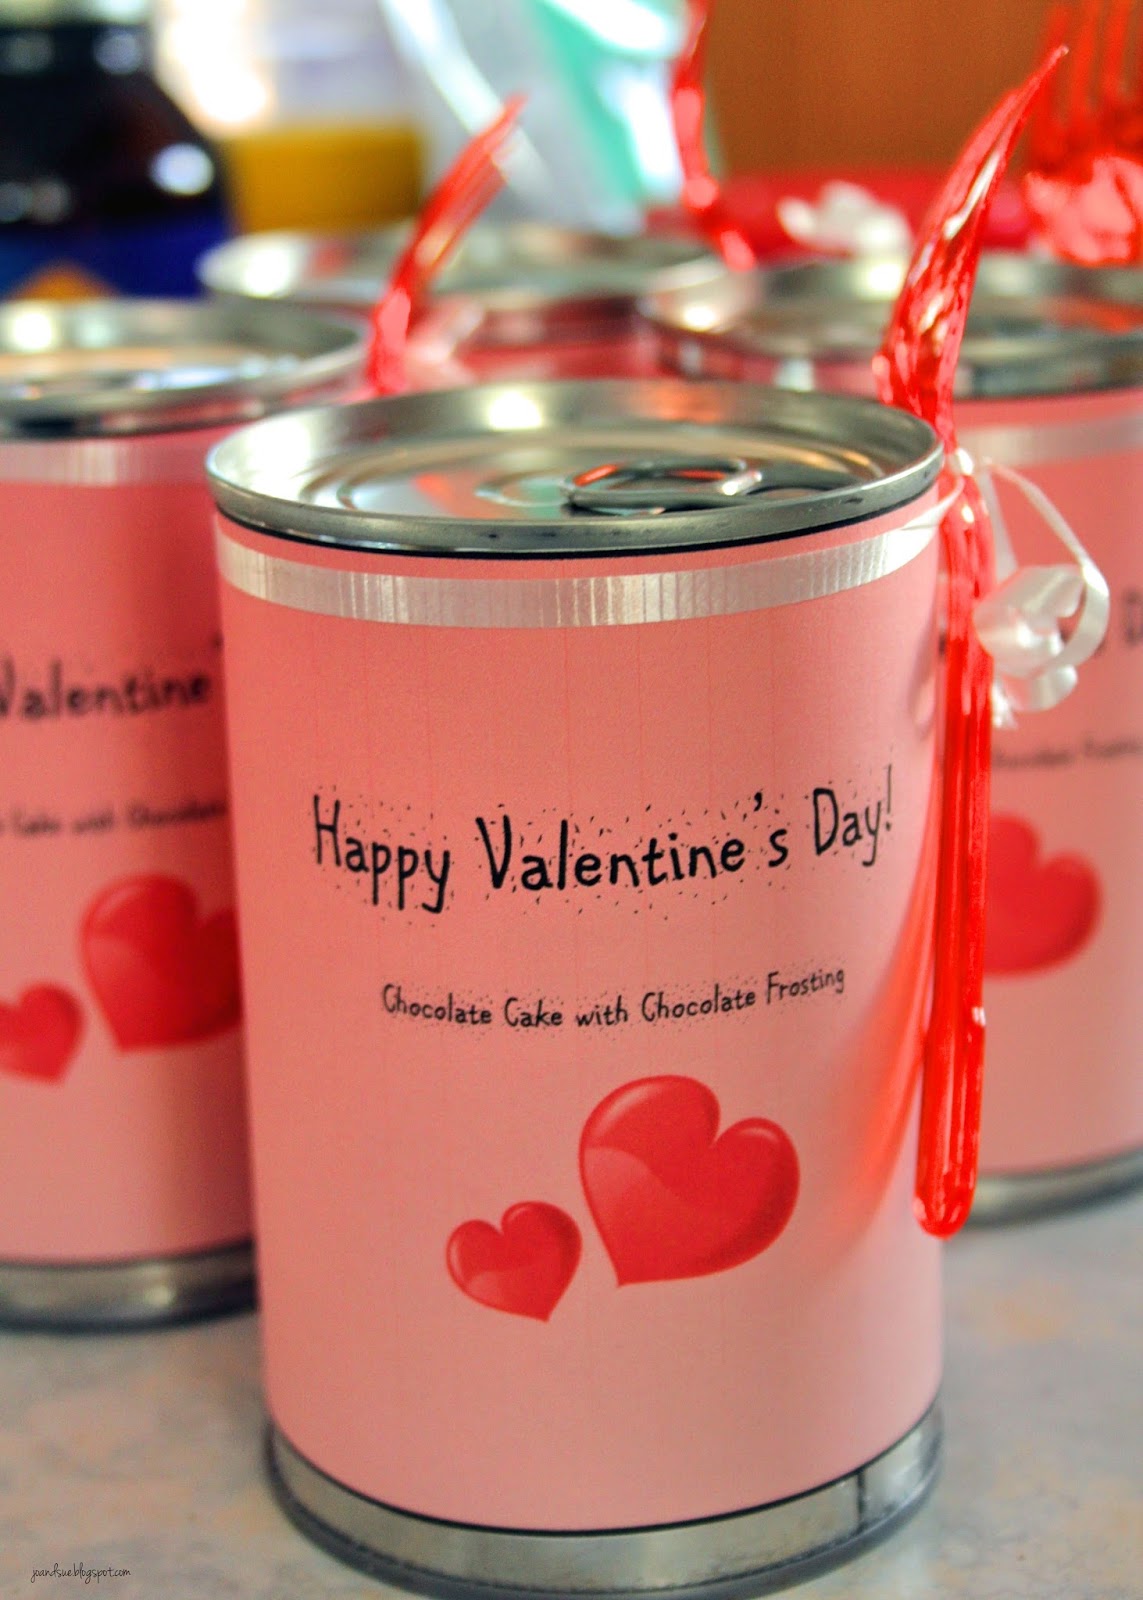
How cute are they?
*eeeeeeeeeeeeee*
But wait, they get even cuter when you open them. 


Let's go in for a closer look, shall we?


All those tasty candies hiding what lies beneath....


Ooooooh.... so much chocolate. 


I could just crawl right in there. 


These cakes in a can were part of what we donated to a local bake sale fundraiser. They are a fabulous idea for bake sales! Something a little different from the normal cupcakes and muffins. 
Make these for the kids, your significant other, friends, or even for yourself. 
Change the label and they are good for all sorts of celebrations - the possibilities are endless!


We're sharing over at Carole's Chatter. Be sure to pop by and say hi!