Friday, October 5, 2018

Upside Down Pear Cake


For some reason pears seem to be the last of the fruit choices. Whenever I bake something with apples or plums or peaches it is always gobbled up in a short time BUT when I make something with pears people are way more reluctant to dig in. 
I kind of get it. I mean.... they aren't my favorite either. It's a texture thing for me. Put them in a pie or a cake though.... I'm all over it. This cake, for example, is ridiculously good. Crumbly spice cake with gooey caramelized pears on top. Uh, yeah. Sign me up. 


Upside Down Pear Cake

Ingredients
Caramelized Pear Layer
2 Tbsp butter
1/2 cup brown sugar
2 pears, peeled and cored

Cake
2 cups flour
1 tsp ginger
1/2 tsp cinnamon
1/8 tsp cardamom
2 tsp baking powder
pinch salt
1/2 cup butter, softened
1 cup sugar
2 eggs
2 tsp vanilla
2/3 cup milk

Directions
Preheat oven to 350. Line the bottom of a 10 inch pan with parchment paper, spray lightly with cooking spray, set aside. 
Place 2 Tbsp butter and 1/2 cup brown sugar in a small saucepan over medium heat. Stir until melted and combined. Spread as evenly as possible into the prepared pan. Slice the pears thinly and lay the pears on top of the sugar mixture, doing your best not to overlap them too much. 
I added a pecan to the center but this is optional! Set aside. 
(NOTE - In the photos you will notice 3 pans. I doubled the recipe and made 3 - 8 inch cakes.)


Prepare cake - In a small mixing bowl, stir together the flour, ginger, cinnamon, cardamom, baking powder, and salt. Set aside.
In a large mixing bowl, beat the butter until it is creamy, scraping sides as needed. Beat in the sugar, eggs, and vanilla. Alternately beat the dry ingredients into the wet ingredients with the milk. 
Carefully scrape batter on top of the pears in the pan and smooth out. (Again, in photo below, recipe has been doubled and made in 3 - 8 inch pans.) 


Bake at 350 until toothpick inserted near center of cake comes out clean, about 35 - 40 minutes. Watch for the top of the cake to turn golden brown. Remove from oven and let cool only 5 minutes. Run a knife around the outside of the pan and then carefully invert cake onto a cooling rack. Peel off the parchment paper. Let cake cool before serving. (Although, it is pretty tasty warm too!)


All that gooey caramel sinks into the cake giving it a bit of a chewy crust.


It's a lovely moist topping on a soft, crumbly, spice cake. One of my favorites. 


Of course adding a bit of vanilla ice cream and hint of caramel sauce can't hurt, right?


This is a great recipe for people who aren't usually fans of pears. You could make it with apples too, if you preferred. 


The recipe as written above makes 1 - 10 inch cake. I chose to double it and put it in 3 - 8 inch pans because I wanted to be able to share with friends and family. 
Note - don't let the cake cool in the pan. The pears and the caramel will stick and you will have a heck of a time getting it out without tearing it up. About 5 - 8 minutes is long enough. I line my pans with parchment paper to help make removing them easier. 

Monday, October 1, 2018

Plum Pie


Fall is my favorite time of year. I wait all year for September and October just to enjoy the harvest of soooo many delicious fruits and veggies AND the beautiful colors in the local mountains. 
Plums are one of those fruits. There are so many delicious things to be made with plums. 
The color and flavor is just so unique. 
Plum season is almost over now though so we go back to planning more recipes for next year's harvest!


Plum Pie

Ingredients
Crust
1 recipe for a double pie crust

Filling
2 lbs fresh plums
1/2 cup brown sugar
1/4 cup cornstarch
2 tsp vanilla

Directions
Preheat oven to 375. 


Wash plums and cut in half (remove pits). Proceed to cut about half the plums into quarters and the other half into 6ths.  Place plums in a large bowl and add in the brown sugar, cornstarch, and vanilla. Stir well and set aside.
Roll out your bottom crust and set in 9 inch pie tin, making sure to leave a bit of crust overhanging. 
Fill the crust with the plum mixture. (There are 2 pies in the photo as I doubled the recipe!)


Roll out your top crust and place on top, pinching edges to seal. You can also do a lattice crust if you prefer, or something even more fun...


If desired you can brush the top crust with a beaten egg and sprinkle with a little sugar. The egg wash helps the crust to brown but is not a necessity. If you do a solid top crust then be sure to poke a few holes in it so the pie can vent. 
Bake at 375 for about an hour to 75 minutes. Top will be browned and filling will be thick and bubbly. 


Cool pie on wire rack before serving. It needs to cool in order to set. 


Of course, a little vanilla ice cream makes things even better. 


I love the color of plum pie. And don't even get me started on texture and flavor!
There is nothing else like it!


So tart! You can add more sugar to the filling if you like BUT the tartness of the plums is what makes this pie so different and yummy. I wouldn't go more than one cup of sugar or you risk being way too sweet. I find half a cup is just right for us. 


I've never made plum tarts before so I think that might be my next adventure. A hand-held version of plum pie - what's not to love? 

Thursday, September 27, 2018

Brie Mummy


In case you were looking for a fun, easy Halloween appetizer to bring to your next Halloween party, you have come to the right place. It doesn't get much easier than our brie mummy. 
You only need 3 ingredients, well 4 if you include the olive eyes, and about half an hour to whip him up. We love to serve our mummy with grapes (oh my gosh grapes and warm brie, don't even get  me started!) and baguette bread. 
Be sure to check out more of our Halloween creations by clicking the "Holiday" bar at the top of the page and scrolling to Halloween. All the links to our bazillion other Halloween recipes are there!


Brie Mummy

Ingredients
1 sheet of puff pastry
3 Tbsp spicy, red pepper jelly
1 round of brie
olive slices (for eyes)

Also needed
egg, beaten

Directions
Preheat oven to 375. Lightly spray an oven safe dish with cooking spray, set aside. 
Place puff pastry sheet on a work surface and roll out to about a 12 X 12 square. Trim down to a 10 X 10 square, keeping the strips of dough you cut off aside. 
Place the pepper jelly in the center of the puff pastry. Spread out to approximately the same size as the round of brie. 


Place brie on top of the pepper jelly. 


Fold the corners of the dough up and around the brie. Pat firmly around the brie to make sure it is in a round shape and the dough is sealed. 


Place the dough, seam side down, in the prepared pan. Take the strips of dough you have reserved and cut them into thinner strips. Place the 2 olive slices on your mummy and then lay the strips of dough over the mummy, criss-crossing them across the face but being careful not to cover the eyes. Make sure the dough folds underneath the mummy so they don't pop off during baking.
Using a pastry or basting brush, brush egg on top of your mummy. 


Place in preheated oven and bake until pastry is golden brown, about 25 - 35 minutes. 
Remove from heat and serve warm.


The red pepper jelly is supposed to look like blood but, as you can see in the photo below....


It doesn't really show until you start digging in there. Feel free to add more red pepper jelly for a more dramatic effect. 
So much cheesy spookiness. We've made him a few times for our parties because he is so simple  AND almost everyone loves cheese so he is a popular addition to the table!

Tuesday, September 25, 2018

Instant Pot Meatloaf and Mashed Potatoes


This July Sue got me an Instant Pot for my birthday. I'd wanted one for some time but, as I get scolded for always buying the latest kitchen doo-dads, I did not get one. 
An Instant Pot, for those of you who are not aware, is a pressure cooker. Okay... not only is it a pressure cooker... it works as a slow cooker, rice cooker, cake cooker, egg cooker, food warmer, steamer, aaaand you can saute in it. 
No... this is not an ad for the Instant Pot. I just like kitchen gadgets that have multiple uses. Do I get sucked in to the latest fads in kitchen gear? Why yes, yes I do. Thanks for asking.
I have to say though pressure cookers have been around for a looooong time so it's not like it's a new thing. They are much safer to use now, which is a big plus.
If we are being totally honest here.... I'm still super nervous to use my Instant Pot. I saw all those picture on the Internet of what can go wrong with a pressure cooker. When I have to release the the pressure valve I hold my breath and still jump when it hisses. 
Totally worth the 10 seconds of anxiety though. Meals like this meatloaf and mashed potato go from start to finish in less than an hour and only dirty one pot. I'd call that a win.


Instant Pot Meatloaf and Mashed Potatoes

Ingredients
Potatoes
2 lbs potatoes, peeled & quartered
2 cups chicken broth
1/2 cup herbed cream cheese
1/4 cup milk
salt & pepper

Meatloaf
1 lb ground beef
1/2 onion, diced
1 tsp garlic powder
1 tsp onion powder
salt & pepper
3 cloves garlic, minced
1 egg
1/4 cup bread crumbs
2 Tbsp Thai sweet chili sauce
1 Tbsp Worcestershire sauce
3 Tbsp ketchup

Directions
Place the potato chunks in the bottom of the Instant pot. Add in the chicken broth. Place the wire rack that comes with the Instant Pot on top of the potatoes.


Prepare meatloaf - in a mixing bowl, mix together the meatloaf ingredients - except for the ketchup. 
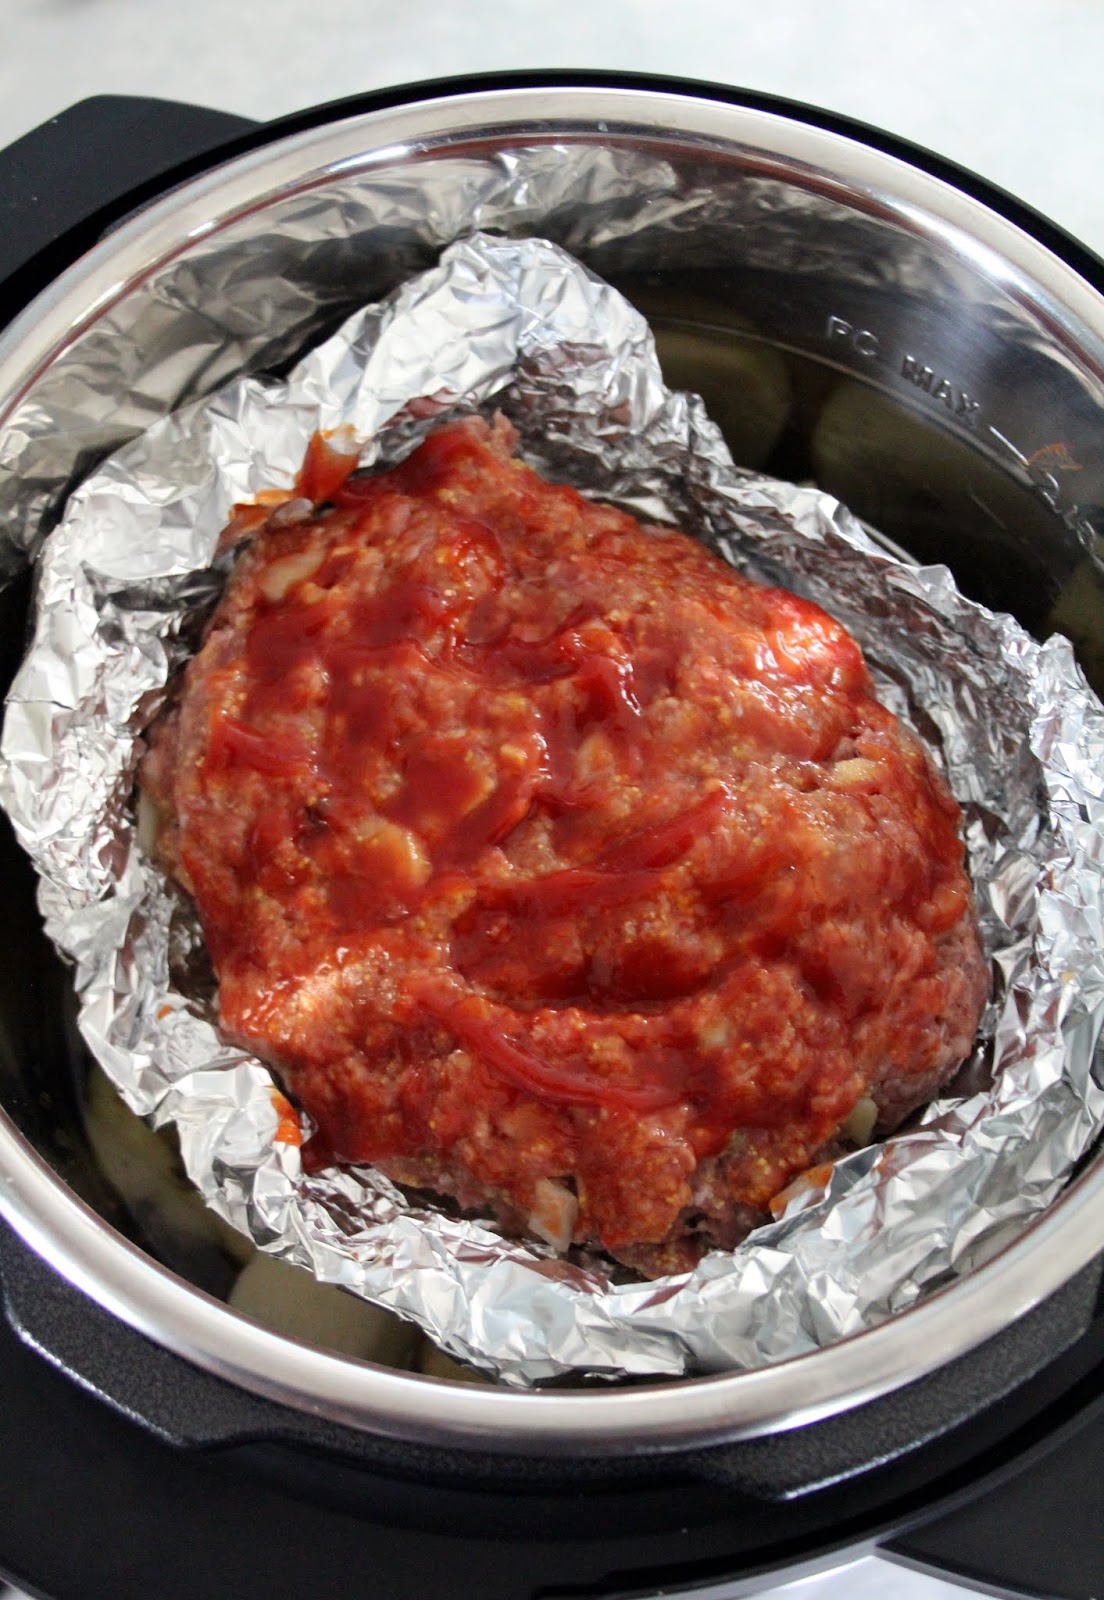
Take a piece of tinfoil and form it into a "bowl" shape that will fit inside the Instant Pot. 
Form your meatloaf into a large loaf/ball shape that will fit in the tinfoil. Place inside the Instant Pot, on top of the wire rack on the potatoes. Brush the top of the meatloaf with the ketchup. 


Place the lid on the Instant pot. Use the manual setting on high. Set for 20 minutes. 
It takes about 15 minutes to come up to pressure so the total time in the pot will be about 35 or so minutes. When done, do a quick release.
Carefully remove the meatloaf from the pot. (If desired, you can brush the meatloaf with a bit more ketchup and place under the broiler of your oven to brown the top. I don't ever do this, but it is an option!)


Drain off any excess liquid from the potatoes. 
Add in the herbed cream cheese, milk, and salt & pepper. Mash directly in the Instant Pot until creamy.
Serve with gravy, if desired.


Super easy, am I right?
You can pretty much use any meatloaf recipe you like, stuff it with cheese, go nuts! I like to use chicken broth in the potatoes for extra flavor but you can certainly just use water if you like. And when you mash the potatoes you can use sour cream in place of cream cheese if you prefer. 
You can also NOT mash the potatoes if you prefer. Throw in some carrot chunks with the potato and then serve the potatoes and carrots with your meatloaf as chunks, not mashed. 
I'm starting to get braver with the Instant Pot so will try to come up with some more recipes to share. 
What are your favorite Instant Pot recipes? 

Thursday, September 20, 2018

Apple Fritters


Apple fritters are a popular choice around our house. I mean, what's not to like?
Apples, sweet dough, gooey glaze, deep frying.... Pretty much the best things ever. 
I am always nervous when it comes to deep frying. All that hot oil scares the bejeebers out of me. That being said - deep frying makes everything better. So... so... much better. 
I use a giant pot and only fill it a little way with oil so I feel much safer about cooking things this way. If you have a deep fryer, then by all means use that! 
FYI - You want to use fairly tart apples for this so you get that bit of appley-ness in the donut. 


Apple Fritters

Ingredients
Fritters
1 Tbsp yeast (not quick yeast)
2 tsp sugar
1/2 cup hot water
2 cups flour
1/4 cup sugar
1/4 tsp baking powder
1/4 tsp nutmeg
1 tsp salt
2 Tbsp butter, softened
1 egg
1/4 tsp vanilla

Apple mixture
2 apples, peeled, cored, and diced
2 Tbsp brown sugar
1 Tbsp cinnamon
3/4 Tbsp flour
2 tsp lemon juice
2 Tbsp water

Glaze
1 cup icing sugar
2 - 3 Tbsp milk
1/2 tsp vanilla

Also need:
oil for deep frying

Directions
Prepare dough - in a large mixing bowl, combine yeast, 2 tsp sugar, and hot water. Set aside for 5 minutes for yeast to bloom.
While you are waiting, whisk together flour, 1/4 cup sugar, baking powder, nutmeg, and salt. Set aside.
After the 5 minutes your yeast should be foamy. Add in butter, egg, and vanilla beating to combine well. Slowly add in the flour mixture, about 1/2 cup at a time, until stiff dough forms. Knead about 2 minutes. Place in an oil bowel, cover, and let rise for an hour in a warm spot.


While dough is rising, prepare the apple mixture.
In a medium saucepan over medium heat, cook apples, brown sugar, cinnamon, flour, lemon juice, and water until thick and apples are starting to get tender - about 5 minutes.


Set aside mixture to cool - I like to place it in the fridge to speed up the process.
After an hour your dough should be doubled in size:


Line a cookie sheet with parchment paper and spray the parchment paper lightly with cooking spray, set aside. 
Punch the dough down and move it to a lightly floured surface. Roll the dough roughly a 12 X 10 rectangle. Spread the cooled apple mixture over the dough. 


Roll up jelly roll style and then slice into 12 equal slices.


Now... here is where you are going to get messy. 
Give each slice a good twist and then flatten between the palms of your hands into a "patty" shape. Place about 2 inches apart on the prepared cookie sheet. 


Cover and let rise for another 35 - 45 minutes, until they have doubled in size again.


In a large, deep pan, heat oil for frying to 360 degrees. 
While oil is heating, prepare glaze by whisking together icing sugar, milk, and vanilla. It should be the consistency of glue. Too thin? Add more icing sugar. Too thick? Add a little more milk. 
Carefully place 2 or 3 fritters into the hot oil and fry for one minute on each side - until golden brown.
Remove from oil and transfer to a wire rack.  
Drizzle each fritter with a generous spoonful of the glaze. Repeat until all your fritters are cooked.


Keep an eye on the color of your fritters! If they are going too dark (like the ones near the center of the above photo) then your oil is too hot. Turn down your heat. (I find it helps to very carefully remove the pot of oil from the burner for a minute to cool down faster. BE VERY CAREFUL when dealing with hot oil!!) You want to stay around 360 degrees. 


I love the crispy exterior and soft and fluffy interior. The addition of the nutmeg makes these just  a little different than a normal apple fritter. 
Recipe above makes 12 apple fritters but can easily be doubled. 
There are several different methods for making apple fritters and find that rolling them like a cinnamon roll, then twisting and flattening them is the least messy. I'd love to hear what method you use!


Be sure to pop over to Carole's Chatter for some fun foody links!

Sunday, September 16, 2018

Cheesy Soft Pretzels


A little while ago a gentleman in our little town was injured and the community pulled together to raise some money. I wanted to do my part to help so I decided to do some baking. I made cinnamon buns and these cheesy soft pretzels. Everyone looooves bread so I knew they would sell well.
I ended up making 18 dozen cinnamon buns and 8 dozen pretzels. So... I know this recipe works well as I made it quite a few times. 
As written below, it makes 8 pretzels but it can easily be doubled! I added some extra aged cheddar to make them just a little different than a regular pretzel. You can leave the cheese out if you want or use another cheese - just make sure it is something strong!


Cheesy Soft Pretzels

Ingredients
1 1/2 cups hot water
2 tsp salt
1 Tbsp sugar
1 pkg yeast (2 1/4 tsp) 
3 - 4 cups flour
2 Tbsp oil
2 cups aged cheddar, shredded

Also needed
2/3 cup baking soda
1 egg, beaten
coarse salt for sprinkling

Directions
In a large bowl, stir together hot water, salt, and sugar. Add in yeast and let sit for 5 minutes for yeast to bloom. Add in 3 cups of flour, 2 Tbsp of oil, and the cheese. Mix until dough forms - you may have to add a bit more flour if it is too sticky. Knead dough for 2 minutes. 
Place into an oil bowl, cover, and let rise in a warm place for an hour.


When dough has doubled....


Preheat oven to 450. Line a cookie sheet with parchment paper and set aside. 
Punch down the dough and divide into 8 equal size balls. (Note: I doubled the recipe that is why the picture below has 16.) Cover the balls with a tea towel and let rest 5 minutes. 


Bring a large pot of water with 2/3 cup of baking soda to a boil. Reduce heat to simmer.
Take one ball and roll it into a rope about 12 - 16 inches long. Fold the rope over on itself to form a pretzel shape. Press your finger firmly into the pretzel where the dough crosses itself. This is so the pretzel will stick together when you drop it in the water. (You can see the little indents below where I pressed the dough together.)


Drop the pretzels, 1 or 2 at a time, into the simmering water. Cook 1 minute and then gently flip over and cook another minute on the other side.


Place back on cookie sheet. When all pretzels have been done, using a pastry or basting brush, brush each pretzel with the beaten egg and then sprinkle with a little of the coarse salt. 
Place in preheated 450 oven and cook until golden brown, about 10 - 15 minutes.


Serve warm with honey mustard or hot mustard dipping sauce. I've also made a melty cheese dip to go with them. My niece-in-law dipped hers in a horseradish sauce that she had and it sounded like a genius idea. You can eat just as is too! There is no wrong way to enjoy a pretzel!


The baking soda bath is what gives them that signature pretzel chewiness. Word of advise - don't add the baking soda to a boiling pot of water. It will go *poof* and you will have baking soda water boiling up and over everything. Add it before the water boils... just sayin'.
These freeze quite well, the only thing is the salt sprinkled on top can disappear when the pretzel thaws. They still have the same great taste but just look a little different. 
If you are craving something salty and chewy and delicious.... you definitely want to give these a try!