Pages

Wednesday, October 31, 2012

Foodie Penpals

So at the end of last month I heard about this really cool event that I knew I had to participate in. It’s called Foodie Penpals.
It was started back in September of 2011 by Lindsay over at The Lean Green Bean. There were about 30 participants in the beginning and this month there are over 1,000 pen pals!!!!! And that's just in the US and Canada!! There are almost 200 more in Europe!
If you want more information please visit The Lean Green Bean.
I was pared with 2 different people. One to send my food related things to, and one to receive things from.
I sent some things to Kim, over at She Is Fierce. You can pop over there to see what I sent her.
I received my package from Jennifer.
 
 
Let me start by saying…I love getting things in the mail. Nothing beats going to the post office and finding a letter (or gift) from family and friends. Receiving Jennifer’s parcel was very exciting. The box was brightly wrapped. I was able to pause for a moment and take a photo before tearing into it.
 
 
Yes, I was like a kid at Christmas time.
Hey…
I knew there was food in there…
Anyways….
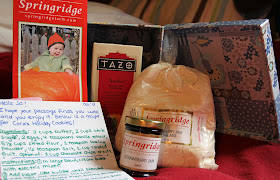
This is what I discovered…
 
 
There was a strawberry jam scone mix with a little jar of strawberry jam, some tea, an adorable little pamphlet on a local farmer’s market (where she got the scone mix and jam), a handwritten recipe for cookies, and it all came in a cute little box.
I had every intention of making the scones so I could share a photo on the blog but then I got carried away with Halloween planning. Needless to say I have not made the scones yet. (When I do I will post a photo of them!) Ditto for the cookie recipe. It sounds yummy and, as you may be aware, I LOVE cookies.
I just wanted to say thanks to Jennifer once again. I am very eager to try the scones. I did bring the tea to work to share with my coworkers…but that is all that I am sharing. Okay… I may let Sue try a bite of a scone…but that’s all….
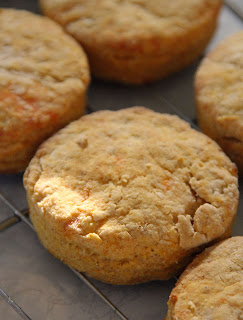
UPDATE - Here is the scones! They were very tasty :)

 
If you are interested in participating in the Foodie Penpals Program then simply visit The Lean Green Bean and follow her easy instructions.
You don’t have to have a blog!
Be sure to check it out. This is only my first month participating but I am already loving it.


Tuesday, October 30, 2012

Halloween Dinner 2012


It's a good thing Halloween only comes once a year. If Sue and I cooked everyday like we cook for Halloween we would both weigh a million pounds.
Seriously.
We made soooooooo much food.
Cute and spooky Halloween food to be exact.
We will share all our photos in this blog and then, as we complete the individual and how-to blogs, we will provide links to those blogs.
But, enough chit chat...let's get to the photos, shall we?
The above Dracula Pizza was probably my favorite from this year. So cute.
 
 
I had to make 2 so I could share one. They were a little fussy to make but overall, quite simple.
I had been scrolling through pages of Halloween treats when a picture of a vampire pizza appeared on screen. I knew I had to try and make something similar.
 
 
I made a simple cheese pizza mummy as we had a few fussy eaters who didn't want anything on their pizza. These were store bought mini pizza crusts. They took about 2 seconds to throw together.
 
 
The longer cheese across the mummy is a cheese string that is pulled into strands. I thought it made them look more like mummies.
 
 
Here is our Frankenstein's monster pizza. Yes...we had a few different pizzas.
These ones were all individual sized pizzas. Instead of pizza sauce it is pesto mixed with alfredo sauce. So yummy!
 
 
These were made on store bought Naan bread. We got the idea from Munchkin Munchies.
Making the stitches out of olives was the only tricky part. Otherwise these were pretty easy.
 
 
Okay....last of the pizzas. This is our spooky spider BBQ chicken pizza. We have made this for several Halloween dinners as it is so popular.
 
 
There it is going in the oven. BBQ sauce instead of pizza sauce and a half of a store bought deli BBQ chicken make this guy amazingly delicious.
 
 
Sue made this spook-tacular Graveyard Dip. (Click HERE for the link)
A spicy bean dip and some tortillas make for an impressive dish.
 
 
Our friend, Kerry, was able to track down a brain mold for us. We made our gruesome mushroom, shrimp, cream cheese dip because we knew it would look very brain like.
 
 
I thought the knife was an especially nice touch. It was really good on whole grain baguettes. (Click HERE for the link!)
 
 
This was supposed to be a mummy filled with spinach dip. (You can get our Spinach Dip recipe HERE.) Sadly, he came out looking more like a potato monster.
Hey...
Potato monsters can be pretty scary too....
 
 
We found some black bow tie pasta on a trip to the city and thought it would be perfect for a Halloween pasta salad. It tasted great but certainly looked a little sketchy.
 
 
Sue made these fabulous monster toes. They are store bought chicken nuggets with whole cashews died black. Then she sprinkled them with finely shredded cheese to make them a little "hairy".
 
 
Mmmm.....hairy monster toes.
 
 
Another super-de-duper simple Halloween dish. Some spaghetti with meat sauce in a "jack o'lantern" orange pepper. It looked like their poor brains were leaking out.
Their brains did taste very yummy.
 
 
There is the 2012 spread.
See....sooooo much food.
 
 
Sue did some creative carving on our mini pumpkins.
 
 
The one Halloween decoration we were able to find at Sue's house. (She still has everything packed up in storage!)
 
 
Cool dollar store labels turn ordinary pop into Halloween worthy drinkables.
 
 
And...some for the adults too, of course.
 
Hopefully by next Halloween Sue will be in her brand new house and we can totally crazy planning a huge Halloween party.
It's so much fun to see people's reactions when they see something ridiculously gross or cute or just super cool that they can eat.
Feel free to leave a comment and let us know what your favorites are!
We'd love to hear from you.
 
Want to see tons of fun links? Head over to Blissful and Domestic and Anyonita Nibbles! and Hun... What's For Dinner? and Table For Seven and Kitchen Fun With My 3 Sons and Chef In Training.

Monday, October 29, 2012

Halloween Sweets #2

 
Sue and I had so much fun getting things ready for Halloween this year. We probably should have invited more people to our dinner...we made soooooo much food.
Anyway, we will be sharing our sweet Halloween treats with you today. Some of the photos of food we will be following up with an additional blog to tell you the recipe or how to. We'll make notes on the ones we will be doing additional blogs on as well adding links to those blogs when they are done.
For now... we hope you like our Halloween 2012 sweets!
The above photo was our Creepy Cheesecake Face (Click HERE for the how to and recipe!) I thought it turned out pretty macabre.
 
 
These cute little guys were Chocolate Chip Cheese Ball Spiders (Click HEREto see that blog.) The original recipe makes one giant cheese ball that you can serve with cookies instead of crackers. I thought I would turn it into a million little spiders instead.
 
 
Another recipe we will doing a separate blog for. I call them Stabby Truffles because...well.....basically because I am terrible at naming things.
 
 
Aren't they so cute?
Be sure to check back for a link to the recipe and how-to. (Update - Click HERE for recipe) If you can believe it; you only need 3 ingredients to make the truffles. Crazy, right?
 
 
This picture is of the jello eyeball "shots". (I forgot to get a close up of them!) These were really fun. You just make jello and put a gummy eyeball in the center. You can make them "adult" but adding alcohol, but we kept ours kid-friendly as we had kids at the dinner.
 
 
Sue and I found a skull mold so had to made some spooky ice cubes. We froze pink grapefruit juice so it would add a bit of flavor to whatever we added it to!
It's the small touches that can make big impressions.
 
 
For a bake sale we made several different Halloween Sugar Cookies. You can read our blog about them HERE. The above ginger-dead man was probably my favorite.
 
 
There is the majority of them. If you want the recipe for the cookie and/or icing, be sure to visit HERE.
 
 
Oooooh...spooky vampire cupcakes.  

 
These were super easy to make. You just add a spoonful of cherrry pie filling to the center of a chocolate cupcake before you bake it.
 
 
You then ice it flat with white frosting and put a few drops of red icing to make it look like fangs bit it. Easy peasy yet super cool. (We got the "Take A Bite" wrappers from Michaels)
 
 
Sue and I have decided that "really simple" skeleton faces are not, after all, really simple.
This guy was the only guy that looked spooky. The other ones we tried looked a little too friendly to be skeletons.
 
 
I had to show this photo of the COOLEST chocolate bars EVER. At first glance I bet you didn't even notice the names on the bars.
They aren't Smarties - they are Scaries.
They aren't Coffee Crisp - they are Coffin Crisp
They aren't Aero - they are Scaero
And, the Kit Kats...yup...black cat on the package.
I found these at the dollar store. Awesome...awesome...awesome...
Where did I get the cool Scooby Doo lunch bag, you ask?
My friend, Angel, gave it to me. Gave. It. To. Me. Who just gives away their cool Scooby Doo lunch bag?
Crazy people..that's who.
 
 
Anyway... I made these cute little paper wrappers for the chocolate bars so they look even cuter (if that is possible) to hand out to the trick-or-treaters.
You can visit Womansday.com for the template for the wrappers.
 
 
There is a shot of the desserts on the table after dinner.
We were pretty happy with how our sweet treats turned out this year.
We were thrilled with how our dinner creations turned out! Come back tomorrow to see our dinner round-up with links to our recipes and how-to's.
Please leave us a comment to let us know what you think of our Halloween creations.
 
Stop by Ms. enPlace for some fun food and crafting links!
Don't forget The Rustic Pig as well.

Friday, October 26, 2012

Dog in a Dog

 
In case you were wondering what a hot dog dresses up for Halloween as....
a dog.
Get it?
Dog in a dog.
C'mon....it's pretty funny, right?
Sue and I saw these over at Rhodes Bread and had to give them a go.
Turns out Sue does not have any patience for making bread creatures. There may have been some cursing and stomping feet going on.
She's kind of pouty when she doesn't get things perfect right away.
*siiiiigh*
Younger sisters....what are you going to do? Even if they are only younger by 20 minutes...
Anyway...these were NOT that tricky to make. I should know...I ended up making all of them.
If you go to the Rhodes Bread website they even have a how-to video for you to watch. (I recommend watching it!)
 
 
Dog in a Dog
 
Ingredients
1 recipe bread dough
10 - 12 regular size weiners
large slice of white cheese
sliced olives
tiny bit of mayo
 
Directions
Preheat oven to 375. Line a cookie sheet with parchment paper. Prepare bread dough as per recipe. When you have gotten to the stage where it has rested for 15 minutes then you are ready to proceed.
For each dog - Pinch off a piece of dough about the size of a baseball. Pinch off about 1/3 of that. Using the bigger piece, flatten into a 7 x 5-inch rectangle. Place on a prepared cooking sheet. Place a hot dog on the dough and roll the dough around the hot dog leaving excess dough on one end to make the head. Pinch a small tail on the other end of the dog. Pinch the dough together behind the head to form the neck.
Cut the smaller pice of dough into three pieces. The first piece is slightly larger than ½ of the roll. The other two pieces are half of what is left. Roll the larger piece into a 6-inch rope that is very thin in the center. Lay the rope over the pinched neck and flatten the ends to make the ears. Roll the other two pieces into 4-inch ropes that are thin in the center but have small balls on the ends. Place these under the dog to make the feet.
 
 
Repeat steps to make as many dogs as dough will allow. I think we got 11. 
Bake at 375 for 15-20 minutes or until golden brown. (Dough does not need to proof.)
Let cool on cookie sheet for 5 - 10 minutes then transfer to wire rack to cool completely.
 
 
Use cheese and olives for eyes and nose. We used a piping tip for the eyes. One end to cut the cheese and the smaller end to cut the olives. The nose bit of olive we just cut with a knife. We held the eyes and nose onto the dog with a tiny bit of mayo.
 
 
You can eat these while they are warm but your cheese eyes may melt. You also could sprinkle some shredded cheese inside, with the weiner, if you wanted a cheesier dog. You can serve these with ketchup or mustard for dipping.
The Rhodes Bread site uses Rhodes dinner rolls but, because we live in a town where you can't buy any kind of frozen bread dough AT ALL, we decided to make our own bread. We used our GO TO BREAD RECIPE that we have used for almost every bread creation we have made.
Feel free to use frozen bread dough if you have access to it.
I think these would be perfect for kids.
Or...for those of us who like really cool and fun food even though we are old enough to know that hot-dogs-don't-dress-up-for-Halloween-but-wouldn't-that-be-so-cute-if-they-did.
 

Wednesday, October 24, 2012

Sweet Potato Biscuits

 
After Thanksgiving I ended up with a ton of leftover sweet potatoes. I wanted to make something out of the ordinary to use them up.
I came across a biscuit recipe in one of my magazines (I can't remember which one....sorry...) that used mashed potato so I decided to take that recipe as a starting point and create something for the leftover sweet potato.
This turned out really interesting. It is flaky and soft with just a hint of spice. It goes great with soup or chili. They are also sweet enough to eat warm, with some honey.
 
Sweet Potato Biscuits
 
Ingredients
2 cups cake flour
2 cups all purpose flour
5 tsp baking powder
pinch salt
2 tsp cinnamon
1 tsp ginger
1/2 cup brown sugar
1 cup butter, chilled
1/2 cup shortening
2 cups sweet potato, mashed
3/4 cup milk
 
Directions
Preheat oven to 425. Line a cookie sheet with parchment paper, set aside.
In a large bowl, whisk together flours, baking powder, salt, spices, and brown sugar. Cut in butter and shortening until mixture resembles coarse crumbs.
In a small bowl, combine sweet potato and milk. Stir into crumb mixture until just moistened. Turn onto lightly floured surface and knead until it just comes together. DO NOT OVERMIX.
Roll or pat out to 1/2 inch thickness. Cut with floured cookie or biscuit cutter. Place on prepared cookie sheet. (You can pull leftover dough together and reroll once more for more biscuits.
Bake at 425 for 10 - 12 minutes, until golden brown.
 
 
Remove from oven and let cool for 5 minutes on cookie sheet before removing to wire rack.
I find these are best served warm.
One of the better ways to use up leftovers that I have tried. Biscuits are so addicting. Little flaky bits of heaven is what I call them.
 
Want to find some great food and crafting links? Check out My Turn (for us).

Tuesday, October 23, 2012

Halloween Sugar Cookies

 
Sue and I made some cute Halloween cookies for our mother's coffee hour and for a bake sale this upcoming weekend. I'm not normally a huge fan of sugar cookies but this recipe stays soft and squishy.
We tried a new icing recipe and it was awesome. It dries shiny and hard so you can stack them.
This is my standby sugar cookie recipe. I used it to make the "fries" to go with our hamburger cupcakes. 
 
 
Sugar Cookies
 
Ingredients
1 cup sugar
1/2 cup brown sugar
1/3 shortening
1/3 butter, softened
2 eggs
2 Tbsp + 1 tsp cream
3 1/4 cups flour
2 1/2 tsp baking powder
pinch salt

Directions
Prepare dough early in the day or the day before as it does need to chill for at least 3 hours before baking.
In a large bowl, cream the sugars and shortening and butter. Add the eggs and cream.
In a medium bowl, mix the dry ingredients with a wire whisk. Add the dry ingredients to the wet ingredients. Mix with mixer until well combined. With hands, shape dough into a ball. Wrap with plastic wrap and refrigerator at least 3 hours, or overnight.
 When dough is chilled, preheat oven to 375. Line a cookie sheet with parchment paper. Set aside.
Roll dough out to about 1/4 inch or so thickness. (If you leave them thicker they stay softer / thinner is crispier.)
 
 
Cut with cookie cutters. Place cut outs on cookie sheet, at least an inch apart.
Bake at 375 for 8 - 10 minutes, until edges are just starting to turn light brown. Remove from oven, let cool on cookie sheet for 5 minutes before removing to wire rack to cool completely.
Decorate as desired.
 
Sugar Cookie Icing
 
Ingredients
1 cup icing sugar
2 tsp milk
2 tsp corn syrup, light
1/4 tsp vanilla (or other clear flavoring)
food coloring
 
Directions
Mix ingredients together in a bowl until smooth. If icing is too thick, add milk - 1 tsp at a time, stirring after each addition - until desired consistency is reached.  (If icing is too thin, stir in more icing sugar.) Divide into separate bowls and stir in desired colors. Dip cookies or paint with a clean brush.
 
 
For our owl we used some edible candy eyes and a candy heart for the nose. We had a tube of store bought icing to help with the red lines.
 
 
Our bats have mini candy eyes and a candy heart cut in half for fangs.
 
 
Our dead gingerbread men in coffins! These guys were my favorite. If you scroll to the top of this blog you will see the guy with the 3 scratches on him. I had a whole story going for that guy. He was attacked by a werewolf on his way to buy chocolate for his girlfriend.
Tragic story.
 
 
Pretty pumpkins!
 
 
I was doubtful my vampire teeth cookie cutter would turn out to look like teeth.
It worked.
These were pretty cool. We used the tube of red icing to apply the blood on the tips of the fangs. If you wait a few minutes for the icing to start to set then you can drag a toothpick through it to create lines.
 
 
Sue was getting into the Halloween spirit.
Since her lips touched that cookie we had to eat it.
Weird how often that was happening....
 
 
There is the cookie collection we sent with our mom to her coffee hour. That is probably about half of the recipe. As you can see we also had a witch cookie cutter. For the life of me I couldn't decide how to paint them.... so we left them un-iced.
I said I was just being thoughtful...some people might not like icing on their cookie.
We also made little gingerbread mummies and gingerbread gunshot victims. We're not exactly sure how gunshot victims are Halloween-y but.... well....we'd been icing cookie for a while and were getting tired.
Halloween treats are some of my favorite to make. They are definitely fun.
 
Be sure to visit The Rustic Pig for some fun food and crafting links. 
 Adorned From Above also has some great links!