Pages

Sunday, March 25, 2018

Salted Caramel Pecan Trifle


There was a birthday at work last week and the lady whose birthday it was said she wanted something caramel-y.  Challenge accepted. 
I knew that she loves trifle so obviously a caramel trifle was the way to go. I added in a sour cream - whipped cream layer for a little tang and toasted pecans for a little crunch and *voila* a super delicious, not too sweet but still sweet enough dessert for the whole office!
Plus, I had enough left over to make a dessert for the family.


You really can't lose with this one. For real though. 


Salted Caramel Pecan Trifle

Caramel Sauce
1/4 cup butter
1 cup brown sugar
1/2 cup whipping cream
1/2 tsp sea salt
1 Tbsp vanilla

Cake
1/2 cup butter, softened
1 cup brown sugar
2 eggs
1 tsp caramel extract
1 1/2 cups flour
1 1/2 tsp baking powder
1/2 tsp salt
1/2 cup milk

Sour Cream Whipped Cream
3 1/2 cups whipping cream
2/3 cup sour cream
2/3 cup icing sugar
2 tsp vanilla

2 cups toasted pecan halves

Directions
Prepare caramel sauce - In a medium saucepan over medium heat, combine butter, brown sugar, whipping cream, sea salt, and vanilla. Bring to a boil, reduce heat, simmer for 7 minutes, stirring constantly. Remove from heat and let cool to room temp. 
 Prepare cakes - Preheat oven to 350. Line 3, 8 inch pans with parchment paper and lightly spray with cooking spray. Set aside.
In a mixing bowl, beat together butter and brown sugar until fluffy, scraping sides as needed. Add in the eggs, beating after each addition. Beat in the caramel extract. 
In a separate bowl, whisk together flour, baking powder, and salt. 
Gradually add the dry mixture to the wet mixture, alternating with the milk. Beat well after each addition. Spread the batter evenly among the 3 pans.
Bake at 350 until toothpick inserted near center comes out clean, about 20 - 30 minutes. 
Let cool ten minutes in pan and then invert on cooling racks to cool completely. 


When caramel sauce and cakes are cool you can prepare the whipping cream.
Prepare sour cream whipped cream - In a large bowl beat whipping cream, sour cream, icing sugar, and vanilla until soft peaks form. 
Assemble your trifle: 
Cut 2 of the cakes into approx 1 inch cubes. 


Have your caramel sauce and whipping cream mixtures ready.


Place a layer of cake cubes in the bottom of your serving dish.
Spread approx 1/3 of the whipped cream mixture over the cake.
Drizzle with a generous amount of caramel sauce and then place about 1/3 of the pecans over the caramel.


Repeat layers 2 more times. 


Chill until ready to serve. 
You will have one cake left over and a little of the cream, caramel, and pecans - depending on the size of your trifle dish, of course. I simply "iced" the cake with the leftover whipped cream and caramel and pecans. 


FYI - it's tasty this way too.


Of course, a big ol' scoop of trifle is a pretty good way to go as well.


If you have a bigger trifle dish then feel free to use up all the ingredients in the trifle. 
FYI - Salted caramel is a fabulous way to go for those people who aren't fond of chocolate. 

Saturday, March 24, 2018

Brown Sugar Cinnamon Toast Ice Cream


Everyone knows that brown sugar cinnamon toast is one of life's most wonderful pleasures. 
Don't even argue. 
When I'm having a cheat day I love crunchy whole grain toast with butter and brown sugar and cinnamon for snack time. Comfort food at its finest. 
Anyway, I decided to play around and see if I could transfer those flavors to another favorite treat of mine... ice cream. 
This...this right here.... I am considering a big win. It's got all the cinnamon sugary goodness of the best snack in the world PLUS the creamy smoothness of a custard ice cream. Have it in a bowl or, even better, serve it with apple pie. 
Your brain will explode. 
Seriously. 
OR, have it in a cone for that almost-toast experience. 
You won't regret it. 


Brown Sugar Cinnamon Toast Ice Cream

Ingredients
2 cups whipping cream
1 cup 1/2 and 1/2 cream
1 cup brown sugar
1 tsp cinnamon
1/4 tsp salt
5 egg yolks
1 Tbsp Fireball whiskey

Directions
In a medium pot over medium heat, whisk together the whipping cream, 1/2 and 1/2, brown sugar, cinnamon, and salt. Cook and stir until mixture is steaming (does not need to boil). 
In a mixing bowl, whisk the 5 egg yolks. Slowly pour a small amount of the cream mixture into the egg yolks, whisking the whole time. Gradually add a little more at a time, continually whisking, until they have been totally combined. (You want to do this slowly to temper the eggs.)
Pour the mixture back into the pot and place back on medium heat. Continue to stir until mixture thickens enough to coat the back of a spoon. 
When thickened, strain the mixture through a sieve into a bowl, stir in the Fireball whiskey,  and place in fridge to chill completely - at least 4 hours. 


When chilled, pour into your ice cream maker and prepare as per manufacturer's instructions. When complete, serve or place in freezer until ready to serve. 


If it freezes too firmly just let it sit out for a few minutes to soften before serving. Adding the Fireball helps to keep it a bit softer. 


I have to say I love it in the cone because it totally reminds me of brown sugar cinnamon toast. My dad loved it with apple pie. It almost has the flavor of apple pie so pairing it with actual apple pie is pretty genius. #ifIdosaysomyself 

Saturday, March 10, 2018

Jackfruit 4 Cheese Lasagna


Can you tell that jackfruit is our new favorite ingredient? We're having too much fun experimenting with it. It's unreal just how meat-like it is. 
By looking at that photo above you can't tell it's a vegetarian lasagna, can you? We didn't think so. It certainly tastes like a "regular" lasagna. Jackfruit tends to take on the flavor of whatever sauce you put it in so works very well in a lasagna. Our taste testers certainly thought so anyways. 
I don't make lasagna that often because of how many dishes you have to dirty to make it. Whether jackfruit or beef, it's kind of a pain in the butt. The end result though - soooooo worth it. 
You can bake this up and then freeze it for later use. Simply pop it in the oven or microwave to reheat. We even have made it in individual dishes so it is easier to reheat.


We'd love to hear from you if you give it a try. Let us know what you think. 
Have you tried jackfruit yet? What have you made with it?


Jackfruit 4 Cheese Lasagna

Ingredients
Ricotta Mixture
1 container (500 gr) ricotta cheese
1 egg
1/4 cup Parmesan cheese, shredded
1 1/2 cup mozza cheese, shredded

"Meat" Mixture
1 large onion, diced
5 cloves garlic, minced
2 tsp Italian seasonings
1/2 tsp red chili flakes
1/4 tsp granulated garlic
salt and pepper
2 boxes (2 X 200 gr) plain jackfruit
1 can (680 ml) tomato sauce
2 Tbsp tomato paste
1 cup broccoli slaw

8 dry, no cook lasagna noodles
6 slices Provolone cheese

Topping
1/4 cup Parmesan cheese, shredded
1 cup mozza cheese, shredded

Directions
Preheat oven to 350. Lightly spray a 10 X 10 baking dish with cooking spray, set aside. 
In a bowl, mix together the ricotta cheese, egg, 1/4 cup Parmesan, and 1 1/2 cups Mozza until well combined. Set aside.
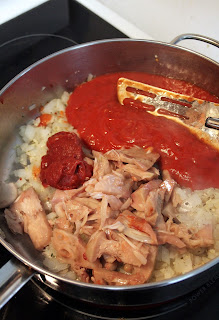
In a large frying pan over medium heat, cook onion and garlic for 5 minutes (until onions have softened). Add in spices, jackfruit, tomato sauce, and tomato paste.


Stir to combine well. Add in the broccoli slaw. Cook and stir for about 5 to 8 minutes to heat everything through. Use your spatula to break up the jackfruit into small pieces. 


Prepare the lasagna: spread half of the jackfruit mixture in the prepared 10 X 10 pan. Top with 4 of the lasagna noodles. Top with 1/2 of the ricotta mixture. Top with the 6 slices of Provoline cheese. 
Repeat the layers: jackfruit mixture, noodles, ricotta mixture. Finish by topping with the remaining 1/4 cup Parmesan and 1 cup mozza cheese. 


Bake at 350 until cheese is melted and browned and lasagna is bubbly - approx 1 hour. Remove from oven and let sit for about 10 minutes to set a bit before serving. 


Serve hot. 


Keep any leftovers in the fridge. As mentioned above, this also freezes very well. 
You could make up the lasagna in the morning and refrigerate it until dinner time before cooking it. Doing it this way will increase your cooking time though. It will probably add about 30 minutes or so to your cooking time. 
This makes 6 servings. 
You can leave out the broccoli slaw or replace it with a handful of spinach if you prefer. I find it a good way to sneak the veggies in without letting the kids know. 

We're sharing over at Carole's Chatter - pop over and say hi!

Sunday, March 4, 2018

Best Baked Beef Back Ribs


I'm not usually much of a rib person. Sue can kick my butt when it comes to flavoring and cooking ribs BUT, I'm pretty sure I may have her beat this time. 
You guys these ribs are uh-maze-ing. So much flavor your taste buds won't know what to do with themselves. I decided to bake them in the oven because I don't have a BBQ but they would be fabulous on the BBQ too. I used beef ribs as they happened to be on sale this week but next time I'm trying pork ribs. 
This was one of those throw-together-what-is-lying-around-and-hope-for-the-best recipes that exceeded all expectations. Definitely going in the "make again" pile. It takes a little time to make because of the basting but there is no effort involved at all. Give them a try, let us know what you think!


Best Baked Beef Back Ribs

Ingredients
Spice Rub
1/2 tsp black pepper
2 tsp paprika
1 tsp onion powder
1 tsp garlic powder
1 tsp crushed red pepper flakes
1/2 tsp salt

Marinade
1/2 cup apple cider vinegar
1/2 tsp liquid smoke
1 Tbsp brown sugar
2 Tbsp Thai sweet chili sauce

Ribs
1 rack of beef back ribs
cooking spray

Directions
Preheat the oven to 250 F. Line a cookie sheet with tinfoil and set aside. 
In a small bowl, stir together the spice rub ingredients. 
Place the ribs, bone side up, on the prepared cookie sheet (so you are looking at the underneath side) and sprinkle with a little of the spice rub. Rub the meat to get it to stick. Flip the ribs over. Lightly spray the top of the ribs with cooking spray. Sprinkle the remaining spice rub over the ribs, massaging the spices into the ribs. 


Leave ribs, bone side down, on the cookie sheet. Place in 250 oven and bake for one hour.
While ribs are baking - whisk together the marinade ingredients and divide into 3 bowls, set aside.
After an hour, remove the ribs from the oven and, using a basting brush, baste the ribs with the marinade from one of the bowls - be sure to use all the marinade from one bowl. 
Place ribs back in the oven and bake another hour. 
After an hour, baste with the marinade from another bowl. 
Bake another hour. 
Baste again with the marinade from the last bowl. Cook at 250 for one more hour. 
Finally, turn heat down to 200 and continue cooking 1 more hour.  (To recap: bake one hour with just spices, marinade hourly/cook for 3 more hours, end with 1 hour at the lower heat for a total of 5 hours of cooking time.)


Remove to a cutting board to let stand for 2 or 3 minutes.


Slice into individual ribs and serve.


We had ours with asparagus and mashed potatoes with gravy but they would be fabulous with just about anything!


A few notes - remember to remove the membrane from the back of the rack of ribs before putting the spice rub on. Removing the membrane makes the ribs easier to cut and to eat. 
Remember to wash the basting brush in between basting the ribs. 
There is very little prep involved in this recipe, you just have to be prepared to invest some time into the basting every hour. Low and slow is the way to go for tender ribs with a caramelized exterior.