Pages

Sunday, August 30, 2015

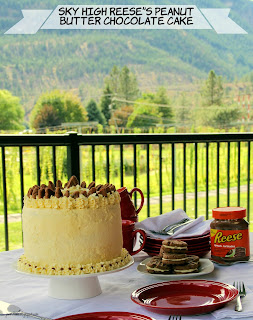
Sky High Reese's Peanut Butter Chocolate Cake (and Reese's Peanut Butter Chocolate Sandwich Cookies) With Vanilla Pudding Frosting


Sue and I may have gone a little crazy with our latest venture.
And when I say "may have", I mean we totally did. 
See, this post is sponsored by Hershey's Canada (Link HERE) and we have been compensated monetarily and with product. Our opinions, however, are all our own. 
Hershey's sent us 2 containers of their Reese Peanut Butter Chocolate Spread with which we were to develop a new recipe. So develop we did. We came up with a monster layer cake, which even has a cookie layer on top, and then used our "leftovers" to make some cute and tasty sandwich cookies. 


Do you like peanut butter? Do you like chocolate?
Okay, first of all - that means we will probably get along great, secondly, you are going to love this cake and cookies. 
For realz.


See the rays of sunshine highlighting this cake. 
That's how fabulous it is. 
Even the sun can't stay away.....
Okay. 
Yes.
It is going to take you a little bit of effort. There are two recipes required to pull this off BUT I promise you will not regret it. 
First up... the cake!


Sky High Reese's Peanut Butter Chocolate Cake

Ingredients
Cake
3 cups flour
3 tsp baking powder
1/2 tsp baking soda
generous pinch salt
1 cup butter, room temp
2 1/2 cups sugar
3 eggs
1 cup Greek yogurt (plain or vanilla)
1 tsp vanilla
1 1/4 cup milk

Vanilla Pudding Frosting
6 cups whipping cream
3 pkg (4 serving size) Vanilla Pudding mix

Directions
Preheat oven to 350. Line 3 - 8 inch cake pans with parchment paper (cut to fit the bottoms) and lightly spray with cooking spray, set aside.
In a mixing bowl, whisk together flour, baking powder, baking soda, and salt.
In a larger mixing bowl, beat butter until fluffy, scraping sides of bowl as necessary. Beat in the sugar until well mixed. Beat in eggs, one at a time.
Beat in the Greek yogurt and vanilla, again, scraping bowl as necessary, until smooth.
Once incorporated, add the flour mixture and milk alternatively until combined. 
Transfer half the batter into another bowl. Beat in the 1 cup of  Reese Peanut Butter Chocolate Spread.


Drop the 2 different batters evenly into the 3 pans in random patterns.


Swirl the batter together slightly with a knife. Make sure batter is evenly spread out in the pans.


Bake at 350 until toothpick inserted in center of cake comes out clean and tops of cake are a dark, golden brown - about 30 - 40 minutes. (Keep an eye on them, do not over cook or your cake will be dry). Remove from oven to cooling racks to cool for about 10 minutes.


Run a knife around the outside of the cake then carefully invert on to the wire rack to cool completely.


While cakes are cooling - prepare the cookie layer and cookies.


Reese's Peanut Butter Chocolate Sandwich Cookies

Ingredients
1/2 cup butter, room temp
1/2 cup sugar
1/2 cup brown sugar
1 egg
1 tsp vanilla
1 tsp baking soda
pinch salt
1 3/4 cup flour

Directions
Preheat oven to 350. Line a cookie sheet with parchment paper. ALSO - for the cake - line an 8 inch cake pan with parchment paper then lightly spray with cooking spray. Set aside.
In a mixing bowl, beat butter until creamy, scraping sides of bowl as necessary. Beat in the Reese Peanut Butter Chocolate Spread. Beat in both sugars until fluffy. Beat in egg and vanilla.
In a separate bowl, whisk together baking soda, salt, and flour. 
Stir the dry ingredients into the wet ingredients until stiff dough forms.
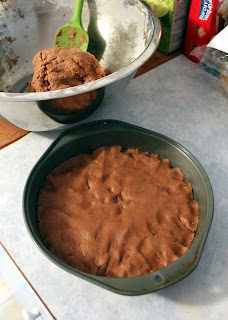
Take a heaping 1 cup of the dough and press into the prepared 8 inch pan.


Bake at 350 for about 10 - 15 minutes, until cookie is puffed up and appears dry. Sides will be golden brown. Don't over cook or cookie will be dry.


Scoop the rest of the cookie dough by the tablespoon full (small cookie scoop) into prepared cookie sheet. Roll each scoop into a ball in the palm of your hands. Place back on cookie sheet and lightly press with a fork to flatten slightly.


Bake at 350 for 7 - 10 minutes, until sides are just slightly browned. Do not over bake.
Remove from oven and let cool for a few minutes before removing to a wire rack to cool completely.


While cookies are cooling, prepare frosting.
Pour the whipping cream into a large mixing bowl, add in the pudding mixes. Beat until mixture thickens and is smooth. Chill, covered, until ready to use. (NOTE - I know it may seem silly but be sure you pour the whipping cream in first AND THEN add in the pudding powder. If you put the pudding powder in first and then add the whipping cream the frosting will be lumpy!)
Assemble cake:
Place one layer of the cake on a serving tray. Spread a generous scoop of vanilla pudding frosting on top. Place 2nd layer of cake and another layer of frosting. Place the 3rd layer of cake and another layer of frosting. Place the 8 inch cookie on top of the cake. (NOTE - I trimmed the hard edges of the cookie off before placing on top to make it easier to cut through when slicing the cake!!)


Frost the sides of the cake with the frosting, using a long flat knife or spreader to make it smooth.


Place some of the frosting in a piping bag and pipe stars or swirls around the base of the cake and around the outside of the cookie layer.


Decorate as desired - we cut a few of the cookies into triangles to place on top.


Take any remaining frosting and place a spoonful on the flat side of one cookie. Lightly press the flat side of another cookie into the frosting. Repeat until frosting and cookies are gone.


Then serve and enjoy.


Let the photo explosion begin.


So pretty.


Layers and layers and layers of tastiness...


Want to join us for snacks?


We made lots. 


Who doesn't love peanut butter and chocolate?
Weird people. That's who. 


One slice goes all the way to heaven.... or just about....


The inside is even prettier than the outside...


I really do enjoy treats. 


Even Sue was getting into the action.


FYI - when you are going to make the cookies and you ask your sister, "Hey, Sue (assuming your sister is also named Sue) where is the rest of the frosting?" and she replies, "It's over there on the counter," motioning only with her head, make sure you double check that it is, indeed, frosting and not a container of butter.
See...
The frosting is a lovely pale yellow color that could easily be mistaken for butter.
And, if you stick your knife in to steal a taste before doing the dishes and you haven't double checked to make sure it is the frosting, you may just end up with a mouth full of butter.
Which you don't want.
Trust me.
Anyways..... you should probably make this cake and/or cookies. Reese Peanut Butter Chocolate spread uses the hashtag #doyouspoon. And trust me, you will want to. 

We're sharing over at The Chicken Chick and Joy Love Food and Memories By The Mile and New Mrs Adventures and Lou Lou Girls and Carole's Chatter so be sure to pop over and check them out!

Monday, August 24, 2015

MMMM Bars


So I think I deserve several gold stars for the clever name of these bars.
Not only is "mmmm" the sound you will make when you eat them, the M's all stand for ingredients in the recipe. 
Molasses.
Mango.
Macadamia nuts.
Meringue. 
*Taaaah - daaaah*
Yes. I'm proud of myself. I am normally the most suckiest name-come-upper-wither ever. 
Also, 
These bars rock. 
Like.... old-school-guitars-and-spandex-and-big-hair rock. 
So many things are going on that your taste buds will be all like... "Whoa! Dude, whatever this is you should marry it."
I know you think I'm exaggerating but I'm not. Not even a little. The tastes and textures and layers of deliciousness are over the top addicting. 
I developed this recipe for the Crosby's Molasses Raising The Bar molasses inspired recipe contest. (Click HERE for more info) I'm so glad that Crosby's runs these fun recipe contests otherwise I would probably never step outside my comfort zone and try these fab new combinations!
Give these a try and let us know what you think!


MMMM Bars

Ingredients
Base
3 cups flour
pinch salt
2 tsp baking powder
1 cup butter, room temp
1/2 cup brown sugar
1 cup sugar
4 egg yolks
1 tsp vanilla
1 cup coarsely chopped macadamia nuts
1/2 cup dried mango, finely diced

Meringue
4 egg whites
1/4 tsp cream of tartar
1 cup brown sugar
1/2 tsp coconut extract

Topping
1/2 cup shredded coconut

Directions
Preheat oven to 325. Line a 12 X 17 baking sheet/jelly roll pan with parchment paper. (Note - can also use a 10.5 X 15.5 jelly roll pan but you will have to increase your cooking time.) Set aside.
In a medium frying pan over medium heat, toast the chopped macadamia nuts until they start to brown and are fragrant - about 5 minutes.


When they are done, scrape them into a bowl to cool. Place the coconut in the pan and toast it as well. It will only take a few minutes to brown as the pan is already hot. When it is done, scrape it into a separate bowl to cool. 
In a mixing bowl, whisk together the flour, salt, and baking powder. Set aside.
In a large mixing bowl, beat butter until smooth - scraping bowl as necessary. Beat in both sugars until fluffy. Beat in the Crosby's Fancy Molasses, egg yolks, and vanilla until well combined.
Beat the dry ingredients into the wet ingredients. Mixture may seem crumbly but should stick together if you squeeze it in your hand.
Beat in the toasted macadamia nuts and mango. 


Press mixture very firmly into the prepared 12 X 17 baking sheet. Set aside.


In a clean mixing bowl, beat your egg whites until foamy. Beat in the cream of tartar.
Very gradually beat in the brown sugar - about a spoonful at a time. 
Beat in the coconut extract. Meringue should be glossy.
Spread evenly over the base.


Sprinkle with the toasted coconut.


Bake at 325 until golden brown, about 20 - 30 minutes. Meringue should appear dry and coconut will be a dark golden brown.


Dip a knife in water and run it around the outside of the pan to release it from the sides of the pan. (You may have to dip it in water a few times so the meringue doesn't stick to the knife.)
Let cool completely on a wire rack. 
When cool you can use the parchment paper to help you remove it from the pan (You can cut it into sections to remove it from the pan to make things easier if need be.) Cut into bars.


Then marvel at how pretty they look.


Try not to eat the whole bunch...


Don't mind me... I'll just be over here looking at this stack of crunchy, chewy heaven.


Maybe just a few more photos....


And, if you don't want them in the longish bar form (I got 32ish bars that were approximately 1 inch X 6 inches pictured above) then you can cut them into squares (I got 64ish approximately 1 X 3 inch squares (yes, I realize that is not technically a square) - see below.) Because these are made in a 12 X 17 baking sheet, this is a perfect recipe for a crowd!


MMMM....
MMMM...
MMMM...
Am I right or am I right?


Be sure to visit Carole's Chatter for tons of great food links! 

Saturday, August 22, 2015

Mocha Layer Cake


Just when you thought chocolate cake couldn't get any better, along comes MOCHA chocolate cake. 
That's right. 
Throw some coffee into a regular chocolate cake, cover it in a delicious mocha pudding frosting and *voila* you have the most amazing cake in the universe. 
Not even lying.
I'm willing to wager that even non-coffee lovers will dive into this cake with wild abandon. Know how I know that? Because I am NOT a coffee drinker... at all... but I could probably eat this whole cake. All of it. In one sitting. 
We used our never fail, moist and delicious Vanderwolf's Secret Chocolate Cake recipe (link HERE) and altered it to get this mocha version. Be sure to visit HERE for the original!! 


Mocha Layer Cake

Ingredients
1/2 cup baking cocoa
2 cups flour
2 tsp baking soda
pinch of salt
2 cups sugar
1 cup buttermilk
2 eggs
2 tsp vanilla
1/2 cup oil
1 cup very hot cappuccino (or VERY strong brewed coffee)

Mocha Pudding Frosting
1 Tbsp instant coffee granules
1 Tbsp hot water
3 cups whipping cream
1 1/2 pkgs (4 serving size) Chocolate Pudding

Directions
Preheat oven to 325 (YUP, 325 not 350). Lightly spray 3 - 8 inch cake pans with cooking spray. Set aside. 
Prepare cake - In a large mixing bowl, whisk together cocoa, flour, baking soda, salt, and sugar.  Make a hollow in center of the dry ingredients and add the buttermilk, eggs, vanilla, oil, and cappuccino.
Whisk all together until well blended.
Pour into prepared baking pans. 
Bake 25 - 35 mins or until toothpick inserted in center comes out clean. (Keep an eye on it!)  Remove from oven to cool 5 minutes on wire rack. Invert cake onto wire cooling rack and allow to cool completely.
Prepare frosting - In a tiny bowl, stir together the 1 Tbsp of coffee granules and 1 Tbsp of hot water to dissolve the granules. In a large mixing bowl beat together whipping cream, coffee, and chocolate pudding until smooth and thickened.
Assemble cake - Place one layer of cake on a serving platter. Frost with a generous scoop of the pudding frosting. Place second layer of cake on top. Spread another generous scoop of frosting on that cake. Place last layer of cake on top.


Use the rest of the icing to frost the sides and top of cake. 
Optional - decorate with a smidge of darker chocolate icing and some hazelnut crisp cookies. 


I used canned frosting for the darker swirls for a different texture and flavor. I thought the hazelnut cookie crisps went really well with the coffee flavor. 


Are you ready to see the inside?
Hang on to your seats....


Oh. My. Heck.
LOOK AT ALL THE CHOCOLATY MOCHA GOODNESS. 
*sigh*
This is actually less sweet than it looks. The coffee adds a bitterness that totally compliments and balances the chocolate. 
And... the pudding frosting is awesome. It sets up well, spreads very smoothly, is not at all sweet, and is a perfect mousse-like texture. 
What are you waiting for????

Be sure to visit this fun linky party at Carole's Chatter!