Pages

Saturday, March 31, 2012

Chocolate and Peanut Butter Chip Pretzel Cookies


It's cookie time!
C is for cookie, that's good enough for me, 'cuz cookie, cookie, cookie starts with C.
Cookie monster is still my favorite Sesame Street Character EVEN THOUGH he apparently now eats vegetables.
I haven't watched Sesame Street for some time now......I'm a Looney Tunes kinda girl.... but I have been told that Cookie Monster eats vegetables and not cookies anymore.
Seriously?
What's up with that?
I can't bring myself to actually watch the show to check. It would make me really sad if they took away Cookies' cookies.
*Sigh*
On the upside - I can still eat as many cookies as I want.
Take that society.


Chocolate and Peanut Butter Chip Pretzel Cookies

Ingredients
1 1/2 cups flour
1/4 tsp baking soda
pinch salt
1/2 cup butter, room temp
1/2 cup brown sugar, packed
1/3 cup white sugar
1 egg
1 tsp vanilla
1 cup chocolate chips
1/2 cup peanut butter chips
1/2 cup broken up pretzel pieces
sea salt for sprinkling

Directions
In a medium bowl, sift together flour, baking soda, salt. Set aside.
In a larger bowl, beat butter and sugars together until light and fluffy. Add in egg and vanilla and beat to combine, scraping sides of bowl.
Add the dry ingredients to the wet ingredients and stir with wooden spoon until just combined and there are no more streaks of flour. Stir in chips and pretzel bits.
Chill dough in fridge for about an hour.
Preheat oven to 350. Line cookie sheet with parchment paper.
Scoop Tbsp of dough onto prepared pan about 2 inches apart. Sprinkle with sea salt.
Bake for approx 10 minutes. (Top should be light golden brown.)
Remove from oven and let cool on sheet for a few minutes before removing to wire rack to cool.


How can you not love a cookie that has all those wonderful ingredients?
Chocolate chips...
Peanut butter chips...
Pretzels...
I even liked the sprinkle of salt on top. It definitely adds to the flavor of the cookie.
Cookie Monster would have these for breakfast every day....
if he were allowed to....

Friday, March 30, 2012

Angel Food Dessert


Clickety click barba trick.
If you remember that saying then you are awesome. If you have never heard it then...well....you are also awesome but like a notch below the awesome that people who know about Barbapapa are at.
Why I am bringing up this unsual topic?
The Barbapapa species used to say "clickety click barba trick" just before they shapeshifted into something cool.
It totally applies to this recipe. You take 2 items and throw them in a bowl and Clickety click barba trick, they turn into this crazy good dessert.  


Angel Food Dessert

Ingredients
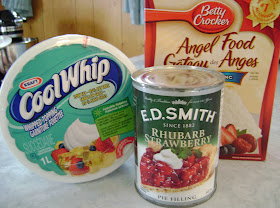
1 box of angel food cake mix
1 can (approx 22 oz) berry pie filling (any flavor - I used Strawberry Rhubarb)
1 container light or no-fat cool whip

Directions
Preheat oven to 350.
In a bowl, mix together angel food cake mix and pie filling. DO NOT add any other ingredients.


Pour into UNGREASED 9 X 13 pan.
Bake for 25 - 30 minutes.
Remove from oven and serve with whipped topping. (Serve warm or cold, either is good.)

How easy is that?
Oh, yes, don't worry about it deflating. It will rise up so unbelievably puffy you won't even believe it but, once you take it out of the oven, it will fall.
It's okay. It's supposed to. Just "frost" it with the light cool whip and you are good to go.


See? Poofy. This is only half as poofy as it was in the oven initially.


 Aaaaawe...now it's flat (and blurry, but that's my fault, not the dessert). But, that's okay because it tastes fantastic and is soooooo light.
When you only have a short time to throw together a dessert to serve company but you want to look like you put a lot of time in it... this is a good choice.
Or, if you just want something light and not overly sweet, this is a good choice for that as well.

Thursday, March 29, 2012

Toffee Bars with Browned Butter Frosting

Sometimes you just don’t want chocolate.
Calm down everyone…I haven’t gone crazy. I just wanted to make a treat that didn’t have chocolate in it.
Weird, I know.
I just felt like I was making a lot of chocolate things lately and wanted to give something new a try.
Enter the Dormestic Goddess and her Toffee Bars With Browned Butter Frosting.
These are amazing. I don’t know if you have tried browned butter or not – I just recently have been introduced to it – but it is one of the most interesting flavors I have tried.
And by “interesting” I mean supercalifraga-delicious.
I made Apple Cake with Toasted Pecans and Browned Butter Frosting a while ago and *Shazaam* I was hooked. Then I saw this bar recipe on the Dormestic Goddess blog and decided to try it out.
So…so…so good.
Next on my list of browned butter things to try is a browned butter ice cream.
Can you imagine such a thing? Eeeeeee….. I’m excited.
Although…. I probably shouldn’t make it. I’m already sabotaging my weight loss efforts with all these stupid (read: stupidly delicious) treats.
(Update: I made the ice cream! Click HERE to see that recipe)

Toffee Bars with Browned Butter Frosting
(Adapted from Dormestic Goddess)

Ingredients
1 cup butter, at room temp, divided
½ cup sugar
1 egg
Pinch salt
1 cup flour
1 can sweetened condensed milk
1 tsp vanilla
2 cups powdered sugar
Directions
Preheat oven to 350 degrees. Spray an 9 X 9 (or 8 X 8 or 9 X 13) pan with baking spray and line with parchment paper, spray lightly again, set aside.
In a medium bowl combine ½ cup of the softened butter with the sugar and whisk until combined. Whisk in egg until light and fluffy, about 2 minutes. Add pinch of salt and flour and stir until combined.

Shortbread-like crust. Mmmm.....

Press dough into prepared pan and bake in preheated oven 12 – 15 minutes, or until crust is set and golden brown. Remove from oven and allow to cool while making the toffee filling.
In a medium sauce pot combine the condensed milk, vanilla, and 2 TBSP of butter and cook over medium heat until butter is melted and mixture begins to thicken, about 5 minutes. Stir constantly so mixture does not scorch.
Pour filling over baked crust. Bake in preheated oven until filling is set, brown, and bubbling. 10 – 12 minutes for softer bars and 15 minutes or longer for hard, crunchy bars.

Toffee middle. Another layer of goodness.

While the bars bake, brown the butter and prepare the frosting. Place the remaining 6 TBSP of butter in a sauce pan and place over medium heat. Melt butter until it begins to bubble. Once the butter begins to bubble and foam, swirl the pan so the butter does not burn. Continue swirling until brown specks begin to appear, about 5 minutes.
Pour butter in the bowl of a stand mixer and allow to cool until bowl is just warm to the touch, another 5 -10 minutes. Sift in powdered sugar and salt and beat until smooth. Spread on still warm bars.
Allow bars to cool to room temperature before cutting.

 So.. it’s not the prettiest bar out there, I admit. But in the flavor and texture categories it is at the top of the list.
So…there you go…if you are not a chocolate lover, like Sue *cough* crazy*cough* then you will appreciate this bar for its simplicity and amazing flavor.
I will let you know how the ice cream turns out. :)
(Update: click HERE to find out how the Browned Butter Ice Cream turned out!)

P.S. - We linked this to Kitchen Fun With My 3 Sons where they have tons of great recipe and craft ideas if you want to have a peek.

Tuesday, March 27, 2012

Shortbread and Caramel Chocolate Brownies ("Twix" Brownies)


That right there, in that photo above, is pure gold.
Yes.
Pure. Brownie. Gold.
Best brownie bar I have ever eaten. Okay...okay... it all starts with a brownie mix (Blasphemy!) but I believe if you made it with a "from scratch" brownie, it might kill you.
Really.
I think it would be TOO good.
If you made it with a "from scratch" brownie recipe all of the atoms in the universe would spontaneously implode.
True story.
So, lest we tempt fate, we should all stick with a mix. Agreed?
Unless you WANT to be the cause of the destruction of the universe.
Up to you.

Shortbread and Caramel Chocolate Brownies
(aka Twix brownies)

Ingredients

Crust layer
1 package of shortbread cookies (I used pecan sandies - 22 of them)
6 Tbsp butter

Brownie Layer
1 box brownie mix
ingredients called for on back of the box
1/4 cup fudge ice cream topping

Caramel Layer

1 (14 oz) bag caramels (I used 40 caramels)
2 Tbsp heavy cream

Chocolate Topping
1 bag milk chocolate chips (I used 2 cups)
2 Tbsp butter
1/4 cup heavy cream

Directions

Preheat oven to 350. Spray a 9 X 13 pan with cooking spray.
Using a food processor, pulse cookies until they resemble sand. In a microwave safe bowl, melt 6 Tbsp butter. Add to cookie crumbs, stirring until crumbs are moist. Press firmly into prepared pan.


Prepare brownie mix as per box instructions. Mix the 1/4 fudge sauce into the brownie batter. Pour batter on top of cookie crust and bake as directed.


Remove from oven and let cool. (Place in fridge to speed process, if desired)
Place caramels and 2 Tbsp cream in a saucepan and cook over medium low heat until caramels are melted and creamy, stirring constantly.
Pour over cooled brownies. Try to pour the caramel evenly across the surface to make spreading easier. Let cool until set. (Again, you can place in the fridge to speed process.)


Melt chocolate, butter, and cream in a saucepan over medium low heat, stirring occasionally until melted and creamy. Pour over caramel layer. Again, try to pour the chocolate evely over the surface to make spreading easier. Cool.


I ended up spreading all of the chocolate layer on top and then scraping about 1/2 of it off. It was really, really thick.


See how thick it is....and that's only half of what was originally on there.
If you are more of a chocolate fiend than I am (not possible) then, by all means, leave all of it on there. I was afraid all that chocolate would drown out the flavors of the caramel and shortbread.
In case you are wondering what shortbread cookies to use...here is what I used...


I used the whole bag (22 cookies).
The original recipe at Jasey's Crazy Daisy blog used Simply Sandies Shortbread Cookies. (I have no idea what those are but the pecan sandies worked well.)

I have another warning to issue regarding this recipe.
Not only should you NOT make these with a "from scratch" brownie recipe at the risk of ending the universe; you should not make these if you do not have anyone to share with.
You may be tempted to eat the entire pan and thus ruin any attempts at maintaining a healthy lifestyle.
Thankfully I made these for a bake sale and only ate one or two or four pieces as I cut them.
What? You can't sell odd sized brownies at a bake sale.
It wouldn't be right.

Monday, March 26, 2012

Country Club Chicken


Need something quick for dinner tonight? This dish comes together in under an hour but it tastes like it took hours to prepare. I’m not usually one to notice the subtleties in a dish but the apple and the wine and the bacon flavors really seem to shine through.
I have no idea why this is called Country Club Chicken. I came across it online while looking for chicken recipes. I altered it a bit (Of course, I can’t help it) without really changing the original recipe from Kayotic Kitchen (For some reason I can't link you to that site. Just google Kayotic Kitchen Country Club Chicken and it will take you there.) . If you want to see truly amazing photos of this dish then please check out the Kayotic Kitchen blog. It will have you wanting to lick your screen. Seriously. One look and you will understand why I had to make this.


Country Club Chicken

Ingredients
6 - 8 slices bacon, chopped
5 chicken breasts
Salt & pepper
1 large onion, finely chopped
2 cups mushrooms, cleaned and sliced
1 apple, peeled, cored, finely chopped
1 can (10 oz) cream of mushroom soup
¼ cup white wine
1 cup aged cheddar

Directions
Preheat oven to 350. Spray a medium sized casserole dish (or 9 X 13 pan)  with cooking spray and set aside.
In a large skillet, over medium – high heat, cook the bacon until it is just starting to get crispy. Remove and drain on paper towel.
Season chicken breasts with salt and pepper. In the same pan (DON’T clean it!! You want all those delicious bacon drippings), quickly brown the chicken on both sides and then transfer to the prepared casserole dish.


Now, cook the onion for a minute or two. Add the mushrooms and continue cooking for another minute or two. Add the apple and cook for another 3 – 4 minutes.
Season with salt and pepper and sprinkle the bacon back in there. Pour in the white wine. Now add the cream of mushroom soup and the aged cheddar. Stir until it is well combined and smooth.
Pour over the chicken breasts.


Place the casserole in the 350 oven and cook for 25 – 30 minutes. Until the chicken is super tender and the sauce is bubbling.
This is great served with spaghetti or with rice. You want something that will soak up all that delicious sauce.
 This is a great dish if you are having company and want them to think you spent hours trying to impress them. My photos don’t really do it justice (seriously, go look at Kayotic Kitchen) but it tastes amazing and the smell in the house while it is cooking will have you drooling.
Literally.
You may want a bib.
All you need is a little veggie side dish – maybe some steamed broccoli or green beans – and you have a fancy schmancy meal that is as easy to make as Kraft dinner and Shake & Bake.
Honest.
Try it.
You’ll see what I mean.
Here - I copied the photo from Kayotic Kitchen in case you can't get to their site either. Now you can see how awesome it looks when someone with fantabulous camera skills takes a photo.

Drooling yet?

Saturday, March 24, 2012

Tropical Quinoa Parfait


With all of the treats I have been having lately I figured I better try to slip something healthy into my repertoire. Don't get me wrong though.... I still want treats.
I came up with this parfait which, I think, is a perfect combination of healthy and treat.
Okay...maybe not perfect but it was really good and, according to Fitday , it is about 230 calories, 8 gr fat, 30 carbs, and 8 gr protein. I'd say that's fairly healthy for breakfast or afternoon snack.
Plus.... it contains vitamin C, B12, iron, fibre, and calcium.
I've made this several times already and substituted mashed banana for the pineapple and also mashed strawberries. They were equally as tasty but, of course, the nutritional values would change with the different fruit. I've also made 2 and let one sit, covered, in the fridge overnight and it was good to take to work for breakfast the next day.
This recipe makes 1 parfait, by the way, but can easily be doubled.


Tropical Quinoa Parfait

Ingredients
Coconut Oat Crumble
2 Tbsp rolled oats
1 Tbsp coconut
1 tsp butter
1/2 tsp brown sugar
1 Tbsp pecans, chopped

3 Tbsp quinoa, not cooked
1/4 tsp cinnamon
1/2 tsp brown sugar

4 Tbsp Fat Free French Vanilla yogurt

1/4 cup crushed pineapple, drained

Directions
Preheat oven to 350.
Mix together Coconut Oat Crumble ingredients and sprinkle into a pie pan. Bake at 350 for 5 - 10 minutes, until golden brown. Set aside to cool.
Cook quinoa according to package directions. (For 3 Tbsp quinoa you want to cook it in a small saucepan with 6 Tbsp water) When it is cooked, remove from heat, add cinnamon and brown sugar, set aside to cool.
When your crumble and quinoa have completely cooled, (place in fridge to speed process) you can assemble your parfait.
1.) Spoon 2 Tbsp yogurt into bottom of glass.
2.) Spoon 2 Tbsp quinoa onto yogurt.
3.) Spoon 1/2 of the crushed pineapple (or whichever fruit you are using)
4.) Spoon 1/2 of the Coconut Oat crumble
Repeat layers one more time.

You may have a little quinoa left over if you measure out the 4 Tbsp for your parfait. You can throw that into a soup or salad, or pretty much anything - or you can use it up in your parfait but it will change the nutritional count.

There you have it.
Healthy but still feels like a treat.
That's something I could get used to.

5 Minute Fudgy Brownie


Okay.
This whole microwave treat thing is just getting out of hand.
First, there was cake in a mug.
Then, there was cookie in a mug.
And now....
*sigh*
Brownie in a mug.
I am in some serious trouble here.
I blame Pinterest.
I mean, if I didn't spend so much time on Pinterest looking at all of those amazing recipes and incredibly creative ideas I would never stumble across all of these things that I keep making and eating because they are so delicious. 
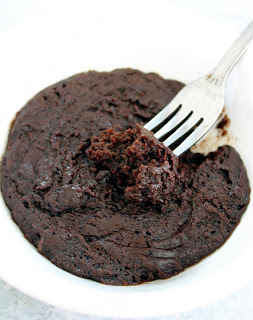
This brownie in a mug recipe, for example, is crazy good. So fudgy and chewy and chocolatey that you will not even believe it came out of the microwave.
The original posting is from Instructables - Mug Brownie . I only changed it ever so slightly to suit my tastes.


5 Minute Fudgy Brownie

Ingredients
4 Tbsp flour
4 Tbsp sugar
2 Tbsp unsweetened baking cocoa
2 Tbsp melted butter
2 Tbsp water
splash vanilla
tiny pinch salt

Directions
In a microwave safe bowl or mug, mix together flour, sugar, cocoa with a fork.
Stir in butter, water, vanilla, and salt.


Make sure you mix well and incorporate all the dry ingredients.
Microwave for about 1 minute. (It will depend on the power of your microwave but it could take between 50 seconds to 1 minute 15 seconds. Start checking at 50 seconds for doneness. My first one took 1 min 10 seconds. the second one took 1 min 5 seconds.)


 I may have mentioned this before but...I am kind of fond of chocolate.
Just a little...
Now that I can have a moist, fudgy brownie in like 2 seconds I am pretty sure I will be eating chocolate every day.
I am scared to see what else Pinterest will lead me to. What other "in a mug" inventions wait to be discovered. I already have a recipe for banana bread/cake in a mug in the line up...and a cinnamon bun-type thingy as well.
My diet and weight loss goals are in serious jeopardy here.
Not cool Pinterest.....not cool.

Friday, March 23, 2012

Steak and Bacon Cheddar Balls


Just a quick blog today about these delicious meatballs.
Now, I have made a fair amount of meatball recipes in my day. This one may be my new number one choice.
They were so moist and delicious and cheesey and bacony that my brain exploded.
I'm not making that up.
*Boom*
Exploded....just like that...
Brain explosions aside....these truly are the yummiest meatballs I have eaten.


Steak and Bacon Cheddar Balls

Ingredients
1 small onion, diced fine
1/2 lb bacon, finely chopped (about 5 - 6 strips)
2 cloves garlic, minced
2 lbs lean ground beef
1 cup shredded, aged cheddar cheese
1/2 cup Parmesan cheese
3 large eggs
 1/2 cup breadcrumbs (I used Panko)
1/2 Tbsp Oh! So Garlic (optional)

Directions
Preheat oven to 425. Spray a 9 X 13 dish with cooking spray.
In a large skillet, cook onion and bacon and garlic, stirring frequently, until bacon has browned and onions are translucent, about 10 minutes. Transfer to a bowl and chill in fridge until cool enough to handle.
In a large mixing bowl, combine beef, cheeses, eggs, breadcrumbs, Oh! So Garlic (if using) and cooled bacon & onions & garlic.
Roll into golf ball sized balls using a small cookie scoop or just pinch off a bit and roll it in your hands.


Place the balls in the prepared baking dish, being careful to line them up snugly. They should be touching each other.
Bake for 20 minutes, or until meatballs are firm and cooked through. Remove from oven and let sit for 5 minutes before serving.

Our dad found a recipe in one of the newspapers that he reads and cut it out for me to try. I tweaked it a bit and this was the result.
So. Good.
In fact, it was so good that the next day for lunch we had Meatball Paninis on Roasted Beet Bread buns. (Click HERE for that recipe!)
*Boom*
My brain exploded AGAIN.


You look me in the eye and tell me that doesn't look amazing!


We split the beet buns and used some spicy mustard on some and some smoky BBQ on others and then sprinkled on some cheese and sliced onion and panini'd them.


Mmmm.... panini'd to perfection.

What more can you ask out of meat dish?
Dinner one night, lunch the next night...
Brain exploding perfection whatever the meal is what I say.

Wednesday, March 21, 2012

Guinness Chocolate Cake with Bailey's Frosting


Depending on how you look at it, I am either late posting this recipe for St. Patrick's Day or really early for next year. I prefer to think I am early.
I found this recipe years ago whilst I was looking for St. Patrick’s Day treats. I don’t remember where….I own a LOT of cooking magazines and books….and I look on the computer way too much. I do try to keep track better now that Sue and I have the blog so I can give credit where it is due. That being said, this is a great recipe that I have made a few times and always gets rave reviews.
However, this is not the BEST chocolate cake recipe out there.
That credit would have to go to our secret family recipe.. I have never found a moister, better cake than that one. This cake is definitely in the top 5 though. The Guinness adds a certain unique flavor and the Bailey’s buttercream…well….I love Bailey’s so I am biased…is delicious.
It is perfect for a St. Patrick’s Day dessert or a family get together when you want to impress your guests or…..you know…..Tuesdays.

Guinness and Bailey’s Chocolate Cake

Ingredients
1 cup Irish stout beer (such as Guinness®)
1 cup butter, cut into pieces
3/4 cup unsweetened cocoa powder
2 eggs
2/3 cup sour cream
2 cups all-purpose flour
2 cups white sugar
1 1/2 tsp baking soda
pinch salt

Bailey's Frosting
 3 cups icing sugar, or as needed
1/2 cup butter at room temperature
3 Tbsp Irish cream liqueur (such as Baileys®), or as needed

Ganache
8 ounces bittersweet chocolate, coarsely chopped
2/3 cup heavy cream
2 Tbsp butter at room temperature

Directions
Preheat oven to 350. Line 3 9-inch cake pans with parchment paper, and spray with cooking spray.
Pour the beer into a saucepan, add the butter, and bring to a simmer over medium-low heat.

Ooooh....Beer and butter!

Remove the pan from the heat, and whisk in the cocoa powder until the mixture is smooth. Set aside.
In a bowl, beat the eggs and sour cream together until smooth with an electric mixer. Gradually whisk in the stout mixture to make a smooth, thick liquid.
In a large bowl, mix together the flour, sugar, baking soda, and salt. Pour the stout mixture into the flour mixture, and gently combine with a spatula. Pour the batter into the prepared pans.
Bake in the preheated oven until the cakes are set and a toothpick inserted into the center of a cake comes out clean, about 30 minutes. Remove and let cool in pans for 5 minutes before gently inverting the cakes onto wire racks to finish cooling.
Prepare Bailey's Frosting - Mix together the icing sugar, butter, and Irish cream liqueur until the mixture forms a smooth and spreadable frosting (add more sugar or liqueur as needed to create the desired consistency). Spread half the frosting on top of each cake.
Prepare ganache - Place the chopped chocolate into a heatproof bowl. Bring cream to almost boiling in a small saucepan, and pour over the chocolate. Stir in the butter, and stir the mixture until the chocolate melts and the mixture is very smooth. Allow to cool until the mixture is pourable but not thin or overly runny, 10 to 15 minutes.
Assemble cake - Place one cake on a serving tray and frost the top of it.
(First layer.)


Stack a cake gently on top of the other, again frosting the top.
(Second layer.)


Place the last layer of cake on top and frost the top f the cake.
(Third layer.)


You can, if you have enough frosting leftover, frost the sides of the cake, if desired.
Carefully drizzle the chocolate mixture over the cake, allowing decorative drips to run down the sides.
(FYI - I usually don't have enough icing to frost the sides of the cake as I am pretty generous with the layers. You can either thin the layers OR make more frosting...your call!)
As you can see by the photo below, I need to work on my artistic drizzling skills... 


This is a sweet cake. I posted this recipe on Allrecipes a couple of years ago and one of the reviewers said it was too sweet. Really? Too sweet? I would have to disagree with that statement BUT, yes, it is sweet. It is a chocolate cake with frosting and ganache after all.

You can also make this into cupcakes if you prefer. You can hollow out a little hole in the cupcake after it has cooled and fill it with the Bailey's frosting and then drizzle with ganache. You will just have to adjust your cooking time accordingly.

FYI - You can also tint the icing green and make a shamrock like so....


We decorated it with our super easy, 3 ingredient, no bake Lime and Coconut Candies. (Recipe HERE) 


However you decorate it, it is still super yummy! 

Monday, March 19, 2012

Smoky Chicken Spread


This is Sue's recipe from way, way back. She makes it quite often, especially around the holidays.
You know how it kills me to give her credit but **sigh** she is sometimes a genius.
Sometimes.
Like, for instance, with this smoky chicken spread. It is really good. She originally developed it as a dip with crackers (Soooo good with Triscuits!) but then we decided to give it a try as a sandwich filler in puff pastry shells.
My idea, by the way.
She's not the only genius in the family.


Smoky Chicken Spread

Ingredients
3 - 4 cups of chicken, cooked & diced
1/2 cup celery, finely chopped
1/4 cup onion, finely chopped
good dash of seasoning salt
good dash of garlic powder
1 Tbsp honey
1/2 cup coarsely chopped, smoked almonds
3/4 cup mayo (Miracle Whip)


Directions
Mix all ingredients together. Let chill for at least an hour before serving.
You can serve it as a dip with crackers, or use it as a filler for sandwiches. (It was delicious in the puff pastry shells.)

You can throw this together in a pinch. We use the Blue Diamond brand almonds and they taste so smoky. We've made it with different flavors ie: BOLD Maui Onion and Garlic, Smokehouse, Jalapeno Smokehouse, etc... and they are all very yummy.
My favorite is still the original Smokehouse.

If you are looking for something crunchy and smoky and still creamy and delicious...this is the recipe for you.
I've said it before and I will say it again....Sue has some good ideas sometimes....but don't tell her I said that.


Sunday, March 18, 2012

Cinnamon Bun Cake


I decided to take over the blog today. It's me, Sue.
Jo has done about a bazillion blogs so I thought I better do one.
Jo introduced me to Pinterest a while ago and ever since I have been addicted. I found this delicious recipe there. Well, I have found a million delicious recipes there. This was just one of the first ones I have actually made.
The original recipe can be found HERE at the Six Sister's Stuff blog. (Very cool blog, by the way.)
If you haven't checked Pinterest out, you should. It's so addicting!


Cinnamon Bun Cake

Ingredients
3 cups flour
pinch salt
1 cup sugar
4 tsp baking powder
1 1/2 cup milk
2 eggs
1 tsp vanilla
4 Tbsp butter, melted

Cinnamon Swirl
1 cup butter, softened
1 cup brown sugar
2 Tbsp flour
1 Tbsp cinnamon
2/3 cups pecans, finely chopped 

Cream Cheese Frosting
8 oz cream cheese, softened
1/4 cup butter, softened
1 cup icing sugar
1 tsp vanilla

Directions
Prepare cake - Preheat oven to 350.
With an electric mixer; mix flour, sugar, salt, baking powder, milk, eggs, and vanilla. Once combined well, slowly stir in 4 Tbsp melted butter. Pour batter into a greased 9 X 13 baking pan. (I made it into 2 - 8X8 square pans. NOTE - be sure to place pans on a cookie sheet as it tends to bubble up and over the edges of the pans and make a bit of a mess if you are not prepared!)


Prepare cinnamon swirl - In a large bowl, mix the 1 cup of softened butter, brown sugar, flour, cinnamon, and pecans until well combined.


Drop evenly over cake batter by the tablespoon and use a knife to marble/swirl through the cake. (This is kind of tricky. Just do the best you can.)


Bake at 350 degrees for 25-30 minutes or until toothpick comes out nearly clean from center.
Prepare frosting - Beat cream cheese and butter until smooth. Beat in icing sugar and vanilla. Spread on cake while still a bit warm. This makes it all melty and gooey and deliciously addicting. Of course, you could wait until it was room temp as well, but why would you want to do that?

I am glad I made it in 2 pans instead of just one. I was able to give one away as a gift. If I had kept it I would have eaten it all. It really is that tasty!
Oh, yeah, while this is baking...the smell is amazing! I guarantee you will be standing by the stove wishing this to cook faster so you can eat it.
(Update - Jo made this as a layer cake. Click HERE to see how she did it!)